2016 RENAULT SCENIC heating
[x] Cancel search: heatingPage 90 of 270

1.84
WINDSCREEN WASH/WIPE (4/4)
1
A
B
C
D
Windscreen washer
With the ignition on, pull stalk 1 then
release.
A brief pull will trigger a single sweep
of the wipers, in addition to the winds-
creen washer.
A longer pull will trigger three sweeps
of the wipers followed, a few seconds
later, by a fourth, in addition to the
windscreen washer.
Note:
In temperatures below zero, the washer
liquid risks freezing to the windscreen,
thereby reducing visibility. Heat the
windscreen using the demister control
before cleaning.
Headlight washers
Headlights on
On equipped vehicles, hold stalk 1
pulled towards you for about 1 second,
and the headlight washers and winds-
creen washers will be activated at the
same time.
Note: to ensure the headlight washers
operate correctly in winter, remove
snow from the jet trims and de-ice the
jet trims using an aerosol de-icer.
You are recommended to regularly
remove dirt encrusted on the headlight
glass.
When the minimum windscreen washer
fluid level is reached, the headlight
washer system may be deprimed.
Fill the windscreen washer fluid and
then activate the windscreen washer,
with the engine running , to reprime
the system.In the event of obstacles present
on the windscreen (dirt, snow, ice,
etc.), clean the windscreen (inclu-
ding the central area located behind
the interior rear-view mirror) and
the rear screen before starting the
wipers (risk of motor overheating).
If an object is preventing a blade
from moving, it may stop functio-
ning. Remove the obstacle and
reactivate the wiper using the wiper
stalk.
Before any action on the
windscreen (washing the
vehicle, de-icing, cleaning
the windscreen, etc.) return
stalk 1 to position A (park).
Risk of injury and/or damage.
When working in the engine
compartment, ensure that
the windscreen wiper stalk
is in position A (park).
Risk of injury.
Page 105 of 270

2.11
GEAR LEVER/HANDBRAKE
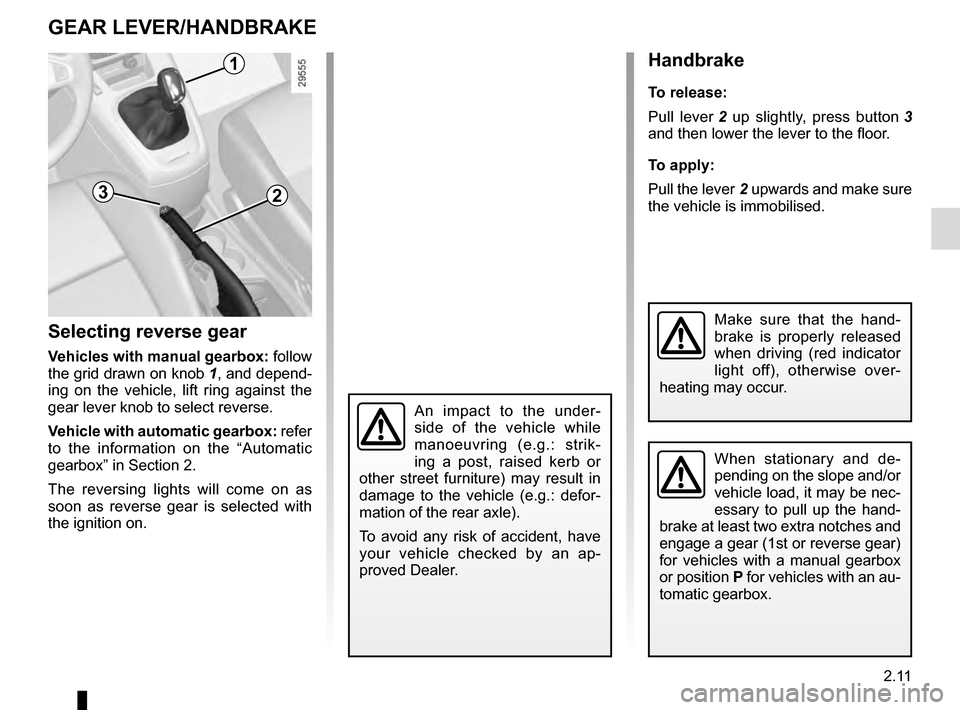
Selecting reverse gear
Vehicles with manual gearbox: follow
the grid drawn on knob 1, and depend-
ing on the vehicle, lift ring against the
gear lever knob to select reverse.
Vehicle with automatic gearbox: refer
to the information on the “Automatic
gearbox” in Section 2.
The reversing lights will come on as
soon as reverse gear is selected with
the ignition on.
Handbrake
To release:
Pull lever 2 up slightly, press button 3
and then lower the lever to the floor.
To apply:
Pull the lever 2 upwards and make sure
the vehicle is immobilised.
Make sure that the hand-
brake is properly released
when driving (red indicator
light off), otherwise over-
heating may occur.
An impact to the under-
side of the vehicle while
manoeuvring (e.g.: strik-
ing a post, raised kerb or
other street furniture) may result in
damage to the vehicle (e.g.: defor-
mation of the rear axle).
To avoid any risk of accident, have
your vehicle checked by an ap-
proved Dealer.
1
23
When stationary and de-
pending on the slope and/or
vehicle load, it may be nec-
essary to pull up the hand-
brake at least two extra notches and
engage a gear (1st or reverse gear)
for vehicles with a manual gearbox
or position P for vehicles with an au-
tomatic gearbox.
Page 140 of 270

2.46
AUTOMATIC GEARBOX (3/3)
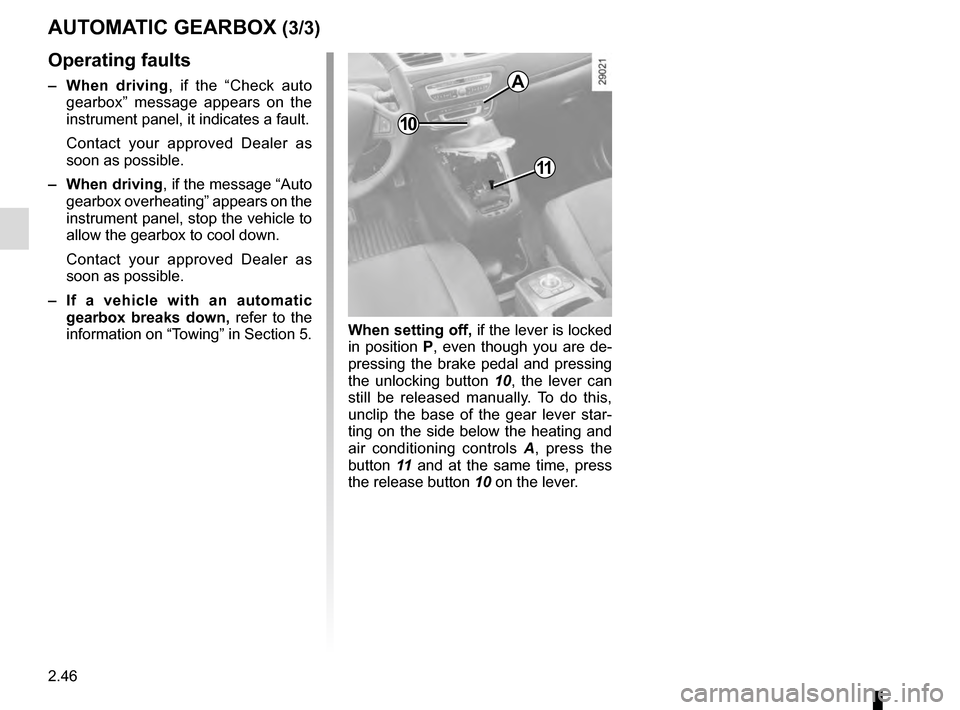
11
10
A
Operating faults
– When driving , if the “Check auto
gearbox” message appears on the
instrument panel, it indicates a fault.
Contact your approved Dealer as
soon as possible.
– When driving , if the message “Auto
gearbox overheating” appears on the
instrument panel, stop the vehicle to
allow the gearbox to cool down.
Contact your approved Dealer as
soon as possible.
– If a vehicle with an automatic
gearbox breaks down, refer to the
information on “Towing” in Section 5. When setting off,
if the lever is locked
in position P, even though you are de-
pressing the brake pedal and pressing
the unlocking button 10, the lever can
still be released manually. To do this,
unclip the base of the gear lever star-
ting on the side below the heating and
air conditioning controls A, press the
button 11 and at the same time, press
the release button 10 on the lever.
Page 148 of 270

3.8
The displayed temperature values
show a comfort level.
When starting the engine, in-
creasing or decreasing the value
displayed will not allow the com-
fort level to be reached any more
quickly. The system will always op-
timise the temperature increase or
decrease (the ventilation system
does not start instantly at maximum
speed: it gradually increases). This
may take several minutes.
Generally speaking, unless there is
a particular reason not to, the dash-
board air vents should remain open.
You are recommended to use automatic mode by selecting one of the auto-
matic programmes AUTO, SOFT or FAST.
In automatic mode (indicator light for button 3 on), all heating and air conditioning
functions are controlled by the system.
You can also change the system selection. In this case, the indicator lig\
ht on the
button 3 will go out and the changed function, which is no longer controlled by \
the
system, will be shown on the display 12.
To return to automatic mode, press one of the AUTO, SOFT or FAST programmes.
AUTOMATIC CLIMATE CONTROL (3/5)
Switching air conditioning on
or off
In automatic mode, the system switches
the air conditioning system on or off,
depending on the climate conditions.
Press switch 8 to switch off the air
conditioning; the integrated indicator
comes on and “A/C OFF” is shown on
display 12.
3
812
Page 231 of 270

5.31
WIPER BLADES: replacing
Windscreen wiper blades 1With the ignition on and engine
switched off, lower the windscreen
wiper stalk completely: they stop
slightly away from the bonnet.
Lift wiper arm 3, pull tab 2 (move-
ment A) and push the blade upwards.
Refitting
Slide the blade along the arm until
it clips on. Check that it is correctly
locked. Return the windscreen wiper
stalk to the park position. The wiper
arm on the driver’s side must always be
on top.– In frosty weather, make
sure that the wiper blades
are not stuck by ice (to
avoid the risk of the motor
overheating).
– Check the condition of the wiper
blades.
Replace the wiper blades as soon
as they begin to lose efficiency
(approximately once a year).
Whilst changing the blade, take care
not to drop the arm onto the window
after it has been removed as this
may break the window.
1
2
3
Check the condition of the wiper
blades. You are responsible for their
service life:
– clean the blades, windscreen and rear screen regularly with soapy
water;
– do not use them when the wind- screen or rear screen are dry;
– free them from the windscreen or rear screen when they have not
been used for a long time.
Rear screen wiper blade 4
– Lift wiper arm 6;
– pivot blade 4 until some resistance is
met (movement B);
– depending on the vehicle, press tab 5, then remove the blade by pull-
ing it (movement C).
To refit
To refit the wiper blade, proceed in re-
verse order to removal. Make sure that
the blade is correctly locked in position.
4
5
B
C
A
6
Page 237 of 270

5.37
OPERATING FAULTS (4/6)
On the roadPOSSIBLE CAUSESWHAT TO DO
Steering becomes heavy. Assistance overheating.Consult an approved dealer.
The engine is overheating. The cool-
ant temperature indicator is in the
warning zone and warning light
® comes on. Engine cooling fan not working. Stop the vehicle, switch off the engine and
contact an approved dealer.
Coolant leaks. Check the coolant reservoir: it should con- tain fluid. If there is no coolant, consult an
approved dealer as soon as possible.
Coolant boiling in the coolant reser-
voir. Mechanical fault: damaged cylinder
head gasket.Stop the engine.
Contact an approved dealer.
Radiator:
If there is a significant lack of coolant, remember that it must never b\
e topped up using cold coolant while
the engine is very warm. After any procedure on the vehicle which has involved even partial drain\
ing of the cooling
system, it must be refilled with a new mixture prepared in the correct p\
roportions. Reminder: only products approved
by our Technical Department may be used for this purpose.
Page 264 of 270

7.2
ALPHABETICAL INDEX (2/5)
driving recommendations ......................................2.15 → 2.17
E
electric beam height adjustment ........................................ 1.80
electric windows ....................................................3.12 → 3.14
electronic parking brake ...............................1.55, 2.12 → 2.14
electronic stability control: ESC ....................1.56, 2.24 → 2.28
emergency brake assist.........................................2.24 → 2.28
emergency braking ................................................2.24 → 2.28
emergency key ........................................................... 1.2 – 1.3
emergency spare wheel ............................................. 5.2 – 5.3
engine technical specifications .................................................. 6.7
engine coolant ..................................................................... 4.8
engine oil ...................................................................4.4 → 4.7
engine oil capacity .....................................................4.5 → 4.7
engine oil level ...........................................................4.4 → 4.7
engine specifications ........................................................... 6.7
engine standby ..........................................................2.6 → 2.8
engine start/stop button .............................................2.3 → 2.5
environment ............................................................\
........... 2.19
ESC: electronic stability control ....................1.56, 2.24 → 2.28
external temperature ......................................................... 1.72
F
faults operating faults ................................................5.34 → 5.39
filter air filter ........................................................................\
. 4.10
diesel filter .................................................................... 4.10
oil filter ........................................................4.5 → 4.7, 4.10
passenger compartment filter ...................................... 4.10
fittings ...............................................................\
.....3.19 → 3.24
front passenger air bag deactivation ................................. 1.46
front seat driver’s position memory .............................................. 1.18 front seat adjustment .............................................. 1.15 – 1.16
front seats
adjustment ........................................................ 1.15 – 1.16
with electric controls .................................................... 1.17
with manual controls .................................................... 1.15
fuel advice on fuel economy ............................................... 2.15
capacity ...............................................................\
......... 1.86
consumption .......................1.55, 1.63 – 1.64, 2.15 → 2.17
filling ........................................................1.55, 1.86 → 1.88
grade ................................................................1.\
86 → 1.88
fuel consumption ......................1.55, 1.63 – 1.64, 2.15 → 2.17
fuel economy .........................................................2.15 → 2.17
fuel priming bulb ................................................................ 1.87
fuel repriming ..................................................................... 1.87
fuel tank capacity ............................................................1.8\
6 → 1.88
fuel tank capacity ...................................................1.86 → 1.88
fuses ....................................................................... 5.25 – 5.26
G
gear lever..............................................................\
............. 2.11
glove box ........................................................................\
... 3.22
grip control ........................................................................\
. 2.27
H
handbrake...............................................................\
.. 1.55, 2.11
hands-free telephone integrated control ............................ 3.42
hazard warning lights signal ................................... 1.74 – 1.75
headlight beam adjustment ............................................... 1.80
headlight flashers .............................................................. 1.74
headlight washer ............................................................... 1.84
headrest................................................................\
............. 3.26
heating and air conditioning system .................................. 3.11
heating system ........................................................3.4 → 3.10
hill descent control ........................................1.56, 2.24 → 2.28