Page 15 of 274
1.9
To deactivate deadlocking
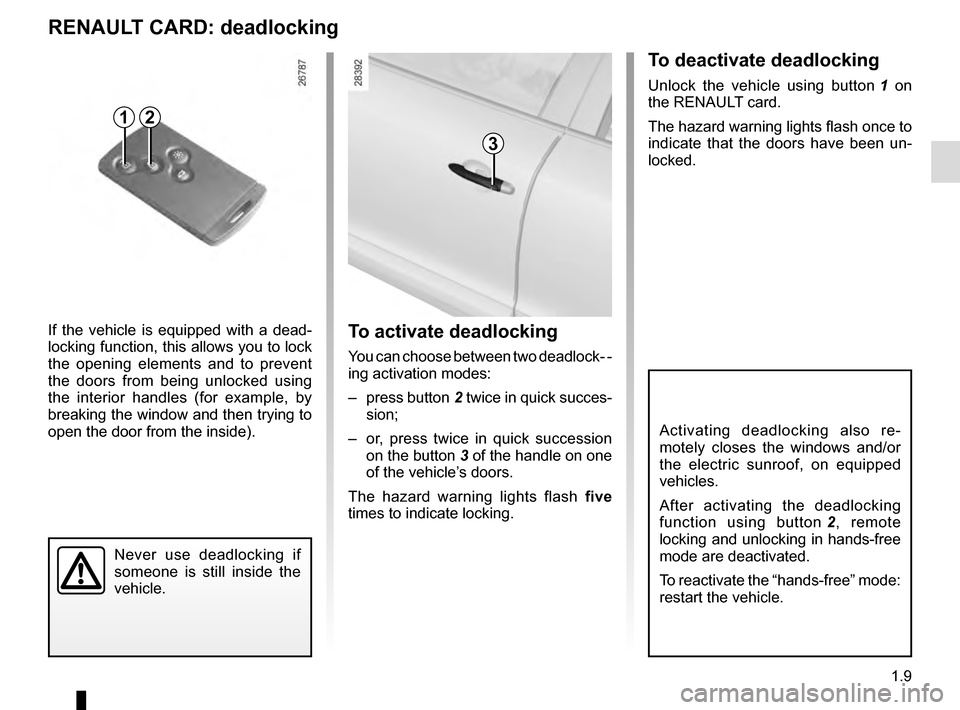
Unlock the vehicle using button 1 on
the RENAULT card.
The hazard warning lights flash once to
indicate that the doors have been un-
locked.
Never use deadlocking if
someone is still inside the
vehicle.
To activate deadlocking
You can choose between two deadlock- -
ing activation modes:
– press button 2 twice in quick succes-
sion;
– or, press twice in quick succession on the button 3 of the handle on one
of the vehicle’s doors.
The hazard warning lights flash five
times to indicate locking.
If the vehicle is equipped with a dead-
locking function, this allows you to lock
the opening elements and to prevent
the doors from being unlocked using
the interior handles (for example, by
breaking the window and then trying to
open the door from the inside).
RENAULT CARD: deadlocking
2
Activating deadlocking also re-
motely closes the windows and/or
the electric sunroof, on equipped
vehicles.
After activating the deadlocking
function using button
2, remote
locking and unlocking in hands-free
mode are deactivated.
To reactivate the “hands-free” mode:
restart the vehicle.
3
1
Page 16 of 274

1.10
OPENING AND CLOSING THE DOORS (1/2)
Opening from the inside
Pull the handle 3.
Lights-on reminder buzzer
If you have switched off the ignition
and left the lights switched on, a remin-
der buzzer will sound when a door is
opened.
Card reminder buzzer
On opening the driver’s door, if the
card is still in the reader, the message
“Please remove keycard” is displayed
on the instrument panel accompanied
by a warning beep.
Door/tailgate open buzzer
If an opening element (door or boot) is
open or not properly closed, as soon as
the vehicle reaches a speed of approxi-
mately 6 mph (10 km/h), the message
“Boot open” or “Door open” (depend-
ing on which is open) will appear on the
instrument panel accompanied by a
warning light.
Special note
After switching off the engine, the lights
and any accessories that are in opera-
tion (radio, etc.) will continue to ope-
rate.
They stop as soon as the driver’s door
is opened.
13
As a safety precaution,
the doors should only be
opened or closed when the
vehicle is stationary.
2
Opening the doors from the
outside
RENAULT card
With the doors unlocked, hold handle 1
and pull it towards you.
Hands-free RENAULT card
With the RENAULT card in the detec-
tion zone, press the button 2, then grip
the handle 1 and pull it towards you.
In some cases, it may be necessary to
pull the handle twice to open the door.
Page 17 of 274
1.11
OPENING AND CLOSING THE DOORS (2/2)
Child safety
To make it impossible for the rear doors
to be opened from the inside, move
lever 4 on each door and check from
the inside that the doors are securely
locked.
4
Driver’s responsibility
when parking or stopping
the vehicle
Never leave an animal,
child or adult who is not self-suffi-
cient alone on your vehicle, even for
a short time.
They may pose a risk to themselves
or to others by starting the engine,
activating equipment such as the
electric windows or locking the
doors.
Also, in hot and/or sunny weather,
please remember that the tempera-
ture inside the passenger compart-
ment increases very quickly.
RISK OF DEATH OR SERIOUS
INJURY.
Page 18 of 274
1.12
LOCKING/UNLOCKING THE DOORS (1/2)
Locking/Unlocking the doors
from the outside
This is done using the RENAULT Card;
see the “RENAULT Card” information in
Section 1.
In certain cases, the RENAULT card
may not work:
– if the RENAULT card battery is weak, flat, etc.
– if equipment operating on the same frequency as the card (mobile
phones, etc.) is used;
– vehicle located in a high electromag- netic radiation zone.
It is then possible:
– to use the key integrated into the card to unlock the front left-hand
door;
– to lock each of the doors manually;
– to use the interior door locking/un- locking control (refer to the following
pages).
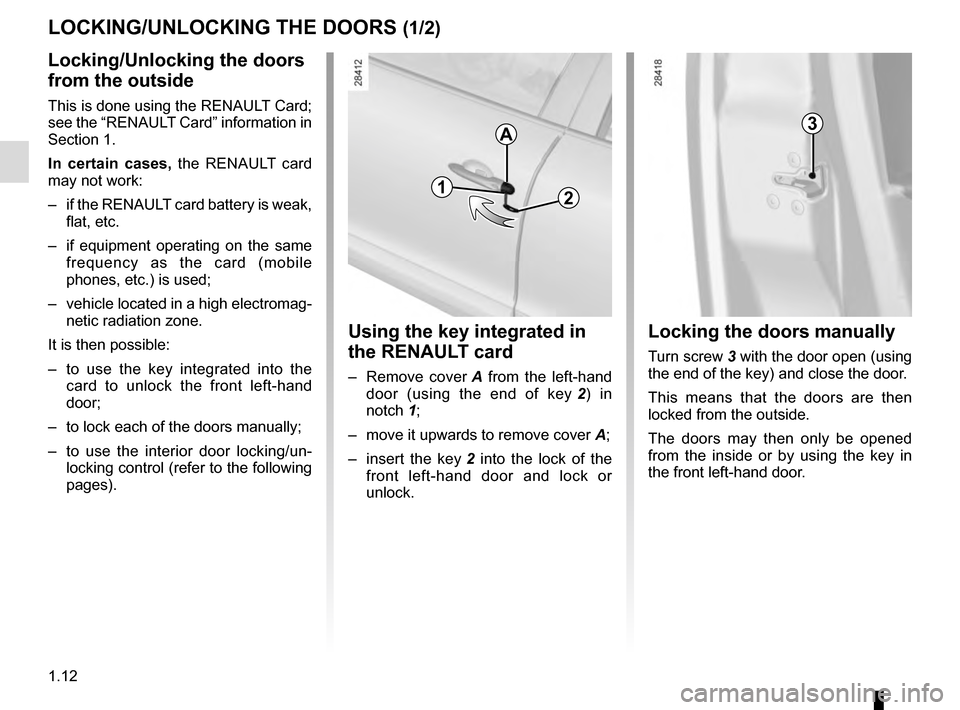
Using the key integrated in
the RENAULT card
– Remove cover A from the left-hand
door (using the end of key 2) in
notch 1;
– move it upwards to remove cover A;
– insert the key 2 into the lock of the
front left-hand door and lock or
unlock.
Locking the doors manually
Turn screw 3 with the door open (using
the end of the key) and close the door.
This means that the doors are then
locked from the outside.
The doors may then only be opened
from the inside or by using the key in
the front left-hand door.
A
2
3
1
Page 19 of 274

1.13
LOCKING/UNLOCKING THE DOORS (2/2)
Interior locking/unlocking
door control
Switch 4 controls the doors, tailgate
and, depending on the vehicle, the fuel
filler flap simultaneously.
If a door or the tailgate is open or not
closed properly, the doors and tailgate
lock/unlock quickly.
If transporting an object with the tail-
gate open, you can still lock the doors:
with the engine stopped, press and
hold switch 4 for more than five sec-
onds to lock the other doors.
Locking the doors without
the RENAULT card
For example, in the event of a dis-
charged battery or the RENAULT card
temporarily not working, etc.
With the engine switched off and a
door or tailgate open, press and hold
switch 4 for more than five seconds.
When the door is closed, all the doors
and the tailgate will be locked.
Unlocking the vehicle from the outside
is only possible with the RENAULT card
in the vehicle's access zone or using
the key integrated in the RENAULT
card.
Door and tailgate status
indicator
When the ignition is on, the indicator
light integrated in switch 4 informs you
of the status of the doors and tailgate:
– indicator light on, the doors and tail- gate are locked,
– indicator light off, the doors and tail- gate are unlocked.
When you lock the doors, the indicator
light remains lit and then goes out.
Never leave your vehicle
with the RENAULT card
inside.
After locking/unlocking the vehicle
or the tailgate only using the but-
tons on the RENAULT card, remote
locking and unlocking in hands-free
mode are deactivated.
To reactivate the “hands-free” mode:
restart the vehicle.
4
Driver’s responsibility
If you decide to keep the
doors locked when you are
driving, remember that it
may be more difficult for those as-
sisting you to gain access to the
passenger compartment in the
event of an emergency.
Page 20 of 274

1.14
Activating/deactivating the
function
Refer to “Vehicle settings customisation
menu” in Section 1, regarding the “Auto
door locking while driving” function:
= function activated
< function deactivated.
AUTOMATIC LOCKING WHEN DRIVING
You can decide whether you want to
activate this function.
Operating principle
After the vehicle is started, the system
automatically locks the doors when
you are driving at approximately 6 mph
(10 km/h) and over.
The door can be unlocked:
– by pressing the door unlocking button 1.
– by opening a front door (vehicle sta- tionary).
Note: if a door is opened or closed,
it will automatically lock again when
the vehicle reaches a speed of 6 mph
(10 km/h).
Operating faults
If you experience an operating fault (no
automatic locking, the indicator light in-
corporated in button 1 does not light up
when trying to lock the doors and tail-
gate, etc.), firstly check that the doors
and tailgate are properly closed. If they
are closed correctly, contact an ap-
proved dealer.
1
Driver’s responsibility
If you decide to keep the
doors locked when you are
driving, remember that it
may be more difficult for those as-
sisting you to gain access to the
passenger compartment in the
event of an emergency.
Page 27 of 274

1.21
Electrically controlled seatsLift handle 1 and tilt the seatback com-
pletely: the seat moves forward.
To return the seat to its original position,
bring the seatback back up. The seat
returns to its original position.
ACCESS TO REAR SEATS, THREE-DOOR VERSION
Manually controlled seats
Lift handle 1 and slide the seat forward.
To return the seat to its original position,
bring the seatback back into position.
Check that no object or
person prevents the front
seat from locking. If so,
remove any obstacles
behind the front seats. Adjust the
seat to allow sufficient room in the
rear. The rear occupants/objects
should then return to the vehicle.
Repeat the above until the seat is
locked correctly.
Risk of seat moving on its runners
during vehicle acceleration or brak-
ing.
Do not move handle 1 and handle 2
or switch 4 at the same time.
1
2
Locking the seats
When a person, an object or a child
seat prevents the front seats from lock-
ing, perform the following operations:
– ask all of the passengers to leave the vehicle and remove any bulky
objects from the rear seats;
– lock the seat(s) in the initial position again;
– move the seat(s) forwards in order to create sufficient space;
– ask the passengers to get back into the vehicle, and refit the child seat or
objects on the rear seats.
Special note: if the seatback is
tilted over the rear bench seat, only
use control 3 to return it to the driv-
ing position.
Never use handle 1 as it is not de-
signed for this purpose: there is a
risk of damage to the mechanism.
1
4
3
Page 29 of 274
1.23
SEAT BELTS (2/3)Adjusting the front seat belt
height
(depending on vehicle)
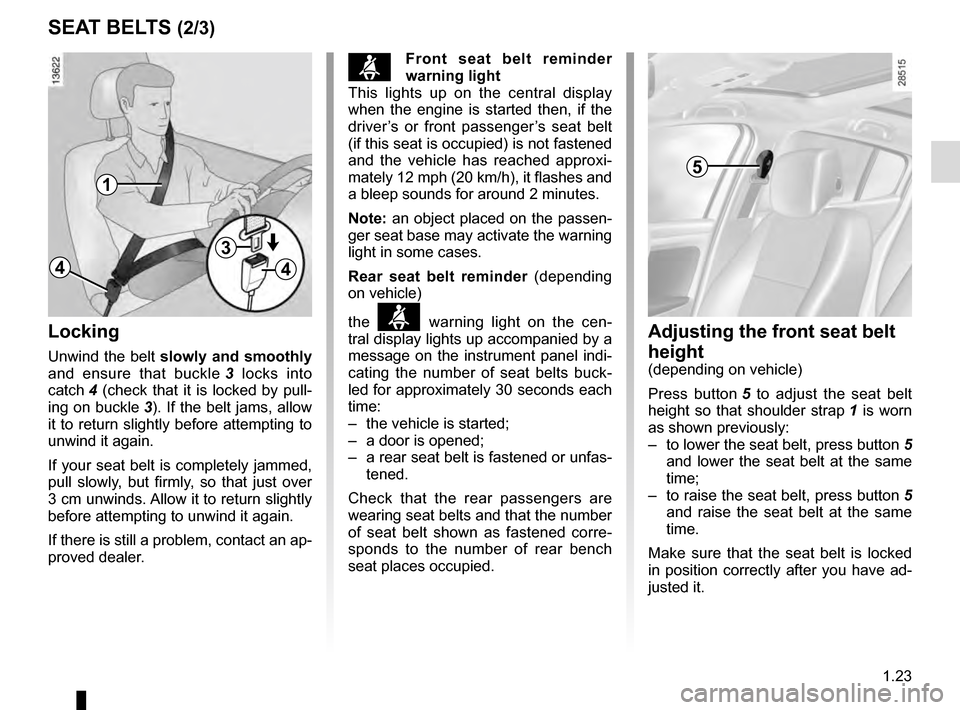
Press button 5 to adjust the seat belt
height so that shoulder strap 1 is worn
as shown previously:
– to lower the seat belt, press button 5
and lower the seat belt at the same
time;
– to raise the seat belt, press button 5
and raise the seat belt at the same
time.
Make sure that the seat belt is locked
in position correctly after you have ad-
justed it.
5
Locking
Unwind the belt slowly and smoothly
and ensure that buckle 3 locks into
catch 4 (check that it is locked by pull-
ing on buckle 3). If the belt jams, allow
it to return slightly before attempting to
unwind it again.
If your seat belt is completely jammed,
pull slowly, but firmly, so that just over
3 cm unwinds. Allow it to return slightly
before attempting to unwind it again.
If there is still a problem, contact an ap-
proved dealer.
1
4
3
4
ßFront seat belt reminder
warning light
This lights up on the central display
when the engine is started then, if the
driver’s or front passenger’s seat belt
(if this seat is occupied) is not fastened
and the vehicle has reached approxi-
mately 12 mph (20 km/h), it flashes and
a bleep sounds for around 2 minutes.
Note: an object placed on the passen-
ger seat base may activate the warning
light in some cases.
Rear seat belt reminder (depending
on vehicle)
the
ß warning light on the cen-
tral display lights up accompanied by a
message on the instrument panel indi-
cating the number of seat belts buck-
led for approximately 30 seconds each
time:
– the vehicle is started;
– a door is opened;
– a rear seat belt is fastened or unfas- tened.
Check that the rear passengers are
wearing seat belts and that the number
of seat belt shown as fastened corre-
sponds to the number of rear bench
seat places occupied.
