Page 182 of 300

3.4
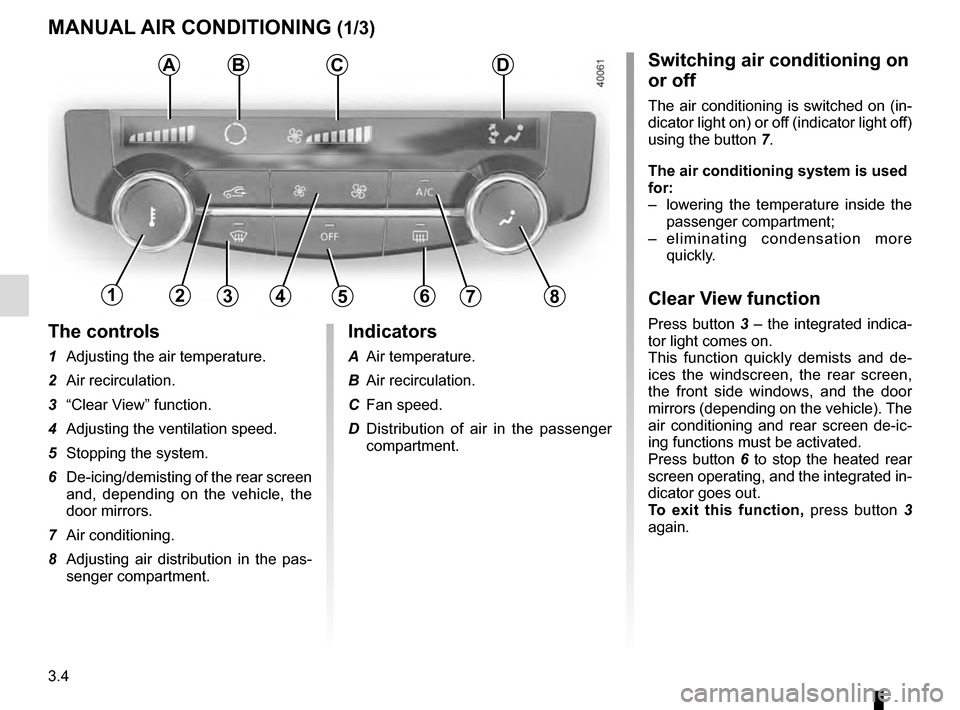
The controls
1 Adjusting the air temperature.
2 Air recirculation.
3 “Clear View” function.
4 Adjusting the ventilation speed.
5 Stopping the system.
6 De-icing/demisting of the rear screen and, depending on the vehicle, the
door mirrors.
7 Air conditioning.
8 Adjusting air distribution in the pas- senger compartment.
MANUAL AIR CONDITIONING (1/3)
ABSwitching air conditioning on
or off
The air conditioning is switched on (in-
dicator light on) or off (indicator light off)
using the button 7.
The air conditioning system is used
for:
– lowering the temperature inside the
passenger compartment;
– eliminating condensation more quickly.
Clear View function
Press button 3 – the integrated indica-
tor light comes on.
This function quickly demists and de-
ices the windscreen, the rear screen,
the front side windows, and the door
mirrors (depending on the vehicle). The
air conditioning and rear screen de-ic-
ing functions must be activated.
Press button 6 to stop the heated rear
screen operating, and the integrated in-
dicator goes out.
To exit this function, press button 3
again.
C
13456782
Indicators
A Air temperature.
B Air recirculation.
C Fan speed.
D Distribution of air in the passenger compartment.
D
Page 184 of 300

3.6
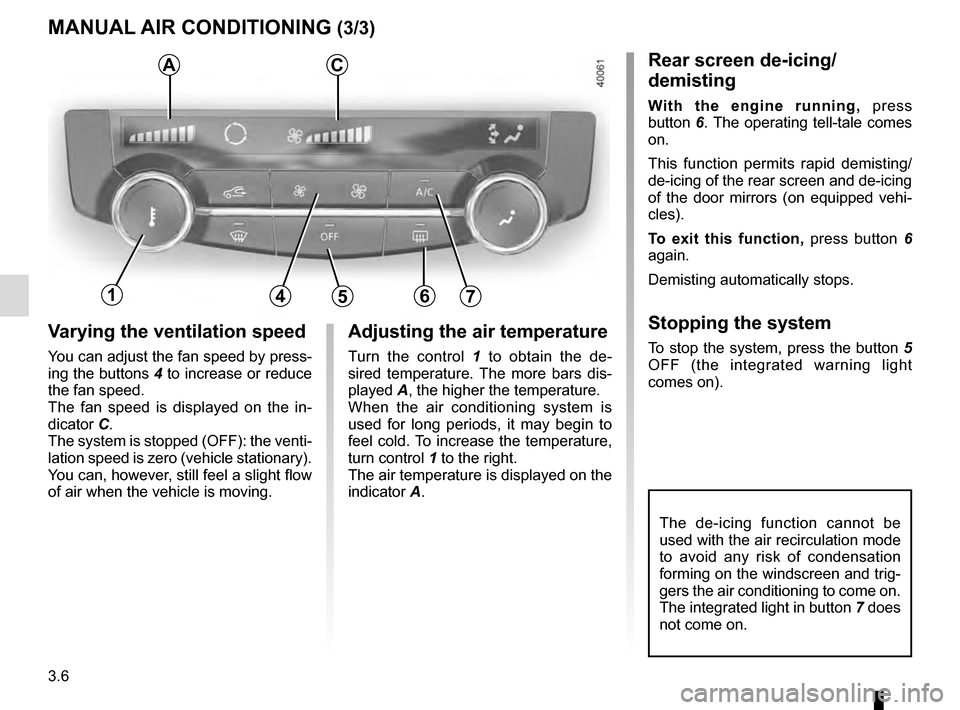
Varying the ventilation speed
You can adjust the fan speed by press-
ing the buttons 4 to increase or reduce
the fan speed.
The fan speed is displayed on the in-
dicator C.
The system is stopped (OFF): the venti-
lation speed is zero (vehicle stationary).
You can, however, still feel a slight flow
of air when the vehicle is moving.
MANUAL AIR CONDITIONING (3/3)
Adjusting the air temperature
Turn the control 1 to obtain the de-
sired temperature. The more bars dis-
played A, the higher the temperature.
When the air conditioning system is
used for long periods, it may begin to
feel cold. To increase the temperature,
turn control 1 to the right.
The air temperature is displayed on the
indicator A.
The de-icing function cannot be
used with the air recirculation mode
to avoid any risk of condensation
forming on the windscreen and trig-
gers the air conditioning to come on.
The integrated light in button 7 does
not come on.
Rear screen de-icing/
demisting
With the engine running, press
button 6. The operating tell-tale comes
on.
This function permits rapid demisting/
de-icing of the rear screen and de-icing
of the door mirrors (on equipped vehi-
cles).
To exit this function, press button 6
again.
Demisting automatically stops.
Stopping the system
To stop the system, press the button 5
OFF (the integrated warning light
comes on).
AC
14567
Page 185 of 300

3.7
AUTOMATIC CLIMATE CONTROL (1/6)Automatic mode
The automatic climate control system
guarantees comfort in the passen-
ger compartment and good visibility
(except in the event of extreme condi-
tions), while optimising consumption.
The system controls the ventilation
speed, air distribution, air recirculation,
and starting and stopping the air condi-
tioning and air temperature.
AUTO: allows the selected com-
fort level to be best attained, depend-
ing on the exterior conditions. Press
button 7. The integrated indicator light
on button 7 comes on.
Varying the ventilation speedIn automatic mode, the system uses
the most suitable amount of air to reach
and maintain the desired comfort level.
You can still adjust the fan speed by
pressing the buttons 6 to increase or
reduce the fan speed.
In this case, the integrated indicator
light on button 7 goes out and the ven-
tilation speed selected is displayed on
the indicator C.
Indicators
A Left-hand side air temperature.
B Distribution of air.
C Fan speed.
D Automatic air recirculation warning
light.
E Right-hand side air temperature.
The controls
1 Stopping the system or, depending on the vehicle, de-icing/demisting
the windscreen.
2 and 10 air temperature.
3 “Clear View” function.
4 and 5 Passenger compartment air
distribution.
6 Fan speed and, depending on the ventilation, stopping the system.
7 Automatic programme.
8 Air conditioning.
9 Air recirculation.
11 De-icing/demisting of the rear screen
and, depending on the vehicle, the
door mirrors.
12 DUAL function
124567891012
ABCDE
311
Page 188 of 300

3.10
45
B
AUTOMATIC CLIMATE CONTROL (4/6)
6311
Clear View function
This function quickly demists and de-
ices the windscreen, the rear screen,
the front side windows, and the door
mirrors (depending on the vehicle). The
air conditioning and rear screen de-ic-
ing functions must be activated.
Press button 3 – the integrated indica-
tor light comes on.
To stop the operation of the rear screen,
press the de-icer button 11. The inte-
grated warning light will go out.
You can change the fan speed: press
the button 6.
To exit this function, press button 3
again.
Some buttons have an operating
tell-tale which indicates the operat-
ing status.
Adjusting the distribution
of air in the passenger
compartment
There are five air distribution options.
Press switches 4 and 5 to scroll through
them. The arrows located on the indica-
tor B combine to show you the distribu-
tion selected:
õAll the air is then directed to
the windscreen and front side
window demisting vents.
÷The air flow is distributed be-
tween front side window de-
misting vents, the windscreen demist-
ing vents and the footwells.
óThe air flow is directed mainly
towards the footwells.
GThe air flow is directed to the
dashboard vents and the foot-
wells.
JAll the air flow is directed to the
dashboard vents.
Page 189 of 300
3.11
AUTOMATIC CLIMATE CONTROL (5/6)
Rear screen de-icing/
demisting
Press button 11 – the integrated indi-
cator light comes on. This function en-
ables rapid demisting or de-icing of the
rear screen and de-icing of the door
mirrors (on equipped vehicles).
To exit this function, press button 11
again. Demisting automatically stops.
De-icing or demisting the
windscreen
(depending on the vehicle)
With the engine running, press the
button 1 – the integrated indicator will
come on.
This function enables quick electric de-
icing/demisting.
111
Page 200 of 300
3.22
PASSENGER COMPARTMENT STORAGE, FITTINGS (5/5)
17
Ensure that no hard, heavy
or pointed objects are
placed in the “open” storage
compartments in such a
way that they may fall onto passen-
gers during sudden turning, braking
or in the event of an accident.
Rear armrest with cup holder
Pull down the armrest 16.
16
Rear door storage
compartment 17
When turning corners,
accelerating or braking,
ensure that the recepta-
cle being held by the cup
holder is not dislodged.
There is a risk of injury if hot liquid
escapes.
Page 205 of 300
3.27
Opening the doors manually
from the inside
If it is impossible to unlock the tailgate,
it can be done manually from inside:
– access the luggage compartment by tilting the rear bench seatback(s),
– insert a pencil or similar object in recess 3 and slide the unit as shown
in the illustration;
– push the tailgate to open it.
BOOT
To open
Press button 1 and lift the tailgate.
To close
Lower the tailgate using the handles 2
inside the tailgate to help you.
1
3
2
Page 226 of 300
4.10
TYRE PRESSURE (1/2)
B: dimension of the tyres fitted to the
vehicle.
C: intended driving speed.
D: recommended pressure for optimis- ing fuel consumption.
NB: driving comfort may be altered.
A
C
D
FE
G
B
C
E
E
F
F
E: front tyre pressure.
F: rear tyre pressure.
G : tyre pressure for the emergency
spare wheel.
Vehicle fitted with a tyre pressure
monitoring system
In cases of under-inflation (puncture,
low pressure, etc.), warning light
lights up on the instrument panel.
Please refer to the information on the
“Tyre pressure monitoring system” in
Section 2.
Label A
Open the driver’s door to read it.
Tyre pressures should be checked
when the tyres are cold.
If the tyre pressures cannot be checked
when the tyres are cold, increase the
pressures from 0.2 to 0.3 bar (or 3 PSI).
Never deflate a hot tyre.
A