2016 RENAULT KADJAR child lock
[x] Cancel search: child lockPage 36 of 300

1.30
METHODS OF RESTRAINT IN ADDITION TO THE FRONT SEAT BELTS (4/4)
Warnings concerning the driver’s air bag
– Do not modify the steering wheel or the steering wheel boss.
– Do not cover the steering wheel boss under any circumstances.
– Do not attach any objects (badge, logo, clock, telephone holder, etc.) to the steering wheel boss.
– The steering wheel must not be removed (except by qualified personnel f\
rom our Network).
– When driving, do not sit too close to the steering wheel. Sit with your \
arms slightly bent (see the information on “Adjusting
your driving position” in Section 1). This will allow sufficient space for the air bag to deploy correctly and be fully effective.
Warnings concerning the passenger air bag
– Do not attach or glue any objects (badge, logo, clock, telephone holder\
, etc.) to the dashboard on or near the air bag.
– Do not place anything between the dashboard and the passenger (pet, umb\
rella, walking stick, parcels, etc.).
– The passenger must not put his or her feet on the dashboard or seat as t\
here is a risk that serious injuries may occur. In general, parts of the body should be kept away from the dashboard (knee\
s, hands, head, etc.).
– The devices in addition to the front passenger seat belt should be react\
ivated as soon as a child seat is removed, to ensure the protection of the passenger in the event of an impact.
A REAR-FACING CHILD SEAT MUST NOT BE FITTED TO THE FRONT PASSENGER SEAT UNLESS THE ADDITIONAL RESTRAINT SYSTEMS, I.E. THE PASSENGER AIR BAG, ARE DEACTIVATED.
(refer to the information on “Child safety: deactivating/activating \
the front passenger air bag” in Section 1)
All of the warnings below are given so that the air bag is not obstructe\
d in any way when it is inflated and also to prevent
the risk of serious injuries caused by items which may be dislodged when\
the air bag inflates.
Page 40 of 300

1.34
CHILD SAFETY: General information (1/2)
Carrying children
Children, and adults, must be correctly
seated and strapped in for all journeys.
The children being carried in your vehi-
cle are your responsibility.
A child is not a miniature adult. Children
are at risk of specific injuries as their
muscles and bones have not yet fin-
ished growing. The seat belt alone
would not provide suitable protection.
Use an approved child seat and ensure
you use it correctly.
A collision at 30 mph
(50 km/h) is the same as fall-
ing a distance of 10 metres.
Transporting a child without
a restraint is the equivalent of allow-
ing him or her to play on a fourth-
floor balcony without railings.
Never travel with a child held in your
arms. In the event of an accident,
you will not be able to keep hold of
the child, even if you yourself are
wearing a seat belt.
If your vehicle has been involved in
a road accident, replace the child
seat and have the seat belts and
ISOFIX anchorage points checked.
To prevent the doors being
opened, use the “Child
safety” device (refer to the
information on “Opening
and closing the doors” in Section 1).
Driver’s responsibility
when parking or stopping
the vehicle
Never leave an animal,
child or adult who is not self-suffi-
cient alone on your vehicle, even for
a short time.
They may pose a risk to themselves
or to others by starting the engine,
activating equipment such as the
electric windows or by locking the
doors.
Also, in hot and/or sunny weather,
please remember that the tempera-
ture inside the passenger compart-
ment increases very quickly.
RISK OF DEATH OR SERIOUS
INJURY.
Page 43 of 300
1.37
CHILD SAFETY: choosing a child seat mounting (1/2)
There are two ways of attaching child
seats: via the seat belt or using the
ISOFIX system.
Attachment via the seat belt
The seat belt must be adjusted to
ensure that it is effective in the event of
harsh braking or an impact.
Ensure that the strap paths indicated
by the child seat manufacturer are re-
spected.
Always check that the seat belt is cor-
rectly fastened by pulling it up, then
pulling it out fully whilst pressing on the
child seat.
Check that the seat is correctly held by
moving it from side to side and back
to front: the seat should remain firmly
fixed.
Check that the child seat has not been
installed at an angle and that it is not
resting against a window.
No modifications may be
made to the component
parts of the restraint system
(ISOFIX seat belts, seats
and their mountings) originally fitted.
The seat belt must never
be twisted or the tension
relieved. Never pass the
shoulder strap under the
arm or behind the back.
Check that the seat belt has not
been damaged by sharp edges.
If the seat belt does not operate nor-
mally, it will not protect the child.
Consult an approved dealer. Do not
use this seat until the seat belt has
been repaired.
Do not use the child seat
if it may unfasten the seat
belt restraining it: the base
of the seat must not rest on
the buckle and/or catch of the seat
belt.
Attachment using the ISOFIX
system
Authorised ISOFIX child seats are ap-
proved in accordance with regulation
ECE-R44 in one of the three following
scenarios:
– ISOFIX universal 3-point forward- facing seat;
– ISOFIX semi-universal 2-point seat;
– specific.
For the latter two, check that your child
seat can be installed by consulting the
list of compatible vehicles.
Attach the child seat with the ISOFIX
locks, if these are provided. The ISOFIX
system allows quick, easy, safe fitting.
The ISOFIX system consists of 2 rings
and, in some cases, a third ring.Before using an ISOFIX
child seat that you pur-
chased for another vehicle,
check that its installation is
authorised. Consult the list of ve-
hicles which can be fitted with the
seat from the equipment manufac-
turer.
Page 44 of 300
1.38
CHILD SAFETY: choosing a child seat mounting (2/2)
3
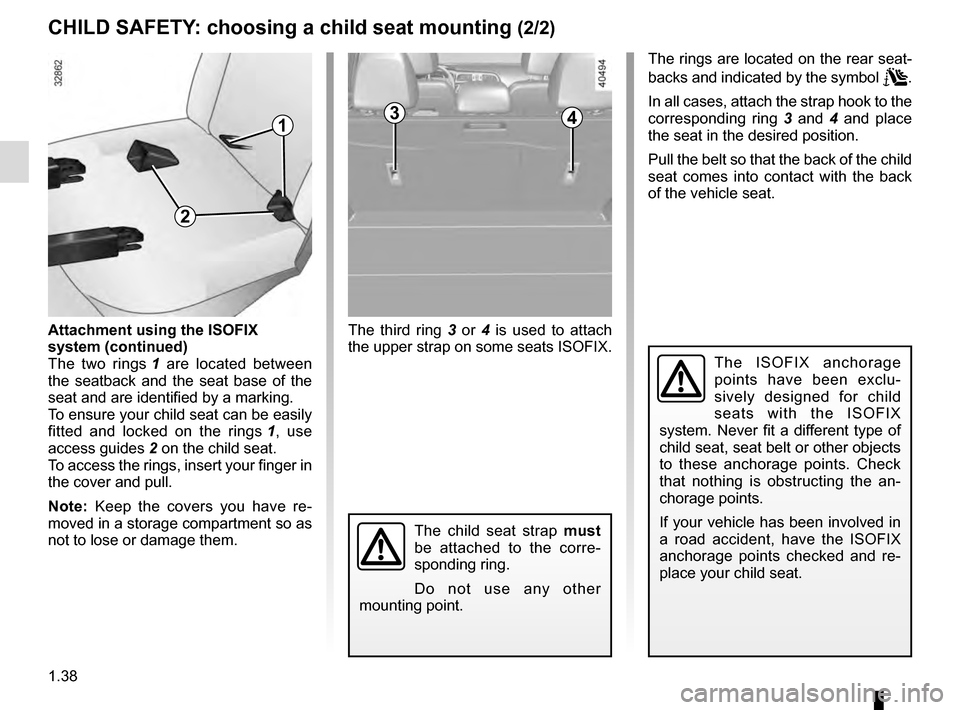
The third ring 3 or 4 is used to attach
the upper strap on some seats ISOFIX.
The ISOFIX anchorage
points have been exclu-
sively designed for child
seats with the ISOFIX
system. Never fit a different type of
child seat, seat belt or other objects
to these anchorage points. Check
that nothing is obstructing the an-
chorage points.
If your vehicle has been involved in
a road accident, have the ISOFIX
anchorage points checked and re-
place your child seat.
Attachment using the ISOFIX
system (continued)
The two rings 1 are located between
the seatback and the seat base of the
seat and are identified by a marking.
To ensure your child seat can be easily
fitted and locked on the rings 1, use
access guides 2 on the child seat.
To access the rings, insert your finger in
the cover and pull.
Note: Keep the covers you have re-
moved in a storage compartment so as
not to lose or damage them. The rings are located on the rear seat-
backs and indicated by the symbol
.
In all cases, attach the strap hook to the
corresponding ring 3 and 4 and place
the seat in the desired position.
Pull the belt so that the back of the child
seat comes into contact with the back
of the vehicle seat.
The child seat strap must
be attached to the corre-
sponding ring.
Do not use any other
mounting point.
1
2
4
Page 46 of 300
1.40
Fit the child seat in a rear
seat wherever possible.
In the rear side seat
A carrycot can be installed across the
vehicle and will take up at least two
seats.
Position the child with their feet nearest
the door.
Move the front seat as far forward as
possible to install a rear-facing child
seat, then move back the seat in front
as far as it will go, although without al-
lowing it to come into contact with the
child seat.
For the safety of a child facing forwards,
move the seat in front of the child as
far forward as possible, remember-
ing to move the seatback forwards to
avoid contact between the seat and the
child’s legs.
In all situations, remove the rear head-
rests (refer to the information on the
“Rear headrests” in Section 3). This
must be done before fitting the child
seat.
Check that the forward-facing child seat
is resting against the back of the vehi-
cle seat.
CHILD SAFETY: fitting a child seat, general information (2/2)
Ensure that the child seat
or the child’s feet do not
prevent the front seat from
locking correctly. Refer to
the information on the “Front seat”
in Section 1.
When fitting a child seat
(Group 2 or 3 booster seat),
check that the seat belts op-
erate (wind) correctly: refer
to Section 1 “Rear seat belts”. If
necessary, adjust the position of the
vehicle seat.
Page 53 of 300
1.47
CHILD SAFETY: deactivating/activating the front passenger air bag (1/3)
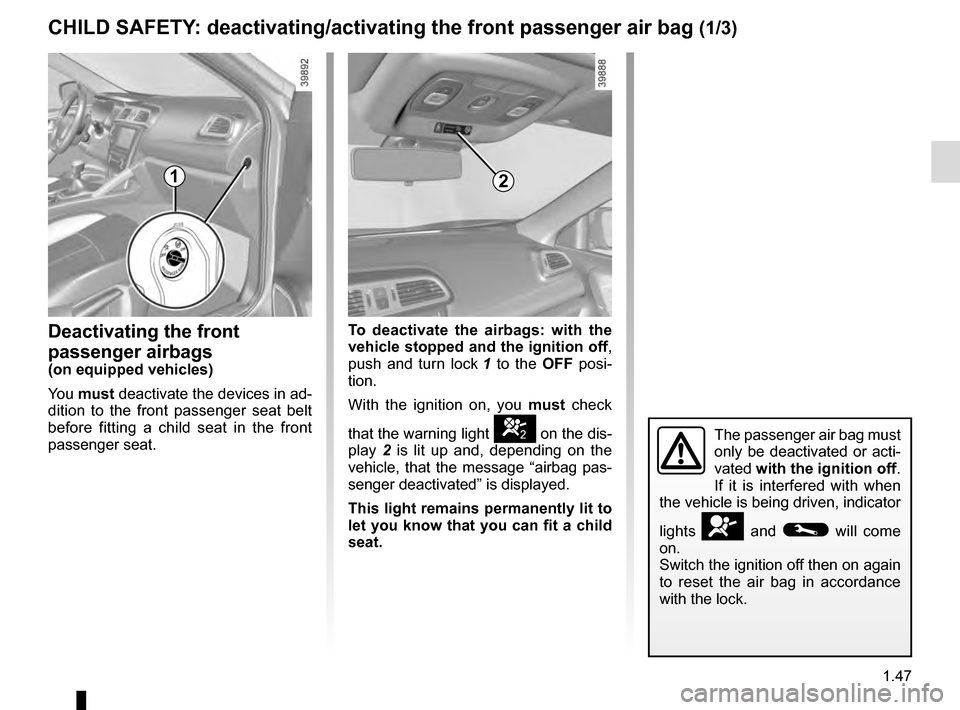
Deactivating the front
passenger airbags
(on equipped vehicles)
You must deactivate the devices in ad-
dition to the front passenger seat belt
before fitting a child seat in the front
passenger seat.
12
The passenger air bag must
only be deactivated or acti-
vated with the ignition off.
If it is interfered with when
the vehicle is being driven, indicator
lights
å and © will come
on.
Switch the ignition off then on again
to reset the air bag in accordance
with the lock.
To deactivate the airbags: with the
vehicle stopped and the ignition off ,
push and turn lock 1 to the OFF posi-
tion.
With the ignition on, you must check
that the warning light
] on the dis-
play 2 is lit up and, depending on the
vehicle, that the message “airbag pas-
senger deactivated” is displayed.
This light remains permanently lit to
let you know that you can fit a child
seat.
Page 55 of 300
1.49
CHILD SAFETY: deactivating/activating the front passenger air bag (3/3)
The passenger airbag must
only be deactivated or acti-
vated when the vehicle is
stationary.
If it is interfered with when the ve-
hicle is being driven, indicator lights
å and © will come on.
Switch the ignition off then on again
to reset the airbag in accordance
with the lock position.
12
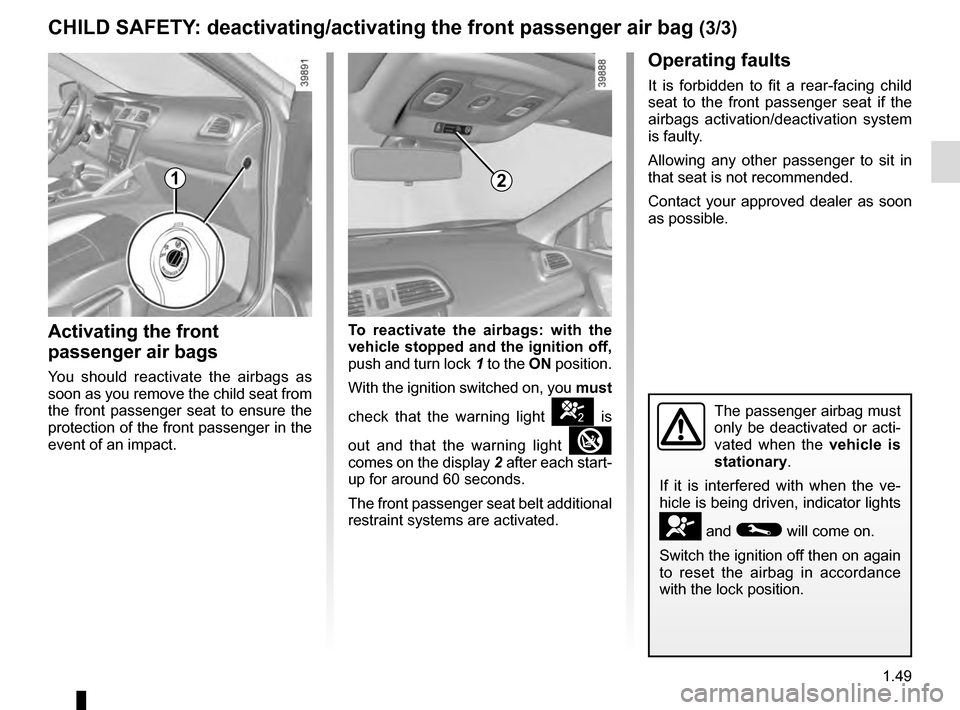
Activating the front
passenger air bags
You should reactivate the airbags as
soon as you remove the child seat from
the front passenger seat to ensure the
protection of the front passenger in the
event of an impact.
Operating faults
It is forbidden to fit a rear-facing child
seat to the front passenger seat if the
airbags activation/deactivation system
is faulty.
Allowing any other passenger to sit in
that seat is not recommended.
Contact your approved dealer as soon
as possible.
To reactivate the airbags: with the
vehicle stopped and the ignition off,
push and turn lock 1 to the ON position.
With the ignition switched on, you must
check that the warning light
] is
out and that the warning light
comes on the display 2 after each start-
up for around 60 seconds.
The front passenger seat belt additional
restraint systems are activated.
Page 108 of 300
2.4
STARTING, STOPPING THE ENGINE: vehicle with key
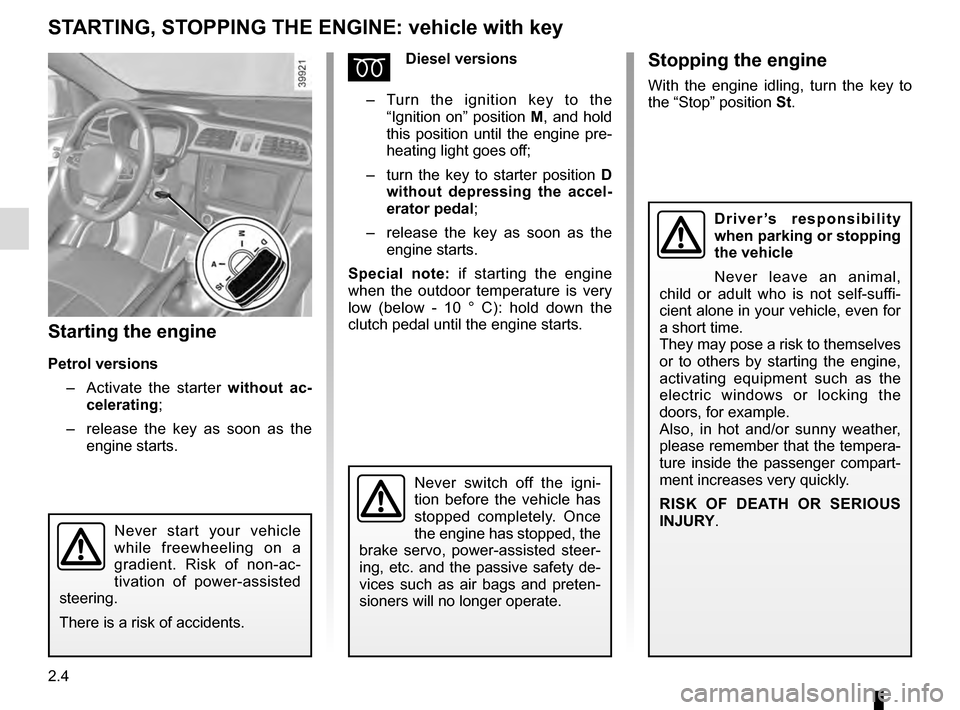
Starting the engine
Petrol versions– Activate the starter without ac-
celerating;
– release the key as soon as the
engine starts.
ÉDiesel versions
– Turn the ignition key to the
“Ignition on” position M, and hold
this position until the engine pre-
heating light goes off;
– turn the key to starter position D
without depressing the accel-
erator pedal;
– release the key as soon as the
engine starts.
Special note: if starting the engine
when the outdoor temperature is very
low (below - 10 ° C): hold down the
clutch pedal until the engine starts.
Never start your vehicle
while freewheeling on a
gradient. Risk of non-ac-
tivation of power-assisted
steering.
There is a risk of accidents.
Never switch off the igni-
tion before the vehicle has
stopped completely. Once
the engine has stopped, the
brake servo, power-assisted steer-
ing, etc. and the passive safety de-
vices such as air bags and preten-
sioners will no longer operate.
Driver’s responsibility
when parking or stopping
the vehicle
Never leave an animal,
child or adult who is not self-suffi-
cient alone in your vehicle, even for
a short time.
They may pose a risk to themselves
or to others by starting the engine,
activating equipment such as the
electric windows or locking the
doors, for example.
Also, in hot and/or sunny weather,
please remember that the tempera-
ture inside the passenger compart-
ment increases very quickly.
RISK OF DEATH OR SERIOUS
INJURY.
Stopping the engine
With the engine idling, turn the key to
the “Stop” position St.