2016 RENAULT CLIO SPORT TOURER tailgate
[x] Cancel search: tailgatePage 88 of 258
1.82
Before any action involving
the windscreen (washing
the vehicle, de-icing, clean-
ing the windscreen, etc.)
return stalk 1 to position A (park).
Risk of injury and/or damage.
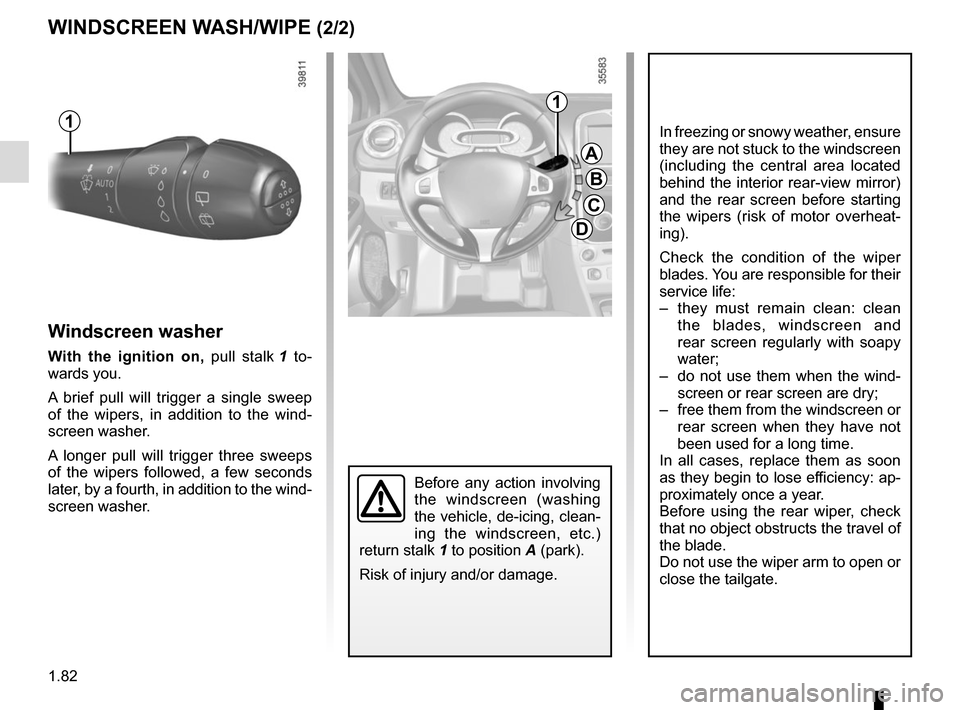
Windscreen washer
With the ignition on, pull stalk 1 to-
wards you.
A brief pull will trigger a single sweep
of the wipers, in addition to the wind-
screen washer.
A longer pull will trigger three sweeps
of the wipers followed, a few seconds
later, by a fourth, in addition to the wind-
screen washer.
WINDSCREEN WASH/WIPE (2/2)
A
B
C
D
1
1
In freezing or snowy weather, ensure
they are not stuck to the windscreen
(including the central area located
behind the interior rear-view mirror)
and the rear screen before starting
the wipers (risk of motor overheat-
ing).
Check the condition of the wiper
blades. You are responsible for their
service life:
– they must remain clean: clean the blades, windscreen and
rear screen regularly with soapy
water;
– do not use them when the wind- screen or rear screen are dry;
– free them from the windscreen or rear screen when they have not
been used for a long time.
In all cases, replace them as soon
as they begin to lose efficiency: ap-
proximately once a year.
Before using the rear wiper, check
that no object obstructs the travel of
the blade.
Do not use the wiper arm to open or
close the tailgate.
Page 89 of 258
1.83
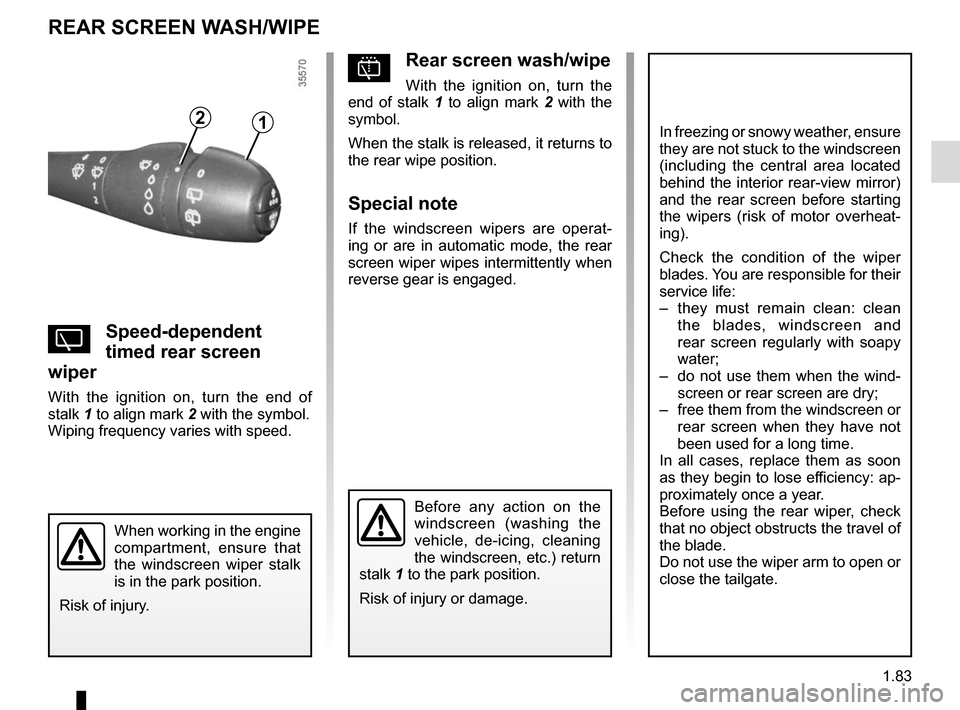
pRear screen wash/wipe
With the ignition on, turn the
end of stalk 1 to align mark 2 with the
symbol.
When the stalk is released, it returns to
the rear wipe position.
Special note
If the windscreen wipers are operat-
ing or are in automatic mode, the rear
screen wiper wipes intermittently when
reverse gear is engaged.
YSpeed-dependent
timed rear screen
wiper
With the ignition on, turn the end of
stalk 1 to align mark 2 with the symbol.
Wiping frequency varies with speed.
REAR SCREEN WASH/WIPE
12In freezing or snowy weather, ensure
they are not stuck to the windscreen
(including the central area located
behind the interior rear-view mirror)
and the rear screen before starting
the wipers (risk of motor overheat-
ing).
Check the condition of the wiper
blades. You are responsible for their
service life:
– they must remain clean: clean the blades, windscreen and
rear screen regularly with soapy
water;
– do not use them when the wind- screen or rear screen are dry;
– free them from the windscreen or rear screen when they have not
been used for a long time.
In all cases, replace them as soon
as they begin to lose efficiency: ap-
proximately once a year.
Before using the rear wiper, check
that no object obstructs the travel of
the blade.
Do not use the wiper arm to open or
close the tailgate.
Before any action on the
windscreen (washing the
vehicle, de-icing, cleaning
the windscreen, etc.) return
stalk 1 to the park position.
Risk of injury or damage.
When working in the engine
compartment, ensure that
the windscreen wiper stalk
is in the park position.
Risk of injury.
Page 132 of 258
2.40
REVERSING CAMERA (1/2)
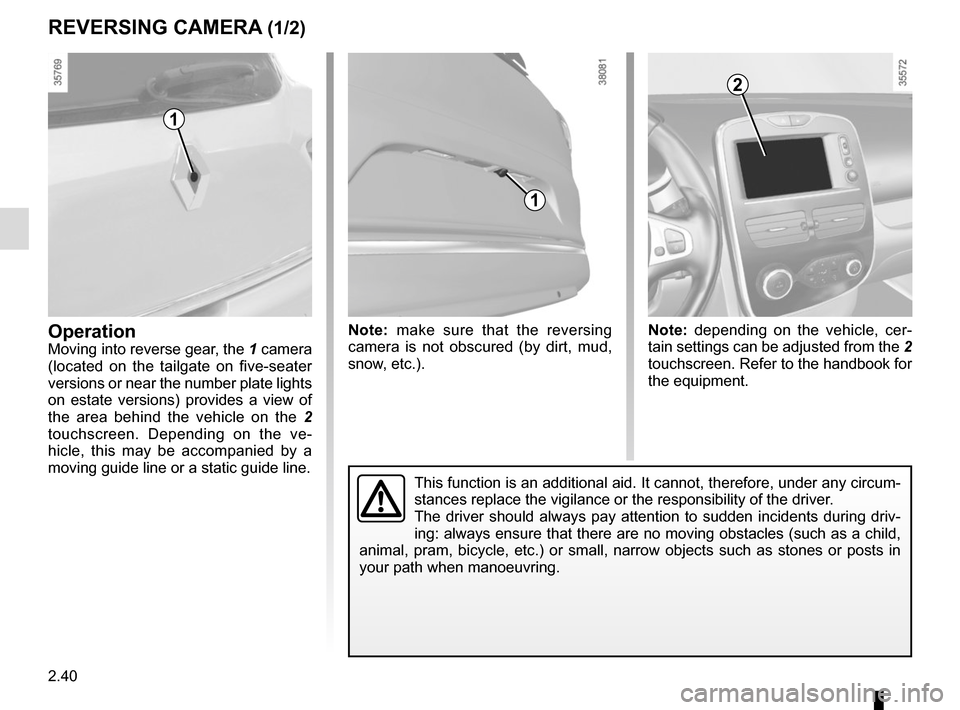
OperationMoving into reverse gear, the 1 camera
(located on the tailgate on five-seater
versions or near the number plate lights
on estate versions) provides a view of
the area behind the vehicle on the 2
touchscreen. Depending on the ve-
hicle, this may be accompanied by a
moving guide line or a static guide line.
1
Note: make sure that the reversing
camera is not obscured (by dirt, mud,
snow, etc.).
2
1
Note: depending on the vehicle, cer-
tain settings can be adjusted from the 2
touchscreen. Refer to the handbook for
the equipment.
This function is an additional aid. It cannot, therefore, under any circ\
um-
stances replace the vigilance or the responsibility of the driver.
The driver should always pay attention to sudden incidents during driv-
ing: always ensure that there are no moving obstacles (such as a child,\
animal, pram, bicycle, etc.) or small, narrow objects such as stones or\
posts in
your path when manoeuvring.
Page 151 of 258
3.15
Unlocking and opening the doors
or tailgate switches on the timed
courtesy lights and lights.
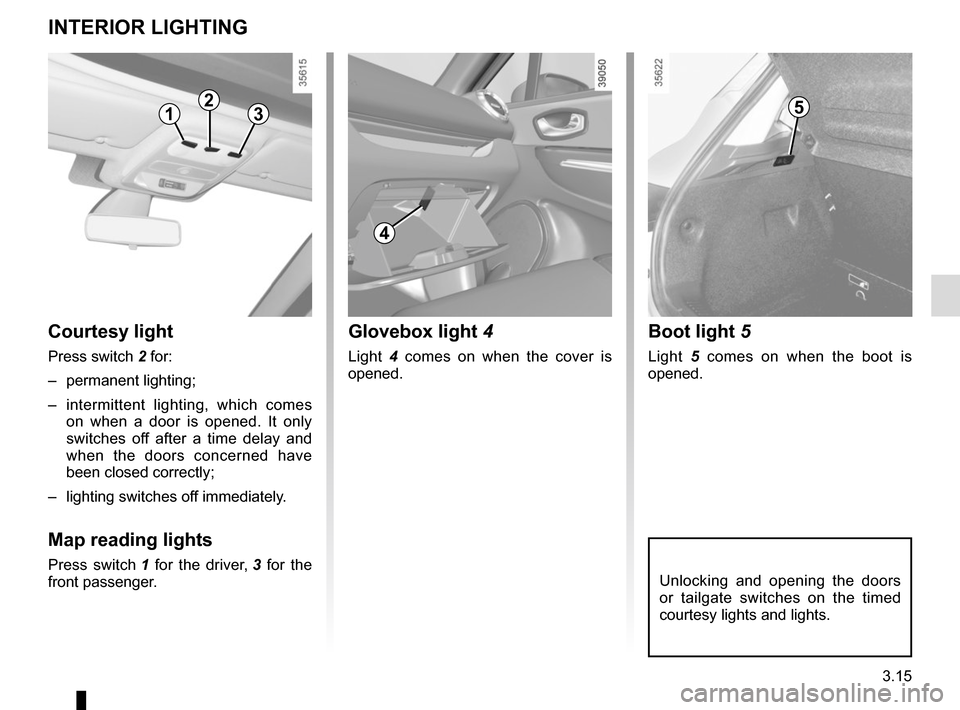
Boot light 5
Light 5 comes on when the boot is
opened.
Courtesy light
Press switch 2 for:
– permanent lighting;
– intermittent lighting, which comes on when a door is opened. It only
switches off after a time delay and
when the doors concerned have
been closed correctly;
– lighting switches off immediately.
Map reading lights
Press switch 1 for the driver, 3 for the
front passenger.
INTERIOR LIGHTING
1235
Glovebox light 4
Light 4 comes on when the cover is
opened.
4
Page 159 of 258
3.23
Do not place any objects,
especially heavy or hard
objects, on the parcel shelf.
These may pose a risk to
the vehicle occupants if the driver
has to brake suddenly or if the vehi-
cle is involved in an accident.
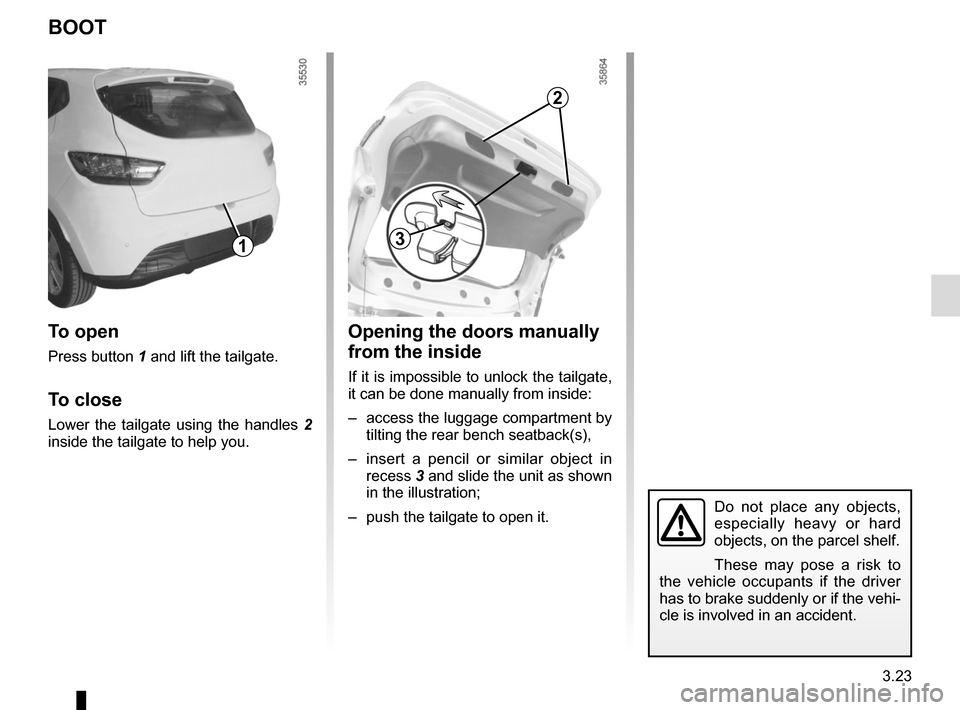
Opening the doors manually
from the inside
If it is impossible to unlock the tailgate,
it can be done manually from inside:
– access the luggage compartment by tilting the rear bench seatback(s),
– insert a pencil or similar object in recess 3 and slide the unit as shown
in the illustration;
– push the tailgate to open it.
BOOT
To open
Press button 1 and lift the tailgate.
To close
Lower the tailgate using the handles 2
inside the tailgate to help you.
13
2
Page 167 of 258
3.31
For information on the range of
equipment adapted to your vehi-
cle, we advise you to consult an ap-
proved Dealer.
Refer to the manufacturer’s instruc-
tions for information on how to fit
and use the roof rack bar.
Please keep these instructions with
the rest of the vehicle documenta-
tion.
Maximum permissible load on
roof rack: 80 kg (including the car-
rying device).
Precautions during use
Handling the tailgate
Before handling the tailgate, check the
objects and/or accessories (bike rack,
roof box, etc.) fitted to the roof bars:
these must be correctly positioned and
secured, so as not to hinder the opera-
tion of the tailgate.
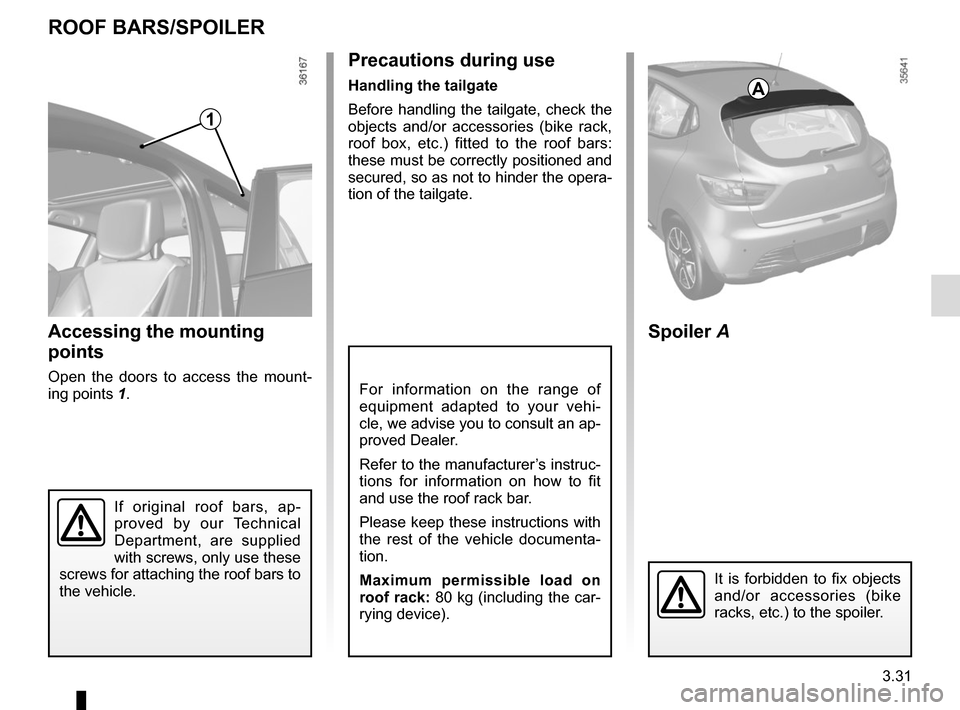
ROOF BARS/SPOILER
A
Spoiler A
Accessing the mounting
points
Open the doors to access the mount-
ing points 1.
If original roof bars, ap-
proved by our Technical
Department, are supplied
with screws, only use these
screws for attaching the roof bars to
the vehicle.
It is forbidden to fix objects
and/or accessories (bike
racks, etc.) to the spoiler.
1
Page 187 of 258
5.3
1
2
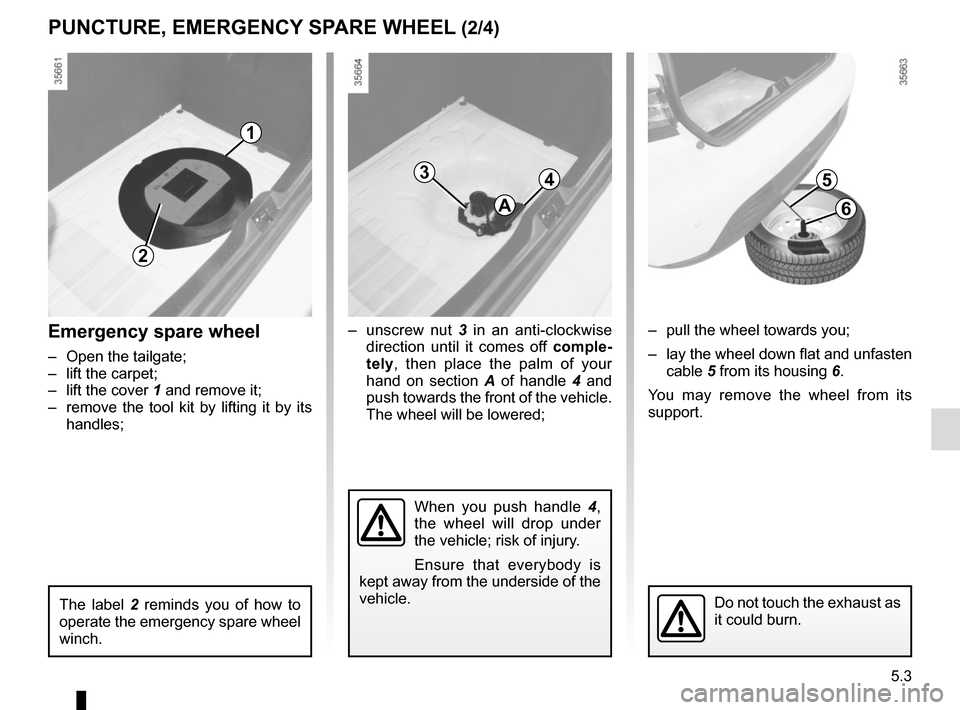
Emergency spare wheel
– Open the tailgate;
– lift the carpet;
– lift the cover 1 and remove it;– remove the tool kit by lifting it by its handles;
The label 2 reminds you of how to
operate the emergency spare wheel
winch.
34
A
– unscrew nut 3 in an anti-clockwise
direction until it comes off comple-
tely, then place the palm of your
hand on section A of handle 4 and
push towards the front of the vehicle.
The wheel will be lowered;
When you push handle 4,
the wheel will drop under
the vehicle; risk of injury.
Ensure that everybody is
kept away from the underside of the
vehicle.
5
6
– pull the wheel towards you;
– lay the wheel down flat and unfasten cable 5 from its housing 6.
You may remove the wheel from its
support.
Do not touch the exhaust as
it could burn.
PUNCTURE, EMERGENCY SPARE WHEEL (2/4)
Page 251 of 258
7.1
ALPHABETICAL INDEX (1/5)
A
ABS ..............................................................1.58, \
2.27 → 2.30
accessories.............................................................\
........... 5.35
accessories socket ............................................................ 3.20
additional methods of restraint .......................................... 1.30 side protection ............................................................. 1.29
to the front seat belts .......................................1.24 → 1.27
to the rear seat belts .................................................... 1.28
adjusting your driving position ......................1.16 → 1.23, 3.21
advice on antipollution ....................................................... 2.18
air bag...........................................................1.24 → 1.30, 1.56
activating the front passenger air bags ........................ 1.50
deactivating the front passenger air bags .................... 1.48
air conditioning ........................................................ 3.4 → 3.11
air vents ...................................................................... 3.2 – 3.3
anti-corrosion check ..............................................6.15 → 6.20
anti-corrosion protection .................................................... 4.13
anti-lock braking system: ABS ...............................2.27 → 2.30
antipollution advice .................................................................\
......... 2.18
armrest: front ..................................................................\
............ 3.17
ashtray ................................................................\
............... 3.20
audible and visual signals.................................................. 1.79
automatic gearbox (use) ........................................2.42 → 2.44
automatic gearbox selector lever...........................2.42 → 2.44
B
battery............................................................ 4.12, 5.32 – 5.33 troubleshooting ................................................. 5.32 – 5.33
bonnet..................................................................\
....... 4.2 – 4.3
brake fluid ........................................................................\
.... 4.8
bulbs changing .................................................5.16 → 5.25, 5.25C
catalytic converter................................................... 2.10 – 2.11
central door locking ........................... 1.5
→ 1.10, 1.13 → 1.15
changing a bulb ............................................5.16 → 5.25, 5.25
changing a wheel.................................................... 5.11 – 5.12
changing gear ...............................................2.12, 2.42 → 2.44
child restraint/seat ....................1.31 – 1.32, 1.34 → 1.42, 1.48
child safety......1.9, 1.12, 1.27, 1.31 – 1.32, 1.34 → 1.42, 1.48,
2.3, 3.12 – 3.13
child seats..........................................1.31 – 1.32, 1.3\
4 → 1.42
children ................................. 1.2, 1.9, 1.31 – 1.32, 3.12 – 3.13
children (safety) .......................................................... 1.2, 1.12
cigar lighter ........................................................................\
3.20
cleaning: inside the vehicle .............................................. 4.15 – 4.16
clock ....................................................................... 1.73 – 1.74
closing the doors ................................................... 1.11 → 1.15
control instruments ............................1.56 → 1.64, 1.73 – 1.74
controls ...............................................................\
...1.52 → 1.55
courtesy light ............................................................ 3.15, 5.24
courtesy mirrors ........................................................ 3.14, 5.25
cruise control ................................................1.59, 2.34 → 2.37
cruise control-speed limiter....................................2.31 → 2.37
D
dashboard..............................................................1\
.52 → 1.55
deadlocking the doors ....................................................... 1.10
demisting rear screen ..................................................3.4, 3.7 → 3.10
windscreen ..................................................3.5, 3.7 → 3.10
dimensions ................................................................. 6.4 – 6.5
dipstick................................................................\
................. 4.4
display ................................................................\
...1.56 → 1.62
doors/tailgate .........................................................\
..1.2 → 1.15
driver’s position .....................................................1.52 → 1.60