Page 17 of 145

1. Speedometer•Indicates vehicle speed.
2. Electronic Vehicle Information Center (EVIC) •When the appropriate conditions exist, this display
shows the Electronic Vehicle Information Center
(EVIC) messages. Refer to “Electronic Vehicle Infor-
mation Center” in “Understanding Your Instrument
Panel” for further information.
• Odometer/Trip Odometer Display Area
U.S. Federal regulations require that upon transfer of
vehicle ownership, the seller certify to the purchaser
the correct mileage that the vehicle has been driven. If
your odometer needs to be repaired or serviced, the
repair technician should leave the odometer reading
the same as it was before the repair or service. If s/he
cannot do so, then the odometer must be set at zero,
and a sticker must be placed in the door jamb stating
what the mileage was before the repair or service. It is a good idea for you to make a record of the odometer
reading before the repair/service, so that you can be
sure that it is properly reset, or that the door jamb
sticker is accurate if the odometer must be reset at zero.
•
Shift Lever Status (PRND)
The shift lever status “P,R,N,D,1,2,3,4,5,6” are dis-
played indicating the shift lever position. Telltales
“1,2,3,4,5,6” indicate the manual mode has been
engaged and the gear selected is displayed. Refer to
“Six-Speed Automatic Transmission” in “Starting
And Operating” for further information on ERS.
3. Tachometer •This gauge measures engine revolutions per minute
(RPM x 1000). Before the pointer reaches the red area,
ease up on the accelerator to prevent engine damage.
4
UNDERSTANDING YOUR INSTRUMENT PANEL 15
Page 18 of 145
4. Temperature Gauge•The temperature gauge shows engine coolant tem-
perature. Any reading within the normal range indi-
cates that the engine cooling system is operating
satisfactorily.
• The gauge pointer will likely indicate a higher tem-
perature when driving in hot weather or up moun-
tain grades. It should not be allowed to exceed the
upper limits of the normal operating range.CAUTION!
Driving with a hot engine cooling system could
damage your vehicle. If the temperature gauge reads
“H” pull over and stop the vehicle. Idle the vehicle
with the air conditioner turned off until the pointer
drops back into the normal range. If the pointer
remains on the “H” and you hear continuous chimes,
turn the engine off immediately and call an autho-
rized dealer for service.
16 UNDERSTANDING YOUR INSTRUMENT PANEL
Page 28 of 145

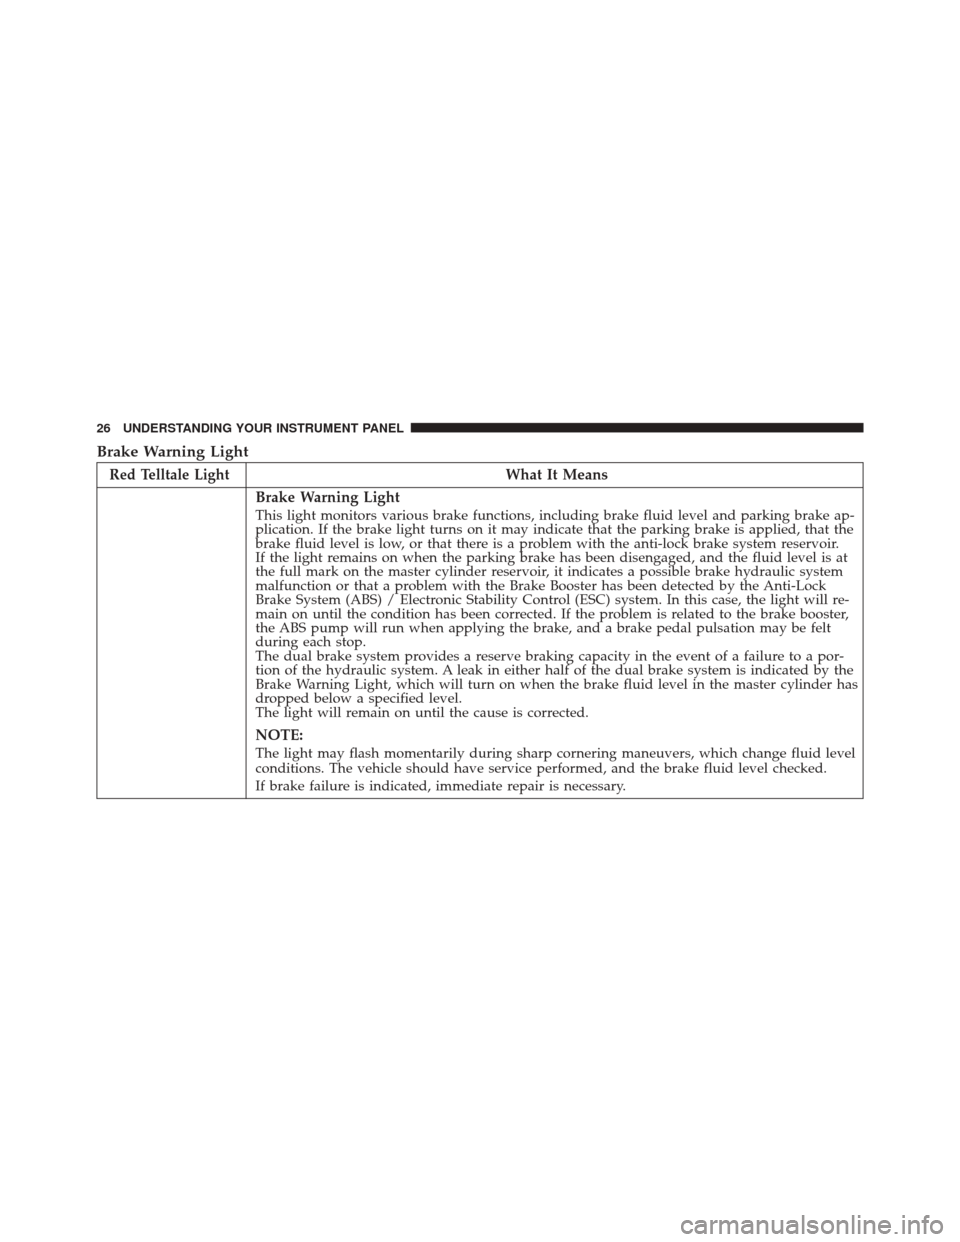
Brake Warning Light
Red Telltale LightWhat It Means
Brake Warning Light
This light monitors various brake functions, including brake fluid level and parking brake ap-
plication. If the brake light turns on it may indicate that the parking brake is applied, that the
brake fluid level is low, or that there is a problem with the anti-lock brake system reservoir.
If the light remains on when the parking brake has been disengaged, and the fluid level is at
the full mark on the master cylinder reservoir, it indicates a possible brake hydraulic system
malfunction or that a problem with the Brake Booster has been detected by the Anti-Lock
Brake System (ABS) / Electronic Stability Control (ESC) system. In this case, the light will re-
main on until the condition has been corrected. If the problem is related to the brake booster,
the ABS pump will run when applying the brake, and a brake pedal pulsation may be felt
during each stop.
The dual brake system provides a reserve braking capacity in the event of a failure to a por-
tion of the hydraulic system. A leak in either half of the dual brake system is indicated by the
Brake Warning Light, which will turn on when the brake fluid level in the master cylinder has
dropped below a specified level.
The light will remain on until the cause is corrected.
NOTE:
The light may flash momentarily during sharp cornering maneuvers, which change fluid level
conditions. The vehicle should have service performed, and the brake fluid level checked.
If brake failure is indicated, immediate repair is necessary.
26 UNDERSTANDING YOUR INSTRUMENT PANEL
Page 34 of 145

Tire Pressure Monitoring Indicator Light
Yellow Telltale LightWhat It Means
Tire Pressure Monitoring Indicator Light
TPMS Failure
The warning light switches on when a failure is detected in the TPMS. In this case, contact
a authorized dealership as soon as possible. Should one or more wheels be fitted without
sensors, the display will show a warning message until initial conditions are restored.
IMPORTANT:Do not continue driving with one or more flat tires as handling may be
compromised. Stop the vehicle, avoiding sharp braking and steering. Repair immediately
using the dedicated tire repair kit and contact your authorized dealership as soon as pos-
sible.
Tire Pressure Low
The warning light switches on and a message is displayed to indicate that the tire pressure
is lower than the recommended value and/or that slow pressure loss is occurring. In these
cases, optimal tire duration and fuel consumption may not be guaranteed.
Should two or more tires be in the condition mentioned above, the display will show the
indications corresponding to each tire in sequence.
In any situation in which the message on the display is �See manual�, it is ESSENTIAL to
refer to the contents of the �Wheels�paragraph in the �Technical data�chapter, strictly com-
plying with the indications that you find there.
32 UNDERSTANDING YOUR INSTRUMENT PANEL
Page 62 of 145

Cooling System Tips — Automated Manual
Transmission
To reduce potential for engine and transmission over-
heating in high ambient temperature conditions, take the
following actions:
•City Driving
— When stopped, shift the transmis-
sion into NEUTRAL and increase engine idle
speed.
• Highway Driving— Reduce your speed.
•Up Steep Hills— Select a lower transmission gear.
•Air Conditioning— Turn it off temporarily. Do Not Operate The Engine With Low Oil
Pressure
If the low oil pressure warning light turns on while
driving, stop the vehicle and shut down the engine as
soon as possible. A chime will sound when the light turns
on.
NOTE:
Do not operate the vehicle until the cause is
corrected. This light does not show how much oil is in the
engine. The engine oil level must be checked under the
hood.
CAUTION!
If oil pressure falls to less than normal readings, shut
the engine off immediately. Failure to do so could
result in immediate and severe engine damage.
60 STARTING AND OPERATING
Page 101 of 145
Tow/Haul Mode
To reduce the potential for transmission overheating,
activate the “TOW/HAUL” feature when using DRIVE
(D) (automatic mode) in hilly areas.
Electronic Speed Control — If Equipped
•Do not use in hilly terrain or with heavy loads.
• When using the speed control, if you experience speed
drops greater than 10 mph (16 km/h), disengage until
you can get back to cruising speed.
• Use speed control in flat terrain and with light loads to
maximize fuel efficiency.
Cooling System
To reduce potential for engine and transmission over-
heating, take the following actions:
City Driving
When stopped for short periods, shift the transmission
into NEUTRAL and increase engine idle speed.
Highway Driving
Reduce speed.
Air Conditioning
Turn off temporarily.
5
STARTING AND OPERATING 99
Page 105 of 145

MAINTENANCE PROCEDURES
The pages that follow contain therequiredmaintenance
services determined by the engineers who designed your
vehicle.
Besides those maintenance items specified in the fixed
maintenance schedule, there are other components which
may require servicing or replacement in the future.
CAUTION!
• Failure to properly maintain your vehicle or per-
form repairs and service when necessary could
result in more costly repairs, damage to other
components or negatively impact vehicle perfor-
mance. Immediately have potential malfunctions
examined by an authorized dealership or qualified
repair center.
(Continued)
CAUTION! (Continued)
•Your vehicle has been built with improved fluids
that protect the performance and durability of your
vehicle and also allow extended maintenance inter-
vals. Do not use chemical flushes in these compo-
nents as the chemicals can damage your engine,
transmission, power steering or air conditioning.
Such damage is not covered by the New Vehicle
Limited Warranty. If a flush is needed because of
component malfunction, use only the specified
fluid for the flushing procedure.
6
MAINTAINING YOUR VEHICLE 103
Page 111 of 145

3. Start the engine using the “Normal Starting” proce-dure. Refer to “Starting Procedures” in “Starting And
Operating” for further information.
CAUTION!
The starter motor will engage for approximately 30
seconds at a time. Allow two minutes between crank-
ing intervals.
NOTE: The engine may run rough until the air is forced
from all the fuel lines.
WARNING!
Do not use alcohol or gasoline as a fuel blending
agent. They can be unstable under certain conditions
and be hazardous or explosive when mixed with
diesel fuel.
CAUTION!
Due to lack of lubricants in alcohol or gasoline, the
use of these fuels can cause damage to the fuel
system.
NOTE:
• We recommend you use a blend of up to 5% biodiesel,
that meets ASTM specification D-975 with your diesel
engine. Use of biodiesel mixture in excess of 20% can
negatively impact the fuel filter’s ability to separate
water from the fuel, resulting in high pressure fuel
system corrosion or damage.
• In addition, commercially available fuel additives are
not necessary for the proper operation of your diesel
engine.
6
MAINTAINING YOUR VEHICLE 109