Page 312 of 669
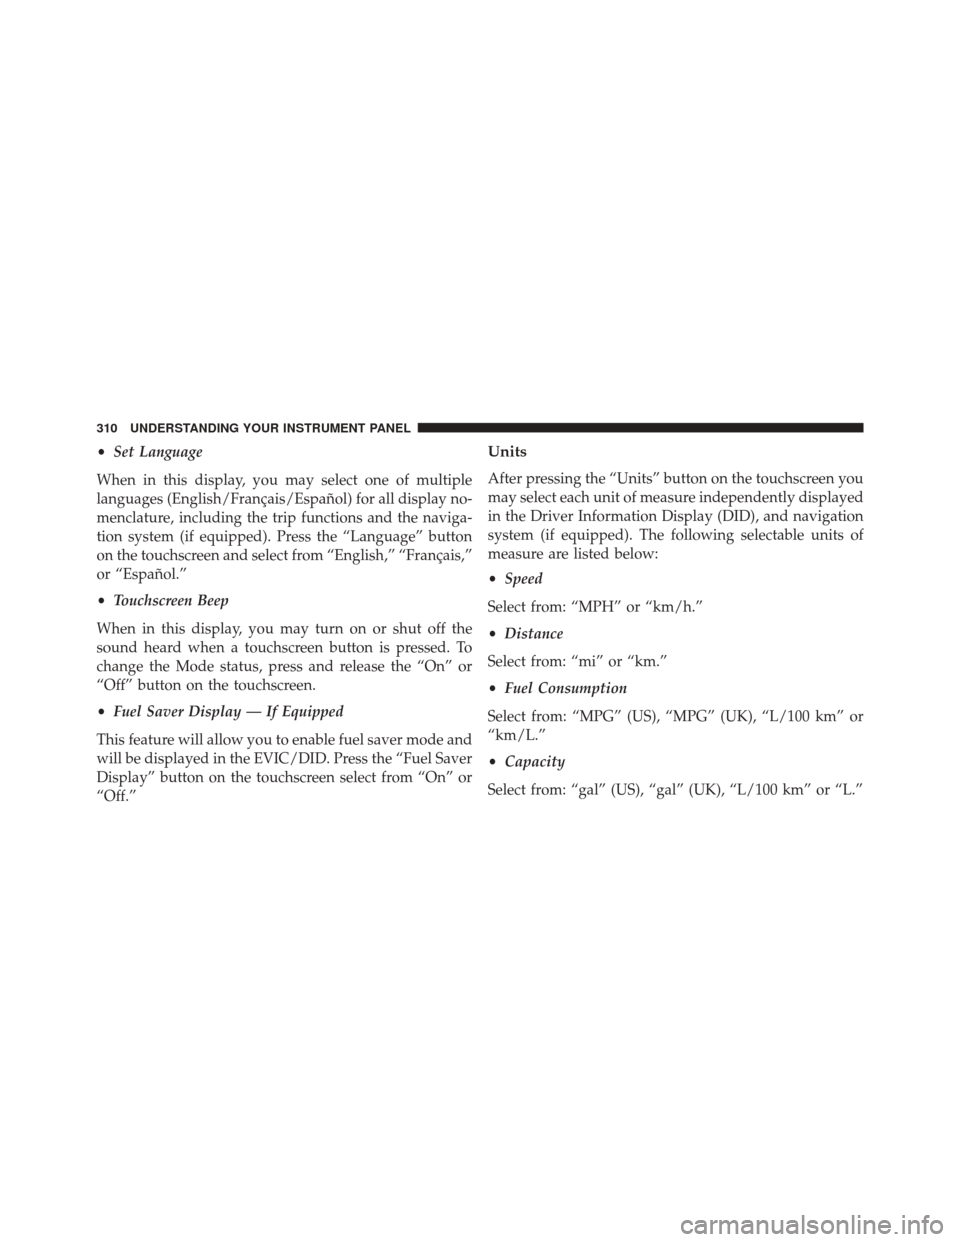
•Set Language
When in this display, you may select one of multiple
languages (English/Français/Español) for all display no-
menclature, including the trip functions and the naviga-
tion system (if equipped). Press the “Language” button
on the touchscreen and select from “English,” “Français,”
or “Español.”
• Touchscreen Beep
When in this display, you may turn on or shut off the
sound heard when a touchscreen button is pressed. To
change the Mode status, press and release the “On” or
“Off” button on the touchscreen.
• Fuel Saver Display — If Equipped
This feature will allow you to enable fuel saver mode and
will be displayed in the EVIC/DID. Press the “Fuel Saver
Display” button on the touchscreen select from “On” or
“Off.”Units
After pressing the “Units” button on the touchscreen you
may select each unit of measure independently displayed
in the Driver Information Display (DID), and navigation
system (if equipped). The following selectable units of
measure are listed below:
• Speed
Select from: “MPH” or “km/h.”
• Distance
Select from: “mi” or “km.”
• Fuel Consumption
Select from: “MPG” (US), “MPG” (UK), “L/100 km” or
“km/L.”
• Capacity
Select from: “gal” (US), “gal” (UK), “L/100 km” or “L.”
310 UNDERSTANDING YOUR INSTRUMENT PANEL
Page 313 of 669
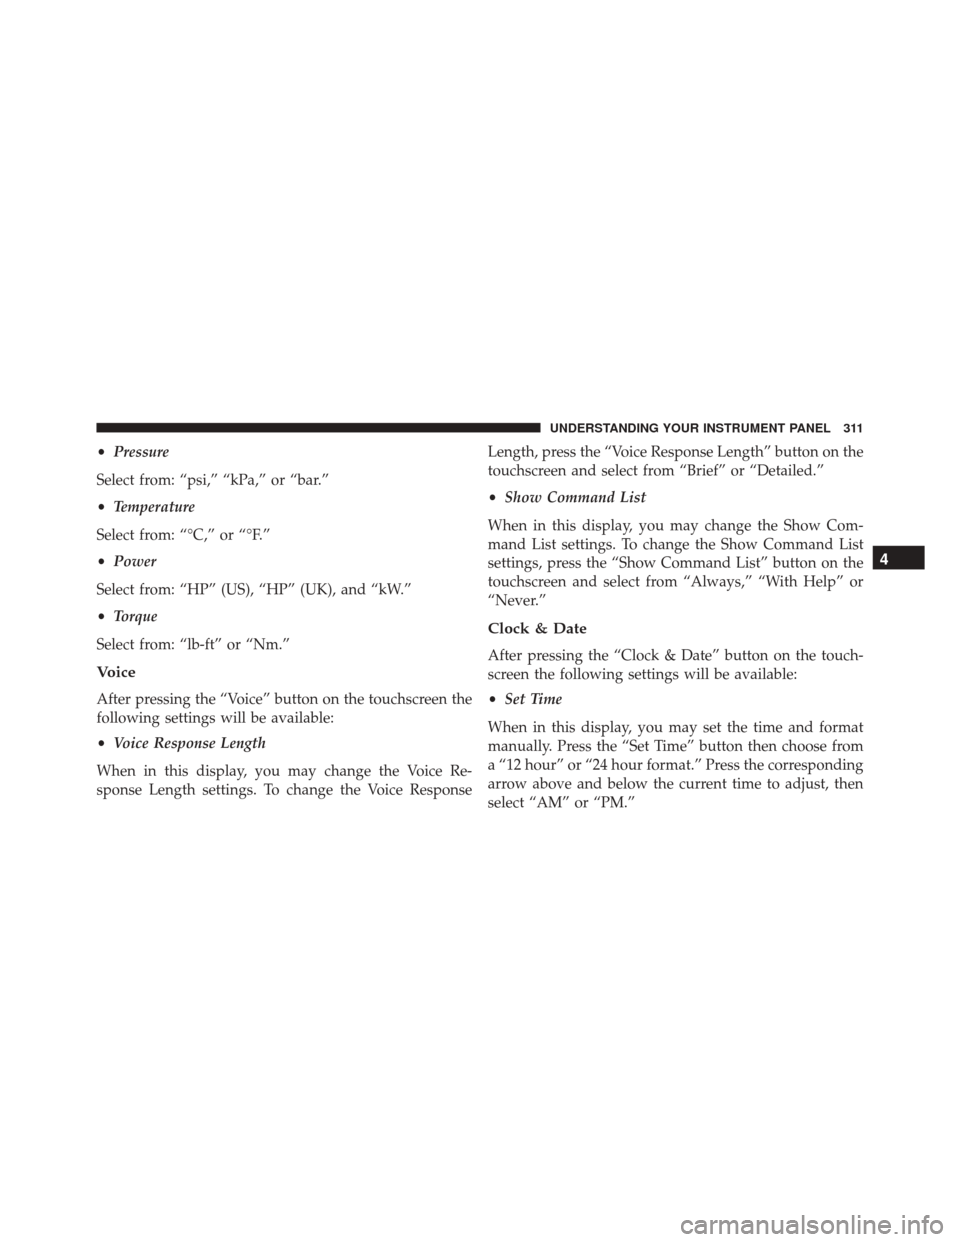
•Pressure
Select from: “psi,” “kPa,” or “bar.”
• Temperature
Select from: “°C,” or “°F.”
• Power
Select from: “HP” (US), “HP” (UK), and “kW.”
• Torque
Select from: “lb-ft” or “Nm.”
Voice
After pressing the “Voice” button on the touchscreen the
following settings will be available:
• Voice Response Length
When in this display, you may change the Voice Re-
sponse Length settings. To change the Voice Response Length, press the “Voice Response Length” button on the
touchscreen and select from “Brief” or “Detailed.”
•
Show Command List
When in this display, you may change the Show Com-
mand List settings. To change the Show Command List
settings, press the “Show Command List” button on the
touchscreen and select from “Always,” “With Help” or
“Never.”
Clock & Date
After pressing the “Clock & Date” button on the touch-
screen the following settings will be available:
• Set Time
When in this display, you may set the time and format
manually. Press the “Set Time” button then choose from
a “12 hour” or “24 hour format.” Press the corresponding
arrow above and below the current time to adjust, then
select “AM” or “PM.”
4
UNDERSTANDING YOUR INSTRUMENT PANEL 311
Page 314 of 669
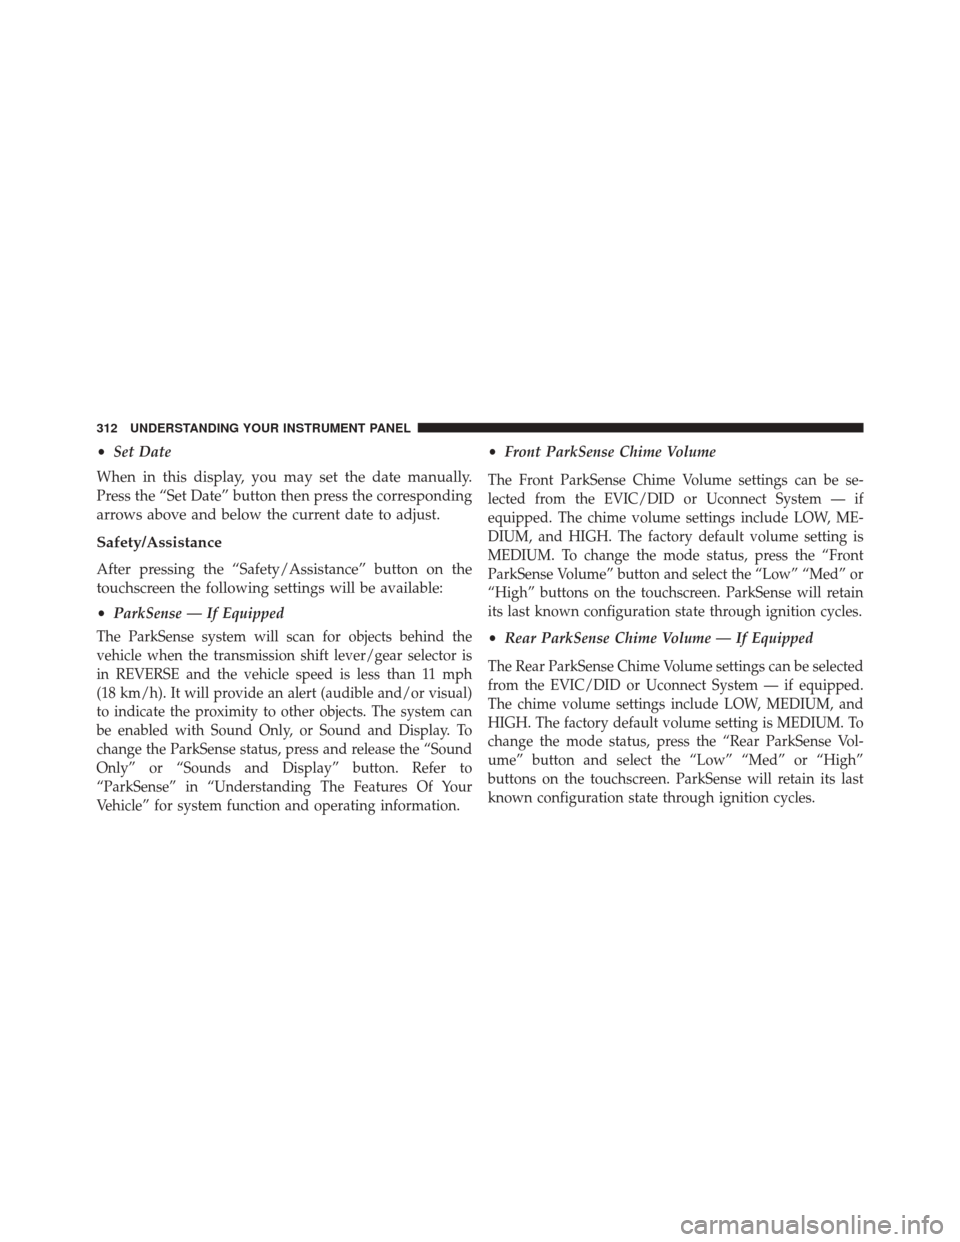
•Set Date
When in this display, you may set the date manually.
Press the “Set Date” button then press the corresponding
arrows above and below the current date to adjust.
Safety/Assistance
After pressing the “Safety/Assistance” button on the
touchscreen the following settings will be available:
• ParkSense — If Equipped
The ParkSense system will scan for objects behind the
vehicle when the transmission shift lever/gear selector is
in REVERSE and the vehicle speed is less than 11 mph
(18 km/h). It will provide an alert (audible and/or visual)
to indicate the proximity to other objects. The system can
be enabled with Sound Only, or Sound and Display. To
change the ParkSense status, press and release the “Sound
Only” or “Sounds and Display” button. Refer to
“ParkSense” in “Understanding The Features Of Your
Vehicle” for system function and operating information.
•Front ParkSense Chime Volume
The Front ParkSense Chime Volume settings can be se-
lected from the EVIC/DID or Uconnect System — if
equipped. The chime volume settings include LOW, ME-
DIUM, and HIGH. The factory default volume setting is
MEDIUM. To change the mode status, press the “Front
ParkSense Volume” button and select the “Low” “Med” or
“High” buttons on the touchscreen. ParkSense will retain
its last known configuration state through ignition cycles.
•Rear ParkSense Chime Volume — If Equipped
The Rear ParkSense Chime Volume settings can be selected
from the EVIC/DID or Uconnect System — if equipped.
The chime volume settings include LOW, MEDIUM, and
HIGH. The factory default volume setting is MEDIUM. To
change the mode status, press the “Rear ParkSense Vol-
ume” button and select the “Low” “Med” or “High”
buttons on the touchscreen. ParkSense will retain its last
known configuration state through ignition cycles.
312 UNDERSTANDING YOUR INSTRUMENT PANEL
Page 327 of 669
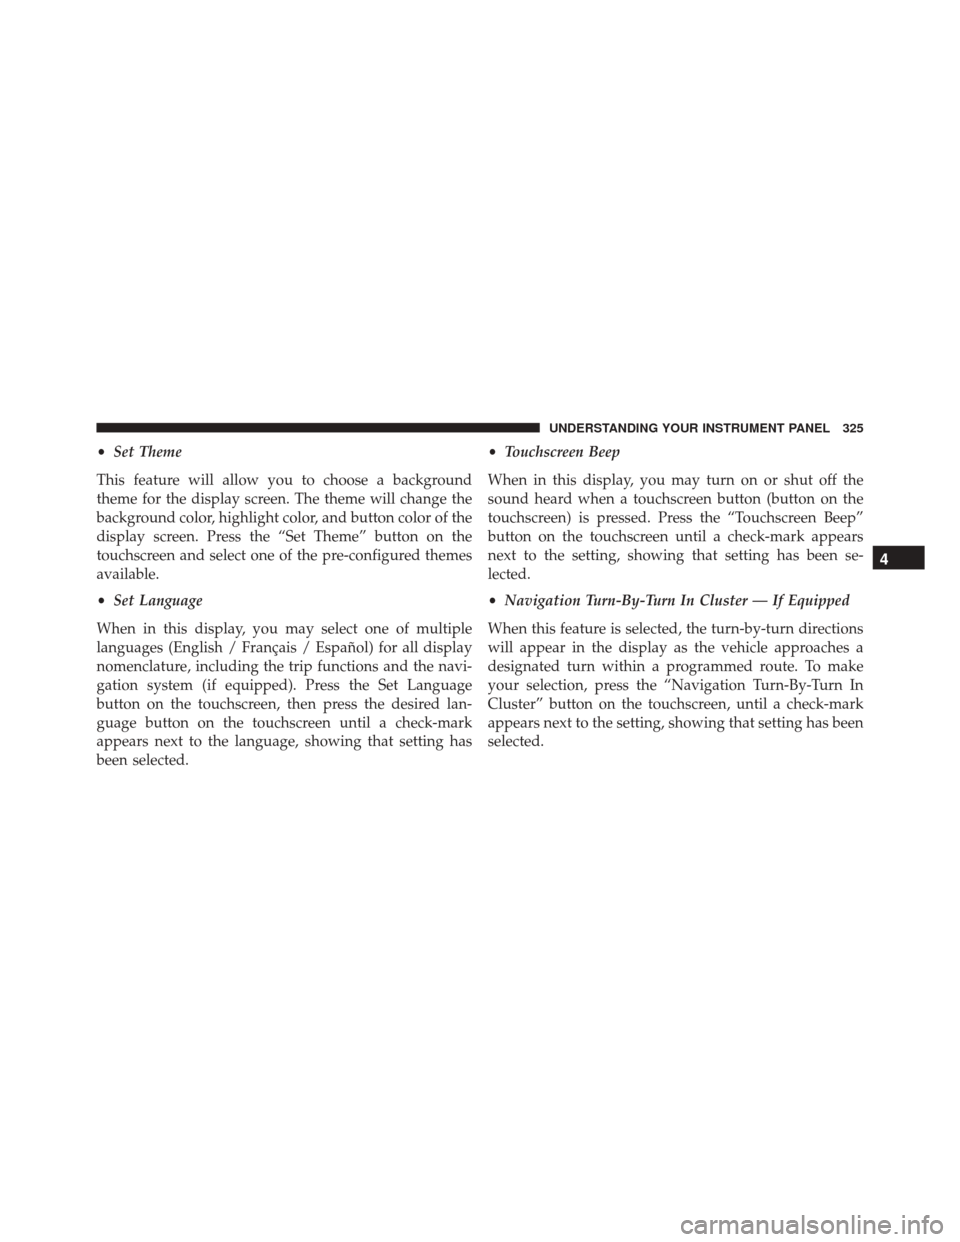
•Set Theme
This feature will allow you to choose a background
theme for the display screen. The theme will change the
background color, highlight color, and button color of the
display screen. Press the “Set Theme” button on the
touchscreen and select one of the pre-configured themes
available.
• Set Language
When in this display, you may select one of multiple
languages (English / Français / Español) for all display
nomenclature, including the trip functions and the navi-
gation system (if equipped). Press the Set Language
button on the touchscreen, then press the desired lan-
guage button on the touchscreen until a check-mark
appears next to the language, showing that setting has
been selected. •
Touchscreen Beep
When in this display, you may turn on or shut off the
sound heard when a touchscreen button (button on the
touchscreen) is pressed. Press the “Touchscreen Beep”
button on the touchscreen until a check-mark appears
next to the setting, showing that setting has been se-
lected.
• Navigation Turn-By-Turn In Cluster — If Equipped
When this feature is selected, the turn-by-turn directions
will appear in the display as the vehicle approaches a
designated turn within a programmed route. To make
your selection, press the “Navigation Turn-By-Turn In
Cluster” button on the touchscreen, until a check-mark
appears next to the setting, showing that setting has been
selected.
4
UNDERSTANDING YOUR INSTRUMENT PANEL 325
Page 329 of 669
•Temperature
Select from: “°C,” or “°F.”
• Power
Select from: “HP” (US), “HP” (UK), and “kW.”
• Torque
Select from: “lb-ft” or “Nm.”
After the desired setting has been selected, press the back
arrow/Done button on the touchscreen to return to the
previous menu.
Voice
After pressing the “Voice” button on the touchscreen the
following settings will be available:
• Voice Response Length
When in this display, you may change the Voice Re-
sponse Length settings. To change the Voice Response Length, select from the “Brief” or “Detailed” buttons on
the touchscreen until a check-mark appears next to the
setting, showing that setting has been selected.
•
Show Command List
When in this display, you may change the Show Command
List settings. To change the Show Command List settings,
select from the “Always,” “With Help” or “Never” buttons
on the touchscreen until a check-mark appears next to the
setting, showing that setting has been selected.
Clock
After pressing the “Clock” button on the touchscreen the
following settings will be available:
•Sync Time With GPS — If Equipped
This feature will allow you to automatically have the
radio set the time. To change the Sync Time setting, press
the “Sync with GPS Time” button on the touchscreen to
turn the feature on or off.
4
UNDERSTANDING YOUR INSTRUMENT PANEL 327
Page 380 of 669
Voice Text Reply
Uconnect will announceincomingtext messages. Push
the Phone button
and say Listen.(Must have com-
patible mobile phone paired to Uconnect system.)
1. Once an incoming text message is read to you, push
the Phone button
. After the beep, say: “Reply.”
2. Listen to the Uconnect prompts. After the beep, repeat
one of the pre-defined messages and follow the system
prompts.
PRE-DEFINED VOICE TEXT REPLY RESPONSES
Yes. Stuck in traffic. See you later.
No. Start without
me. I’ll be late.
Okay. Where are you? I will be minuteslate.
Call me. Are you there
yet?
I’ll call you later. I need
directions. See you in
of minutes.
I’m on my way. Can’t talk right
now.
I’m lost. Thanks.
Uconnect 8.4A/8.4AN Phone
378 UNDERSTANDING YOUR INSTRUMENT PANEL
Page 392 of 669
While in Do Not Disturb, Conference Call can be selected
so you can still place a second call without being inter-
rupted by incoming calls.
NOTE:
•Reply with text message is not compatible with iP-
hones.
• Auto reply with text message is only available on
phones that supporting Bluetooth MAP.
General Information
This device complies with FCC rules Part 15 and Industry
Canada RSS-210. Operation is subject to the following
two conditions:
1. This device may not cause harmful interference.
2. This device must accept any interference that may be received including interference that may cause unde-
sired operation. NOTE:
•
The transmitter has been tested and it complies with
FCC and IC rules. Changes or modifications not ex-
pressly approved by the party responsible for compli-
ance could void the user ’s authority to operate the
device.
• The term IC before the certification/registration num-
ber only signifies that Industry Canada technical speci-
fications were met.
Additional Information
© 2015 FCA US LLC. All rights reserved. Mopar and
Uconnect are registered trademarks and Mopar Owner
Connect is a trademark of FCA US LLC. Android is a
trademark of Google Inc. SiriusXM and all related marks
and logos are trademarks of SiriusXM Radio Inc. Yelp,
Yelp logo, Yelp burst and related marks are registered
trademarks of Yelp.
390 UNDERSTANDING YOUR INSTRUMENT PANEL
Page 407 of 669
Only shift from DRIVE to PARK or REVERSE when the
accelerator pedal is released and the vehicle is stopped.
Be sure to keep your foot on the brake pedal when
shifting between these gears.
The transmission shift lever has only PARK, REVERSE,
NEUTRAL, and DRIVE shift positions. Manual down-
shifts can be made using the Electronic Range Select
(ERS) shift control (refer to “Electronic Range Select [ERS]
Operation” in this section for further information). Push-
ing the ERS (-/+) switches (on the shift lever) while in the
DRIVE position will select the highest available transmis-
sion gear, and will display that gear limit in the instru-
ment cluster as 1, 2, 3, etc. Models with the Driver
Information Display (DID) will display both the selected
gear limit, and the actual current gear, while in ERS
mode.Gear Ranges
DO NOT race the engine when shifting from PARK or
NEUTRAL into another gear range.
NOTE:After selecting any gear range, wait a moment to
allow the selected gear to engage before accelerating.
This is especially important when the engine is cold.
PARK (P)
This range supplements the parking brake by locking the
transmission. The engine can be started in this range.
Never attempt to use PARK while the vehicle is in
motion. Apply the parking brake when leaving the
vehicle in this range.
When parking on a level surface, you may shift the
transmission into PARK first, and then apply the parking
brake.
5
STARTING AND OPERATING 405