2016 Peugeot 508 RXH boot cover
[x] Cancel search: boot coverPage 8 of 364

6
508_en_Chap00b_vue-ensemble_ed01-2016
Interior
Boot fittings (Saloon) 112
- r ings, hooks, straps
-
s
torage box
-
bo
xes, storage
-
b
oot lamp
-
floor
Boot fittings (SW and non-hybrid R XH)
1
13
-
r
ings hooks
-
b
oot lamp
-
floor
-
1
2 V accessory socket
-
storage
Luggage cover (SW and non-hybrid R XH)
1
14
High load net (SW and non-hybrid R XH)
1
15 -116
Warning triangle
2
27
AdBlue
® additive tank 2 23 -226
Rear fittings
1
11
-
r
ear armrest
-
sk
i flap Front seats
7
5 -78
-
manual
-
electric
-
w
elcome function
-
h
ead restraints
-
heated
- massage
Conventional child seats
1
43 -151, 157
el
ectric child lock
1
58Mats
10 0
Airbags
1
39-152
Interior fittings
9
9-101
-
s
un visor
-
i
lluminated glove box
-
1
2 V accessory socket
Centre console
10
7-108
-
f
ront armrest
-
1
2 V socket
- u
S
B Player - Plug
Deactivating the passenger's front air bag
14
0, 146
Seat belts
1
36-138
Rear seats
1
09-110
ISOFIX child seats
1
52-156, 157
Over view
Page 87 of 364

85
508_en_Chap03_ergonomie-et-confort_ed01-2016
Recommendations for ventilation and air conditioning
the air conditioning system does not contain chlorine and does not present any danger to the ozone layer. In order for these systems to be fully effective, follow the operation and maintenance guidelines below:
F
I
f the interior temperature remains very high after the vehicle has been parked in the sun for a considerable time, first ventilate the
passenger compartment for a few minutes.
P
lace the air flow control at a sufficient level to provide an adequate renewal of air in the passenger compartment.
F t
o o
btain an even air distribution, take care not to obstruct the exterior air intake grilles located at the base of the windscreen, the nozzles,
the vents and the air outlets, as well as the air extractor located in the boot.
F
I
n normal conditions, use the intake of exterior air as prolonged use of the air recirculation may cause misting of the windows and side
windows.
F
D
o not cover the sunshine sensor, located on the dashboard; this is used for regulation of the automatic air conditioning system.
F
O
perate the air conditioning system for 5 to 10 minutes, once or twice a month to keep it in good working order.
F e
n
sure that the passenger compartment filter is in good condition and have the filter elements replaced regularly (refer to the "Checks"
section).
W
e recommend the use of a combined passenger compartment filter. t
h
anks to its second special active filter, it contributes to the
purification of the air breathed by the occupants and the cleanliness of the passenger compartment (reduction of allergic symptoms, bad
odours and greasy deposits).
F t
h
e air conditioning uses power from the engine while operating. t
h
is results in an increase in the vehicle's fuel consumption.
W
hen towing at or near maximum capacity or on steep slopes in high ambient temperatures, switching off the air conditioning saves engine
power and so improves towing capacity.
C
ondensation created by the air conditioning results in a discharge of water under the vehicle when stationary, which is per fectly normal.
F t
o e
nsure correct operation of the air conditioning system, you are also advised to have it checked regularly.
F
I
f the system does not produce cold air, do not use it and contact a P
e
uge
Ot
dealer or a qualified workshop.
3
ease of use and comfort
Page 113 of 364

111
508_en_Chap03_ergonomie-et-confort_ed01-2016
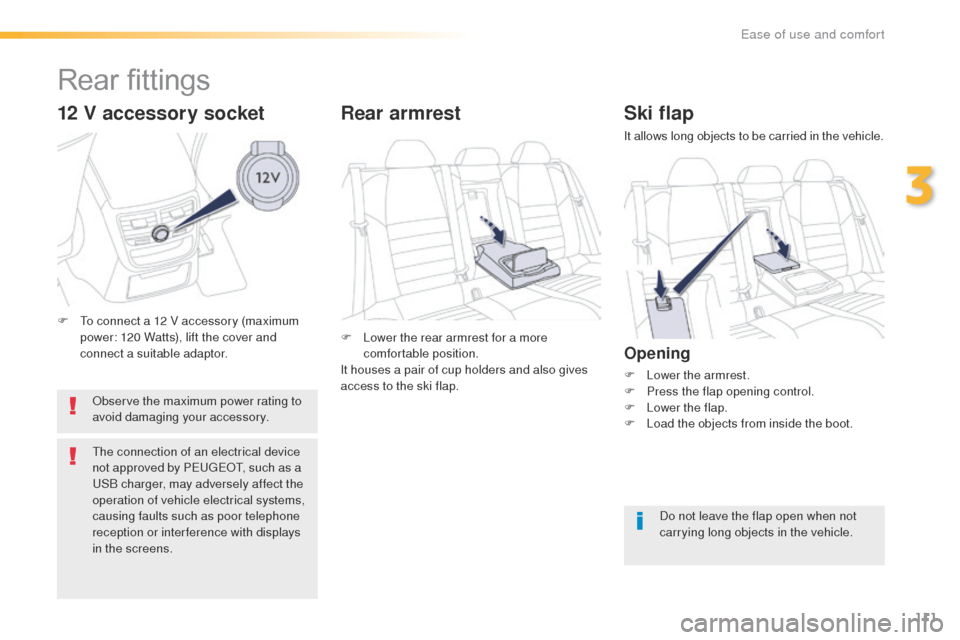
Ski flap
It allows long objects to be carried in the vehicle.
Opening
F Lower the armrest.
F P ress the flap opening control.
F
L
ower the flap.
F
L
oad the objects from inside the boot.
Do not leave the flap open when not
carrying long objects in the vehicle.
F
L
ower the rear armrest for a more
comfortable position.
It houses a pair of cup holders and also gives
access to the ski flap.
Rear armrest
12 V accessory socket
Observe the maximum power rating to
avoid damaging your accessory.
th
e connection of an electrical device
not approved by P
e
uge
Ot, s
uch as a
uS
B charger, may adversely affect the
operation of vehicle electrical systems,
causing faults such as poor telephone
reception or inter ference with displays
in the screens.
Rear fittings
F to connect a 12 V accessory (maximum power: 120 Watts), lift the cover and
connect a suitable adaptor.
3
ease of use and comfort
Page 115 of 364

113
508_en_Chap03_ergonomie-et-confort_ed01-2016
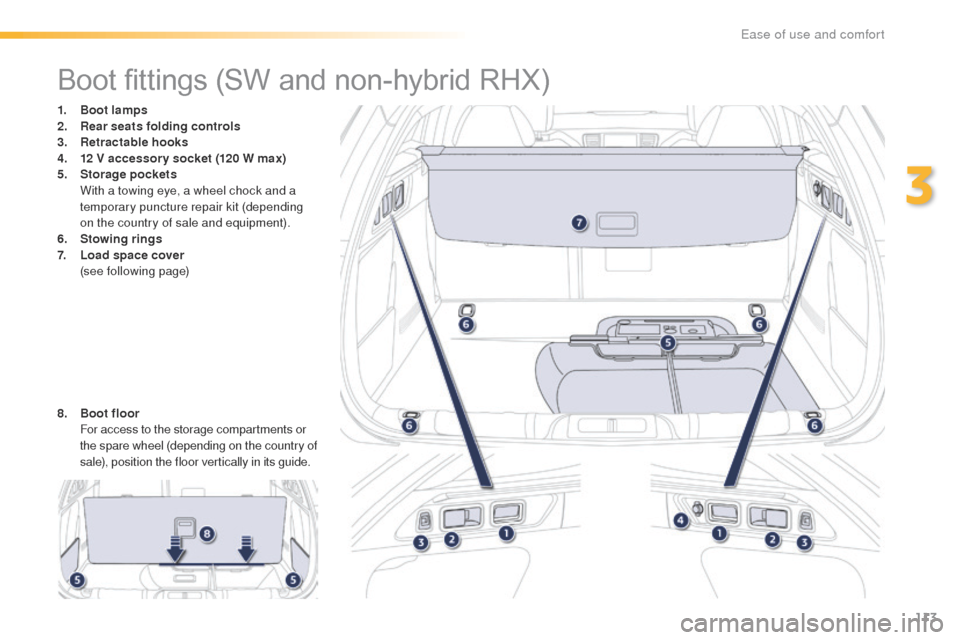
Boot fittings (SW and non-hybrid RHX)
1. Boot lamps
2. Rear seats folding controls
3.
R
etractable hooks
4.
1
2 V accessor y socket (120 W max)
5.
Sto
rage pockets
W
ith a towing eye, a wheel chock and a
temporary puncture repair kit (depending
on the country of sale and equipment).
6.
S
towing rings
7.
L
oad space cover
(
see following page)
8.
B
oot floor
F
or access to the storage compartments or
the spare wheel (depending on the country of
sale), position the floor vertically in its guide.
3
ease of use and comfort
Page 212 of 364

210
508_en_Chap07_info-pratiques_ed01-2016
Maintenance
Correct operation is only possible if the towball
and its carrier remain clean.
Before cleaning the vehicle with a high
pressure jet wash, the towbar harness socket
carrier must be folded away, the towball
removed and the protective blanking plug
inserted in the carrier.
For any work on the towbar, go to a P
e
uge
Ot
dealer or a qualified workshop.
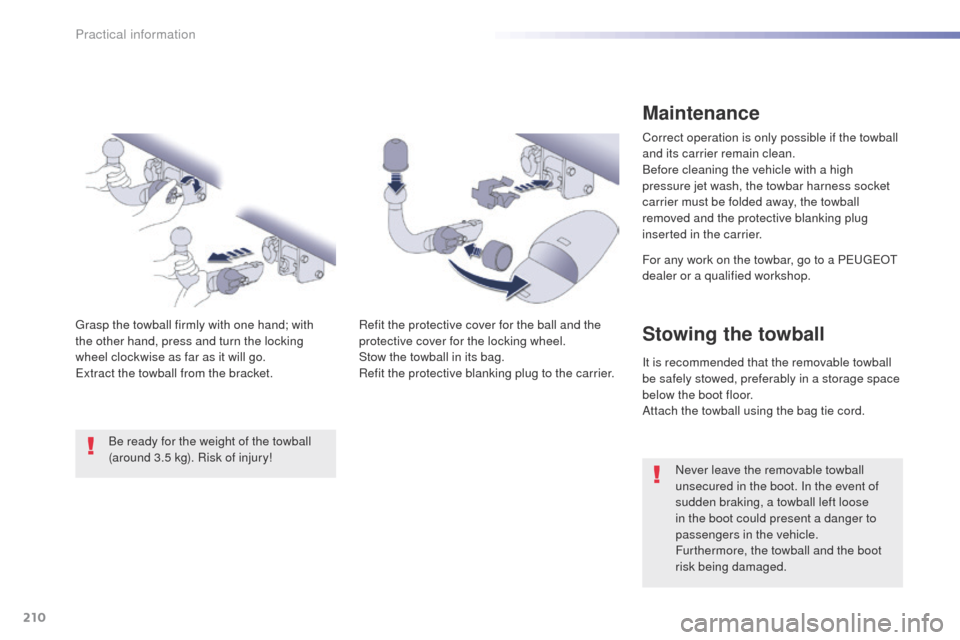
Refit the protective cover for the ball and the
protective cover for the locking wheel.
Stow the towball in its bag.
Refit the protective blanking plug to the carrier.
gr
asp the towball firmly with one hand; with
the other hand, press and turn the locking
wheel
clockwise as far as it will go.
ex
tract the towball from the bracket. Be ready for the weight of the towball
(around 3.5 kg). Risk of injury!
Stowing the towball
It is recommended that the removable towball
be safely stowed, preferably in a storage space
below the boot floor.
Attach the towball using the bag tie cord. Never leave the removable towball
unsecured in the boot. In the event of
sudden braking, a towball left loose
in the boot could present a danger to
passengers in the vehicle.
Furthermore, the towball and the boot
risk being damaged.
Practical information
Page 229 of 364

227
508_en_Chap08_en-cas-de-pannes_ed01-2016
Warning triangle
Before leaving your vehicle to set up
and install the triangle, switch on the
hazard warning lamps and put on your
high visibility vest.
th
e dimensions of the triangle (once folded) or
its storage box must be:
-
A : l
ength = 438 mm,
-
B : h
eight = 56 mm,
-
C : w
idth = 38 mm.
Saloon
F Press the lug 1 and pull the assembly
towards you.
SW and non-hybrid RXH
F turn the knob 2 to remove the cover.
F H old the cover and the triangle so that they
do not fall. F
P
lace the triangle behind the vehicle, as
required by the legislation in force in your
c o unt r y.
th
e triangle is available as an
accessory; contact a P
e
uge
Ot
dealer
or a qualified workshop.
Placing the triangle in
the roadthis safety device should be used in addition to
the hazard warning lamps.
Its presence in the vehicle is mandatory.
th
e location for stowing a folded
triangle is in the inner trim panel of the
boot lid or tailgate.
Refer to the manufacturer's instructions
on unfolding and installing supplied with
the triangle.
8
In the event of a breakdown
Page 237 of 364

235
508_en_Chap08_en-cas-de-pannes_ed01-2016
Spare wheel
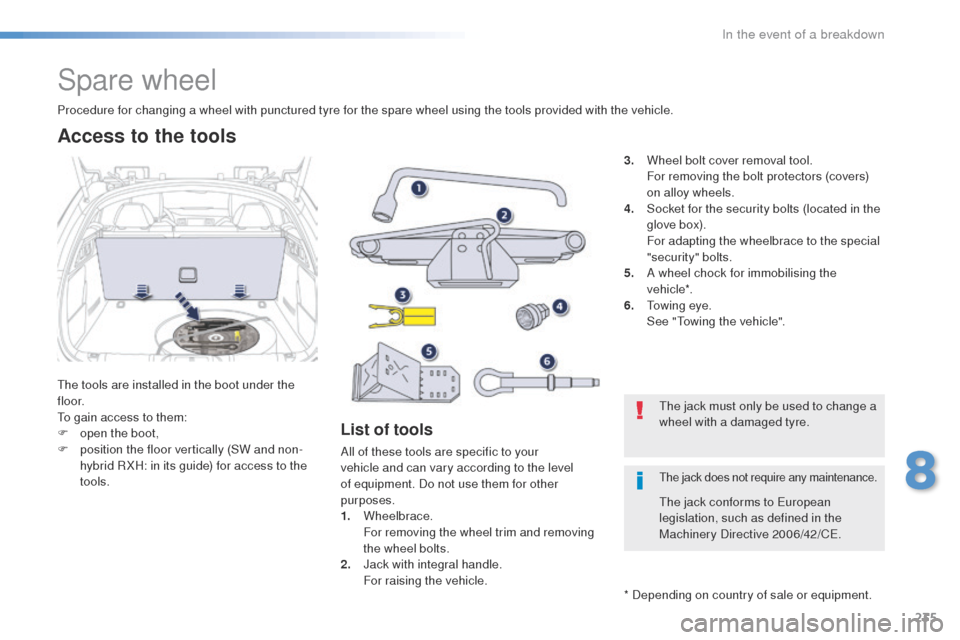
the tools are installed in the boot under the
f l o o r.
to g
ain access to them:
F
o
pen the boot,
F
p
osition the floor vertically (SW and non-
hybrid R XH: in its guide) for access to the
tools.
Procedure for changing a wheel with punctured tyre for the spare wheel using the tools provided with the vehicle.
List of tools
All of these tools are specific to your
vehicle and can vary according to the level
of equipment. Do not use them for other
purposes.
1.
Wheelbrace.
F
or removing the wheel trim and removing
the wheel bolts.
2.
J
ack with integral handle.
F
or raising the vehicle. 3.
W
heel bolt cover removal tool.
F
or removing the bolt protectors (covers)
on alloy wheels.
4.
S
ocket for the security bolts (located in the
glove box).
F
or adapting the wheelbrace to the special
"security" bolts.
5.
A w
heel chock for immobilising the
vehicle*.
6.
t
o
wing eye.
S
ee "
to
wing the vehicle".
Access to the tools
* Depending on country of sale or equipment.
th
e jack must only be used to change a
wheel with a damaged tyre.
th
e jack conforms to e
u
ropean
legislation, such as defined in the
Machinery Directive 2006/42/C
e.
the jack does not require any maintenance.
8
In the event of a breakdown
Page 247 of 364

245
508_en_Chap08_en-cas-de-pannes_ed01-2016
1. Brake lamps
( light emitting diodes - LEDs).
2.
Si
delamps
(
light emitting diodes - LEDs).
3.
D
irection indicators
(
PY21W amber).
4.
Fo
glamps
(
light-emitting diodes) /
R
eversing lamps (W16W).
Rear lamps (Saloon)
Direction indicators and reversing lamp
Direction indicators Reversing lamp
Light emitting diodes-LEDs
For replacement, contact a PeugeOt
dealer or qualified workshop. F
O
pen the boot, then the plastic cover.
F
R
emove the two lamp unit fixing nuts.
F e
x
tract the lamp unit carefully from the
outside.
F
D
isconnect the electrical connector.
F
S
pread the tabs and remove the bulb
h o l d e r.
F t
u
rn the bulb a quarter of a turn and pull it
out.
For reassembly, carry out these operations in
reverse order. -
R
emove the direction indicator bulb holder,
as described above.
- t
u
rn the bulb a quarter of a turn and
change it.to r eassemble, carry out these operations in
reverse order.
8
In the event of a breakdown