2016 Peugeot 508 RXH ECO mode
[x] Cancel search: ECO modePage 93 of 364
91
508_en_Chap03_ergonomie-et-confort_ed01-2016
Quad-zone digital air conditioning
Automatic operation
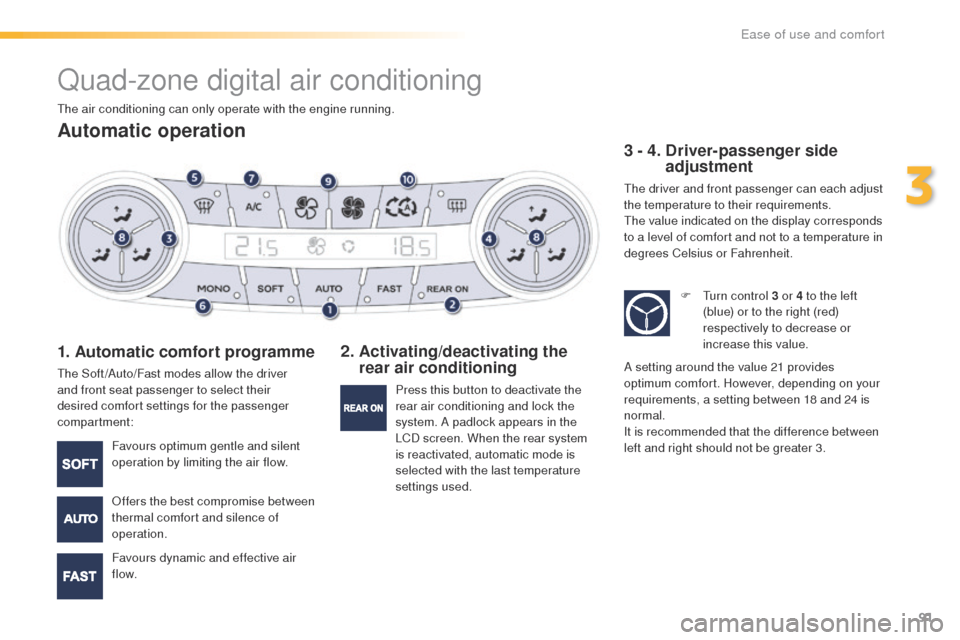
1. Automatic comfort programme
the Soft /Auto/Fast modes allow the driver
and front seat passenger to select their
desired comfort settings for the passenger
compartment:
2. Activating/deactivating the rear air conditioning 3 - 4.
D
river-passenger side
adjustment
the driver and front passenger can each adjust
the temperature to their requirements.
th
e value indicated on the display corresponds
to a level of comfort and not to a temperature in
degrees Celsius or Fahrenheit.
Favours optimum gentle and silent
operation by limiting the air flow.
Offers the best compromise between
thermal comfort and silence of
operation.
Favours dynamic and effective air
f low. Press this button to deactivate the
rear air conditioning and lock the
system. A padlock appears in the
LCD screen. When the rear system
is reactivated, automatic mode is
selected with the last temperature
settings used. F
t
u
rn control 3 or 4 to the left
(blue) or to the right (red)
respectively to decrease or
increase this value.
A setting around the value 21 provides
optimum comfort. However, depending on your
requirements, a setting between 18 and 24 is
normal.
It is recommended that the difference between
left and right should not be greater 3.
th
e air conditioning can only operate with the engine running.
3
ease of use and comfort
Page 96 of 364
94
508_en_Chap03_ergonomie-et-confort_ed01-2016
Adjusting the rear passenger comfort level
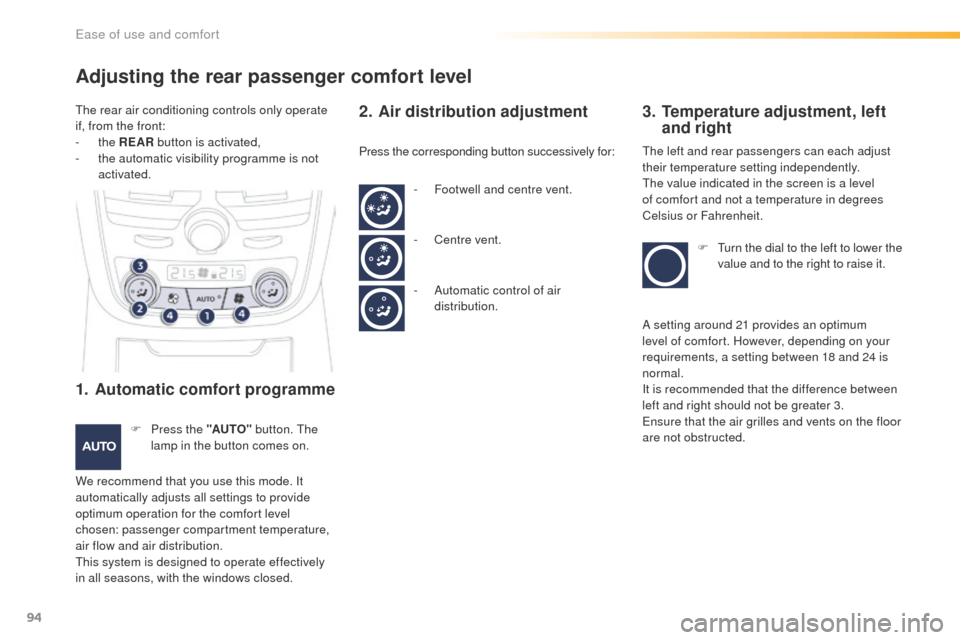
1. Automatic comfort programme
F Press the "AUTO" button. th e
lamp in the button comes on.
We recommend that you use this mode. It
automatically adjusts all settings to provide
optimum operation for the comfort level
chosen: passenger compartment temperature,
air flow and air distribution.
th
is system is designed to operate effectively
in all seasons, with the windows closed.
2. Air distribution adjustment 3. T emperature adjustment, left
and right
Press the corresponding button successively for:th e left and rear passengers can each adjust
their temperature setting independently.
th
e value indicated in the screen is a level
of comfort and not a temperature in degrees
Celsius or Fahrenheit.
F
t
u
rn the dial to the left to lower the
value and to the right to raise it.
-
F
ootwell and centre vent.
-
C
entre vent.
-
A
utomatic control of air
distribution.
th
e rear air conditioning controls only operate
if, from the front:
-
the
REAR button is activated,
-
t
he automatic visibility programme is not
activated.
A setting around 21 provides an optimum
level of comfort. However, depending on your
requirements, a setting between 18 and 24 is
normal.
It is recommended that the difference between
left and right should not be greater 3.
en
sure that the air grilles and vents on the floor
are not obstructed.
ease of use and comfort
Page 99 of 364
97
508_en_Chap03_ergonomie-et-confort_ed01-2016
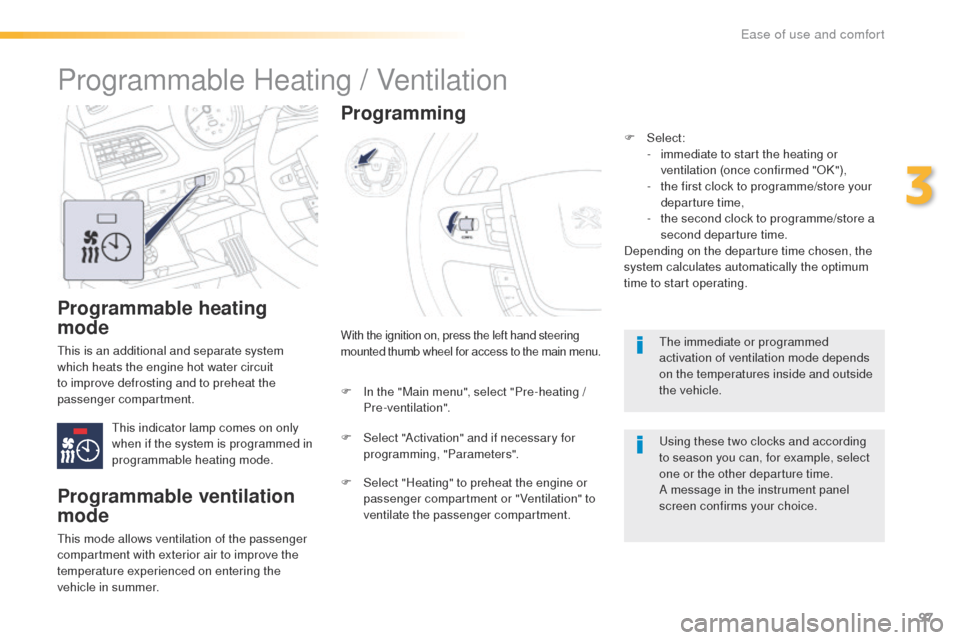
Programmable heating
mode
this is an additional and separate system
which heats the engine hot water circuit
to improve defrosting and to preheat the
passenger compartment.
th
is indicator lamp comes on only
when if the system is programmed in
programmable heating mode.With the ignition on, press the left hand steering
mounted thumb wheel for access to the main menu.
Programming
F In the "Main menu", select "Pre-heating /
Pre-ventilation".
F
S
elect "Activation" and if necessary for
programming, "Parameters".
F
S
elect "Heating" to preheat the engine or
passenger compartment or "Ventilation" to
ventilate the passenger compartment.
Programmable Heating / Ventilation
Programmable ventilation
mode
this mode allows ventilation of the passenger
compartment with exterior air to improve the
temperature experienced on entering the
vehicle in summer. F
Select:
-
i
mmediate to start the heating or
ventilation (once confirmed "OK"),
-
t
he first clock to programme/store your
departure time,
-
t
he second clock to programme/store a
second departure time.
Depending on the departure time chosen, the
system calculates automatically the optimum
time to start operating.
th
e immediate or programmed
activation of ventilation mode depends
on the temperatures inside and outside
the vehicle.
us
ing these two clocks and according
to season you can, for example, select
one or the other departure time.
A message in the instrument panel
screen confirms your choice.
3
ease of use and comfort
Page 104 of 364
102
508_en_Chap03_ergonomie-et-confort_ed01-2016
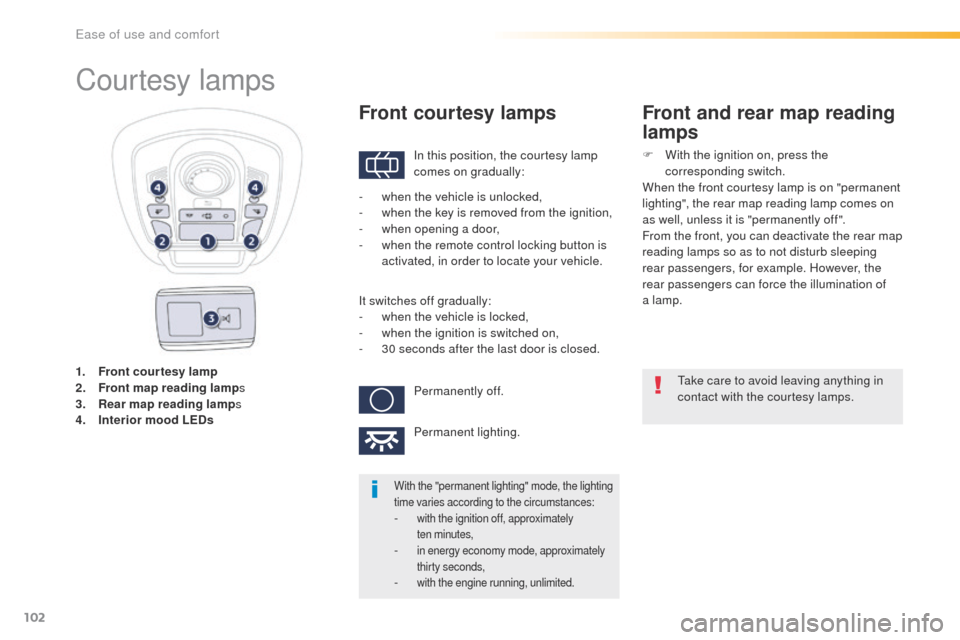
1. Front courtesy lamp
2. Front map reading lamp s
3.
R
ear map reading lamp s
4.
I
nterior mood LEDs
Courtesy lamps
In this position, the courtesy lamp
comes on gradually:
Front courtesy lamps
take care to avoid leaving anything in
contact with the courtesy lamps.
With the "permanent lighting" mode, the lighting
time varies according to the circumstances:
- with the ignition off, approximately ten minutes,
- in energy economy mode, approximately thirty seconds,
- with the engine running, unlimited.
- when the vehicle is unlocked,
- w hen the key is removed from the ignition,
-
w
hen opening a door,
-
w
hen the remote control locking button is
activated, in order to locate your vehicle.
It switches off gradually:
-
w
hen the vehicle is locked,
-
w
hen the ignition is switched on,
-
3
0 seconds after the last door is closed.Permanently off.
Permanent lighting.
Front and rear map reading
lamps
F With the ignition on, press the corresponding switch.
When the front courtesy lamp is on "permanent
lighting", the rear map reading lamp comes on
as well, unless it is "permanently off ".
From the front, you can deactivate the rear map
reading lamps so as to not disturb sleeping
rear passengers, for example. However, the
rear passengers can force the illumination of
a lamp.
ease of use and comfort
Page 121 of 364

119
508_en_Chap04_eclairage-et-visibilite_ed01-2016
Foglamp selection ring
the foglamps operate with dipped and main
beam headlamps.
Front and
rear foglamps
When the headlamps switch off with automatic
illumination of headlamps (AutO m odel) or when
the dipped beam headlamps are switched off
manually, the foglamps and sidelamps remain on.
F turn the ring rear wards to switch off the foglamps, the sidelamps will then switch off.
In good or rainy weather, both day
and night, the front foglamps and the
rear foglamps are prohibited. In these
situations, the power of their beams
may dazzle other drivers.
t
he
y should
only be used in fog or snow.
In these weather conditions, it is your
responsibility to switch on the foglamps
and dipped headlamps manually as the
sunshine sensor may detect sufficient
light.
Do not forget to switch off the front
foglamps and the rear foglamps when
they are no longer needed.
Rotate and release the ring:
F f or wards a first time to switch on the front
foglamps,
F
f
or wards a second time to switch on the rear
foglamps,
F
r
ear wards a first time to switch off the rear
foglamps,
F
r
ear wards a second time to switch of the
front fog lamps.
Lighting left on audible
signal
An audible signal when a front door
is opened warns the driver that the
vehicle's exterior lighting is on, with the
ignition off and in manual lighting mode.
In this case, switching off the lighting
stops the audible signal.
With the ignition off, if the dipped
headlamps remain on, the vehicle goes
into "
eC
O" mode to avoid discharging
the battery.
th
e lighting goes off when you switch
off the ignition, but you can always
switch it on again using the lighting
control stalk.
4
Lighting and visibility
Page 136 of 364

134
508_en_Chap05_securite_ed01-2016
Snow driving assistance
(Intelligent Traction Control)
Your vehicle has a system to help driving on
snow: Intelligent Traction Control.
th
is automatic system continuously checks
for situations of difficult sur face adhesion that
could make it difficult to move off or make
progress on deep fresh snow or compacted
snow.
In these situations, Intelligent Traction
Control limits the amount of wheel slip to
provide the best traction and trajectory control.
In extremely severe conditions (deep snow,
mud…), it can be useful to temporarily
deactivate the wheel anti-slip regulation
system to allow a degree of wheel spin and so
recover grip.
It is recommended that the system be
reactivated as soon as possible.
Snow tyres are strongly recommended on
sur faces offering low levels of adhesion.
Anti-lock braking system
(ABS) and electronic brake
force distribution (EBFD)
Operation
In emergency braking, press
very firmly without releasing the
pressure. When changing wheels (tyres and rims),
make sure that these are approved for
your vehicle.
Normal operation of the ABS may make
itself felt by slight vibrations of the brake
pedal.
th
e fixed illumination of this warning
lamp indicates that there is a fault
with the ABS.
When this warning lamp comes on,
coupled with the STOP and ABS warning
lamps, accompanied by an audible signal
and a message, it indicates that there
is a fault with the electronic brake force
distribution (
eB
FD).
the vehicle retains conventional braking. Drive
carefully at moderate speed.
You must stop as soon as it is safe to do so.
In both cases, have the system checked by a
P
e
uge
Ot
dealer or a qualified workshop as
soon as possible.
Safety
Page 167 of 364
165
508_en_Chap06_conduite_ed01-2016
For Diesel vehicles, in very cold
weather the engine will not start
until the pre-heater warning
lamp has gone off.
If this warning lap comes on
after pressing the "S TA R T/
STOP " button, you should
maintain pressure on the brake
or clutch pedal until the warning
lamp goes off and not press the
" START/STOP " button, until the
engine starts. If the vehicle is not immobilised, the
engine will not stop.
Switching off
F Immobilise the vehicle.
F
W
ith the electronic key inside
the vehicle, press the " S TA R T/
STOP " button.
th
e engine stops and the steering column is
locked.
Ignition on (accessory) position
With the electronic key inside the vehicle,
press the "StA Rt/ StO P" button, with no
action on the pedals, to switch the ignition
on or off and so allow the use of the ancillary
equipment.
If one of the starting conditions is not
met, a reminder message appears in
the instrument panel screen. In some
circumstances, it is necessary to turn
the steering wheel slightly while pressing
the "S
tA
R
t/
S
tO
P" button to assist
unlocking of the steering; a message
warns you when this is needed.
F
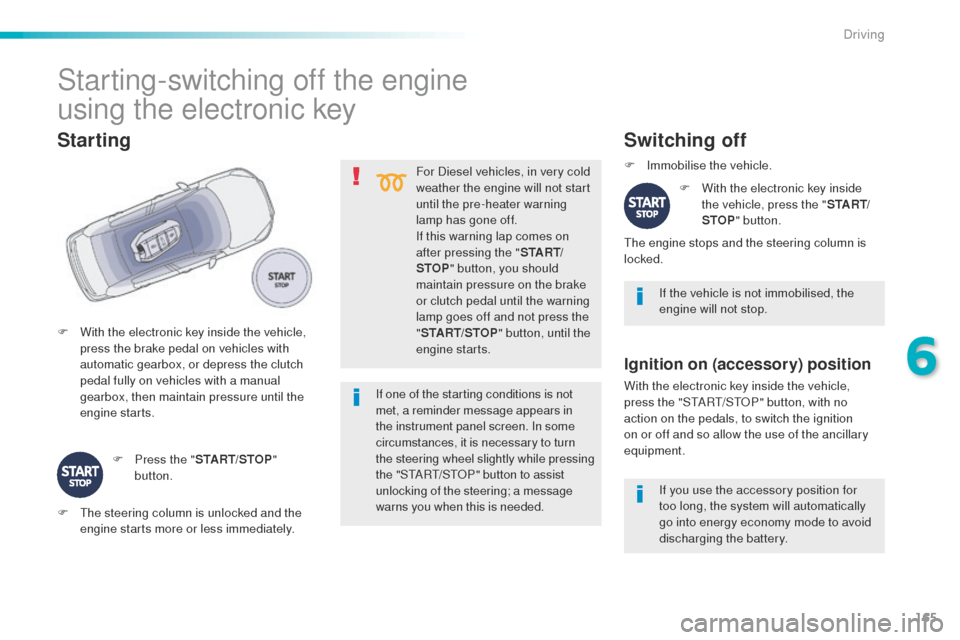
W
ith the electronic key inside the vehicle,
press the brake pedal on vehicles with
automatic gearbox, or depress the clutch
pedal fully on vehicles with a manual
gearbox, then maintain pressure until the
engine starts.
Starting
F Press the " START/STOP"
button.
Starting-switching off the engine
using the electronic key
F the steering column is unlocked and the engine starts more or less immediately. If you use the accessory position for
too long, the system will automatically
go into energy economy mode to avoid
discharging the battery.
6
Driving
Page 170 of 364
168
508_en_Chap06_conduite_ed01-2016
It is recommended that you do not
apply the parking brake in very cold
conditions (ice) and during towing
(breakdown, caravan...). Deactivate the
automatic functions and release the
parking brake manually.Before leaving the vehicle, check that
parking brake warning lamps in the
instrument panel and the control lever A
are on, not flashing.
th
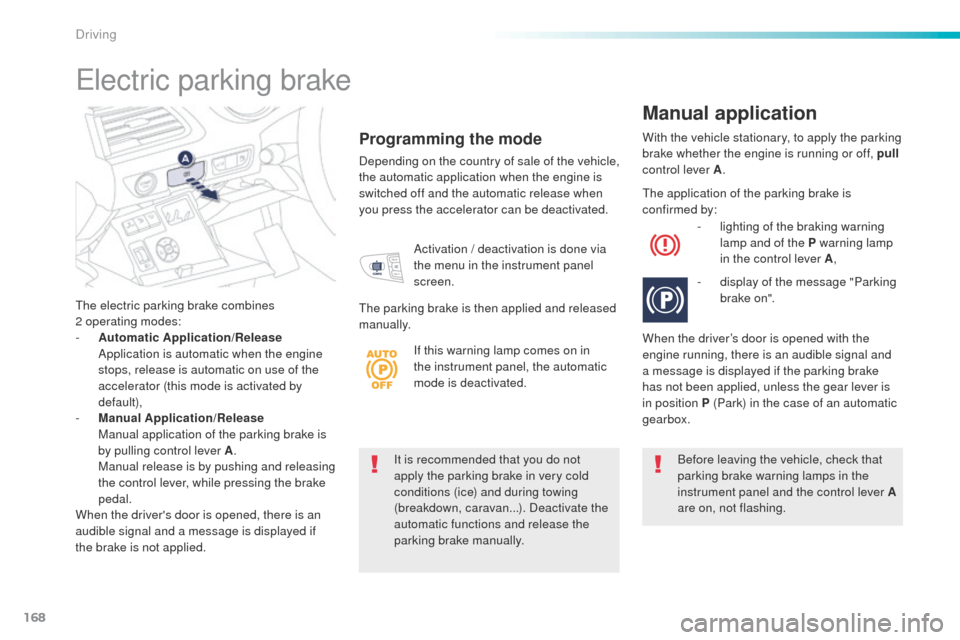
e electric parking brake combines
2
operating modes:
-
A
utomatic Application/Release
A
pplication is automatic when the engine
stops, release is automatic on use of the
accelerator (this mode is activated by
default),
-
M
anual Application/Release
M
anual application of the parking brake is
by pulling control lever A . M
anual release is by pushing and releasing
the control lever, while pressing the brake
pedal.
When the driver's door is opened, there is an
audible signal and a message is displayed if
the brake is not applied.
Programming the mode
Depending on the country of sale of the vehicle,
the automatic application when the engine is
switched off and the automatic release when
you press the accelerator can be deactivated. With the vehicle stationary, to apply the parking
brake whether the engine is running or off, pull
control lever A .
Manual application
Activation / deactivation is done via
t he menu in the instrument panel
screen.
th
e parking brake is then applied and released
manually.
th
e application of the parking brake is
confirmed by:
-
l
ighting of the braking warning
lamp and of the P warning lamp
in the control lever A ,
-
d
isplay of the message "Parking
brake on".
When the driver’s door is opened with the
engine running, there is an audible signal and
a message is displayed if the parking brake
has not been applied, unless the gear lever is
in position P (Park) in the case of an automatic
gearbox.
electric parking brake
If this warning lamp comes on in
the instrument panel, the automatic
mode is deactivated.
Driving