2016 Peugeot 508 oil pressure
[x] Cancel search: oil pressurePage 14 of 364
12
Limit the causes of excess consumption
Spread loads throughout the vehicle; place the heaviest items in the
bottom of the boot, as close as possible to the rear seats.
Limit the loads carried in the vehicle and reduce wind resistance (roof
bars, roof rack, bicycle carrier, trailer...). u
s
e a roof box in preference.
Remove roof bars and roof racks after use.
At the end of winter, remove snow tyres and refit your summer tyres.
Observe the recommendations on
maintenance
Check the tyre pressures regularly, when cold, referring to the label in
the door aperture, driver's side.
Carry out this check in particular:
-
b
efore a long journey,
-
a
t each change of season,
-
a
fter a long period out of use.
Don't forget the spare wheel and the tyres on any trailer or caravan.
Have your vehicle serviced regularly (engine oil, oil filter, air filter,
passenger compartment filter...) and observe the schedule of
operations recommended in the manufacturer's service schedule.
With a BlueHDi Diesel engine, if the SCR system is faulty your vehicle
becomes polluting; go to a P
e
uge
Ot
dealer or a qualified workshop
without delay to have the emissions of nitrous oxides brought back to
the legal level.
When refuelling, do not continue after the third cut-off of the nozzle to
avoid any over flow.
At the wheel of your new vehicle, it is only after the first 1 800 miles
(3
000 kilometres) that you will see the fuel consumption settle down to
a consistent average.
Eco-driving
Page 21 of 364
19
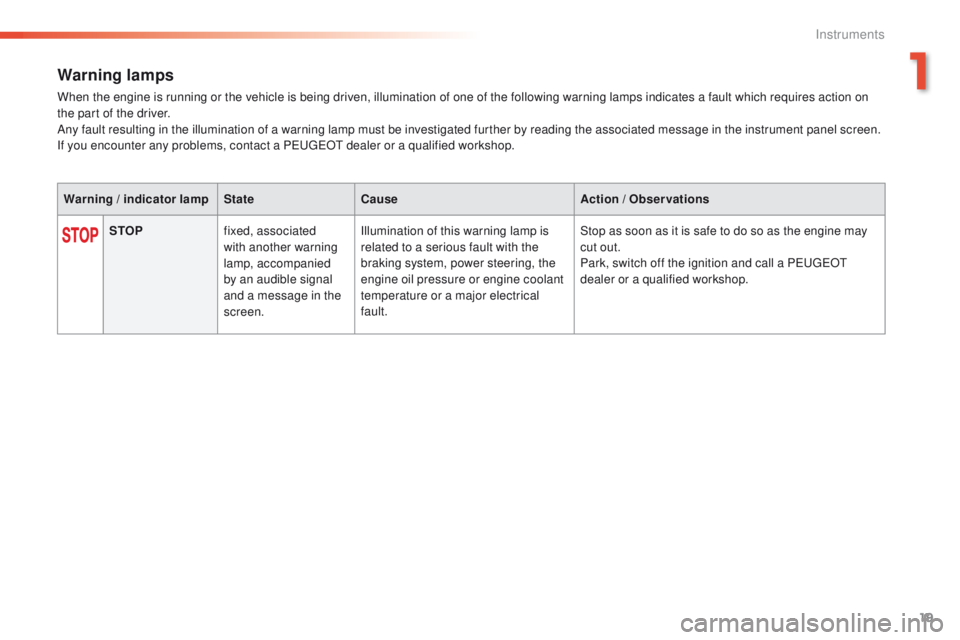
Warning lamps
When the engine is running or the vehicle is being driven, illumination of one of the following warning lamps indicates a fault which requires action on
the part of the driver.
Any fault resulting in the illumination of a warning lamp must be investigated further by reading the associated message in the instrument panel screen.
If you encounter any problems, contact a P
e
uge
Ot
dealer or a qualified workshop.
Warning / indicator lamp StateCause Action / Observations
STOP fixed, associated
with another warning
lamp, accompanied
by an audible signal
and a message in the
screen. Illumination of this warning lamp is
related to a serious fault with the
braking system, power steering, the
engine oil pressure or engine coolant
temperature or a major electrical
fault. Stop as soon as it is safe to do so as the engine may
cut out.
Park, switch off the ignition and call a P
e
uge
Ot
dealer or a qualified workshop.
1
Instruments
Page 22 of 364
20
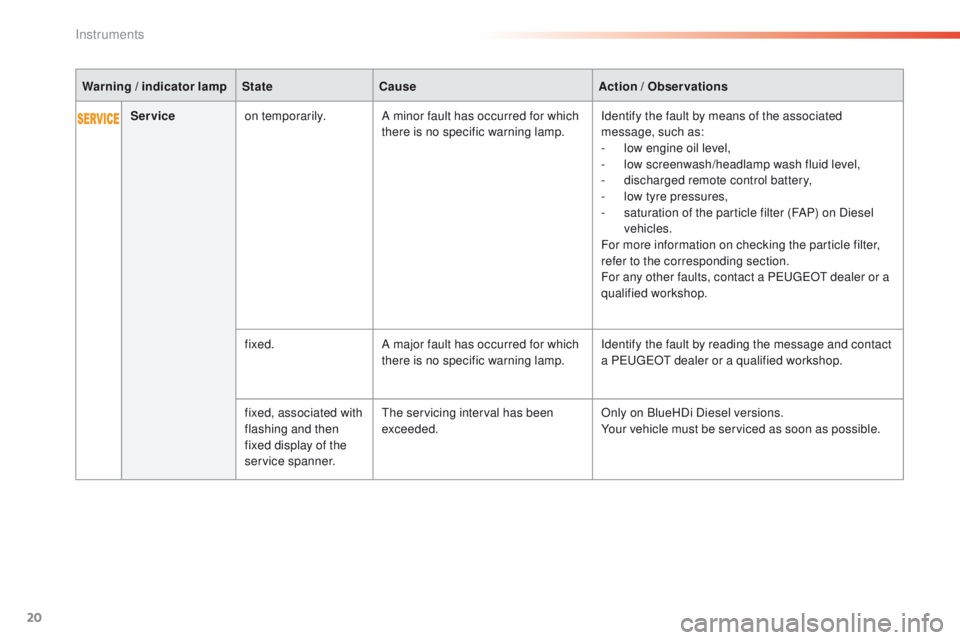
Serviceon temporarily. A minor fault has occurred for which
there is no specific warning lamp. Identify the fault by means of the associated
message, such as:
-
l
ow engine oil level,
-
l
ow screenwash/headlamp wash fluid level,
-
d
ischarged remote control battery,
-
l
ow tyre pressures,
-
s
aturation of the particle filter (FAP) on Diesel
vehicles.
For more information on checking the particle filter,
refer to the corresponding section.
For any other faults, contact a P
e
uge
Ot
dealer or a
qualified workshop.
fixed. A major fault has occurred for which
there is no specific warning lamp. Identify the fault by reading the message and contact
a P
e
uge
Ot
dealer or a qualified workshop.
fixed, associated with
flashing and then
fixed display of the
service spanner.
the
servicing interval has been
exceeded. Only on BlueHDi Diesel versions.
Your vehicle must be serviced as soon as possible.
Warning / indicator lamp
StateCause Action / Observations
Instruments
Page 28 of 364
26
Warning or indicator lamp
in the instrument panelState
Cause Action / Observations
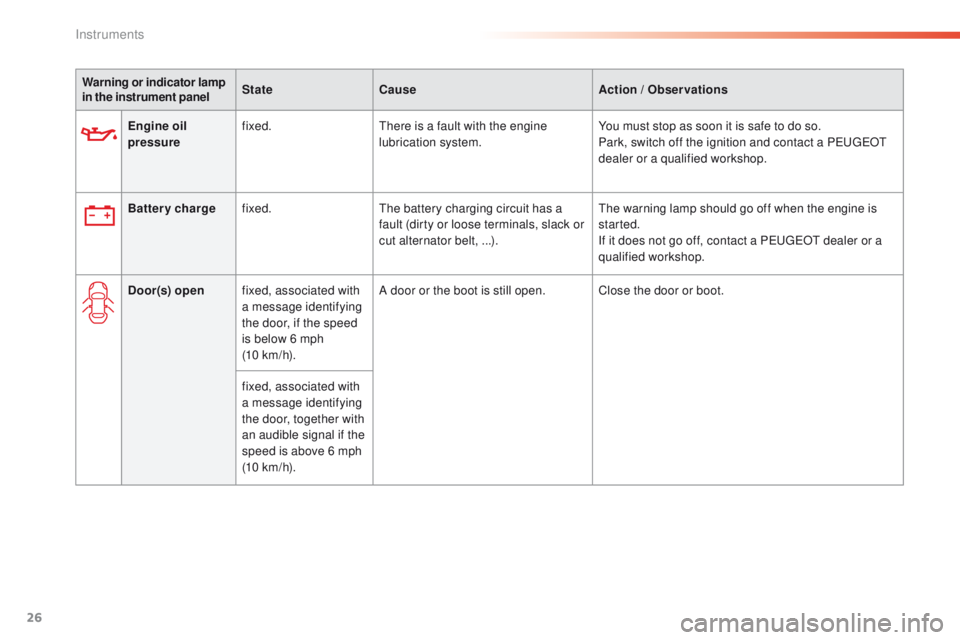
Engine oil
pressure fixed.
th
ere is a fault with the engine
lubrication system. You must stop as soon it is safe to do so.
Park, switch off the ignition and contact a P
e
uge
Ot
dealer or a qualified workshop.
Battery charge fixed.
th
e battery charging circuit has a
fault (dirty or loose terminals, slack or
cut alternator belt, ...).
th
e warning lamp should go off when the engine is
started.
If it does not go off, contact a P
e
uge
Ot
dealer or a
qualified workshop.
Door(s) open fixed, associated with
a message identifying
the door, if the speed
is below 6 mph
(10
km/h).A door or the boot is still open. Close the door or boot.
fixed, associated with
a message identifying
the door, together with
an audible signal if the
speed is above 6 mph
(10 km/h).
Instruments
Page 32 of 364
30
Coolant temperature
gauge
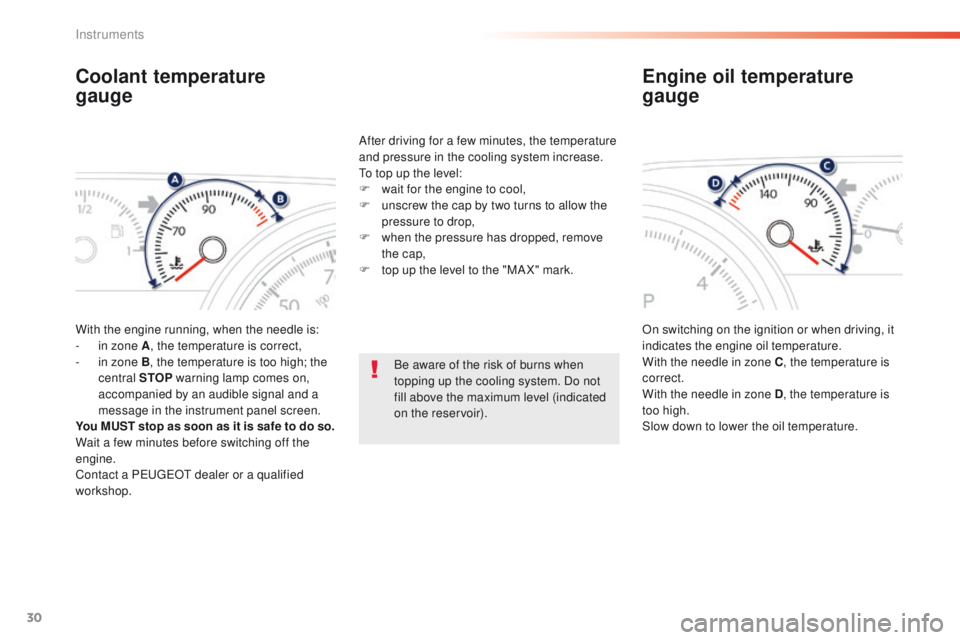
With the engine running, when the needle is:
- i n zone A , the temperature is correct,
-
i
n zone B, the temperature is too high; the
central STOP warning lamp comes on,
accompanied by an audible signal and a
message in the instrument panel screen.
You MUST stop as soon as it is safe to do so.
Wait a few minutes before switching off the
engine.
Contact a P
e
uge
Ot
dealer or a qualified
workshop. After driving for a few minutes, the temperature
and pressure in the cooling system increase.
to t
op up the level:
F
w
ait for the engine to cool,
F
u
nscrew the cap by two turns to allow the
pressure to drop,
F
w
hen the pressure has dropped, remove
the cap,
F
t
op up the level to the "MA X" mark.
On switching on the ignition or when driving, it
indicates the engine oil temperature.
With the needle in zone C, the temperature is
correct.
With the needle in zone D , the temperature is
too high.
Slow down to lower the oil temperature.
Engine oil temperature
gauge
Be aware of the risk of burns when
topping up the cooling system. Do not
fill above the maximum level (indicated
on the reservoir).
Instruments
Page 222 of 364
220
Coolant level
the coolant level should be close
to the "MA X" mark but should never
exceed it.
In addition, as the cooling system is pressurised,
wait at least one hour after switching off the engine
before carrying out any work.
to a
void any risk of scalding, unscrew the cap by
two turns to allow the pressure to drop. When the
pressure has dropped, remove the cap and top up
the level.
Changing the coolant
the coolant does not have to be replaced at routine services.
Fluid specification
the coolant must conform to the
manufacturer's recommendations.
Fluid specification
For optimum cleaning and to avoid freezing,
this fluid must not be topped up with or
replaced with plain water.
Screenwash and headlamp
wash fluid
In the case of vehicles fitted with
headlamp washers, the low fluid level
is indicated by an audible signal and
a message in the instrument panel
screen.
Avoid prolonged contact of used oil or
fluids with the skin.
Most of these fluids are harmful to
health or indeed very corrosive.
Do not discard used oil or fluids into
sewers or onto the ground.
ta
ke used oil to a P
e
uge
Ot
dealer or
a qualified workshop (France) or to an
authorised waste disposal site.
Used products
A low additive level is indicated by illumination
of this warning lamp, accompanied by an
audible warning and a message in the
instrument panel screen.
Diesel additive level
(Diesel engine with
particle filter)
When the engine is warm, the temperature of
the coolant is regulated by the fan.
to
p up the reservoir when you next stop
the
vehicle.
In wintry conditions, the use of an
ethyl alcohol or methanol base fluid is
recommended.
The cooling fan may star t after
switching off the engine: take care
with articles and clothing that might
be caught by the fan blades.
To p p i n g u p
this additive must be topped up by a
Pe
ugeOt dealer or a qualified workshop
without delay.
Practical information
Page 235 of 364
233
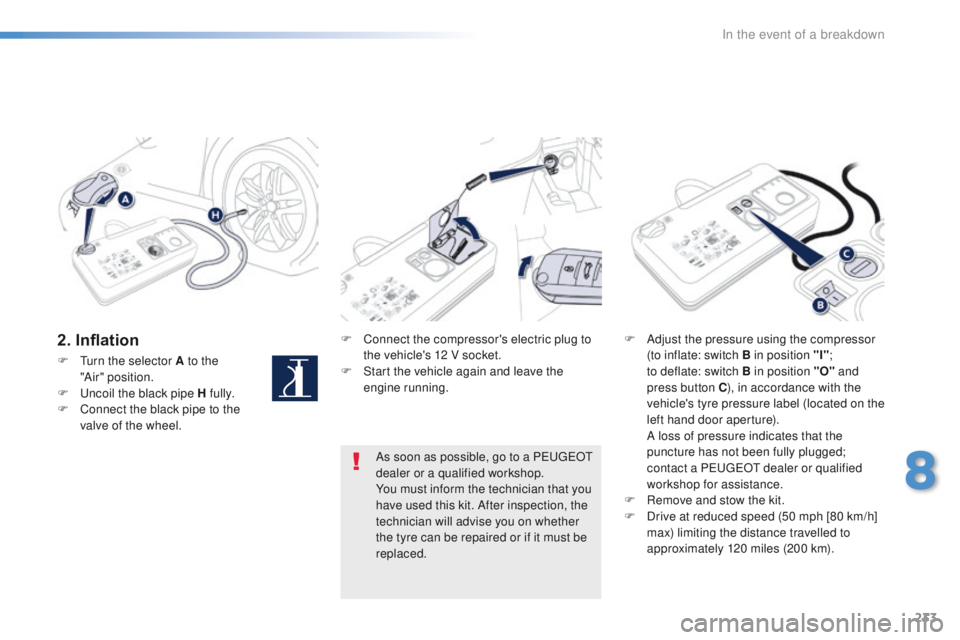
2. InflationF Connect the compressor's electric plug to the vehicle's 12 V socket.
F
S
tart the vehicle again and leave the
engine running. F
A djust the pressure using the compressor
(to inflate: switch B in position "I" ;
to
deflate: switch B in position "O" and
press button C ), in accordance with the
vehicle's tyre pressure label (located on the
left hand door aperture).
A l
oss of pressure indicates that the
puncture has not been fully plugged;
contact a P
e
uge
Ot
dealer or qualified
workshop for assistance.
F
R
emove and stow the kit.
F
D
rive at reduced speed (50 mph [80 km/h]
max) limiting the distance travelled to
approximately 120 miles (200 km).
As soon as possible, go to a P
e
uge
Ot
dealer or a qualified workshop.
You must inform the technician that you
have used this kit. After inspection, the
technician will advise you on whether
the tyre can be repaired or if it must be
replaced.
F
t
u
rn the selector A to the
"Air"
position.
F
u
n
coil the black pipe H fully.
F
C
onnect the black pipe to the
valve of the wheel.
8
In the event of a breakdown
Page 236 of 364
234
Removing the cartridge
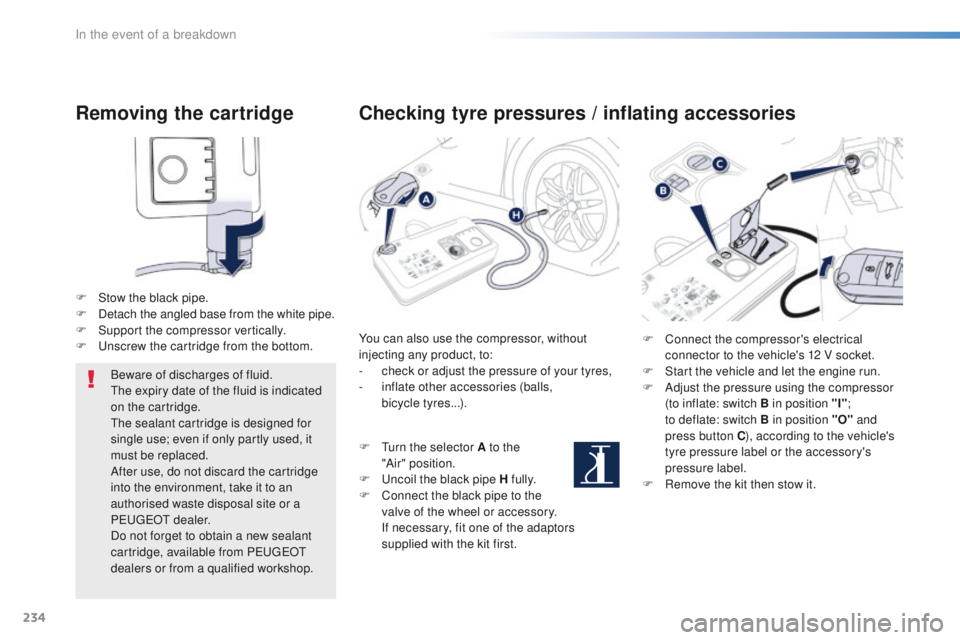
F Stow the black pipe.
F D etach the angled base from the white pipe.
F
S
upport the compressor vertically.
F
u
n
screw the cartridge from the bottom.
Beware of discharges of fluid.
th
e expiry date of the fluid is indicated
on the cartridge.
th
e sealant cartridge is designed for
single use; even if only partly used, it
must be replaced.
After use, do not discard the cartridge
into the environment, take it to an
authorised waste disposal site or a
P
e
uge
Ot d
ealer.
Do not forget to obtain a new sealant
cartridge, available from P
e
uge
Ot
dealers or from a qualified workshop.
Checking tyre pressures / inflating accessories
You can also use the compressor, without
injecting any product, to:
-
c
heck or adjust the pressure of your tyres,
-
i
nflate other accessories (balls,
bicycle
tyres...).
F
t
u
rn the selector A to the
"Air"
position.
F
u
n
coil the black pipe H fully.
F
C
onnect the black pipe to the
valve of the wheel or accessory.
I
f necessary, fit one of the adaptors
supplied with the kit first. F
C onnect the compressor's electrical
connector to the vehicle's 12 V socket.
F
S
tart the vehicle and let the engine run.
F
A
djust the pressure using the compressor
(to inflate: switch B in position "I" ;
to
deflate: switch B in position "O" and
press button C ), according to the vehicle's
tyre pressure label or the accessory's
pressure label.
F
R
emove the kit then stow it.
In the event of a breakdown