Page 200 of 364
198
5008_en_Chap09_verifications_ed01-2015
Underbonnet - Diesel engines
The various caps and covers allow access for checking the levels of the various fluids, for replacing certain components and for priming the fuel system.
1.
P
ower steering reservoir.
2.
S
creenwash and headlamp wash reservoir.
3.
C
oolant header tank.
4.
B
rake fluid reservoir. 5.
B
attery / Fuses.
6.
Fusebox.
7.
A
i r f i l t e r.
8.
E
ngine oil dipstick.9.
E
ngine oil filler cap.
10.
P
riming pump*.
11.
E
arth point ("-" terminal).
* Depending on engine.
Checks
Page 203 of 364

201
5008_en_Chap09_verifications_ed01-2015
Diesel additive level (Diesel
engine with particle filter)
Used products
To p p i n g u p
This additive must be topped up by a
PEUGEOT dealer or a qualified workshop
without delay.A low additive level is indicated by
illumination of this warning lamp,
accompanied by an audible warning
and a message in the instrument panel screen.Fluid specification
For optimum cleaning and to avoid freezing,
this fluid must not be topped up with or
replaced with plain water. In the case of vehicles fitted with
headlamp washers, the low fluid level
is indicated by an audible signal and
a message in the instrument panel
screen.
Top up the reservoir when you next stop the
vehicle.
Screenwash and headlamp
wash fluid
Avoid prolonged contact of used oil or
fluids with the skin.
Most of these fluids are harmful to
health or indeed very corrosive.
Do not discard used oil or fluids into
sewers or onto the ground.
Take used oil to a PEUGEOT dealer or
a qualified workshop (France) or to an
authorised waste disposal site.
The cooling fan may star t after switching
off the engine: take care with ar ticles and
clothing that might become caught by the
fan blades.
Fluid specification
The coolant must conform to the
manufacturer's recommendations.
Coolant level
The coolant level should be close
to the "MA X" mark but should never
exceed it.
When the engine is warm, the
temperature of the coolant is regulated by
the fan.
In addition, as the cooling system is pressurised,
wait at least one hour after switching off the
engine before carrying out any work.
To avoid any risk of scalding, unscrew the cap
by two turns to allow the pressure to drop. When
the pressure has dropped, remove the cap and
top up the level. In wintry conditions, the use of an
ethyl alcohol or methanol base fluid is
recommended.
9
Checks
Page 233 of 364

231
5008_en_Chap10_infos-pratiques_ed01-2015
Changing a bulb
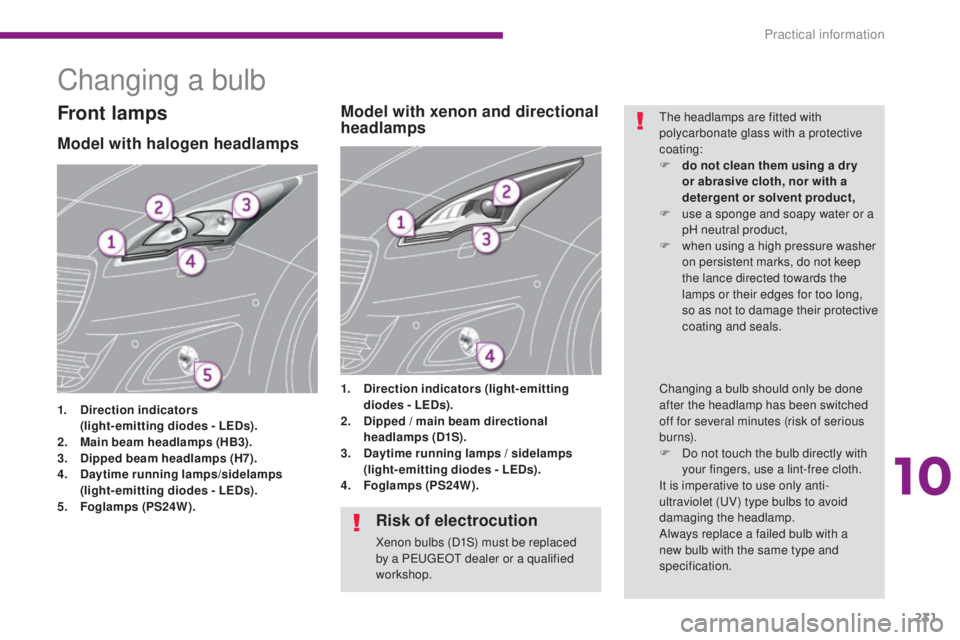
Model with halogen headlamps
1. Direction indicators
( light-emitting diodes - LEDs).
2.
M
ain beam headlamps (HB3).
3.
D
ipped beam headlamps (H7).
4.
D
aytime running lamps/sidelamps
(
light-emitting diodes - LEDs).
5.
F
oglamps (PS24W). 1.
D
irection indicators (light-emitting
diodes - LEDs).
2. D ipped / main beam directional
headlamps (D1S).
3.
D
aytime running lamps / sidelamps
(light-emitting diodes - LEDs).
4.
F
oglamps (PS24W).
Model with xenon and directional
headlampsFront lampsThe headlamps are fitted with
polycarbonate glass with a protective
coating:
F
d
o not clean them using a dr y
or abrasive cloth, nor with a
detergent or solvent product,
F
u
se a sponge and soapy water or a
pH neutral product,
F
w
hen using a high pressure washer
on persistent marks, do not keep
the lance directed towards the
lamps or their edges for too long,
so as not to damage their protective
coating and seals.
Changing a bulb should only be done
after the headlamp has been switched
off for several minutes (risk of serious
burns).
F
D
o not touch the bulb directly with
your fingers, use a lint-free cloth.
It is imperative to use only anti-
ultraviolet (UV) type bulbs to avoid
damaging the headlamp.
Always replace a failed bulb with a
new bulb with the same type and
specification.
Risk of electrocution
Xenon bulbs (D1S) must be replaced
by a PEUGEOT dealer or a qualified
workshop.
10
Practical information
Page 234 of 364
232
5008_en_Chap10_infos-pratiques_ed01-2015
Changing main beam headlamp bulbs
(model with halogen headlamps)Changing dipped beam headlamp bulbs
(models with halogen headlamps)
F Remove the protective plastic cover by pulling the tab.
F
D
isconnect the bulb connector.
F
E
xtract the bulb by pulling and change it.
To refit, carry out these operations in reverse
o r d e r. F
R emove the protective plastic cover by
pulling the tab.
F
W
ithout disconnecting the connector, turn
the body of the bulb a quarter of a turn to
the left to disengage the assembly.
F
D
isconnect the connector to release
the bulb.
To refit, carry out these operations in reverse
o r d e r.
Changing direction indicators
and daytime running lamps /
sidelamps
For the replacement of these LED (light-
emitting diode) lamps, contact a PEUGEOT
dealer or a qualified workshop.
Practical information
Page 235 of 364
233
5008_en_Chap10_infos-pratiques_ed01-2015
Changing foglamp
bulbs
Contact a PEUGEOT dealer or a qualified
workshop.
F
I
nsert a screwdriver towards the centre of
the repeater between the repeater and the
base of the mirror.
F
T
ilt the screwdriver to extract the repeater
and remove it.
F
D
isconnect the repeater connector.
Changing integrated direction
indicator side repeatersChanging dipped beam and
main beam headlamp bulbs
(models with xenon headlamps)
D1S xenon bulbs must be changed
by a PEUGEOT dealer or a qualified
workshop as there is a risk of
electrocution.
It is recommended that all D1S bulbs
are changed at the same time if one of
them fails.
You can also contact a PEUGEOT
dealer or a qualified workshop to have
these lamps changed.
To refit, carry out these operations in reverse
o r d e r.
Contact a PEUGEOT dealer or a qualified
workshop to obtain a new repeater.
10
Practical information
Page 243 of 364
241
5008_en_Chap10_infos-pratiques_ed01-2015
Engine compartment
fuses
The fusebox is placed in the engine
compartment near the battery.Fuse
N° Rating
(A) Functions
F2 15Horn.
F3 10Front / rear wash-wipe.
F4 10Daytime running lamps.
F5 15Purge canister, turbine discharge and Turbo pressure
regulation electrovalves (1.6 litre THP), oil vapour heater
(1.6 litre THP), diesel heater (1.6 litre HDi).
F6 10Diagnostic socket, directional headlamps, particle
emission filter pump (Diesel), Distance alert, mirror
adjustment control.
F7 10Power steering control unit, automatic gearbox, directional
headlamps height adjustment motor.
F8 20Starter motor control.
F9 10Clutch and brake pedal switches.
F11 40Air conditioning fan.
Access to the fuses
F Unclip the cover.
F
C hange the fuse (see corresponding
paragraph).
F
W
hen you have finished, close the cover
carefully to ensure correct sealing of the
fusebox.
Fuse table
10
Practical information
Page 244 of 364
242
5008_en_Chap10_infos-pratiques_ed01-2015
Fuse N° Rating
(A) Functions
F12 30Windscreen wipers slow / fast speed.
F14 30Air pump.
F15 10Right-hand main beam headlamp.
F16 10Left-hand main beam headlamp.
F17 15Left-hand dipped headlamp.
F18 15Right-hand dipped headlamp.
Practical information
Page 249 of 364

247
5008_en_Chap10_infos-pratiques_ed01-2015
Exiting economy mode
These functions are reactivated automatically
next time the vehicle is driven.
To restore the use of these functions
immediately, start the engine and let it run for at
least 5 minutes.
Load reduction modeEnergy economy mode
Switching to economy mode
Once this time has elapsed, a message
appears in the screen indicating that the
vehicle has switched to economy mode and the
active functions are put on standby.
System which manages the use of certain
functions according to the level of charge
remaining in the battery.
When the vehicle is being driven, the load
reduction function temporarily deactivates
certain functions, such as the air conditioning,
the heated rear screen...
The deactivated functions are reactivated
automatically as soon as conditions permit.
System which manages the duration of use of certain functions to conserve a sufficient level of
charge in the battery.
After the engine has stopped, you can still use functions such as the audio and telematics
system,
windscreen wipers, dipped beam headlamps, courtesy lamps, etc. for a maximum
combined duration of thirty minutes.
This period may be greatly reduced if the battery is not fully charged.
If the telephone is being used at this
time, the call will be maintained for
5 minutes with the hands-free kit of your
P
E
UGEOT
C
onnect Sound (RD5) or
P
E
UGEOT
C
onnect Navigation (RNEG). Let the engine run for the duration
specified to ensure that the battery
charge is sufficient.
Do not repeatedly and continuously
restart the engine in order to charge the
battery.
A flat battery prevents the engine
from starting (refer to the "Battery"
paragraph).
10
Practical information