2016 PEUGEOT 5008 ignition
[x] Cancel search: ignitionPage 212 of 364
210
5008_en_Chap09_verifications_ed01-2015
Never store bottles of AdBlue® in your
vehicle.
Recommendations on storage
AdBlue® freezes at about -11°C and
deteriorates above 25°C. It is recommended
that bottles be stored in a cool area and
protected from direct sunlight.
Under these conditions, the additive can be
kept for at least a year.
If the additive has frozen, it can be used once it
has completely thawed out.
Procedure
Before topping-up, ensure that the vehicle is
parked on a flat and level sur face.
In wintry conditions, ensure that the
temperature of the vehicle is above -11°C.
Otherwise the AdBlue
® may be frozen and
so cannot be poured into its tank. Park your
vehicle in a warmer area for a few hours to
allow the top-up to be carried out.
F
S
witch off the ignition and remove the key. F
F
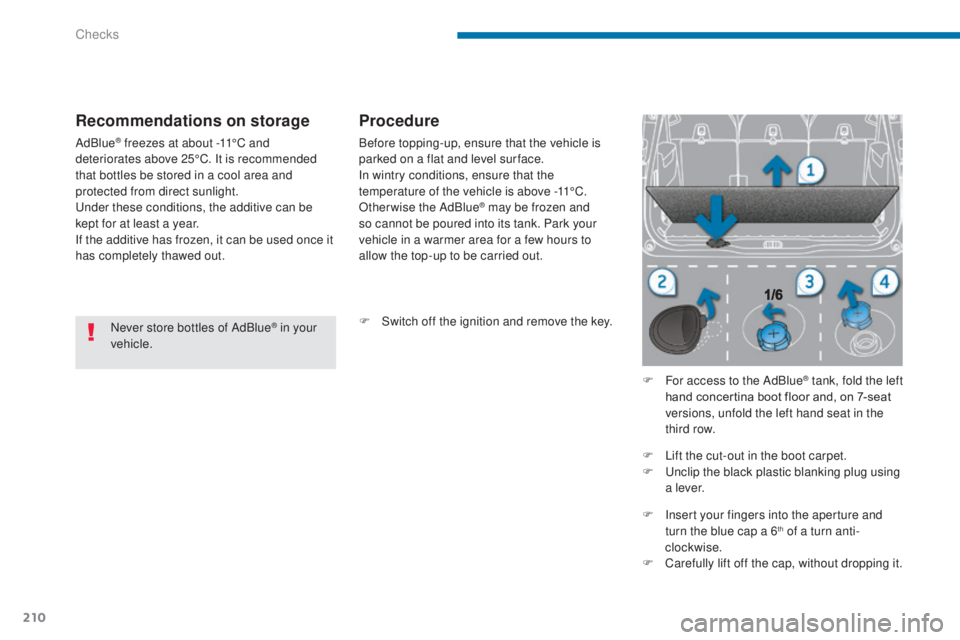
or access to the AdBlue
® tank, fold the left
hand concertina boot floor and, on 7-seat
versions, unfold the left hand seat in the
third row.
F
L
ift the cut-out in the boot carpet.
F
U
nclip the black plastic blanking plug using
a l eve r.
F
I
nsert your fingers into the aperture and
turn the blue cap a 6
th of a turn anti-
clockwise.
F
C
arefully lift off the cap, without dropping it.
Checks
Page 213 of 364
211
5008_en_Chap09_verifications_ed01-2015
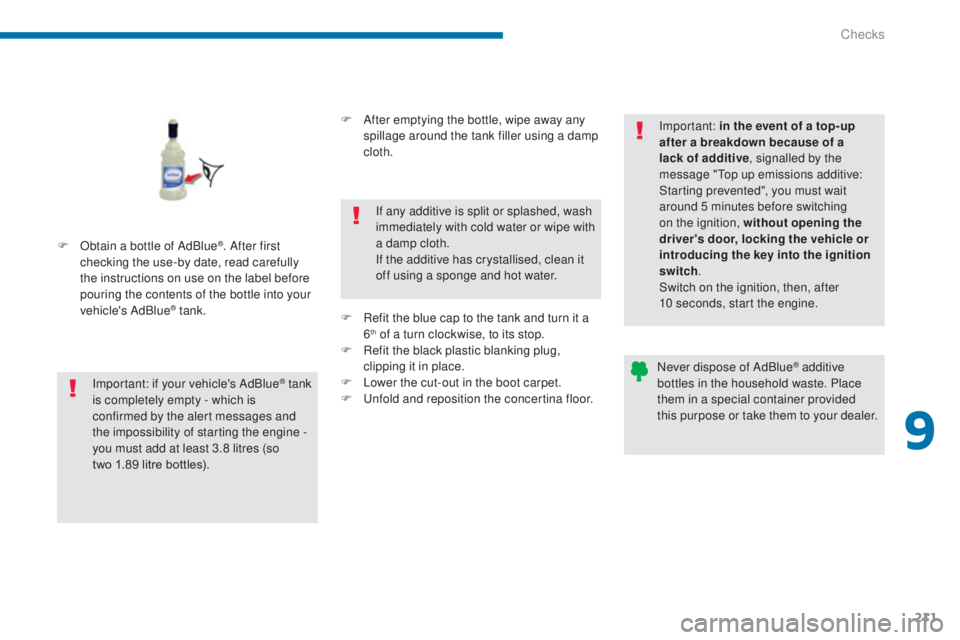
F Obtain a bottle of AdBlue®. After first
checking the use-by date, read carefully
the instructions on use on the label before
pouring the contents of the bottle into your
vehicle's AdBlue
® tank.
Important: if your vehicle's AdBlue
® tank
i
s completely empty - which is
confirmed by the alert messages and
the impossibility of starting the engine
-
you must add at least 3.8 litres (so
two
1.89 litre bottles). F
A
fter emptying the bottle, wipe away any
spillage around the tank filler using a damp
cloth.
If any additive is split or splashed, wash
immediately with cold water or wipe with
a damp cloth.
If the additive has crystallised, clean it
off using a sponge and hot water.
F
R
efit the blue cap to the tank and turn it a
6
th of a turn clockwise, to its stop.
F
R
efit the black plastic blanking plug,
clipping it in place.
F
L
ower the cut-out in the boot carpet.
F
U
nfold and reposition the concertina floor. Important: in the event of a top-up
after a breakdown because of a
lack of additive
, signalled by the
message "Top up emissions additive:
Starting prevented", you must wait
around 5 minutes before switching
on the ignition, without opening the
driver's door, locking the vehicle or
introducing the key into the ignition
switch .
Switch on the ignition, then, after
10 seconds, start the engine.
Never dispose of AdBlue
® additive
bottles in the household waste. Place
them in a special container provided
this purpose or take them to your dealer.
9
Checks
Page 218 of 364
216
5008_en_Chap10_infos-pratiques_ed01-2015
Repair procedure
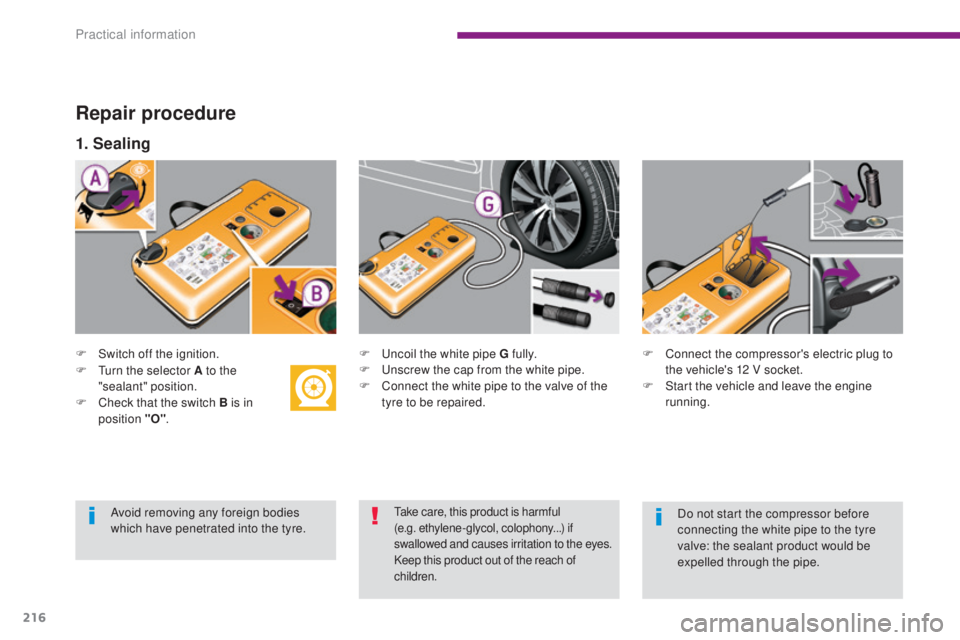
F Switch off the ignition.F U ncoil the white pipe G fully.
F U nscrew the cap from the white pipe.
F
C
onnect the white pipe to the valve of the
tyre to be repaired. F
C onnect the compressor's electric plug to
the vehicle's 12 V socket.
F
S
tart the vehicle and leave the engine
running.
1. Sealing
F Turn the selector A to the "sealant" position.
F
C
heck that the switch B is in
position "O" .
Take care, this product is harmful
(e.g.
ethylene-glycol, colophony...) if
swallowed and causes irritation to the eyes.
Keep this product out of the reach of
children.Avoid removing any foreign bodies
which have penetrated into the tyre. Do not start the compressor before
connecting the white pipe to the tyre
valve: the sealant product would be
expelled through the pipe.
Practical information
Page 222 of 364
220
5008_en_Chap10_infos-pratiques_ed01-2015
Temporary puncture repair kit
The kit is stowed in the boot, under the left
hand seat in the 3rd row.
Using the kit
(7-seat version)
This kit comprises a compressor and a bottle of sealant.
It permits temporary repair of a tyre.
You can then drive to the nearest garage.
Its compressor can be used to check and adjust the tyre pressure.
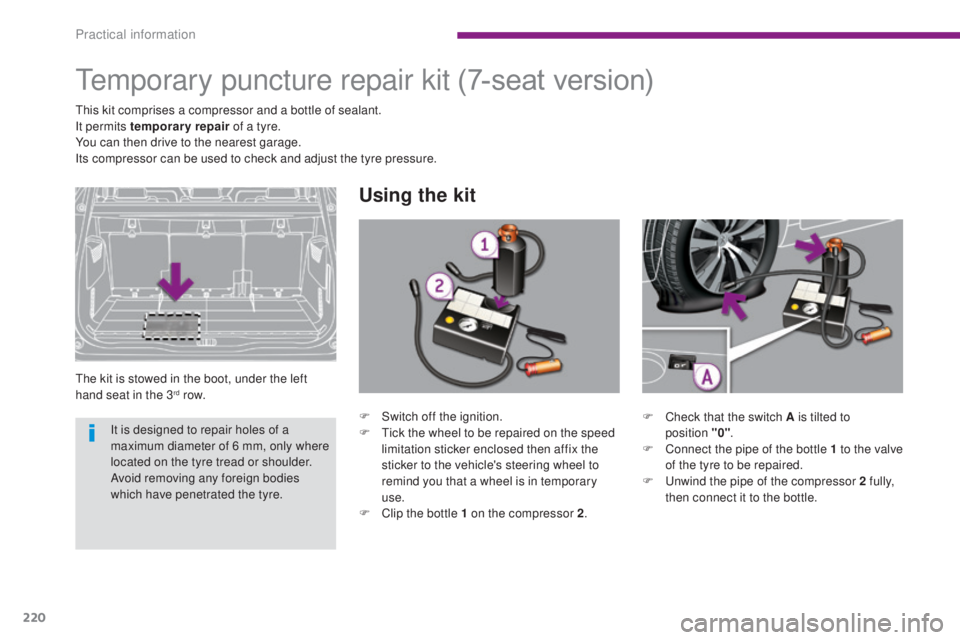
F
C
heck that the switch A is tilted to
position
"0".
F
C
onnect the pipe of the bottle 1 to the valve
of the tyre to be repaired.
F
U
nwind the pipe of the compressor 2 fully,
then connect it to the bottle.
F
S
witch off the ignition.
F
T
ick the wheel to be repaired on the speed
limitation sticker enclosed then affix the
sticker to the vehicle's steering wheel to
remind you that a wheel is in temporary
use.
F
C
lip the bottle 1 on the compressor 2.
It is designed to repair holes of a
maximum diameter of 6 mm, only where
located on the tyre tread or shoulder.
Avoid removing any foreign bodies
which have penetrated the tyre.
Practical information
Page 228 of 364

226
5008_en_Chap10_infos-pratiques_ed01-2015
Removing a wheel
F Depending on equipment, clip the tool 4 to the finisher cap on each wheel bolt with
alloy wheels to remove them.
F
D
epending on equipment, slacken the
security bolt using the socket 3 fitted to the
wheelbrace 6 .
F
S
lacken the other bolts using the
wheelbrace 6 .
Parking the vehicle
Immobilise the vehicle where it does not
block traffic: the ground must be level,
stable and non-slippery ground.
Apply the parking brake unless it has
been programmed to automatic mode.
Switch off the ignition.
With a manual gearbox, engage first
gear to block the wheels.
With an electronic gearbox, place the
lever in position R to block the wheels.
With an automatic gearbox, place the
lever in position P to block the wheels.
Check that the braking warning lamp
and the P warning lamp in the parking
brake control come on.
If necessary, place a chock under the
wheel diagonally opposite the wheel to
be changed.
The occupants must get out of the
vehicle and wait where they are safe.
Never go underneath a vehicle raised
using a jack; use an axle stand. F
P
osition the foot of the jack 8 on the
ground and ensure that it is directly below
one of the front A or rear B jacking points
provided on the underbody, whichever is
closest to the wheel to be changed.
Wheel with wheel trim
When removing the wheel , first
remove the wheel trim using the
wheelbrace 6 by pulling at the valve
cut-out.
When refitting the wheel , refit the
wheel trim by placing its cut-out at the
valve, and press round its edge with the
palm of your hand.
Practical information
Page 241 of 364
239
5008_en_Chap10_infos-pratiques_ed01-2015
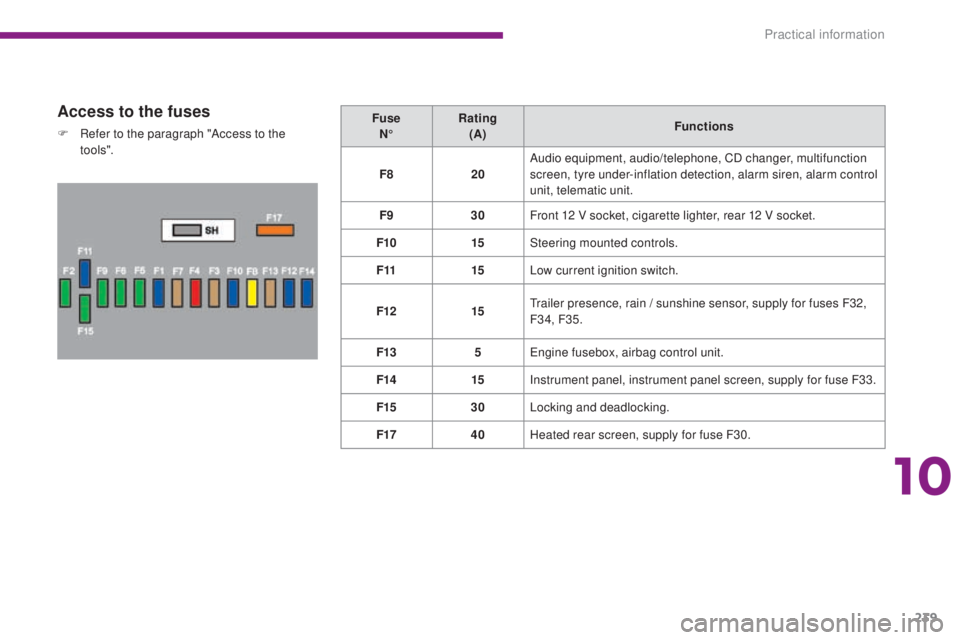
Access to the fuses
F Refer to the paragraph "Access to the to o ls". Fuse
N° Rating
(A) Functions
F8 20Audio equipment, audio/telephone, CD changer, multifunction
screen, tyre under-inflation detection, alarm siren, alarm control
unit, telematic unit.
F9 30Front 12 V socket, cigarette lighter, rear 12 V socket.
F10 15Steering mounted controls.
F11 15Low current ignition switch.
F12 15Trailer presence, rain / sunshine sensor, supply for fuses F32,
F34, F35.
F13 5Engine fusebox, airbag control unit.
F14 15Instrument panel, instrument panel screen, supply for fuse F33.
F15 30Locking and deadlocking.
F17 40Heated rear screen, supply for fuse F30.
10
Practical information
Page 247 of 364
245
5008_en_Chap10_infos-pratiques_ed01-2015
Starting using another
battery
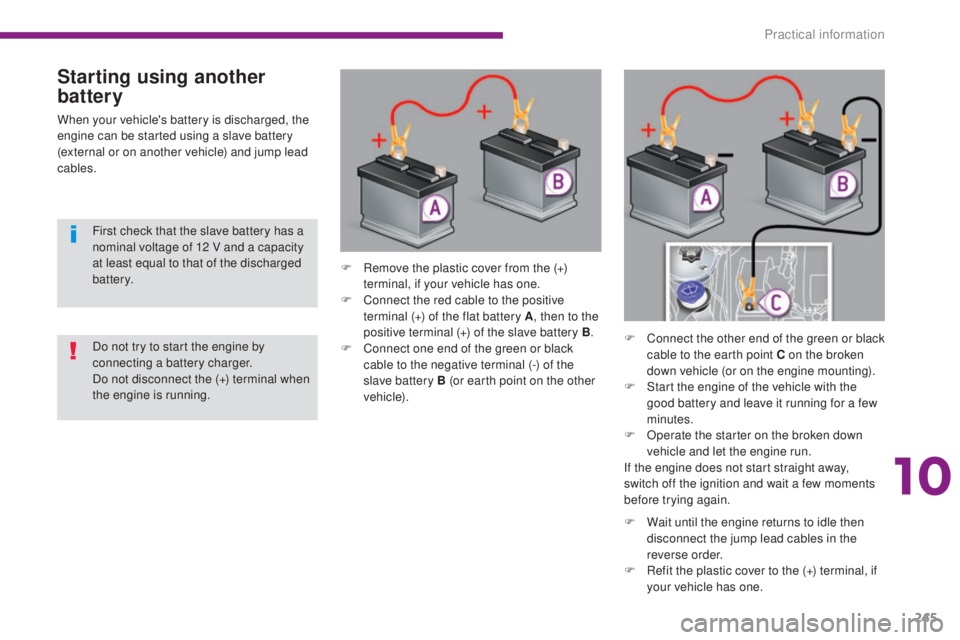
When your vehicle's battery is discharged, the
engine can be started using a slave battery
(external or on another vehicle) and jump lead
cables.F
R
emove the plastic cover from the (+)
terminal, if your vehicle has one.
F
C
onnect the red cable to the positive
terminal (+) of the flat battery A , then to the
positive terminal (+) of the slave battery B.
F
C
onnect one end of the green or black
cable to the negative terminal (-) of the
slave battery B (or earth point on the other
vehicle). F
C
onnect the other end of the green or black
cable to the earth point C on the broken
down vehicle (or on the engine mounting).
F
S
tart the engine of the vehicle with the
good battery and leave it running for a few
minutes.
F
O
perate the starter on the broken down
vehicle and let the engine run.
If the engine does not start straight away,
switch off the ignition and wait a few moments
before trying again.
Do not try to start the engine by
connecting a battery charger.
Do not disconnect the (+) terminal when
the engine is running. First check that the slave battery has a
nominal voltage of 12 V and a capacity
at least equal to that of the discharged
battery.
F
W
ait until the engine returns to idle then
disconnect the jump lead cables in the
reverse order.
F
R
efit the plastic cover to the (+) terminal, if
your vehicle has one.
10
Practical information
Page 248 of 364
246
5008_en_Chap10_infos-pratiques_ed01-2015
Charging the battery using
a battery charger
F Disconnect the battery from the vehicle.
F F ollow the instructions for use provided by
the manufacturer of the charger.
F
C
onnect the battery starting with the
negative terminal (-).
F
C
heck that the terminals and connectors
are clean. If they are covered with sulphate
(whitish or greenish deposit), remove them
and clean them.
The batteries contain harmful substances
such as sulphuric acid and lead. They
must be disposed of in accordance
with regulations and must not, in any
circumstances, be discarded with
household waste.
Take used remote control batteries and
vehicle batteries to a special collection point.
It is advisable to disconnect the battery
if the vehicle is to be left unused for
more than one month.
Before disconnecting the battery
Wait 2 minutes after switching off the ignition
before disconnecting the battery.
Close the windows and the doors before
disconnecting the battery.
Following reconnection of the
battery
Following reconnection of the battery, switch on
the ignition and wait 1 minute before starting to
permit initialisation of the electronic systems.
However, if problems remain following this
operation, contact a PEUGEOT dealer or a
qualified workshop.
Referring to the corresponding section, you
must yourself reinitialise (depending on
version):
-
t
he remote control key,
-
t
he electric blind(s),
-
...
Protect your eyes and face before
handling the battery.
All operations on the battery must be
carried out in a well ventilated area and
away from naked flames and sources
of sparks, so as to avoid the risk of
explosion or fire.
Do not try to charge a frozen battery;
the battery must first be thawed out to
avoid the risk of explosion. If the battery
has been frozen, before charging have
it checked by a PEUGEOT dealer or a
qualified workshop who will check that
the internal components have not been
damaged and the casing is not cracked,
which could cause a leak of toxic and
corrosive acid.
Do not reverse the polarity and use only
a 12 V charger.
Do not disconnect the terminals while
the engine is running.
Do not charge the batteries without
disconnecting the terminals first.
Wash your hands afterwards.
Do not push the vehicle to start the
engine if you have an electronic or
automatic gearbox.
Some functions are not available if the
battery is not sufficiently charged.
Practical information