2016 Peugeot 308 brake light
[x] Cancel search: brake lightPage 6 of 344
4
3008_en_Chap00b_vue-ensemble_ed01-2015
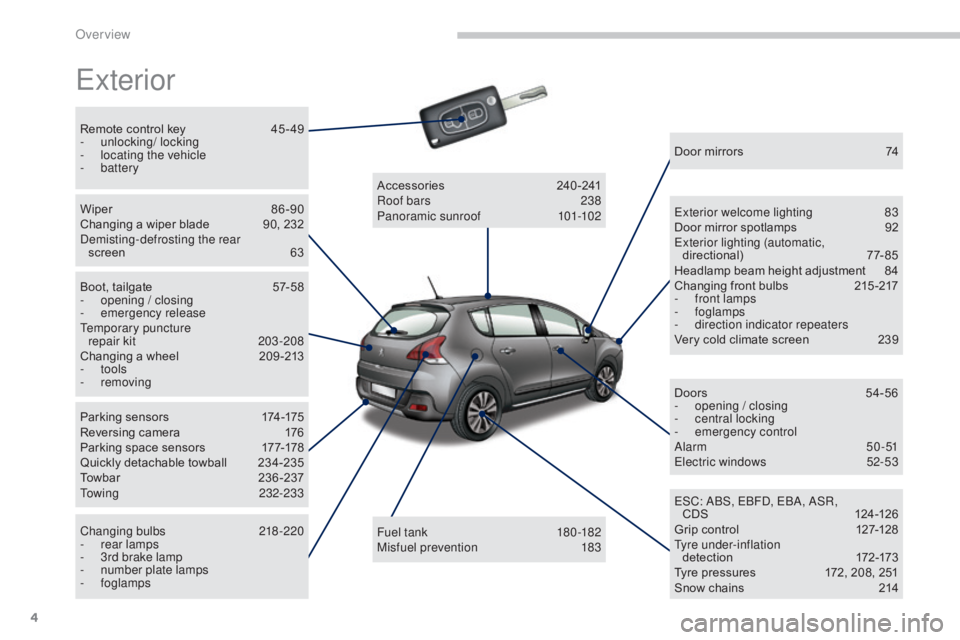
Exterior
Remote control key 45 - 49
- u nlocking/ locking
-
l
ocating the vehicle
-
battery
Wiper
8
6 -90
Changing a wiper blade
9
0, 232
Demisting-defrosting the rear screen
6
3
Boot, tailgate
5
7-58
-
ope
ning / closing
-
em
ergency release
Temporary puncture repair kit
2
03-208
Changing a wheel
2
09 -213
-
tools
-
removing
Parking sensors
1
74-175
Reversing camera
1
76
Parking space sensors
1
77-178
Quickly detachable towball
2
34-235
Towbar
23
6-237
Towing
232-233
Changing bulbs
2
18-220
-
r
ear lamps
-
3
rd brake lamp
-
n
umber plate lamps
-
foglamps Fuel tank
18
0 -182
Misfuel prevention
1
83
Accessories
2
40-241
Roof bars
2
38
Panoramic sunroof
1
01-102Door mirrors
7
4
Exterior welcome lighting
8
3
Door mirror spotlamps
9
2
Exterior lighting (automatic, directional)
7
7-85
Headlamp beam height adjustment
8
4
Changing front bulbs
2
15 -217
-
f
ront lamps
-
foglamps
-
d
irection indicator repeaters
Very cold climate screen
2
39
Doors
5
4-56
-
ope
ning / closing
-
c
entral locking
-
em
ergency control
Alarm
50-51
Electric windows
5
2-53
ESC: ABS, EBFD, EBA, ASR, CDS
12
4 -126
Grip control
1
27-128
Tyre under-inflation d ete c t i o n
17
2-173
Tyre pressures
1
72, 208, 251
Snow chains
2
14
Over view
Page 14 of 344
12
3008_en_Chap00c_eco-conduite_ed01-2015
Eco-driving
Eco-driving is a range of everyday practices that allow the motorist to optimise their fuel consumption and CO2 emissions.
Optimise the use of your gearbox
With a manual gearbox, move off gently and change up without waiting.
During acceleration change up early.
With an automatic or electronic gearbox, give preference to automatic
mode and avoid pressing the accelerator pedal heavily or suddenly.
The gear shift indicator invites you engage the most suitable gear: as
soon as the indication is displayed in the instrument panel, follow it
straight away.
For vehicles fitted with an electronic or automatic gearbox, this
indicator appears only in manual mode.
Drive smoothly
Maintain a safe distance between vehicles, use engine braking rather
than the brake pedal, and press the accelerator progressively. These
practices contribute towards a reduction in fuel consumption and CO
2
emissions and also helps reduce the background traffic noise.
If your vehicle has cruise control, make use of the system at speeds
above 25 mph (40 km/h) when the traffic is flowing well.
Control the use of your electrical
equipment
Before moving off, if the passenger compartment is too warm, ventilate it
by opening the windows and air vents before using the air conditioning.
Above 30 mph (50 km/h), close the windows and leave the air vents
open.
Remember to make use of equipment that can help keep the
temperature in the passenger compartment down (sunroof and window
blinds...).
Switch off the air conditioning, unless it has automatic regulation, as
soon as the desired temperature is attained.
Switch off the demisting and defrosting controls, if not automatic.
Switch off the heated seat as soon as possible.
Switch off the headlamps and front foglamps when the level of light
does not require their use.
Avoid running the engine before moving off, particularly in winter; your
vehicle will warm up much faster while driving.
As a passenger, if you avoid connecting your multimedia devices
(film, music, video game...), you will contribute towards limiting the
consumption of electrical energy, and so of fuel.
Disconnect your portable devices before leaving the vehicle.
Eco-driving
Page 19 of 344
17
3008_en_Chap01_controle-marche_ed01-2015
Warning/indicator lampis onCause Action / Observations
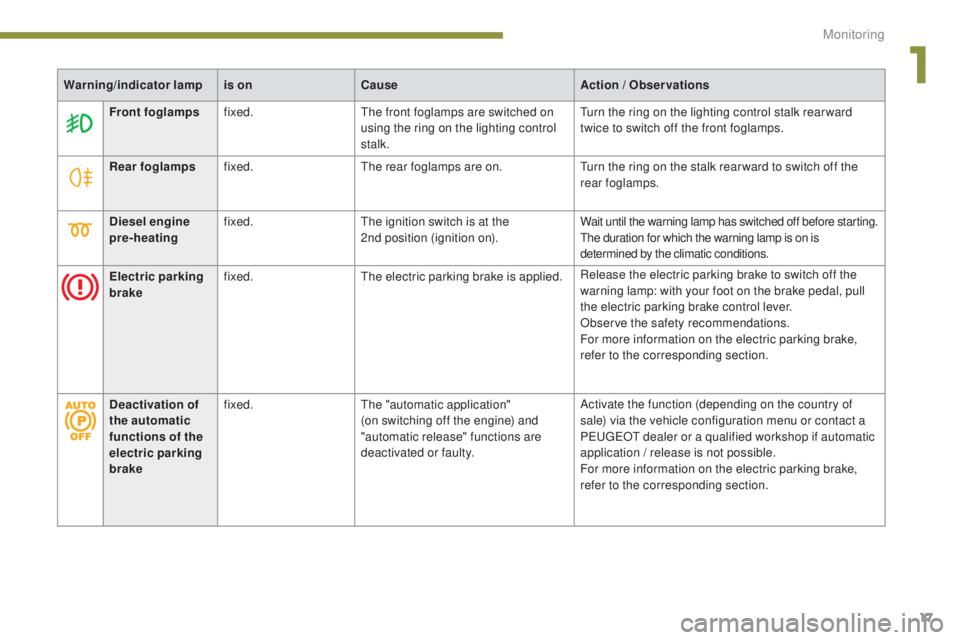
Electric parking
brake fixed.
The electric parking brake is applied. Release the electric parking brake to switch off the
warning lamp: with your foot on the brake pedal, pull
the electric parking brake control lever.
Observe the safety recommendations.
For more information on the electric parking brake,
refer to the corresponding section.
Deactivation of
the automatic
functions of the
electric parking
brake fixed.
The "automatic application"
(on switching off the engine) and
"automatic release" functions are
deactivated or faulty. Activate the function (depending on the country of
sale) via the vehicle configuration menu or contact a
PEUGEOT dealer or a qualified workshop if automatic
application
/ release is not possible.
For more information on the electric parking brake,
refer to the corresponding section.
Diesel engine
pre-heating
fixed.
The ignition switch is at the
2nd
position (ignition on).
Wait until the warning lamp has switched off before starting.
The duration for which the warning lamp is on is
determined by the climatic conditions.
Front foglampsfixed. The front foglamps are switched on
using the ring on the lighting control
stalk. Turn the ring on the lighting control stalk rear ward
twice to switch off the front foglamps.
Rear foglamps fixed. The rear foglamps are on. Turn the ring on the stalk rear ward to switch off the
rear foglamps.
1
Monitoring
Page 20 of 344
18
3008_en_Chap01_controle-marche_ed01-2015
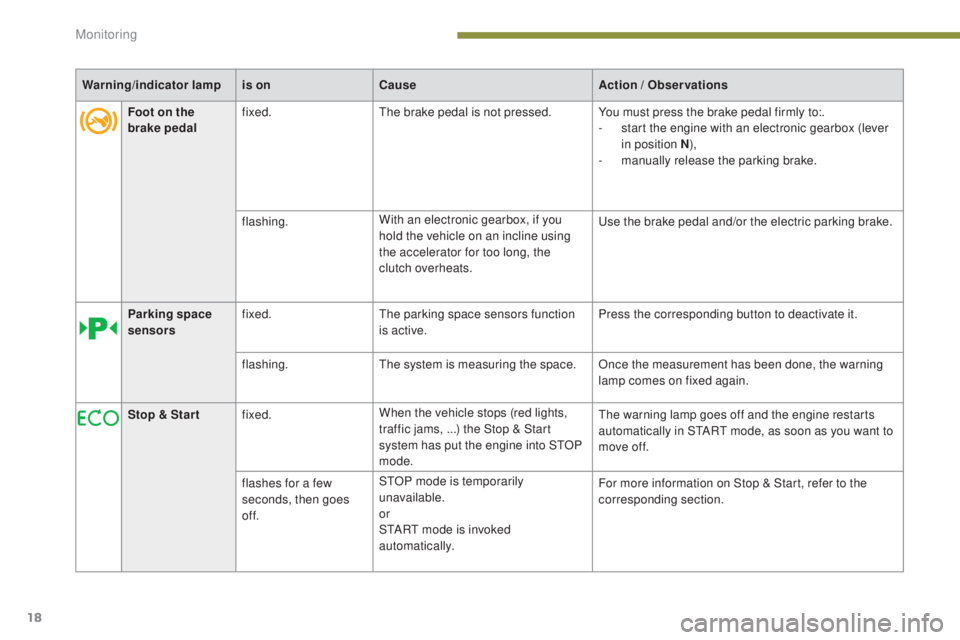
Foot on the
brake pedalfixed.
The brake pedal is not pressed. You must press the brake pedal firmly to:.
- s tart the engine with an electronic gearbox (lever
in position N ),
-
m
anually release the parking brake.
flashing. With an electronic gearbox, if you
hold the vehicle on an incline using
the accelerator for too long, the
clutch overheats. Use the brake pedal and/or the electric parking brake.
Parking space
sensors fixed.
The parking space sensors function
is active. Press the corresponding button to deactivate it.
flashing. The system is measuring the space. Once the measurement has been done, the warning
lamp comes on fixed again.
Stop & Star t fixed. When the vehicle stops (red lights,
traffic jams, ...) the Stop & Start
system has put the engine into STOP
mode. The warning lamp goes off and the engine restarts
automatically in START mode, as soon as you want to
move off.
flashes for a few
seconds, then goes
of f. STOP mode is temporarily
unavailable.
or
START mode is invoked
automatically. For more information on Stop & Start, refer to the
corresponding section.
Warning/indicator lamp
is onCause Action
/ Observations
Monitoring
Page 34 of 344
32
3008_en_Chap01_controle-marche_ed01-2015
Vehicle configurationOptions
Once the "Options" menu has been selected,
you can start diagnostics of the status of the
equipment (active, not active, faulty).
Languages
Once the "Languages" menu has been
selected, you can change the language used
by the display (Français, Italiano, Nederlands,
Portugues, Portugues-Brasil, Türkçe, Deutsch,
English, Espanol).
Date and time
Once the "Display settings" menu has been selected,
you can gain access to the following settings:
- year,
- month,
-
d ay,
-
h o u r,
-
minutes,
-
1
2 or 24 hour mode.
Units
Once the "Units" menu has been selected, you
can change the units for:
-
t
emperature (°C or °F),
-
f
uel consumption (l/100 km, mpg or km/l).
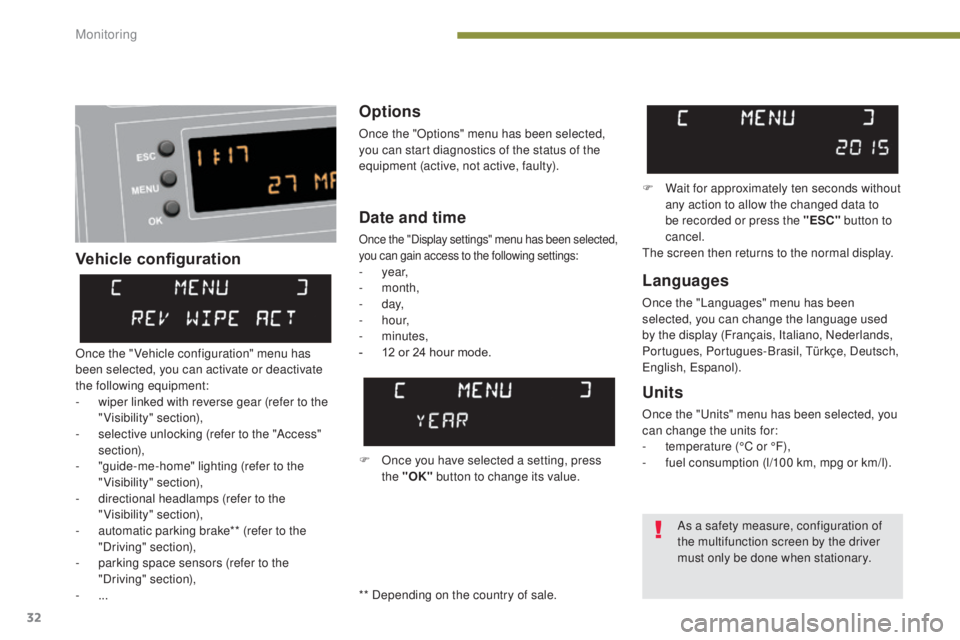
F Once you have selected a setting, press the "OK" button to change its value. F
W
ait for approximately ten seconds without
any action to allow the changed data to
be recorded or press the "ESC" button to
cancel.
The screen then returns to the normal display.
Once the " Vehicle configuration" menu has
been selected, you can activate or deactivate
the following equipment:
-
w
iper linked with reverse gear (refer to the
"Visibility" section),
-
s
elective unlocking (refer to the "Access"
section),
-
"
guide-me-home" lighting (refer to the
"Visibility" section),
-
d
irectional headlamps (refer to the
"Visibility" section),
-
a
utomatic parking brake** (refer to the
"Driving" section),
-
p
arking space sensors (refer to the
"Driving" section),
-
... As a safety measure, configuration of
the multifunction screen by the driver
must only be done when stationary.
** Depending on the country of sale.
Monitoring
Page 36 of 344
34
3008_en_Chap01_controle-marche_ed01-2015
Date and timeLanguages
Once the "Languages" menu has been
selected, you can change the language used
by the display.
Units
Once the "Units" menu has been selected,
you can change the units of the following
parameters:
-
t
emperature (°C or °F),
-
f
uel consumption (l/100 km, mpg or km/l).
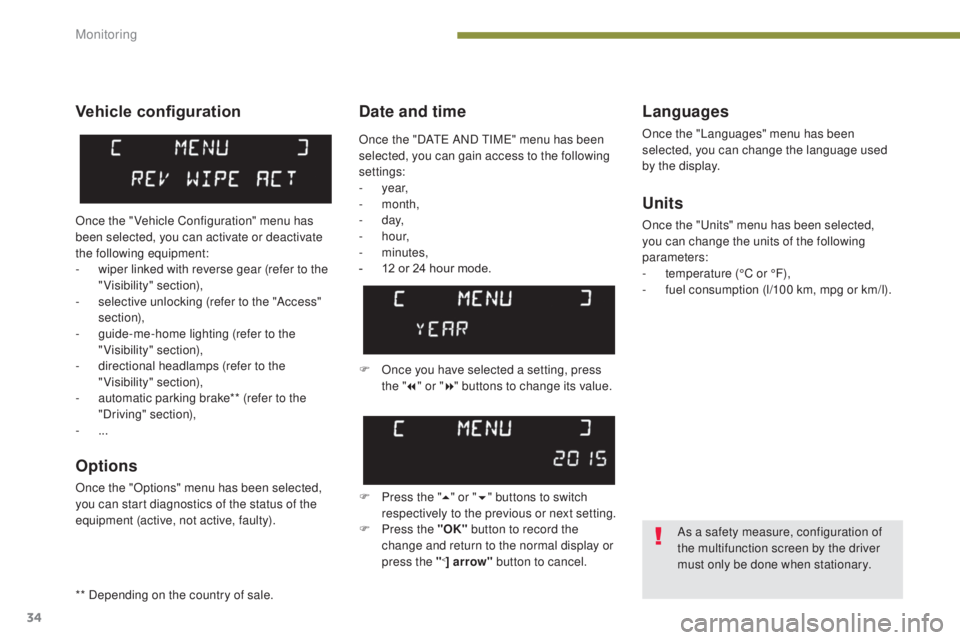
F
O
nce you have selected a setting, press
the " 7" or " 8" buttons to change its value.
F
P
ress the " 5" or " 6" buttons to switch
respectively to the previous or next setting.
F
P
ress the "OK" button to record the
change and return to the normal display or
press the "
<] arrow" button to cancel.
Vehicle configuration
Once the " Vehicle Configuration" menu has
been selected, you can activate or deactivate
the following equipment:
-
w
iper linked with reverse gear (refer to the
"Visibility" section),
-
s
elective unlocking (refer to the "Access"
section),
-
g
uide-me-home lighting (refer to the
"Visibility" section),
-
d
irectional headlamps (refer to the
"Visibility" section),
-
a
utomatic parking brake** (refer to the
"Driving" section),
-
...
Options
Once the "Options" menu has been selected,
you can start diagnostics of the status of the
equipment (active, not active, faulty).
As a safety measure, configuration of
the multifunction screen by the driver
must only be done when stationary.
Once the "DATE AND TIME" menu has been
selected, you can gain access to the following
settings:
-
year,
-
month,
-
d ay,
-
h o u r,
-
minutes,
-
1
2 or 24 hour mode.
** Depending on the country of sale.
Monitoring
Page 38 of 344
36
3008_en_Chap01_controle-marche_ed01-2015
"Trip computer" menu
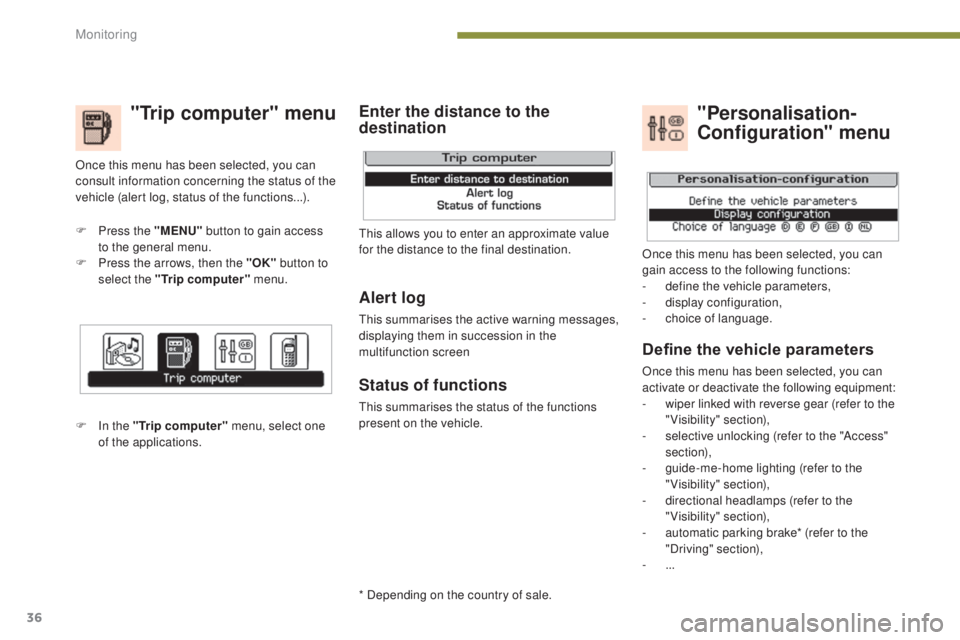
F Press the "MENU" button to gain access
to the general menu.
F
P
ress the arrows, then the "OK" button to
select the "Trip computer" menu.
F
I
n the "Trip computer" menu, select one
of the applications. This allows you to enter an approximate value
for the distance to the final destination.
Once this menu has been selected, you can
consult information concerning the status of the
vehicle (alert log, status of the functions...).
Define the vehicle parameters
Once this menu has been selected, you can
activate or deactivate the following equipment:
-
w
iper linked with reverse gear (refer to the
"Visibility" section),
-
s
elective unlocking (refer to the "Access"
section),
-
g
uide-me-home lighting (refer to the
"Visibility" section),
-
d
irectional headlamps (refer to the
"Visibility" section),
-
a
utomatic parking brake* (refer to the
"Driving" section),
-
...
"Personalisation-
Configuration" menu
Once this menu has been selected, you can
gain access to the following functions:
-
d
efine the vehicle parameters,
-
d
isplay configuration,
-
c
hoice of language.
Alert log
This summarises the active warning messages,
displaying them in succession in the
multifunction screen
Status of functions
This summarises the status of the functions
present on the vehicle.
Enter the distance to the
destination
* Depending on the country of sale.
Monitoring
Page 41 of 344
39
3008_en_Chap01_controle-marche_ed01-2015
Display configuration
This menu is used to select the colour scheme
for the screen, adjust the brightness, set
the date and time and to choose the units
for distance (km or miles), fuel consumption
(l/100 km, mpg or km/l) and temperature
(°Celsius or °Fahrenheit).
Adjusting the voice synthesiser
This menu is used to adjust the volume setting
for navigation instructions and to choose the
type of voice (male or female).
Choice of language
This menu is used to choose the language
used by the screen from a defined list.
Vehicle parameters
This menu is used to activate or deactivate
certain driving and comfort systems, classified
by category:
-
"
Driver aid":
●
"
Electric brake*" (Automatic electric
parking brake; refer to the "Driving"
section),
-
"
Wiper operation":
●
"R
ear wiper operates in reverse: ON /
OFF " (rear wiper coupled to reverse
gear; refer to the " Visibility" section), -
"
Vehicle access" (refer to the "Access"
section):
●
"
P
lip action: all doors, driver only
"
(Selective unlocking of the driver's door),
- "
Lighting configuration " (refer to the
"Visibility" section):
●
"
D
uration of guide me home lighting:
OFF / 15 s / 30 s / 60 s
" (Automatic
guide me home lighting),
●
"
Directional headlights: ON / OFF
"
(Main / additional directional lighting).
Alert log
This lists the active alerts by displaying in turn
the different messages associated with them.
* Depending on the country of sale.
Adjusting the date and time
-
P
ress on SETUP
.
-
Sel
ect "Display configuration" and confirm.
-
S
elect "Set date and time" and confirm.
Select "Minute adjustment via GPS" so that
the
minutes are adjusted automatically by
satellite reception.
-
S
elect the setting to modify. Confirm by
pressing on OK , then modify the setting
and confirm again to save the modification.
-
A
djust the settings one by one.
-
Sel
ect " OK" in the screen then confirm to
save the setting.
1
Monitoring