Page 21 of 402
Seat lifter (if so equipped for driver’s
seat)
Pull up or push down the adjusting lever to adjust
the seat height until the desired position is
achieved.
FOLDING REAR SEAT
1. Ensure the rear outboard seat belt tongue isproperly stowed in the rear trim slot next to
the door
�Abefore moving the rear seatback
�Bin order to prevent the outboard seat belt
from getting caught behind the rear seat-
back. 2. Pull the knob
�Cand fold�Dthe rear seat-
back down.
WARNING
● Never allow anyone to ride in the cargo
area or on the rear seat when it is in the
fold-down position. Use of these areas
by passengers without proper restraints
could result in serious injury or death in
an accident or sudden stop.
LRS2710LRS2700LRS2701
1-4Safety—Seats, seat belts and supplemental restraint system
Page 22 of 402
●Properly secure all cargo with ropes or
straps to help prevent it from sliding or
shifting. Do not place cargo higher than
the seatbacks. In a sudden stop or col-
lision, unsecured cargo could cause
personal injury.
● When returning the seatbacks to the
upright position, be certain they are
completely secured in the latched posi-
tion. If they are not completely secured,
passengers may be injured in an acci-
dent or sudden stop.
CENTER ARMREST (if so equipped)
Pull the armrest down until it is horizontal.
ARMREST (if so equipped for driver’s
side only)
To use the armrest, pull it down to the resting
position.
�AStowed position
�BResting position
LRS2733LRS2454
Safety—Seats, seat belts and supplemental restraint system1-5
Page 31 of 402

Fastening the seat belts
1. Adjust the seat. For additional information,refer to “Seats” in this section. 2. Slowly pull the seat belt out of the retractor
and insert the tongue into the buckle�Auntil
you hear and feel the latch engage.
● The retractor is designed to lock dur-
ing a sudden stop or on impact. A
slow pulling motion permits the seat
belt to move, and allows you some
freedom of movement in the seat.
● If the seat belt cannot be pulled from
its fully retracted position, firmly pull
the belt and release it. Then
smoothly pull the belt out of the re-
tractor. 3. Position the lap belt portion
low and snug
on the hips�Bas shown.
4. Pull the shoulder belt portion toward the retractor to take up extra slack
�C. Be sure
the shoulder belt is routed over your shoul-
der and across your chest.
The front passenger seat and the rear seating
positions three-point seat belts have two modes
of operation: ● Emergency Locking Retractor (ELR)
● Automatic Locking Retractor (ALR)
The ELR mode allows the seat belt to extend and
retract to allow the driver and passengers some
LRS2708LRS2674LRS2675
1-14Safety—Seats, seat belts and supplemental restraint system
Page 33 of 402
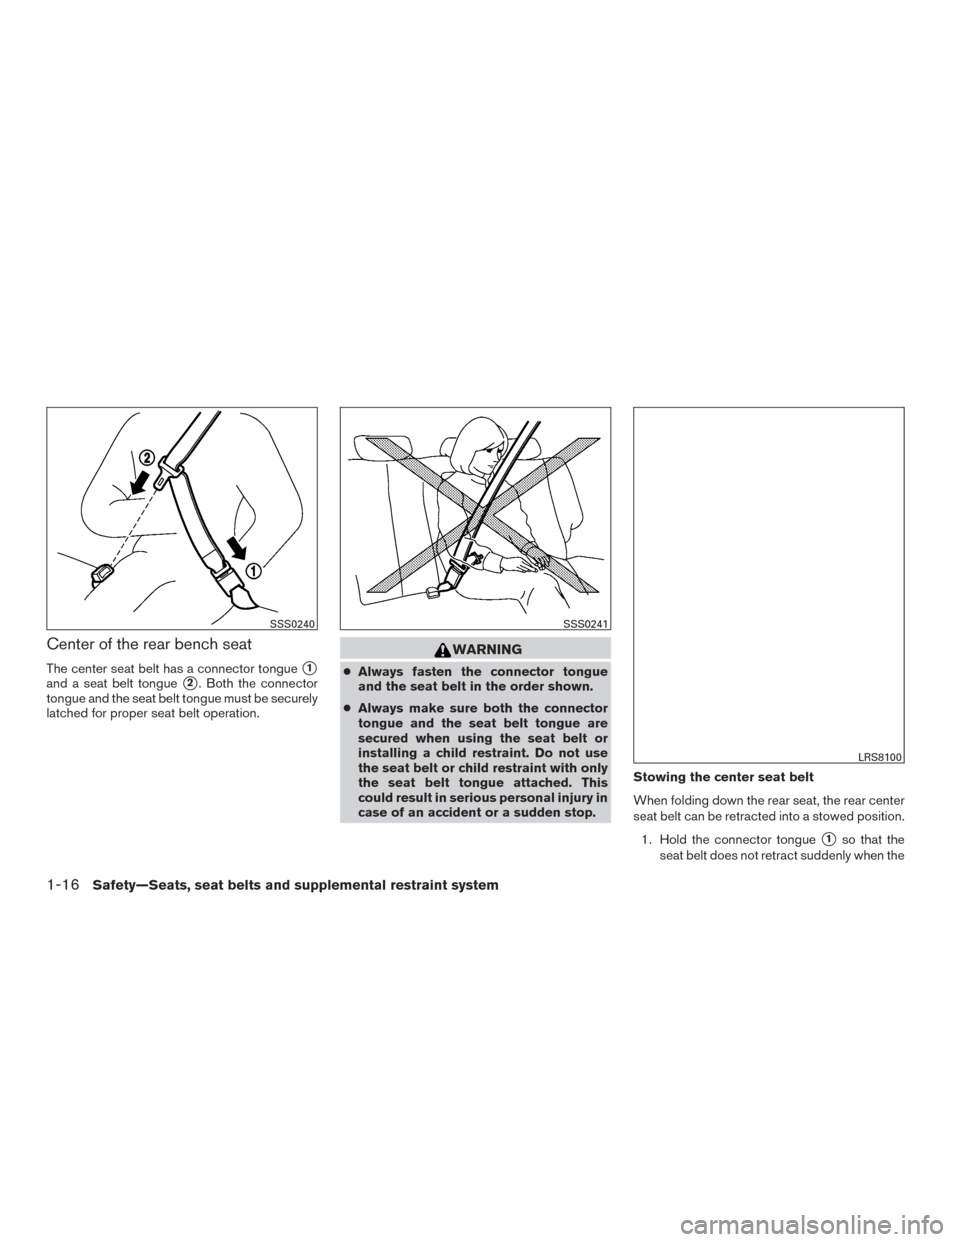
Center of the rear bench seat
The center seat belt has a connector tongue�1
and a seat belt tongue�2. Both the connector
tongue and the seat belt tongue must be securely
latched for proper seat belt operation.
WARNING
● Always fasten the connector tongue
and the seat belt in the order shown.
● Always make sure both the connector
tongue and the seat belt tongue are
secured when using the seat belt or
installing a child restraint. Do not use
the seat belt or child restraint with only
the seat belt tongue attached. This
could result in serious personal injury in
case of an accident or a sudden stop. Stowing the center seat belt
When folding down the rear seat, the rear center
seat belt can be retracted into a stowed position.
1. Hold the connector tongue
�1so that the
seat belt does not retract suddenly when the
SSS0240SSS0241
LRS8100
1-16Safety—Seats, seat belts and supplemental restraint system
Page 34 of 402
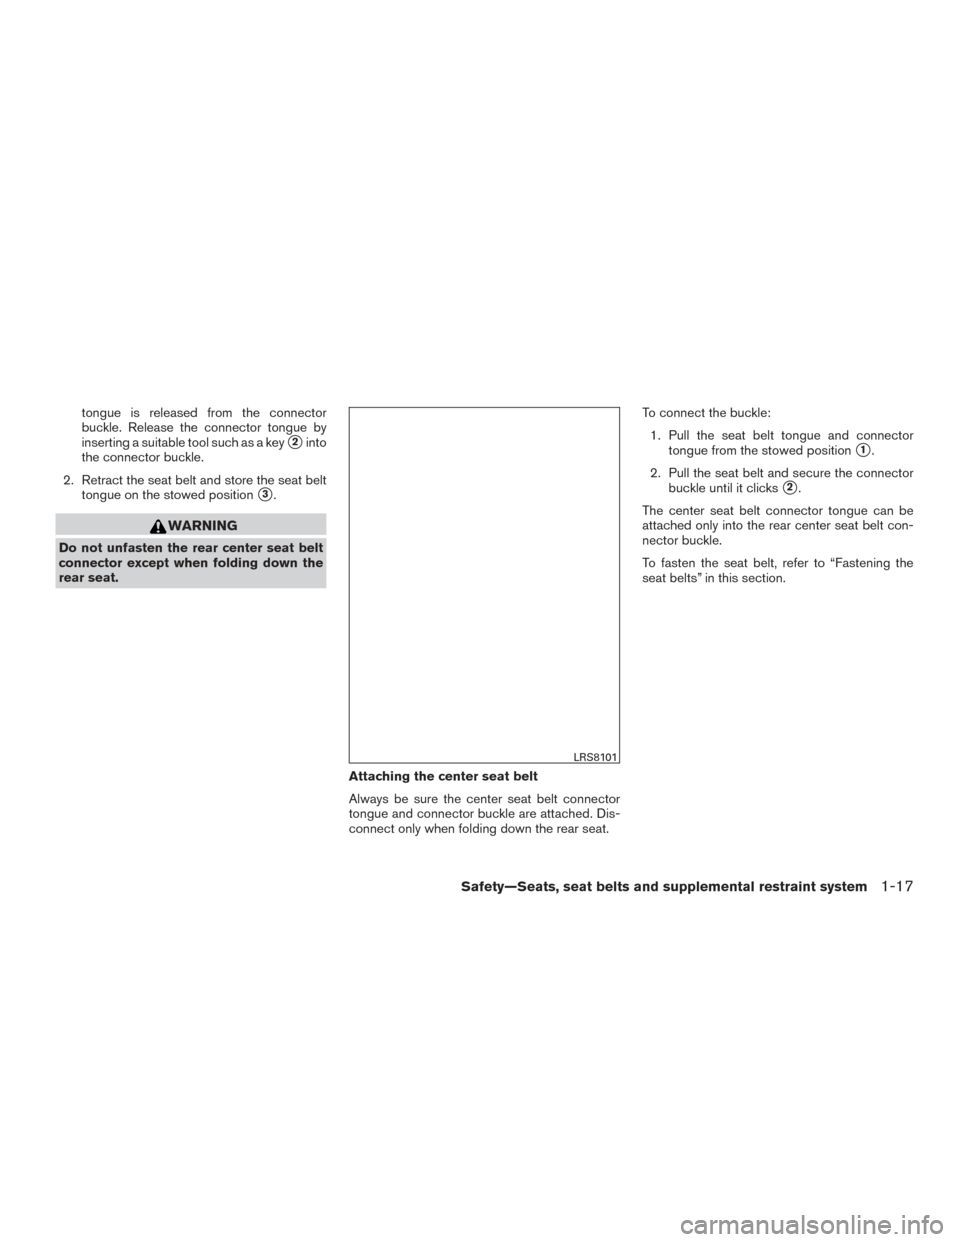
tongue is released from the connector
buckle. Release the connector tongue by
inserting a suitable tool such as a key
�2into
the connector buckle.
2. Retract the seat belt and store the seat belt tongue on the stowed position
�3.
WARNING
Do not unfasten the rear center seat belt
connector except when folding down the
rear seat.
Attaching the center seat belt
Always be sure the center seat belt connector
tongue and connector buckle are attached. Dis-
connect only when folding down the rear seat. To connect the buckle:
1. Pull the seat belt tongue and connector tongue from the stowed position
�1.
2. Pull the seat belt and secure the connector buckle until it clicks
�2.
The center seat belt connector tongue can be
attached only into the rear center seat belt con-
nector buckle.
To fasten the seat belt, refer to “Fastening the
seat belts” in this section.
LRS8101
Safety—Seats, seat belts and supplemental restraint system1-17
Page 59 of 402

If the seating position does not have an
adjustable head restraint/headrest and it is
interfering with the proper booster seat fit,
try another seating position or a different
booster seat.
4. Position the lap portion of the seat belt low and snug on the child’s hips. Be sure to
follow the booster seat manufacturer’s in-
structions for adjusting the seat belt routing.
5. Pull the shoulder belt portion of the seat belt toward the retractor to take up extra slack.
Be sure the shoulder belt is positioned
across the top, middle portion of the child’s
shoulder. Be sure to follow the booster seat
manufacturer’s instructions for adjusting the
seat belt routing.
6. Follow the warnings, cautions and instruc- tions for properly fastening a seat belt
shown in “Three-point type seat belt with
retractor” in this section. 7. If the booster seat is installed in the front
passenger seat, place the ignition switch in
the ON position. The front passenger air bag
status light
may or may not illuminate,
depending on the size of the child and the
type of booster seat being used. For addi-
tional information, refer to “Front passenger
air bag and status light” in this section.
PRECAUTIONS ON SRS
This SRS section contains important information
concerning the following systems:
● Driver and front passenger supplemental
front-impact air bag (NISSAN Advanced Air
Bag System)
● Front seat-mounted side-impact supple-
mental air bag
● Roof-mounted curtain side-impact supple-
mental air bag
● Seat belt with pretensioner(s) (front seats)
Supplemental front-impact air bag system
The NISSAN Advanced Air Bag System can help
cushion the impact force to the head and chest of
the driver and front passenger in certain frontal
collisions.
Front seat-mounted side-impact supple-
mental air bag system
This system can help cushion the impact force to
the chest area of the driver and front passenger in
certain side-impact collisions. The side air bags
are designed to inflate on the side where the
vehicle is impacted.
WRS0475
SUPPLEMENTAL RESTRAINT
SYSTEM (SRS)
1-42Safety—Seats, seat belts and supplemental restraint system
Page 72 of 402

If the vehicle is moving, please come to a stop
when it is safe to do so. Check and correct any of
the above conditions. Restart the vehicle and
wait 1 minute.
NOTE:
A system check will be performed during
which the front passenger air bag status
light will remain lit for about 7 seconds
initially.
If the light is still OFF after this, the small adult,
child or child restraint should be repositioned in
the rear seat and the vehicle should be checked
as soon as possible. It is recommended that you
visit a NISSAN dealer for this service.
Other supplemental front-impact air bag
precautions
WARNING
●Do not place any objects on the steering
wheel pad or on the instrument panel.
Also, do not place any objects between
any occupant and the steering wheel or
instrument panel. Such objects may be-
come dangerous projectiles and cause
injury if the front air bags inflate. ●
Immediately after inflation, several
front air bag system components will be
hot. Do not touch them; you may se-
verely burn yourself.
● No unauthorized changes should be
made to any components or wiring of
the supplemental air bag system. This is
to prevent accidental inflation of the
supplemental air bag or damage to the
supplemental air bag system.
● Do not make unauthorized changes to
your vehicle’s electrical system, sus-
pension system or front end structure.
This could affect proper operation of
the front air bag system.
● Tampering with the front air bag system
may result in serious personal injury.
Tampering includes changes to the
steering wheel and the instrument
panel assembly by placing material
over the steering wheel pad and above
the instrument panel or by installing
additional trim material around the air
bag system.
● Removing or modifying the front pas-
senger seat may affect the function of
the air bag system and result in serious
personal injury. ●
Modifying or tampering with the front
passenger seat may result in serious
personal injury. For example, do not
change the front seats by placing mate-
rial on the seat cushion or by installing
additional trim material, such as seat
covers, on the seat that are not specifi-
cally designed to assure proper air bag
operation. Additionally, do not stow any
objects under the front passenger seat
or the seat cushion and seatback. Such
objects may interfere with the proper
operation of the occupant classification
sensor (weight sensor) .
● No unauthorized changes should be
made to any components or wiring of
the seat belt system. This may affect the
front air bag system. Tampering with
the seat belt system may result in seri-
ous personal injury.
Safety—Seats, seat belts and supplemental restraint system1-55
Page 80 of 402
1. Tachometer
2. Temperature gauge
3. Odometer/twin trip odometer/trip com-puter
4. Fuel gauge 5. Speedometer
6. Trip odometer reset switch/trip com-
puter mode 7. Continuously Variable Transmission
(CVT) position indicator (CVT models
only)
8. Instrument brightness control
CAUTION
● To clean the meter lens, use a soft cloth,
dampened with water. Never use a
rough cloth, alcohol, benzine, thinner or
any kind of solvent or paper towel with
a chemical cleaning agent. They will
scratch or cause discoloration to the
lens.
● Do not spray any liquid such as water on
the meter lens. Spraying liquid may
cause the system to malfunction.
Type A (if so equipped)
LIC2146
METERS AND GAUGES
Instruments and controls2-3

Pull up or push down the adjusting lever to adjust
the seat height until the desired position is
achieved.
FOLDING REAR SEAT
1. Ensure the rear outboar")