Page 146 of 402

FUEL-FILLER CAP
WARNING
●Gasoline is extremely flammable and
highly explosive under certain condi-
tions. You could be burned or seriously
injured if it is misused or mishandled.
Always stop the engine and do not
smoke or allow open flames or sparks
near the vehicle when refueling.
● Do not attempt to top off the fuel tank
after the fuel pump nozzle shuts off
automatically. Continued refueling may
cause fuel overflow, resulting in fuel
spray and possibly a fire.
● Use only an original equipment type
fuel-filler cap as a replacement. It has a
built-in safety valve needed for proper
operation of the fuel system and emis-
sion control system. An incorrect cap
can result in a serious malfunction and
possible injury. It could also cause
the
Malfunction Indicator Light
(MIL) to come on.
● Never pour fuel into the throttle body to
attempt to start your vehicle. ●
Do not fill a portable fuel container in
the vehicle or trailer. Static electricity
can cause an explosion of flammable
liquid, vapor or gas in any vehicle or
trailer. To reduce the risk of serious
injury or death when filling portable fuel
containers:
– Always place the container on the ground when filling.
– Do not use electronic devices when filling.
– Keep the pump nozzle in contact with the container while you are fill-
ing it.
– Use only approved portable fuel con- tainers for flammable liquid.
CAUTION
●Do not use E-15 or E-85 fuel in your
vehicle. For additional information, re-
fer to the “Fuel Recommendation” in
the “Technical and consumer informa-
tion” section of this manual. ●
The LOOSE FUEL CAP warning mes-
sage will be displayed if the fuel-filler
cap is not properly tightened. It may
take a few driving trips for the message
to be displayed. Failure to tighten the
fuel-filler cap properly after the LOOSE
FUEL CAP warning message is dis-
played may cause the
Malfunc-
tion Indicator Light (MIL) to illuminate.
● Failure to tighten the fuel-filler cap
properly may cause the
Malfunc-
tion Indicator Light (MIL) to illuminate.
If the
light illuminates because
the fuel-filler cap is loose or missing,
tighten or install the cap and continue
to drive the vehicle. The
light
should turn off after a few driving trips.
If the
light does not turn off after a
few driving trips, have the vehicle in-
spected. It is recommended you visit a
NISSAN dealer for this service.
● For additional information, refer to the
“Malfunction Indicator Light (MIL)” in
the “Instruments and controls” section
of this manual.
● If fuel is spilled on the vehicle body,
flush it away with water to avoid paint
damage.
Pre-driving checks and adjustments3-27
Page 147 of 402
NOTE:
Changing ignition switch status during the
refueling process may cause a delay in fuel
gauge response.To remove the fuel-filler cap:1. Turn the fuel-filler cap counterclockwise to remove.
2. Put the fuel-filler cap on the cap holder
�1
while refueling.
To install the fuel-filler cap: 1. Insert the fuel-filler cap straight into the fuel- filler tube.
2. Turn the fuel-filler cap clockwise until a single click is heard.
Loose Fuel Cap warning message
The LOOSE FUEL CAP warning message dis-
plays in the odometer when the fuel-filler cap is
not tightened correctly after the vehicle has been
refueled. It may take a few driving trips for the
message to be displayed. To turn off the warning
message, perform the following:
1. Remove and install the fuel-filler cap as pre- viously described as soon as possible.
2. Tighten the fuel-filler cap until it clicks.
LPD2172
Type A (if so equipped)
LPD2025
3-28Pre-driving checks and adjustments
Page 148 of 402
3. Press the loose fuel cap warning reset but-ton
�Ain the meter for about 1 second to
turn off the LOOSE FUEL CAP warning
message after tightening the fuel-filler cap.
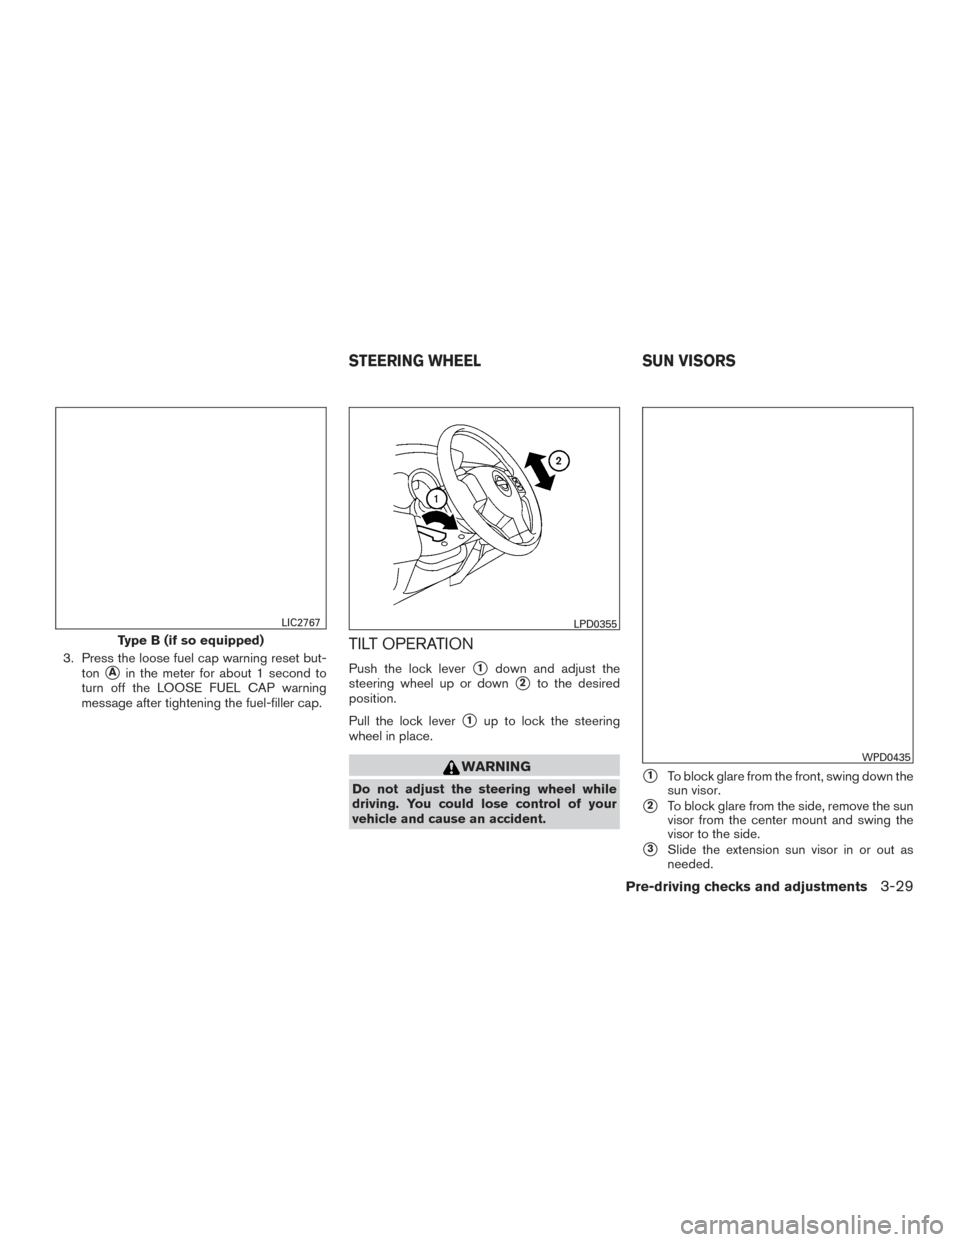
TILT OPERATION
Push the lock lever�1down and adjust the
steering wheel up or down
�2to the desired
position.
Pull the lock lever
�1up to lock the steering
wheel in place.
WARNING
Do not adjust the steering wheel while
driving. You could lose control of your
vehicle and cause an accident.�1To block glare from the front, swing down the
sun visor.
�2To block glare from the side, remove the sun
visor from the center mount and swing the
visor to the side.
�3Slide the extension sun visor in or out as
needed.
Type B (if so equipped)
LIC2767LPD0355
WPD0435
STEERING WHEEL SUN VISORS
Pre-driving checks and adjustments3-29
Page 346 of 402

●Never pour fuel into the throttle body or
attempt to start the engine with the air
cleaner removed. Doing so could result
in serious injury.
To remove the filter from the air cleaner, release
the retaining clips
�A, then release the holders at
the back of the unit. Pull the unit upward
�B.
The viscous paper type filter element should not
be cleaned and reused. Replace the air filter
according to the maintenance log shown in a
separate maintenance booklet.
When replacing the air filter, wipe the inside of
the air cleaner housing and the cover with a damp
cloth.
CLEANING
If your windshield is not clear after using the
windshield–washer or if a wiper blade chatters
when running, wax or other material may be on
the blade or windshield.
Clean the outside of the windshield with a washer
fluid or a mild detergent. Your windshield is clean
if beads do not form when rinsing with clear
water.
Clean each blade by wiping it with a cloth soaked
in a washer fluid or a mild detergent. Then rinse
the blades with clear water. If your windshield is
still not clear after cleaning the blades and using
the wiper, install new windshield wiper blades.
CAUTION
Worn windshield wiper blades can dam-
age the windshield and impair driver
vision.
REPLACING
Replace the wiper blades if they are worn.
To replace the windshield wiper blades, follow
the procedure below:
1. Lift the wiper arm away from the windshield.
2. Push the release tab
�B.
3. Move the wiper blade
�Adown and remove.
4. Insert the new wiper blade onto the wiper arm until it clicks into place.
5. Push wiper on to windshield.
LDI2757
WINDSHIELD WIPER BLADES
Maintenance and do-it-yourself8-19
Page 377 of 402

Incorrect ignition timing may result in spark
knock, after-run and/or overheating, which may
cause excessive fuel consumption or engine
damage. If any of the above symptoms are en-
countered, have your vehicle checked. It is rec-
ommended that you visit a NISSAN dealer for
servicing.
However, now and then you may notice
light spark knock for a short time while
accelerating or driving up hills. This is not a
cause for concern, because you get the
greatest fuel benefit when there is light
spark knock for a short time under heavy
engine load.
ENGINE OIL AND OIL FILTER
RECOMMENDATIONS
Selecting the correct oil
It is essential to choose the correct grade, quality
and viscosity engine oil to ensure satisfactory
engine life and performance. For additional infor-
mation, refer to “Recommended fluids/lubricants
and capacities” in this section. NISSAN recom-
mends the use of an energy conserving oil in
order to improve fuel economy.
Select only engine oils that meet the American
Petroleum Institute (API) certification or Interna-
tional Lubricant Standardization and ApprovalCommittee (ILSAC) certification and SAE vis-
cosity standard. These oils have the API certifica-
tion mark on the front of the container. Oils which
do not have the specified quality label should not
be used as they could cause engine damage.Oil additives
NISSAN does not recommend the use of oil
additives. The use of an oil additive is not neces-
sary when the proper oil type is used and main-
tenance intervals are followed.
Oil which may contain foreign matter or has been
previously used should not be used.
LTI2061
9-6Technical and consumer information