Page 141 of 636
 .
Push the heated steering wheel switch to warm
the steering whee")
The heated steering wheel system is designed to
operate only when the surface temperature of the
steering wheel is below 68°F (20°C) .
Push the heated steering wheel switch to warm
the steering wheel after the engine starts. The
indicator light will come on.
If the surface temperature of the steering wheel is
below 68°F (20°C) , the system will heat the
steering wheel and cycle off and on to maintain a
temperature above 68°F (20°C) . The indicator
light will remain on as long as the system is on.Push the switch again to turn the heated steering
wheel system off manually. The indicator light will
go off. The switch will turn off automatically
30 minutes after activation, once this happens
the switch will need to be pressed again to restart
the cycle.
NOTE:
If the surface temperature of the steering
wheel is above 68°F (20°C) when the switch
is turned on, the system will not heat the
steering wheel. This is not a malfunction.
The warning systems switch is used to turn on
and off the Blind Spot Warning (BSW) system
that is activated using the settings menu on the
vehicle information display.
When the warning systems switch is turned off,
the indicator
�1on the switch is off. The indicator
will also be off if the warning system is deacti-
vated using the settings menu.
The BSW system will turn on the BSW/RCTA
indicator light, located next to the outside mirrors,
if the radar detects a vehicle in the detection
zone. If the turn signal is activated in the direction
of the detected vehicle, a chime sounds twice
and the BSW/RCTA indicator light will flash. For
LIC0421LSD2208
HEATED STEERING WHEEL SWITCH
(if so equipped) WARNING SYSTEMS SWITCH (if so
equipped)
2-60Instruments and controls
Page 165 of 636
 will automati-
cally shut off. The heated outside mirrors (if
so equipped) will re")
NOTE:
If the rear power window is opened while
the defroster switch is on, the rear window
defroster (if so equipped) will automati-
cally shut off. The heated outside mirrors (if
so equipped) will remain on. The rear win-
dow defroster will automatically turn on
when the rear power window is fully closed
if the switch is on.The interior light has a three-position switch and
operates regardless of ignition switch position.
When the switch is in the ON position
�1, the
interior lights illuminate, regardless of door posi-
tion. The lights will go off after a period of time
unless the ignition switch is placed in the ON
position. When the switch is in the DOOR or normal
operation position
�2, the interior lights, puddle
lights (if so equipped) , and cargo light will stay on
for a period of time when:
● The doors are unlocked by the key fob, a key
or the power door lock switch while all doors
are closed and the ignition switch is in the
OFF position.
● The driver’s door is opened and then closed
while the key is removed from the ignition
switch.
● The key is removed from the ignition switch
while all doors are closed.
The lights will turn off while the timer is activated
when: ● The driver’s door is locked by the key fob, a
key, or the power door lock switch.
● The ignition switch is turned ON.
When the switch is in the OFF position
�3, the
interior lights do not illuminate, regardless of door
position. The puddle lights (if so equipped) and
cargo light come on when any front or rear pas-
senger door is opened.
The lights will turn off automatically after a period
of time while doors are open to prevent the bat-
tery from becoming discharged.
LIC0792
INTERIOR LIGHTS
2-84Instruments and controls
Page 172 of 636

3 Pre-driving checks and adjustments
Keys .............................................3-2NISSAN Intelligent Key® . .......................3-2
NISSAN Vehicle Immobilizer System keys .........3-4
Doors ............................................3-5
Locking with key ................................3-5
Locking with inside lock knob ....................3-6
Locking with power door lock switch . . . ..........3-7
Automatic door locks ...........................3-7
Child safety rear door lock .......................3-7
NISSAN Intelligent Key® ...........................3-8
Operating range ................................3-9
Door locks/unlocks precaution ...................3-9
NISSAN Intelligent Key® Operation .............3-10
How to use the remote keyless entry
function ...................................... 3-13
Warning signals ............................... 3-17
Troubleshooting guide ......................... 3-18
Remote Engine Start (if so equipped) ...............3-19
Remote engine start operating range . . . .........3-19
Remote starting the vehicle .....................3-19
Extending engine run time ......................3-20
Canceling a remote start .......................3-20
Conditions the remote start will not work .........3-20 Hood
........................................... 3-21
Fuel-filler door ................................... 3-22
Diesel fuel engines ............................ 3-22
Gasoline fuel engines .......................... 3-22
Steering wheel ................................... 3-24
Manual operation (if so equipped) ...............3-24
Automatic operation (if so equipped)............. 3-25
Sun visors ....................................... 3-26
Vanity mirrors (if so equipped) ...................3-26
Card holder (driver’s side only) ..................3-27
Mirrors .......................................... 3-27
Manual anti-glare rearview mirror
(if so equipped) ............................... 3-27
Automatic anti-glare rearview mirror
(if so equipped) ............................... 3-27
Outside mirrors ............................... 3-28
Truck box ........................................ 3-32
Tailgate ....................................... 3-32
Tie
down hooks ............................... 3-36
Automatic drive positioner (if so equipped) ..........3-36
Memory storage function .......................3-37
Entry/exit function ............................. 3-38
System operation .............................. 3-38
Page 197 of 636
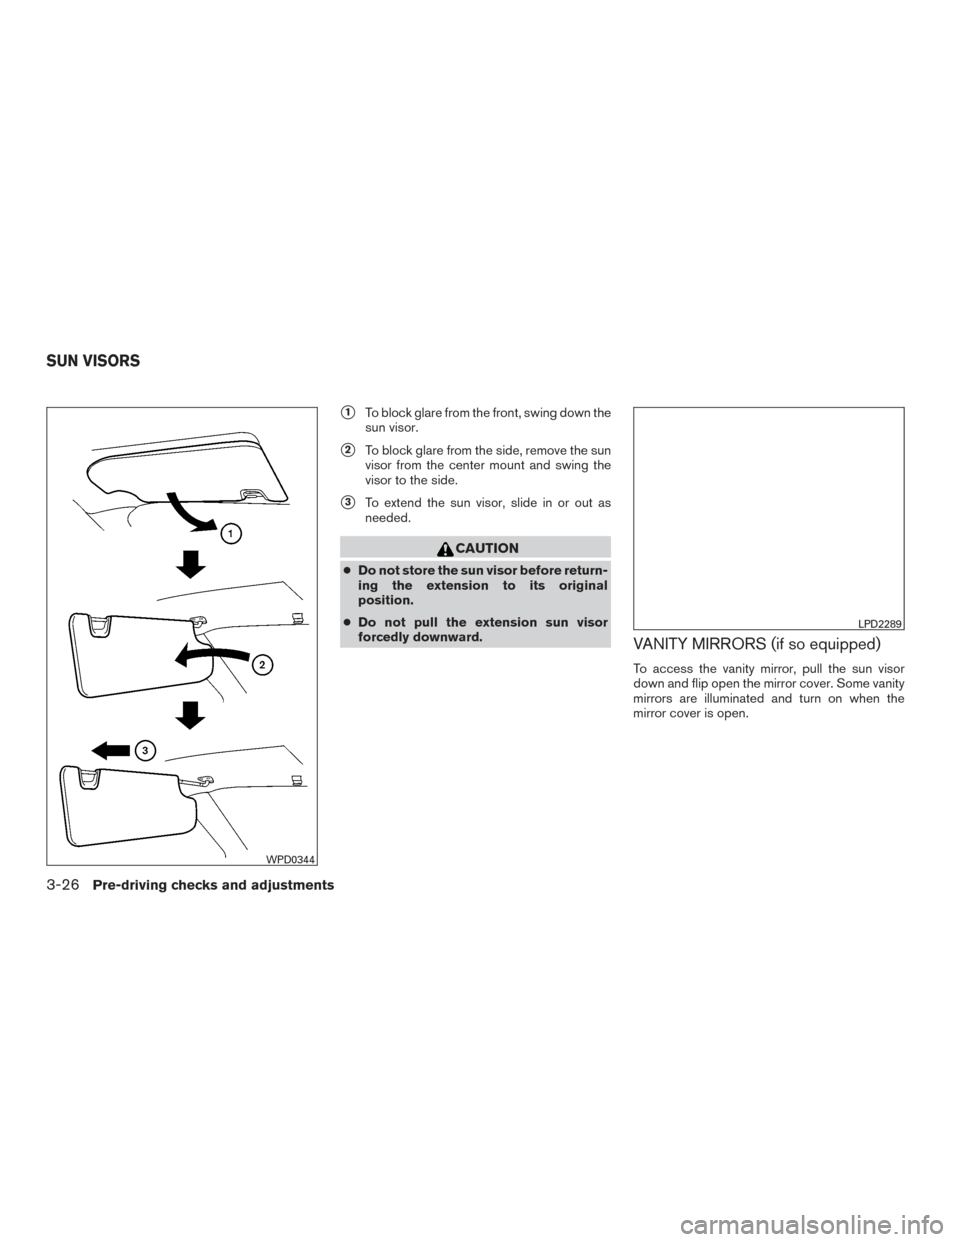
�1To block glare from the front, swing down the
sun visor.
�2To block glare from the side, remove the sun
visor from the center mount and swing the
visor to the side.
�3To extend the sun visor, slide in or out as
needed.
CAUTION
● Do not store the sun visor before return-
ing the extension to its original
position.
● Do not pull the extension sun visor
forcedly downward.
VANITY MIRRORS (if so equipped)
To access the vanity mirror, pull the sun visor
down and flip open the mirror cover. Some vanity
mirrors are illuminated and turn on when the
mirror cover is open.
WPD0344
LPD2289
SUN VISORS
3-26Pre-driving checks and adjustments
Page 198 of 636

To access the card holder, slide card in the card
holder. Do not view information while operating
the vehicle.
MANUAL ANTI-GLARE REARVIEW
MIRROR (if so equipped)
Use")
CARD HOLDER (driver’s side only)
To access the card holder, slide card in the card
holder. Do not view information while operating
the vehicle.
MANUAL ANTI-GLARE REARVIEW
MIRROR (if so equipped)
Use the night position�1to reduce glare from
the headlights of vehicles behind you at night.
Use the day position
�2when driving in daylight
hours.
WARNING
Use the night position only when neces-
sary, because it reduces rear view clarity.
AUTOMATIC ANTI-GLARE
REARVIEW MIRROR (if so equipped)
The inside mirror is designed so that it automati-
cally dims during night time conditions and ac-
cording to the intensity of the headlights of the
vehicle following you. The automatic anti-glare
feature is activated when the ignition switch is in
the ON position.
The indicator light
�2will illuminate when the
automatic anti-glare feature is operating.
NOTE:
Do not hang any objects over the sensors
�1or apply glass cleaner to the sensors.
Doing so will reduce the sensitivity of the
sensors, resulting in improper operation.LPD2436WPD0126
MIRRORS
Pre-driving checks and adjustments3-27
Page 199 of 636

To turn off the automatic anti-glare feature, press
the O button. The indicator light will turn off.
To turn on the automatic anti-glare feature again,
press the | button again")
Type A (if so equipped)
To turn off the automatic anti-glare feature, press
the O button. The indicator light will turn off.
To turn on the automatic anti-glare feature again,
press the | button again. The indicator light
will turn on.
For additional information, refer to the
“HomeLink® Universal Transceiver” in the “In-
struments and controls” section of this manual.
Type B (if so equipped)
●To turn off the anti-glare feature, press
the
button. The indicator light will turn
off.
● To turn on the anti-glare feature, press
the
button again. The indicator light
will turn on.
For additional information about the compass
and compass features
�3, refer to “Compass” in
the “Instruments and controls” section of this
manual. For additional information, refer to the
“HomeLink® Universal Transceiver” in the “In-
struments and controls” section of this manual.
OUTSIDE MIRRORS
WARNING
●
Objects viewed in the outside mirror on
the passenger side are closer than they
appear. Be careful when moving to the
right. Using only this mirror could cause
an accident. Use the inside mirror or
glance over your shoulder to properly
judge distances to other objects.
● Do not adjust the mirrors while driving.
You could lose control of your vehicle
and cause an accident.
Type A - Without compass (if so equipped)
LPD0469
Type B - With compass (if so equipped)
LPD2419
3-28Pre-driving checks and adjustments
Page 200 of 636
Manual control type (if so equipped)
The outside mirror can be moved in any direction
for a better rear view.
Electric control type (if so equipped)
The outside mirror remote control will operate
only when the ignition switch is placed in the
ACC or ON position.
Rotate the control lever to select the right or left
mirror. Adjust the mirror to the desired position by
moving the control lever.
Trailer tow mirrors (if so equipped)
WARNING
Objects viewed in the convex portion of
the trailer tow mirror are closer than they
appear. Be careful when changing lanes or
turning. Using only the convex mirror
could cause an accident. Use the other
mirrors or glance over your shoulder to
properly judge distances to other objects.
Use the outside mirror remote control to adjust
the top portion of the trailer tow mirror.
WPD0170LPD0346LPD0279
Pre-driving checks and adjustments3-29
Page 201 of 636
The lower portion of the trailer tow mirror can be
moved manually in any direction for a better rear
view.Pull the trailer tow mirror outward to extend it to
the desired position for better visibility while tow-
ing a trailer.
WARNING
Do not extend or retract mirrors while driv-
ing. You may lose control of your vehicle
and cause an accident.
CAUTION
Driving in tight spaces with mirrors ex-
tended may cause damage to the vehicle.
Manual folding outside mirrors
Pull the outside mirror toward the door to fold it.
LPD0268
Type A (if so equipped)
LPD0259
3-30Pre-driving checks and adjustments

The outside mirror can be moved in any direction
for a better rear view.
Electric control type (if so equipped)
The outside mirror remote control will operate
only")
