2016 NISSAN SENTRA instrument panel
[x] Cancel search: instrument panelPage 4 of 32
2
DRIVE MODES
NORMAL
Normal drive mode is recommended for
normal, everyday driving and is the default mode
of your vehicle.
ECO
ECO drive mode is recommended to help maximize fuel economy. Performance may be reduced.
• Press the
ECO button
1 on the instrument panel to activate.
•
T
he ECO drive indicator light will illuminate on the instrument panel.
SPORT
SPORT drive mode is recommended for an enhanced performance feel. Fuel econ\
omy may be reduced.
• Press the
SPORT button
2 on the instrument panel to activate.
• T
he SPORT drive indicator light will illuminate on the instrument panel.
For more information, refer to the “Starting and driving (section 5)” of your Owner’s Manual.
NEW SYSTEM FEATURES
12
NISSANCONNECTsm SERVICES1 (if so equipped)
NissanConnect Services combines personalized convenience and personal security features, adding innovation to your daily drive. Your vehicle will connect to
the NissanConnect Services Data Center and NissanConnect Services Response
Center using the TCU (Telematics Control Unit) installed in your vehicle. For more
details on NissanConnect Services or to enroll your vehicle, please visit
www.NissanUSA.com/connect or call 855-426-6628.
Available services include:
Automatic Collision Notification – In the event
of an air bag deployment, vehicle information
is sent to the emergency response center
. The
Emergency Response Agent attempts to contact
the vehicle’s occupant and sends appropriate
emergency services.
Emergency Call – T his service provides
emergency assistance by connecting the
subscriber to a NissanConnect Services Specialist.
•
In case of an emergency
, press the in-vehicle telematics SOS button
1.
•
A Response Specialist will provide assist
ance based on the situation described by
the vehicle’s occupant.
1
1938277_16c_Sentra_US_pQRG_050516.indd 25/6/16 10:26 AM
To view detailed instructional videos regarding these and other features, please go to www.nissanownersinfo.mobi.
Page 5 of 32
3
Roadside Assistance – Roadside Assistance can
be accessed by:
1.
In-vehicle menu (headset button on the
map screen)
2. Niss
anConnect Services companion app
3.
Calling the Roadside Assist
ance
Provider directly
•
T
his service allows subscribers to receive
assistance for a non-emergency incident, such as towing, or a third party response.
In-vehicle Mess aging – Enables NISSAN to send service reminders, marketing,
renewal and other messages to subscribers directly into the vehicle.
Vehicle Health Report – Get a monthly overview on your vehicle’s overall health delivered to your email.
Dealer Service Sc heduling – Provides the subscriber with information and a
mechanism to allow him or her to contact a dealer to schedule service for the vehicle.
Stolen Vehicle Locator – A Response Specialist will attempt to obtain location information from a reported stolen vehicle and provide that information \
to local law
enforcement agencies to assist in the recovery of your stolen vehicle.
Remote Door Loc k/Unlock – Remotely access your vehicle via a NissanConnect
Services Response Specialist, the NissanConnect Services companion app or
website to remotely lock or unlock your vehicle.
Remote Sound Horn and Flash Lights – Sound the horn and flash the l\
ights remotely
using the Niss anConnect Services companion app or website.
Alarm Notification – T his system will notify you when the factory-installed vehicle alarm
system has been activated.
Maintenance Alert – Receive notifications via a selected method of \
a vehicle system
malfunction that triggers instrument panel warning lights.
Connected Searc h – Select “Connected Search” from the Destination menu on the
vehicle’s Navigation System to conduct a Point Of Interest (POI) search within a
certain distance of the vehicle’s location.
Assisted Searc h – Allows the subscriber to verbally request POI destination data from
a live operator.
Destination Download – Use the Niss anConnect Services companion app or website
to search for and send destinations directly to the vehicle.
Journey Planner – Send a route with up to five waypoints and a dest\
ination directly to
the vehicle.
Boundary Alert – Monitor the movement of your vehicle within a specifi\
ed region. Set up boundaries in the Monitoring section of the NissanConnect Services web portal.
Speed Alert – Set up a maximum speed on the Niss anConnect Services web portal.
You will receive notifications if your vehicle exceeds the maximum spee\
d setting.
1938277_16c_Sentra_US_pQRG_050516.indd 35/6/16 10:27 AM
To view detailed instructional videos regarding these and other features, please go to www.nissanownersinfo.mobi.
Page 10 of 32
8
LOOSE FUEL CAP
A LOOSE FUEL CAP warning message will
display in the vehicle information display
1
(if so equipped) when the fuel-filler cap is not
tightened correctly.
To tighten, turn the cap clockwise until a single click is heard.
The warning message will extinguish when the vehicle detects the fuel-filler cap is properly tightened and the
button 2 on the steering wheel is pressed.
If the cap is not properly tightened, the Malfunction Indicator Light may
also illuminate.
For more information, refer to the “Instruments and controls (section 2)” and the “Pre-driving checks and
adjustments (section 3)” of your Owner’s Manual.
1
2
FUEL-FILLER DOOR
The fuel-filler door release is located to the left of the steering wheel below the instrument panel.
To open the fuel-filler door, pull the release 1.
The fuel-filler door is located on the passenger’s side at the rear of the vehicle.
For more information, refer to the “Pre-driving checks and adjustments (section 3)” of your Owner’s Manual.
1
CLOCK SET/ADJUSTMENT
WITHOUT NAVIGATION – FM/AM RADIO
To adjust the time and the appearance of the clock on the display:
1.
Press the
SETUP button
1.
2.
Turn the TUNE/MENU knob
2 to select
“CLOCK” and press the ENTER button
3.
3.
Turn the TUNE/MENU knob
2 to select
“Set Time” and press the ENTER button 3.
The following settings can be adjusted:
•
By turning the
TUNE/MENU knob
2, the hours can be adjusted. Pressing
the ENTER button
3 will allow the minutes to be adjusted by the
TUNE/MENU knob
2.
• Press the
ENTER button
3 to finish.
The display will return to the regular display after 10 seconds.
ESSE NTIAL I N FOR MATION
12
3
1938277_16c_Sentra_US_pQRG_050516.indd 85/6/16 10:27 AM
To view detailed instructional videos regarding these and other features, please go to www.nissanownersinfo.mobi.
Page 14 of 32
12
TURNING THE ENGINE OFF
For a Continuously Variable Transmission, apply the brake pedal, move the shift lever to the P (PARK) position, apply the parking brake and push the ignition switch.
For a manual transmission, apply the brake pedal, depress the clutch pedal, place the vehicle in 1 (FIRST) gear, apply the parking brake and turn the ignition off.
For more information, refer to the “Starting and driving (section 5)” of your Owner’s Manual.
HEADLIGHT CONTROL SWITCH
HEADLIGHT CONTROL
Turn the headlight control switch to the position 1 to turn on the front parking,
tail, license plate and instrument panel lights. Turn the switch to the
position 2 to
turn on the headlights.
AUTOLIGHT SYSTEM
The autolight system will automatically turn the headlights on when it is dark and off when it is
light. The system will keep the headlights on for
a period of time after you turn the ignition off and
all doors are closed.
To activate the autolight system, turn the headlight control switch to the AUTO position
3 then push the ignition switch to
ON. To deactivate the autolight system, turn the headlight control switch to the OFF
position,
position 1 or position2.
HIGH BEAM SELECT
With the headlights on (either in the AUTO
position
3 or position 2), push the
headlight control switch forward
4 to select
the high beam function. The blue indicator light
will illuminate in the instrument panel. Pull the
headlight switch back to the original position to
select the low beam. The blue indicator light will extinguish.
Pull and release the headlight control switc h 5 to flash the headlight high beams on
and off.
FOG LIGHT SWITCH (if so equipped)
The headlights must be in the AUTO position
or the low beams
selected for the fog lights
to operate.
Turn the switch (inside collar) to the position
6 to turn the fog lights on.
Turn the switch (inside collar) to the OFF position to turn the fog lights off.
1
2
3
6
45
FIRST DRIVE FEATURES
1938277_16c_Sentra_US_pQRG_050516.indd 125/6/16 10:28 AM
To view detailed instructional videos regarding these and other features, please go to www.nissanownersinfo.mobi.
Page 19 of 32
17
CRUISE CONTROL
The cruise control system enables you to set a constant cruising speed once the vehicle has
reached 25 mph (40 km/h).
The system will automatically maintain the set speed until you tap the brake pedal, accelerate,
cancel or turn the system off.
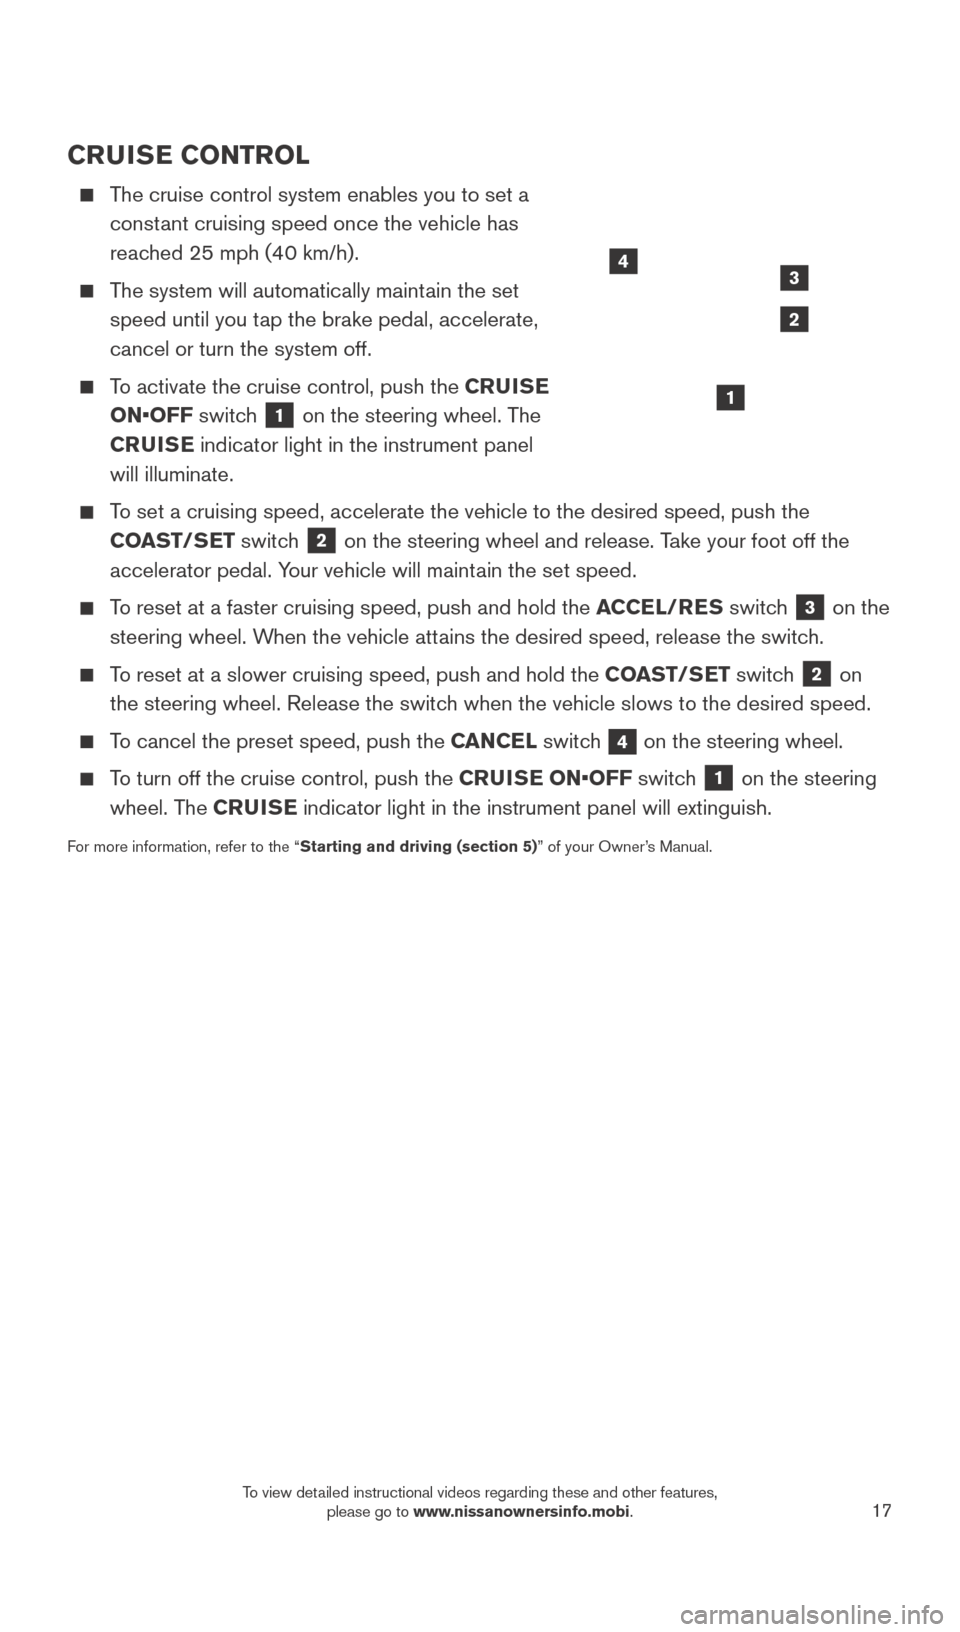
To activate the cruise control, push the CRUISE
ON•OFF switch
1 on the steering wheel. The
CRUISE indicator light in the instrument panel
will illuminate.
To set a cruising speed, accelerate the vehicle to the desired speed, pus\
h the COAST/SET switch
2 on the steering wheel and release. Take your foot off the
accelerator pedal. Your vehicle will maintain the set speed.
To reset at a faster cruising speed, push and hold the ACCEL/RES switch 3 on the
steering wheel. When the vehicle attains the desired speed, release the switch.
To reset at a slower cruising speed, push and hold the COAST/SET switch 2 on
the steering wheel. Release the switch when the vehicle slows to the desired speed.
To cancel the preset speed, push the CANCEL switch 4 on the steering wheel.
To turn off the cruise control, push the CRUISE ON•OFF switch 1 on the steering
wheel. The CRUISE indicator light in the instrument panel will extinguish.
For more information, refer to the “Starting and driving (section 5)” of your Owner’s Manual.
1
4
2
3
1938277_16c_Sentra_US_pQRG_050516.indd 175/6/16 10:29 AM
To view detailed instructional videos regarding these and other features, please go to www.nissanownersinfo.mobi.
Page 20 of 32
18
FIRST DRIVE FEATURES
INTELLIGENT CRUISE CONTROL (ICC) (if so equipped)
VEHICLE-TO-VEHICLE DISTANCE CONTROL MODE
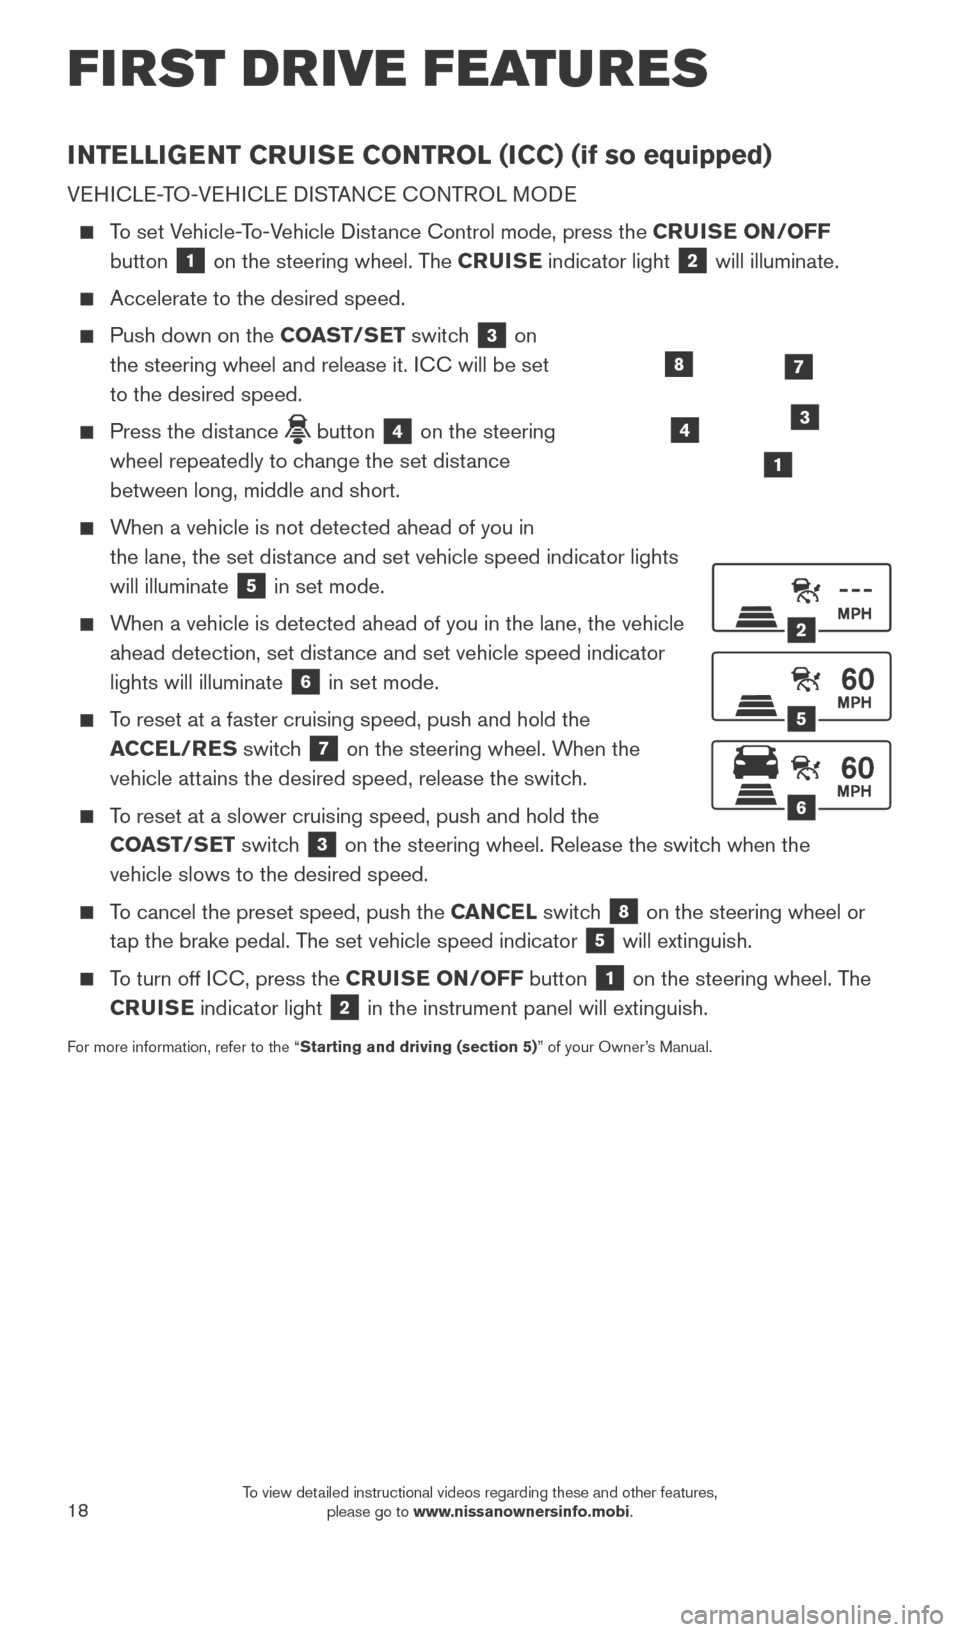
To set Vehicle-To-Vehicle Distance Control mode, press the CRUISE ON/OFF button
1 on the steering wheel. The CRUISE indicator light 2 will illuminate.
Accelerate to the desired speed.
Push down on the COAST/SET switch 3 on
the steering wheel and release it. ICC will be set
to the desired speed.
Press the dist ance button 4 on the steering
wheel repeatedly to change the set distance
between long, middle and short.
When a vehicle is not detected ahead of you in the lane, the set distance and set vehicle speed indicator lights
will illuminate
5 in set mode.
When a vehicle is detected ahead of you in the lane, the vehicle ahead detection, set distance and set vehicle speed indicator
lights will illuminate
6 in set mode.
To reset at a faster cruising speed, push and hold the ACCEL/RES switch
7 on the steering wheel. When the
vehicle attains the desired speed, release the switch.
To reset at a slower cruising speed, push and hold the COAST/SET switch
3 on the steering wheel. Release the switch when the
vehicle slows to the desired speed.
To cancel the preset speed, push the CANCEL switch 8 on the steering wheel or
tap the brake pedal. The set vehicle speed indicator
5 will extinguish.
To turn off ICC, press the CRUISE ON/OFF button 1 on the steering wheel. The
CRUISE indicator light
2 in the instrument panel will extinguish.
For more information, refer to the “Starting and driving (section 5)” of your Owner’s Manual.
2
5
6
1
4
87
3
1938277_16c_Sentra_US_pQRG_050516.indd 185/6/16 10:29 AM
To view detailed instructional videos regarding these and other features, please go to www.nissanownersinfo.mobi.