2016 NISSAN SENTRA ad blue
[x] Cancel search: ad bluePage 219 of 478
RDM (random) button
When the RDM (random) button is pressed while
a compact disc is playing, the play pattern can be
changed as follows:
CD:
1 Disc Random←→OFF
CD with MP3 or WMA:
1 Disc Random →1 Folder Random →OFF
1 Disc Random: all tracks on the disc will be
played randomly.
1 Folder Random: all tracks in the current folder
will be played randomly.
OFF: No random play pattern is applied. The
indicator on the display will turn off.
The current play pattern of the CD is displayed on
the screen unless no pattern is applied.
CD EJECT button
When the
CD EJECT button is pressed
with a compact disc loaded, the compact disc
will eject and the last source will be played.
When the
CD EJECT button is pressed
twice with a compact disc loaded, the compact
disc will be ejected further for easier CD removal.
If the disc is not removed within 20 seconds, the
disc will reload.
Additional features
For additional information about the iPod® player
available with this system, refer to “iPod® player
operation without Navigation System” in this sec-
tion.
For additional information about the USB (Uni-
versal Serial Bus) connection port interface avail-
able with this system, refer to “USB (Universal
Serial Bus) Connection Port (models without
Navigation System)” in this section.
For additional information about the Bluetooth®
audio interface available with this system, refer to
“Bluetooth® streaming audio without Navigation
System” in this section.
4-44Monitor, climate, audio, phone and voice recognition systems
Page 220 of 478
FM/AM/SAT RADIO WITH
COMPACT DISC (CD) PLAYER (Type
B) (if so equipped)For additional information, refer to “Audio opera-
tion precautions” regarding all operation precau-
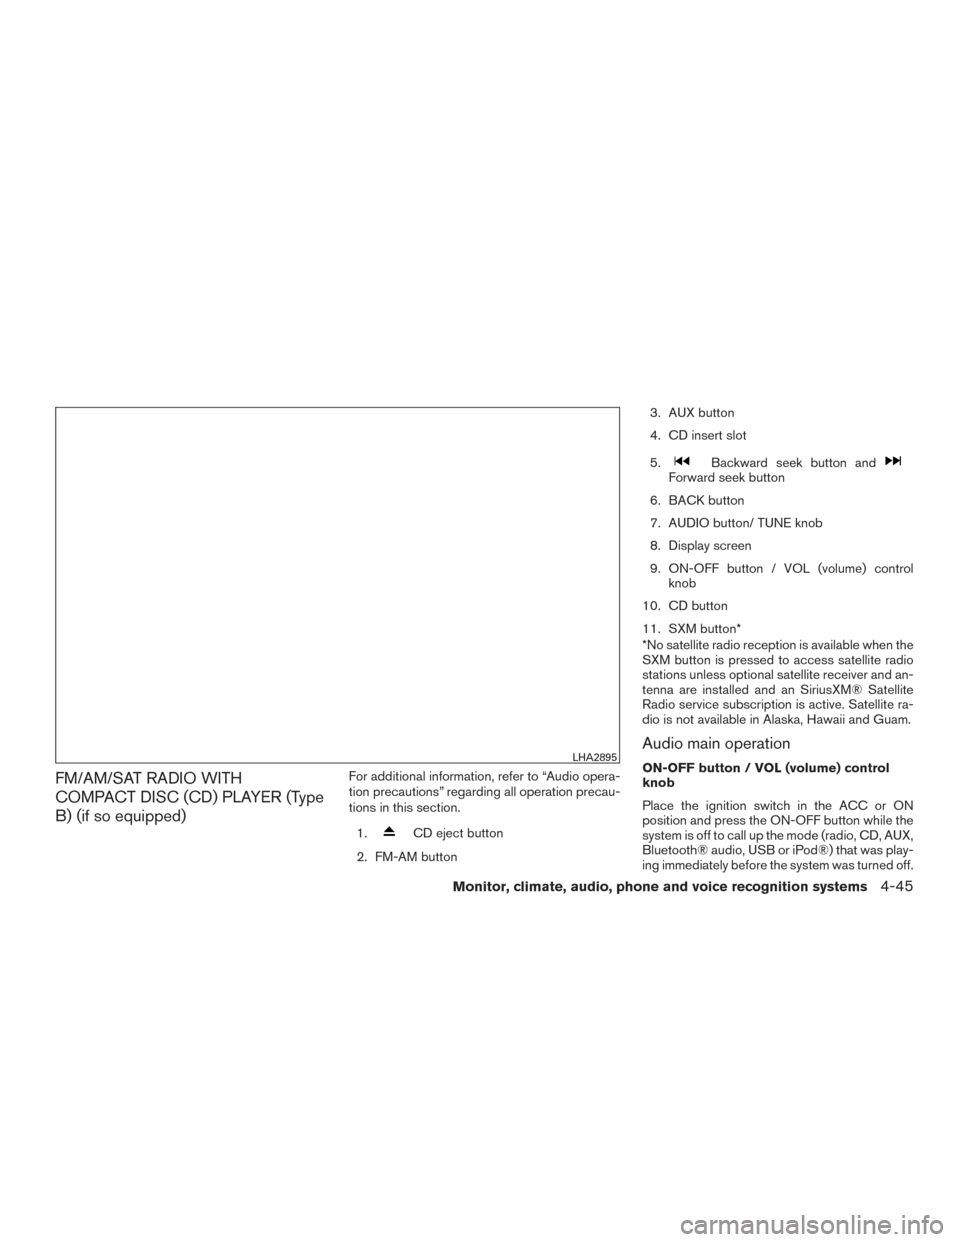
tions in this section.1.
CD eject button
2. FM-AM button 3. AUX button
4. CD insert slot
5.
Backward seek button andForward seek button
6. BACK button
7. AUDIO button/ TUNE knob
8. Display screen
9. ON-OFF button / VOL (volume) control knob
10. CD button
11. SXM button*
*No satellite radio reception is available when the
SXM button is pressed to access satellite radio
stations unless optional satellite receiver and an-
tenna are installed and an SiriusXM® Satellite
Radio service subscription is active. Satellite ra-
dio is not available in Alaska, Hawaii and Guam.
Audio main operation
ON-OFF button / VOL (volume) control
knob
Place the ignition switch in the ACC or ON
position and press the ON-OFF button while the
system is off to call up the mode (radio, CD, AUX,
Bluetooth® audio, USB or iPod®) that was play-
ing immediately before the system was turned off.LHA2895
Monitor, climate, audio, phone and voice recognition systems4-45
Page 226 of 478
SEEK (Reverse or FastForward) buttons
Press and hold the SEEK buttons
orfor 1.5 seconds while the compact disc
is playing to reverse or fast forward the track
being played. The compact disc plays at an in-
creased speed while reversing or fast forwarding.
When the button is released, the compact disc
returns to normal play speed.
SEEK buttons
Press the SEEK button
while a CD or
MP3/WMA CD is playing to return to the begin-
ning of the current track. Press the SEEK
button
several times to skip backward sev-
eral tracks.
Press the SEEK button
while a CD or
MP3/WMA CD is playing to advance one track.
Press the SEEK button
several times to
skip forward several tracks. If the last track on a
CD is skipped, the first track on the disc is played.
If the last track in a folder of an MP3/WMA CD is
skipped, the first track of the next folder is played. AUX button
The AUX IN audio input jack accepts any stan-
dard analog audio input such as from a portable
cassette tape/CD player, MP3 player or a laptop
computer. Press the AUX button to play a com-
patible device plugged into the AUX IN jack.
CD EJECT button
When the
CD EJECT button is pressed
with a compact disc loaded, the compact disc
will eject and the last source will be played.
If the disc is not removed within 10 seconds, the
disc will reload.
Additional features
For additional information, refer to “iPod® player
operation with Navigation System” in this section.
For additional information, refer to “USB (Univer-
sal Serial Bus) Connection Port (models with
Navigation System)” in this section.
For additional information, refer to “Bluetooth®
streaming audio with Navigation System” in this
section.USB (Universal Serial Bus)
CONNECTION PORT (models
without Navigation System) (if so
equipped)
Connecting a device to the USB
connection port
WARNING
Do not connect, disconnect, or operate the
USB device while driving. Doing so can be
a distraction. If distracted you could lose
control of your vehicle and cause an acci-
dent or serious injury.
LHA4001
Monitor, climate, audio, phone and voice recognition systems4-51
Page 236 of 478
BLUETOOTH® STREAMING AUDIO
WITHOUT NAVIGATION SYSTEM (if
so equipped)
If you have a compatible Bluetooth® audio de-
vice that is capable of playing audio files, the
device can be connected to the vehicle’s audio
system so that the audio files on the device play
through the vehicle’s speakers.
Connecting Bluetooth® audio
To connect your Bluetooth® audio device to the
vehicle, follow the procedure below:1. Press the
button. The system an-
nounces the available commands.
2. Say “Add Phone”. The system acknowl- edges the command and asks you to initiate
connecting from the phone handset. The
connecting procedure of the cellular phone
varies according to each cellular phone
model. For additional information, refer to
the cellular phone Owner’s Manual. You can
also visit www.nissanusa.com/bluetooth or
www.nissan.ca/bluetooth for instructions on
connecting NISSAN recommended cellular
phones. 3. When prompted for a Passkey code, enter
“1234” from the handset. The Passkey code
“1234” has been assigned by NISSAN and
cannot be changed.
Audio main operation
To switch to the Bluetooth® audio mode, press
the MEDIA button repeatedly until the
Bluetooth® audio mode is displayed on the
screen.
You can use the vehicle audio controls or the
Bluetooth® device’s controls to play, pause, skip
or reverse tracks.
BLUETOOTH® STREAMING AUDIO
WITH NAVIGATION SYSTEM
If you have a compatible Bluetooth® audio de-
vice that is capable of playing audio files, the
device can be connected to the vehicle’s audio
system so that the audio files on the device play
through the vehicle’s speakers.
Connecting Bluetooth® audio
To connect your Bluetooth® audio device to the
vehicle, follow the procedure below:
1. Press the [
] button.
2. Touch the “Settings” key.
3. Touch the “Phone & Bluetooth” key.
4. Touch the “Connect New Device” key.
LHA3747
Monitor, climate, audio, phone and voice recognition systems4-61
Page 237 of 478
5. The system acknowledges the commandand asks you to initiate connecting from the
phone handset. The connecting procedure
of the cellular phone varies according to
each cellular phone model. For additional
information, refer to the cellular phone Own-
er’s Manual. You can also visit
www.nissanusa.com/bluetooth or
www.nissan.ca/bluetooth for instructions on
connecting NISSAN recommended cellular
phones.
Audio main operation
To switch to the Bluetooth® audio mode, press
the AUX button repeatedly until the Bluetooth®
audio mode is displayed on the screen.
The controls for the Bluetooth® audio are dis-
played on the screen.
CD CARE AND CLEANING
●Handle a CD by its edges. Do not bend the
disc. Never touch the surface of the disc.
● Always place the discs in the storage case
when they are not being used.
● To clean a disc, wipe the surface from the
center to the outer edge using a clean, soft
cloth. Do not wipe the disc using a circular
motion.
● Do not use a conventional record cleaner or
alcohol intended for industrial use.
LHA2844LHA0049
4-62Monitor, climate, audio, phone and voice recognition systems
Page 238 of 478
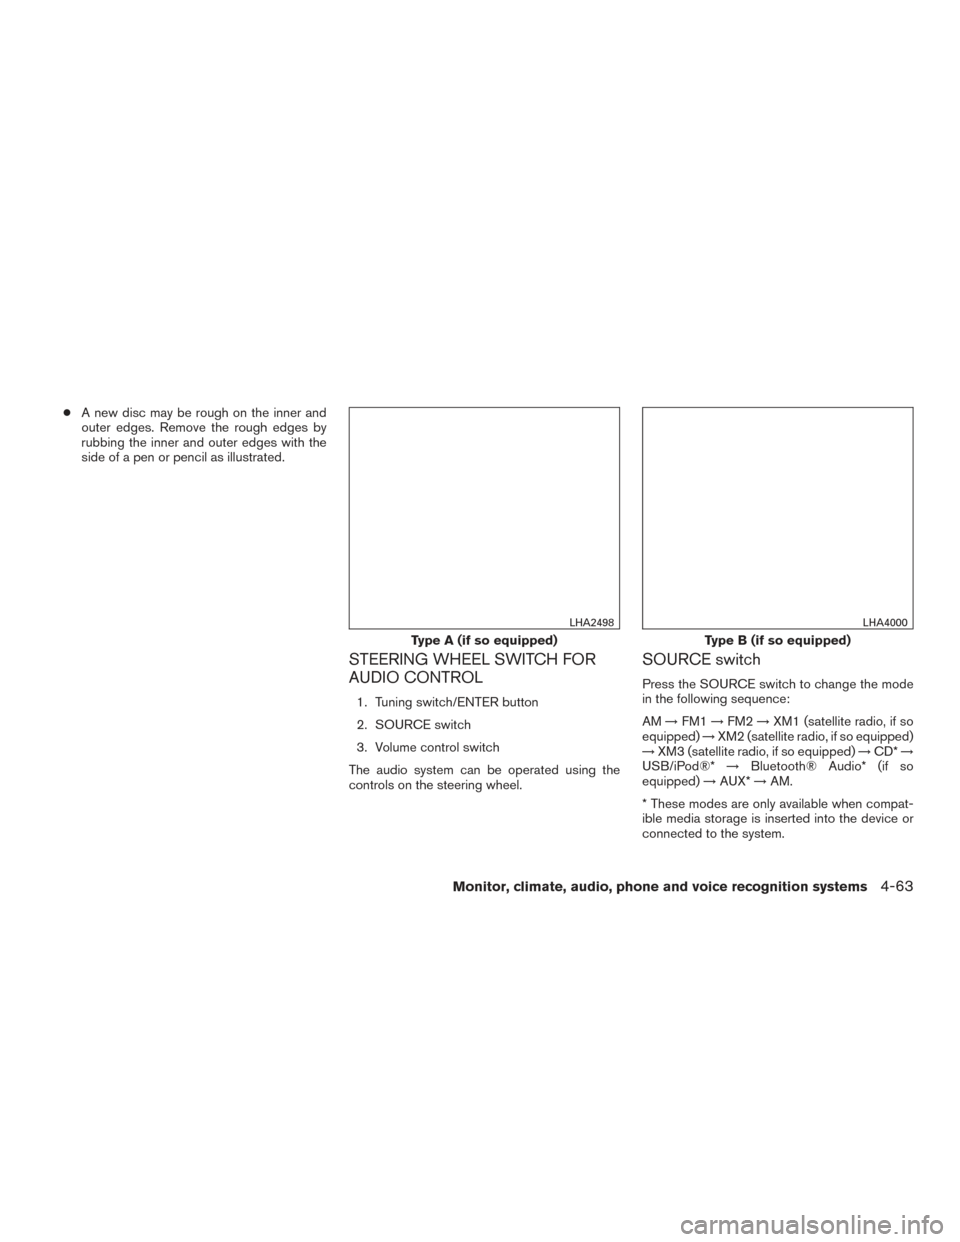
●A new disc may be rough on the inner and
outer edges. Remove the rough edges by
rubbing the inner and outer edges with the
side of a pen or pencil as illustrated.
STEERING WHEEL SWITCH FOR
AUDIO CONTROL
1. Tuning switch/ENTER button
2. SOURCE switch
3. Volume control switch
The audio system can be operated using the
controls on the steering wheel.
SOURCE switch
Press the SOURCE switch to change the mode
in the following sequence:
AM →FM1 →FM2 →XM1 (satellite radio, if so
equipped) →XM2 (satellite radio, if so equipped)
→ XM3 (satellite radio, if so equipped) →CD* →
USB/iPod®* →Bluetooth® Audio* (if so
equipped) →AUX* →AM.
* These modes are only available when compat-
ible media storage is inserted into the device or
connected to the system.
Type A (if so equipped)
LHA2498
Type B (if so equipped)
LHA4000
Monitor, climate, audio, phone and voice recognition systems4-63
Page 239 of 478
Volume control switch
Push the volume control switch to increase or
decrease the volume.
Tuning switch
While the display is showing a map or audio
screen, tilt the Tuning switch upward or down-
ward to select a station, track, CD or folder. For
most audio sources, tilting the switch up/down
for more than 1.5 seconds provides a different
function than a tilting up/down for less than
1.5 seconds.
AM and FM● Tilt up/down for less than 1.5 seconds to
increase or decrease the preset station.
● Tilt up/down for more than 1.5 seconds to
seek up or down to the next station.
XM/SXM (if so equipped) ● Tilt up/down for less than 1.5 seconds to
increase or decrease the preset station.
● Tilt up/down for more than 1.5 seconds to
go to the next or previous category. iPod®
● Tilt up/down for less than 1.5 seconds to
increase or decrease the track number.
● Tilt up/down for more than 1.5 seconds to
fast forward or rewind the current track.
CD ● Tilt up/down for less than 1.5 seconds to
increase or decrease the track number.
● Tilt up/down for more than 1.5 seconds to
increase or decrease the folder number (if
playing compressed audio files) or to fast
forward or rewind the current track.
USB ● Tilt up/down for less than 1.5 seconds to
increase or decrease the track number.
● Tilt up/down for more than 1.5 seconds to
fast forward or rewind the current track.
Bluetooth® Audio (if so equipped) ● Tilt up/down for less than 1.5 seconds to
skip ahead or back to the next song.
● Tilt up/down for more than 1.5 seconds to
reverse or fast forward the current track.
ANTENNA
The antenna pattern is printed inside the rear
window.
CAUTION
● Do not place metalized film near the
rear window glass or attach any metal
parts to it. This may cause poor recep-
tion or noise.
● When cleaning the inside of the rear
window, be careful not to scratch or
damage the rear window antenna.
Lightly wipe along the antenna with a
dampened soft cloth.
4-64Monitor, climate, audio, phone and voice recognition systems
Page 240 of 478
This vehicle is equipped with Smartphone Inte-
gration technology. This allows many compatible
Smartphone applications to be displayed and
easily controlled through the vehicle’s touch-
screen.
NOTE:
A compatible smartphone and registration
is required to use mobile applications or to
access connected features of certain ve-
hicle applications.
REGISTERING WITH
NISSANCONNECTSMMOBILE APPS
To use the Smartphone Integration feature, it is
necessary for the user to register. In order to
register, visit the NissanConnect
SMMobile App
website, www.nissanusa.com/connect/ or
www.canada.nissanconnect.com (For Canada)
and sign up or create an account through the
prompts on the NissanConnect Mobile App.
Once registered, download the NissanConnect
App from your compatible phone’s application
download source and then log into the applica-
tion. If you already have an account created
through the App, please log in.
CONNECT PHONE
To use this feature, a compatible smartphone
must be connected via Bluetooth® or USB to the
vehicle. For additional information, refer to
“Bluetooth® Hands-Free Phone System without
Navigation System (Type B)” or “Bluetooth®
Hands-Free Phone System with Navigation Sys-
tem” in this section.
NOTE:
For vehicles with navigation, Apple
iPhones® REQUIRE the phone to be
plugged in via USB for NissanConnect Mo-
bile Apps to function.
For vehicles without Navigation, Apple
iPhones® must be paired via Bluetooth®
for NissanConnect Mobile Apps to func-
tion.
NOTE:
For Android phones, NissanConnect Mo-
bile Apps REQUIRES the phone to be
paired via Bluetooth®.
APPLICATION DOWNLOAD
Once connected, the NissanConnect App will
search your phone to determine which compat-
ible applications are currently installed. The user
will then choose which apps they want to bring
into their vehicle from the list of apps within the
“Manage My Apps” section of the NissanCon-
nect App on their smartphone. The vehicle will
then download the in-vehicle interface for each of
these compatible applications. Once down-
loaded, the user can access their selected smart-
phone applications through the vehicle interface.
For additional information on application avail-
ability visit www.nissanusa.com/connect/ or
www.canada.nissanconnect.com
NISSANCONNECTSMMOBILE APPS
(if so equipped)
Monitor, climate, audio, phone and voice recognition systems4-65