Page 398 of 478

CHANGING ENGINE OIL FILTER
1. Park the vehicle on a level surface and applythe parking brake.
2. Turn the engine off.
3. Place a large drain pan under the oil filter
�B. 4. Loosen the oil filter
�Bwith an oil filter
wrench by turning it counterclockwise. Then
remove the oil filter by turning it by hand.
CAUTION
Be careful not to burn yourself. The engine
oil may be hot.
5. Wipe the engine oil filter sealing surface with a clean rag.
CAUTION
Be sure to remove any old gasket material
remaining on the sealing surface of the
engine. Failure to do so could lead to
engine damage.
6. Coat the gasket on the new filter with clean engine oil.
7. Screw on the oil filter until a slight resistance is felt, then tighten an additional 2/3 turn.
8. Refill engine with recommended oil through the oil filler opening
�A, then install oil filler
cap securely.
9. Start the engine and check for leakage around the oil filter. Correct as required.
10. Turn the engine off and wait more than 10 minutes. Check the oil level. Add engine
oil if necessary
�A. For additional information on the location of the
engine oil filler cap, refer to “Engine compartment
check locations” in this section
LDI2781
Maintenance and do-it-yourself8-11
Page 399 of 478

ONLY in NISSAN CVTs. Do not mix with
other fluids.
● Do not use Automatic transmission
fluid (ATF) or Manual transmis")
CAUTION
●NISSAN recommends using Genuine
NISSAN CVT Fluid NS-3 (or equivalent)
ONLY in NISSAN CVTs. Do not mix with
other fluids.
● Do not use Automatic transmission
fluid (ATF) or Manual transmission fluid
in a NISSAN CVT, as it may damage the
CVT. Damage caused by the use of flu-
ids other than as recommended is not
covered under NISSAN’s New Vehicle
Limited Warranty.
● Using fluids that are not equivalent to
Genuine NISSAN CVT Fluid NS-3 may
also damage the CVT. Damage caused
by the use of fluids other than as recom-
mended is not covered under NISSAN’s
New Vehicle Limited Warranty.
When checking or replacement of CVT fluid is
required, it is recommended that you visit a
NISSAN dealer for servicing. For additional brake and clutch fluid specification
information, refer to “Recommended
fluids/lubricants and capacities” in the “Technical
and consumer information” section of this
manual.
WARNING
●
Use only new fluid from a sealed con-
tainer. Old, inferior or contaminated
fluid may damage the brake and clutch
(if so equipped) systems. The use of
improper fluids can damage the brake
and clutch system and affect the vehi-
cle’s stopping ability.
● Clean the filler cap before removing.
● Brake and clutch fluid is poisonous and
should be stored carefully in marked
containers out of reach of children.
CAUTION
Do not spill the fluid on any painted sur-
faces. This will damage the paint. If fluid is
spilled, immediately wash the surface with
water.
BRAKE FLUID
Check the fluid level in the reservoir. If the level is
below the MIN line
�1, or the brake warning light
comes on, add Genuine NISSAN Brake Fluid or
equivalent DOT 3fluid up to the MAX line
�2.If
fluid must be added frequently, the system should
be checked. It is recommended that you visit a
NISSAN dealer for this service.
LDI2169
CONTINUOUSLY VARIABLE
TRANSMISSION (CVT) FLUID (if so
equipped) BRAKE AND CLUTCH (if so equipped)
FLUID
8-12Maintenance and do-it-yourself
Page 400 of 478

Check the fluid level in the reservoir. If the level is
below the MIN line
�1, or the brake warning light
comes on, add Genuine NISSAN Brake Fluid or
equivalent DOT 3flui")
CLUTCH FLUID (if so equipped)
Check the fluid level in the reservoir. If the level is
below the MIN line
�1, or the brake warning light
comes on, add Genuine NISSAN Brake Fluid or
equivalent DOT 3fluid up to the MAX line
�2.If
fluid must be added frequently, the system should
be checked. It is recommended that you visit a
NISSAN dealer for this service.
WINDSHIELD-WASHER FLUID
RESERVOIR
Fill the windshield-washer fluid reservoir periodi-
cally.
To fill the windshield-washer fluid reservoir, lift
the cap off the reservoir and pour the windshield-
washer fluid into the reservoir opening.
Add a washer solvent to the washer for better
cleaning. In the winter season, add a windshield-
washer antifreeze. Follow the manufacturer’s in-
structions for the mixture ratio. Refill the reservoir more frequently when driving
conditions require an increased amount of
windshield-washer fluid.
Recommended fluid is Genuine NISSAN Wind-
shield Washer Concentrate Cleaner & Antifreeze
or equivalent.
CAUTION
●
Do not substitute engine antifreeze
coolant for windshield-washer fluid.
This may result in damage to the paint.
● Do not fill the windshield-washer fluid
reservoir with washer fluid concen-
trates at full strength. Some methyl al-
cohol based washer fluid concentrates
may permanently stain the grille if
spilled while filling the windshield-
washer fluid reservoir.
● Pre-mix washer fluid concentrates with
water to the manufacturer’s recom-
mended levels before pouring the fluid
into the windshield-washer fluid reser-
voir. Do not use the windshield-washer
reservoir to mix the washer fluid con-
centrate and water.
LDI2169LDI2170
WINDSHIELD-WASHER FLUID
Maintenance and do-it-yourself8-13
Page 408 of 478

If the brakes do not operate properly, it is recom-
mended you have the brakes checked by a
NISSAN dealer.
Self-adjusting brakes
Your vehicle is equipped with self-adjusting
brakes.
The front (and rear-if so equipped) disc-type
brakes self-adjust every time the brake pedal is
applied. The rear drum-type brakes (if so
equipped) self-adjust every time the parking
brake is applied.
WARNING
Have your brake system checked if the
brake pedal height does not return to nor-
mal. It is recommended that you visit a
NISSAN dealer for this service.
Brake pad wear indicators
The disc brake pads on your vehicle have audible
wear indicators. When a brake pad requires re-
placement, a high pitched scraping or screech-
ing sound will be heard when the vehicle is in
motion. The noise will be heard whether or not the
brake pedal is depressed. Have the brakes
checked as soon as possible if the wear indicator
sound is heard.Under some driving or climate conditions, occa-
sional brake squeak, squeal or other noise may
be heard. Occasional brake noise during light to
moderate stops is normal and does not affect the
function or performance of the brake system.
Proper brake inspection intervals should
be followed.
For additional information regard-
ing brake inspections, refer to the appropriate
maintenance schedule information in the
“NISSAN Service and Maintenance Guide”.
Two types of fuses are used. Type
�Ais used in
the fuse boxes in the engine compartment. Type
�Bis used in the passenger compartment fuse
box.
Type
�Afuses can be installed in the engine
compartment and passenger compartment fuse
boxes.
LDI0455
BRAKES FUSES
Maintenance and do-it-yourself8-21
Page 409 of 478
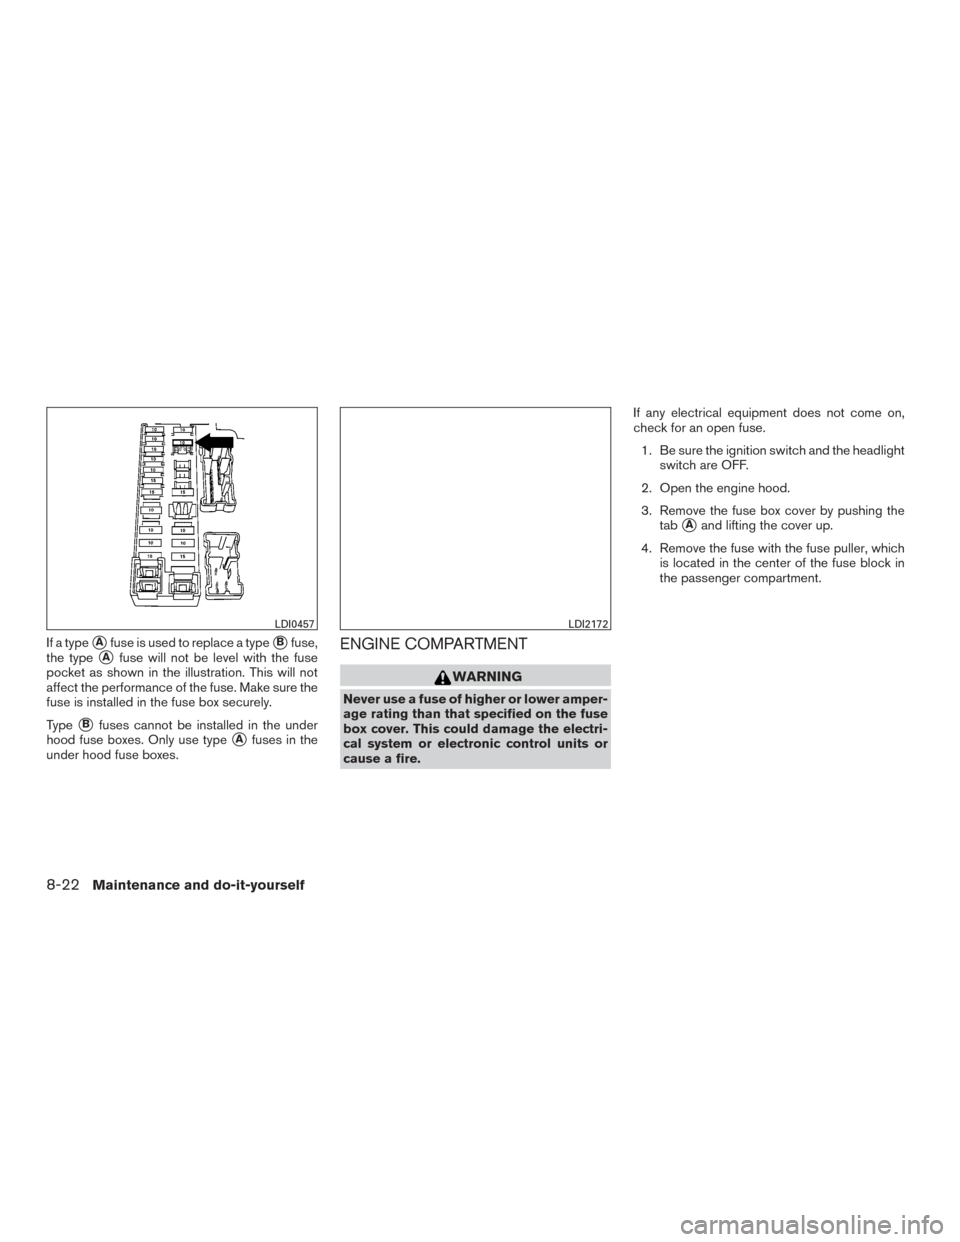
If a type�Afuse is used to replace a type�Bfuse,
the type
�Afuse will not be level with the fuse
pocket as shown in the illustration. This will not
affect the performance of the fuse. Make sure the
fuse is installed in the fuse box securely.
Type
�Bfuses cannot be installed in the under
hood fuse boxes. Only use type
�Afuses in the
under hood fuse boxes.
ENGINE COMPARTMENT
WARNING
Never use a fuse of higher or lower amper-
age rating than that specified on the fuse
box cover. This could damage the electri-
cal system or electronic control units or
cause a fire. If any electrical equipment does not come on,
check for an open fuse.
1. Be sure the ignition switch and the headlight switch are OFF.
2. Open the engine hood.
3. Remove the fuse box cover by pushing the tab
�Aand lifting the cover up.
4. Remove the fuse with the fuse puller, which is located in the center of the fuse block in
the passenger compartment.
LDI0457LDI2172
8-22Maintenance and do-it-yourself
Page 410 of 478

5. If the fuse is open�B, replace it with a new
fuse
�C.
6. If a new fuse also opens, have the electrical system checked and repaired. It is recom-
mended that you visit a NISSAN dealer for
this service.
Fusible links
If the electrical equipment does not operate and
fuses are in good condition, check the fusible
links. If any of these fusible links are melted,
replace with only Genuine NISSAN parts.
PASSENGER COMPARTMENT
WARNING
Never use a fuse of higher or lower amper-
age rating than that specified on the fuse
box cover. This could damage the electri-
cal system or electronic control units or
cause a fire.
If any electrical equipment does not operate,
check for an open fuse. NOTE:
The fuse box is located on the driver’s side
of the instrument panel.
1. Be sure the ignition switch and the headlight switch are OFF.
2. Remove the fuse box cover
�Awith a suit-
able tool. Use a cloth to avoid damaging the
trim.
3. Locate the fuse that needs to be replaced.
4. Remove the fuse with the fuse puller
�B.
LDI2746LDI2712
Maintenance and do-it-yourself8-23
Page 411 of 478

5. If the fuse is open�C, replace it with an
equivalent good fuse
�D.
6. Push the fuse box cover to install.
If a new fuse also opens, have the electrical
system checked and repaired. It is recommended
that you visit a NISSAN dealer for this service.Extended storage switch
If any electrical equipment does not operate,
remove the extended storage switch and check
for an open fuse.
NOTE:
The extended storage switch is used for
long term vehicle storage. Even if the ex-
tended storage switch is broken it is not
necessary to replace it. Replace only the
open fuse in the switch with a new fuse. How to replace the extended storage switch:
1. To remove the extended storage switch, be sure the ignition switch is in the OFF or
LOCK position.
2. Be sure the headlight switch is in the OFF position.
3. Remove the fuse box cover.
4. Pinch the locking tabs
�Aand�Bfound on
each side of the storage switch.
5. Pull the storage switch straight out from the fuse box
�C.
LDI2713LDI2747
8-24Maintenance and do-it-yourself
Page 415 of 478

Note:
Changes or modifications not expressly ap-
proved by the party responsible for compli-
ance could void the user’s authority to op-
erate the equipment.
For Canada:
This device complies with Industry Canada
licence-exempt RSS standard(s) . Opera-
tion is subject to the following two condi-
tions: (1) this device may not cause inter-
ference, and (2) this device must accept any
interference, including interference that
may cause undesired operation of the de-
vice.
HEADLIGHTS
Replacing the halogen headlight bulb
(if so equipped)
NOTE:
The headlight is a semi-sealed beam type
which used a replaceable headlight (halo-
gen) bulb. They can be replaced from inside
the engine compartment without removing
the headlight assembly.
CAUTION
●Aiming is not necessary after replacing
the bulb. When aiming adjustment is
necessary, it is recommended that you
visit a NISSAN dealer for this service.
● Do not leave the headlight assembly
open without a bulb installed for a long
period of time. Dust, moisture, smoke,
etc. entering the headlight body may
affect bulb performance. Remove the
bulb from the headlight assembly just
before a replacement bulb is installed.
● Only touch the base when handling the
bulb. Never touch the glass envelope.
Touching the glass could significantly
affect bulb life and/or headlight
performance.
● High pressure halogen gas is sealed
inside the halogen bulb. The bulb may
break if the glass envelope is scratched
or the bulb is dropped.
● Use the same number and wattage as
shown in the chart.
Type A (if so equipped)
LDI2980
LIGHTS
8-28Maintenance and do-it-yourself