2016 NISSAN SENTRA light
[x] Cancel search: lightPage 201 of 478
MANUAL OPERATION
Fan speed control
Press thefan control buttons to manually
control the fan speed.
Press the AUTO button to return to automatic
control of the fan speed.
Air recirculation
Press theair recirculation button to recir-
culate interior air inside the vehicle.
The air recirculation cannot be activated when
the air conditioner is in the
front defogging
mode.
Fresh air intake
Press thefresh air intake button to draw
outside air into the passenger compartment.
Automatic intake air control
In the AUTO mode, the intake air will be con-
trolled automatically. To manually control the in-
take air, press the
air recirculation button.
To return to the automatic control mode, press
and hold the
air recirculation button or
press and hold the
fresh air intake button
for about 2 seconds. The indicator lights (both Air
recirculation and Fresh air intake buttons) will
flash twice and then the intake air will be con-
trolled automatically.
Air flow control
Pressing the MODE button manually controls air
flow and selects the air outlet:
— Air flows from center and side
vents.
— Air flows from center and sidevents and foot outlets.
— Air flows mainly from foot outlets.
— Air flows from defroster and footoutlets.
To turn system off
Press the ON-OFF button.
Rear window and outside mirror
defroster switch
For additional information, refer to “Rear window
and outside mirror (if so equipped) defroster
switch” in the “Instruments and controls” section
of this manual.
OPERATING TIPS
●When the engine coolant temperature and
outside air temperature are low, the air flow
from the foot outlets may not operate for a
maximum of 150 seconds. However, this is
not a malfunction. After the coolant tempera-
ture warms up, air flow from the foot outlets
will operate normally. The sunload sensor (if so equipped) , located on
the top passenger’s side of the instrument panel,
helps the system maintain a constant tempera-
ture. Do not put anything on or around this sen-
sor.
LHA2510
4-26Monitor, climate, audio, phone and voice recognition systems
Page 202 of 478
The air conditioner system in your NISSAN ve-
hicle is charged with a refrigerant designed with
the environment in mind.
This refrigerant does not harm the earth’s
ozone layer.
Special charging equipment and lubricant is re-
quired when servicing your NISSAN air condi-
tioner. Using improper refrigerants or lubricants
will cause severe damage to your air conditioner
system. For additional information, refer to “Air
conditioner system refrigerant and oil recommen-
dations” in the “Technical and consumer informa-
tion” section of this manual.
It is recommended that you visit a NISSAN dealer
to service your “environmentally friendly” air con-
ditioning system.
WARNING
The air conditioner system contains refrig-
erant under high pressure. To avoid per-
sonal injury, any air conditioner service
should be done only by an experienced
technician with proper equipment.
RADIO
With the ignition placed in the ACC or ON posi-
tion, press the
(power ON) or ON-OFF
button to turn the radio on. If you listen to the
radio with the engine not running, the ignition
should be placed in the ACC position.
Radio reception is affected by station signal
strength, distance from radio transmitter, build-
ings, bridges, mountains and other external influ-
ences. Intermittent changes in reception quality
normally are caused by these external influences.
Using a cellular phone in or near the vehicle
may influence radio reception quality.
Radio reception
Your NISSAN radio system is equipped with
state-of-the-art electronic circuits to enhance ra-
dio reception. These circuits are designed to
extend reception range, and to enhance the qual-
ity of that reception.
However, there are some general characteristics
of both FM and AM radio signals that can affect
radio reception quality in a moving vehicle, even
when the finest equipment is used. These char-
acteristics are completely normal in a given re-
ception area and do not indicate any malfunction
in your NISSAN radio system. Reception conditions will constantly change be-
cause of vehicle movement. Buildings, terrain,
signal distance and interference from other ve-
hicles can work against ideal reception. De-
scribed below are some of the factors that can
affect your radio reception.
Some cellular phones or other devices may
cause interference or a buzzing noise to come
from the audio system speakers. Storing the de-
vice in a different location may reduce or elimi-
nate the noise.
FM RADIO RECEPTION
Range: FM range is normally limited to 25 – 30 mi
(40 – 48 km) , with monaural (single channel) FM
having slightly more range than stereo FM. Exter-
nal influences may sometimes interfere with FM
station reception even if the FM station is within
25 mi (40 km) . The strength of the FM signal is
directly related to the distance between the
transmitter and receiver. FM signals follow a line-
of-sight path, exhibiting many of the same char-
acteristics as light. For example, they will reflect
off objects.
Fade and drift: As your vehicle moves away from
a station transmitter, the signals will tend to fade
and/or drift.
SERVICING AIR CONDITIONER (if so
equipped)
AUDIO SYSTEM
Monitor, climate, audio, phone and voice recognition systems4-27
Page 203 of 478
Static and flutter: During signal interference from
buildings, large hills or due to antenna position
(usually in conjunction with increased distance
from the station transmitter) , static or flutter can
be heard. This can be reduced by adjusting the
treble control to reduce treble response.
Multipath reception: Because of the reflective
characteristics of FM signals, direct and reflected
signals reach the receiver at the same time. The
signals may cancel each other, resulting in mo-
mentary flutter or loss of sound.
AM RADIO RECEPTION
AM signals, because of their low frequency, can
bend around objects and skip along the ground.
In addition, the signals can be bounced off the
ionosphere and bent back to earth. Because of
these characteristics, AM signals are also sub-
ject to interference as they travel from transmitter
to receiver.
Fading: Occurs while the vehicle is passing
through freeway underpasses or in areas with
many tall buildings. It can also occur for several
seconds during ionospheric turbulence even in
areas where no obstacles exist.
Static: Caused by thunderstorms, electrical
power lines, electric signs and even traffic lights.
SATELLITE RADIO RECEPTION (if so
equipped)
When the satellite radio is used for the first time
or the battery has been replaced, the satellite
radio may not work properly. This is not a mal-
function. Wait more than 10 minutes with satellite
radio ON and the vehicle outside of any metal or
large building for satellite radio to receive all of
the necessary data.
No satellite radio reception is available and “NO
SAT” is displayed when the SAT band option is
selected unless optional satellite receiver and
antenna are installed and a SiriusXM® Satellite
Radio service subscription is active. Satellite ra-
dio is not available in Alaska, Hawaii and Guam.
Satellite radio performance may be affected if
cargo carried on the roof blocks the satellite radio
signal.
If possible, do not put cargo over the satellite
antenna.
A build up of ice on the satellite radio antenna can
affect satellite radio performance. Remove the
ice to restore satellite radio reception.
AUDIO OPERATION PRECAUTIONS
LHA0099
4-28Monitor, climate, audio, phone and voice recognition systems
Page 204 of 478
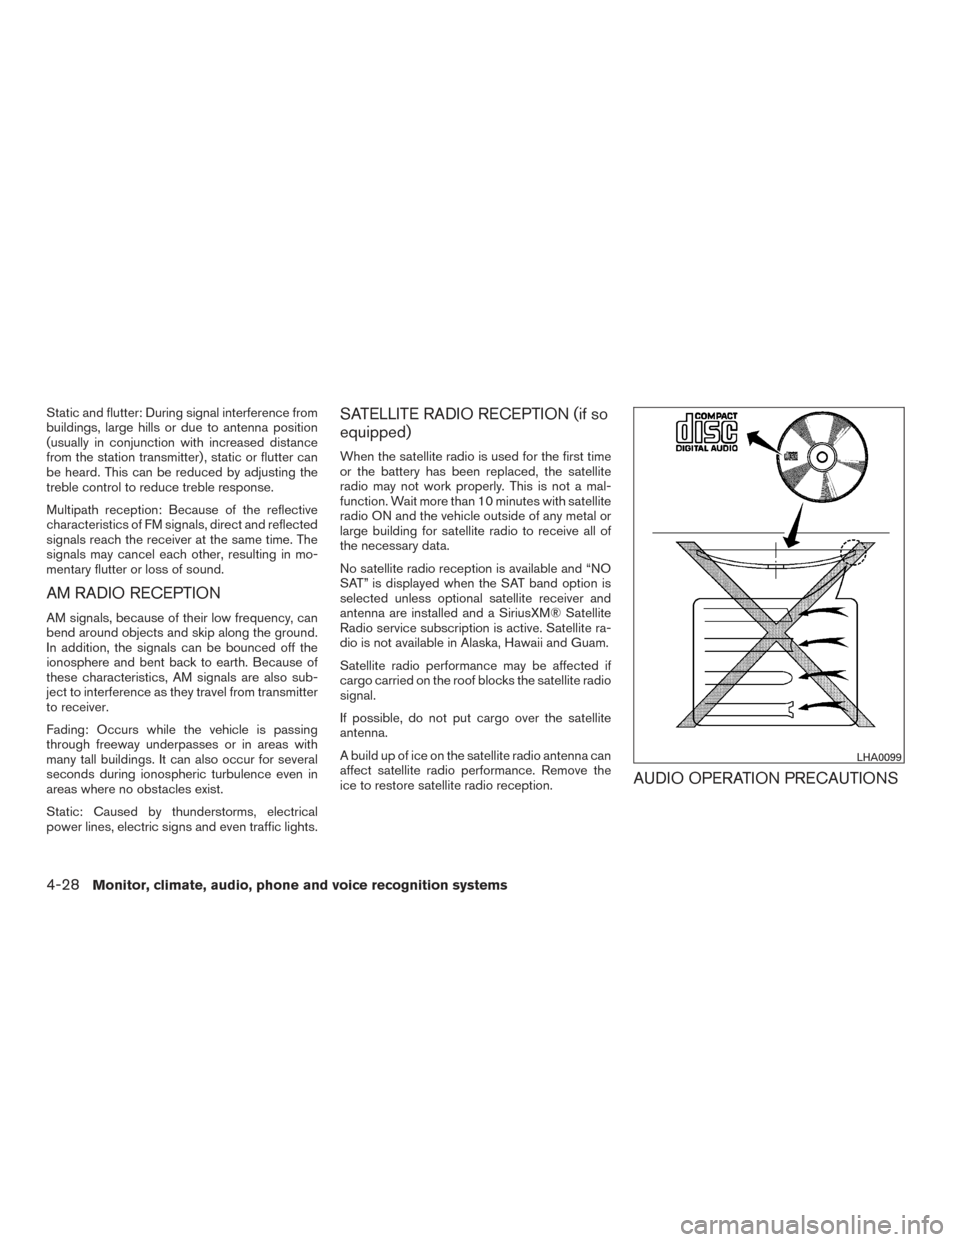
Compact disc (CD) player
CAUTION
●Do not force a compact disc into the CD
insert slot. This could damage the CD
and/or CD player.
● Trying to load a CD with the CD door
closed could damage the CD and/or CD
player.
● Only one CD can be loaded into the CD
player at a time.
● Only use high quality 4.7 in (12 cm)
round discs that have the “COMPACT
disc DIGITAL AUDIO” logo on the disc
or packaging.
● During cold weather or rainy days, the
player may malfunction due to the hu-
midity. If this occurs, remove the CD
and dehumidify or ventilate the player
completely.
● The player may skip while driving on
rough roads.
● The CD player sometimes cannot func-
tion when the compartment tempera-
ture is extremely high or low.
Decrease/increase the temperature
before use. ●
Do not expose the CD to direct sun-
light.
● CDs that are in poor condition or are
dirty, scratched or covered with finger-
prints may not work properly.
● The following CDs may not work prop-
erly:
● Copy control compact discs (CCCD)
● Recordable compact discs (CD-R)
● Rewritable compact discs (CD-RW)
● Do not use the following CDs as they
may cause the CD player to malfunc-
tion:
● 3.1 in (8 cm) discs with an adapter
● CDs that are not round
● CDs with a paper label
● CDs that are warped, scratched, or
have abnormal edges
● This audio system can only play pre-
recorded CDs. It has no capability to
record or burn CDs.
● If the CD cannot be played, one of the
following messages will be displayed. CHECK DISC
●
Confirm that the CD is inserted cor-
rectly (the label side is facing up,
etc.) .
● Confirm that the CD is not bent or
warped and it is free of scratches.
PRESS EJECT
This is an error due to excessive tem-
perature inside the player. Remove the
CD by pressing the EJECT button. After
a short time, reinsert the CD. The CD
can be played when the temperature of
the player returns to normal.
UNPLAYABLE
The file is unplayable in this audio sys-
tem (only MP3 or WMA (if so equipped)
CD) .
Monitor, climate, audio, phone and voice recognition systems4-29
Page 216 of 478
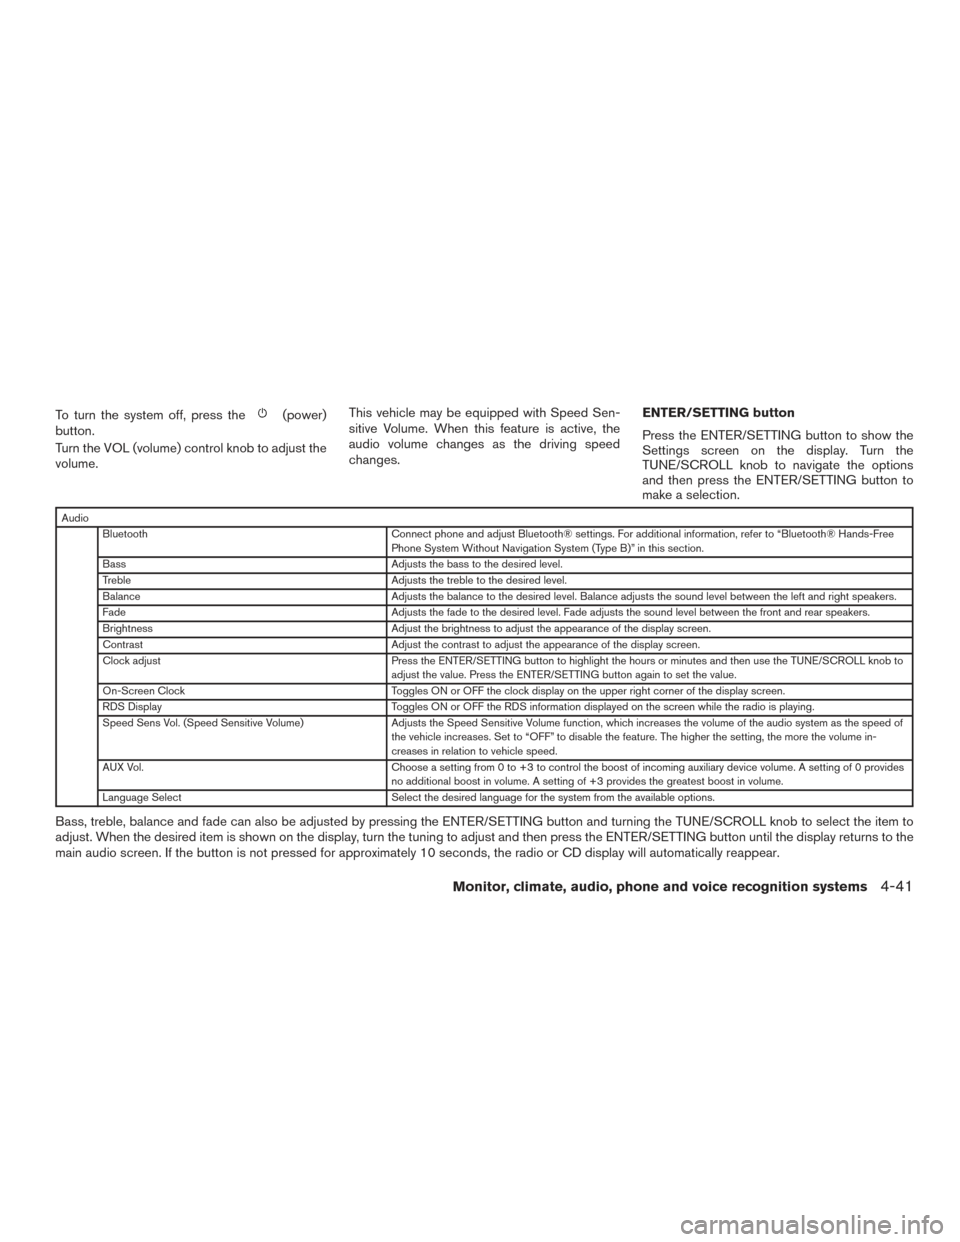
To turn the system off, press the(power)
button.
Turn the VOL (volume) control knob to adjust the
volume. This vehicle may be equipped with Speed Sen-
sitive Volume. When this feature is active, the
audio volume changes as the driving speed
changes.
ENTER/SETTING button
Press the ENTER/SETTING button to show the
Settings screen on the display. Turn the
TUNE/SCROLL knob to navigate the options
and then press the ENTER/SETTING button to
make a selection.
Audio
Bluetooth Connect phone and adjust Bluetooth® settings. For additional information, refer to “Bluetooth® Hands-Free
Phone System Without Navigation System (Type B)” in this section.
Bass Adjusts the bass to the desired level.
Treble Adjusts the treble to the desired level.
Balance Adjusts the balance to the desired level. Balance adjusts the sound level between the left and right speakers.
Fade Adjusts the fade to the desired level. Fade adjusts the sound level between the front and rear speakers.
Brightness Adjust the brightness to adjust the appearance of the display screen.
Contrast Adjust the contrast to adjust the appearance of the display screen.
Clock adjust Press the ENTER/SETTING button to highlight the hours or minutes and then use the TUNE/SCROLL knob to
adjust the value. Press the ENTER/SETTING button again to set the value.
On-Screen Clock Toggles ON or OFF the clock display on the upper right corner of the display screen.
RDS Display Toggles ON or OFF the RDS information displayed on the screen while the radio is playing.
Speed Sens Vol. (Speed Sensitive Volume) Adjusts the Speed Sensitive Volume function, which increases the volume of the audio system as the speed of
the vehicle increases. Set to “OFF” to disable the feature. The higher the setting, the more the volume in-
creases in relation to vehicle speed.
AUX Vol. Choose a setting from 0 to +3 to control the boost of incoming auxiliary device volume. A setting of 0 provides
no additional boost in volume. A setting of +3 provides the greatest boost in volume.
Language Select Select the desired language for the system from the available options.
Bass, treble, balance and fade can also be adjusted by pressing the ENTER/SETTING button and turning the TUNE/SCROLL knob to select the item to
adjust. When the desired item is shown on the display, turn the tuning to adjust and then press the ENTER/SETTING button until the display returns to the
main audio screen. If the button is not pressed for approximately 10 seconds, the radio or CD display will automatically reappear.
Monitor, climate, audio, phone and voice recognition systems4-41
Page 225 of 478
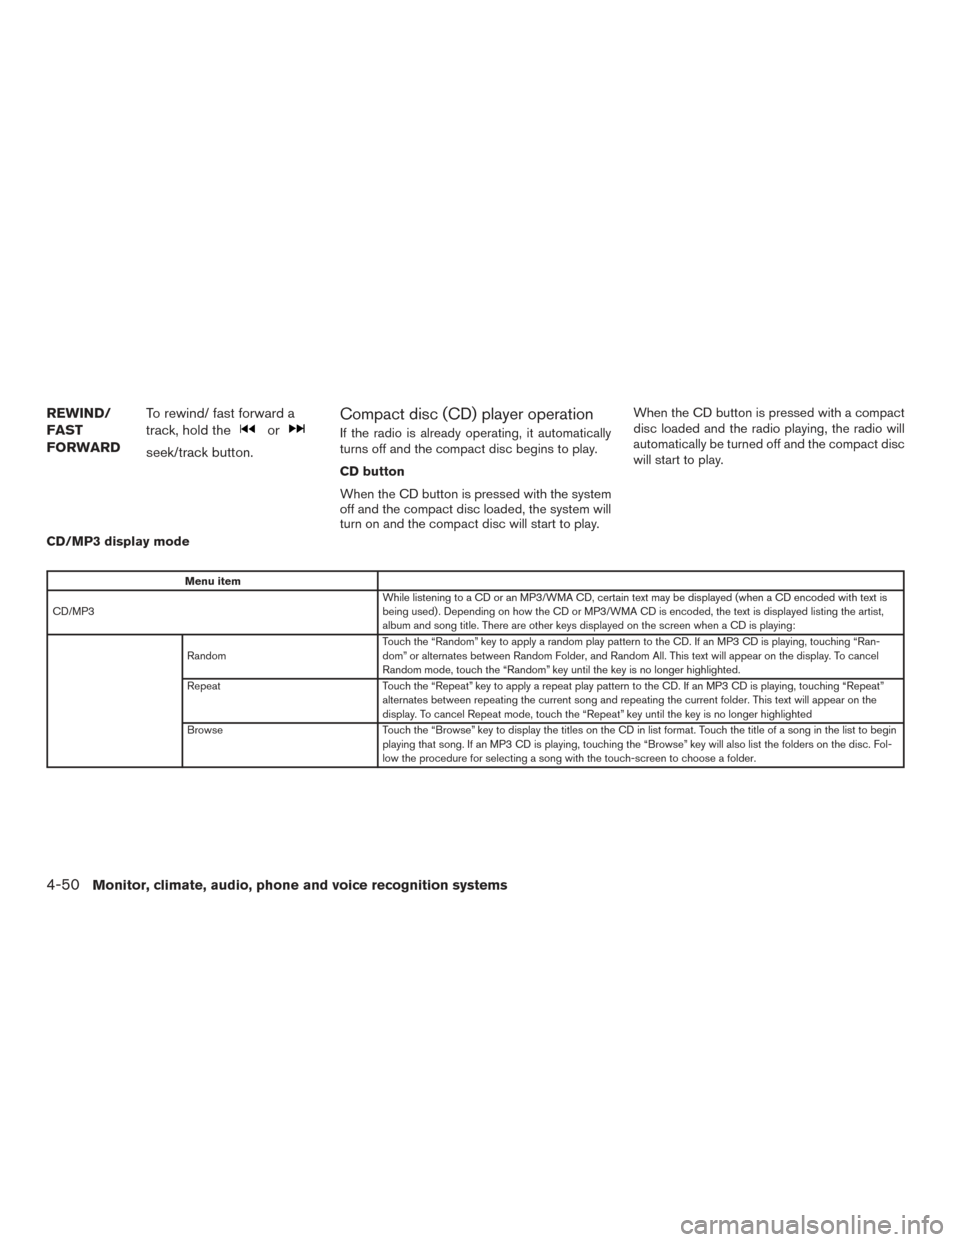
REWIND/
FAST
FORWARDTo rewind/ fast forward a
track, hold the
or
seek/track button.
Compact disc (CD) player operation
If the radio is already operating, it automatically
turns off and the compact disc begins to play.
CD button
When the CD button is pressed with the system
off and the compact disc loaded, the system will
turn on and the compact disc will start to play. When the CD button is pressed with a compact
disc loaded and the radio playing, the radio will
automatically be turned off and the compact disc
will start to play.
CD/MP3 display mode
Menu item
CD/MP3 While listening to a CD or an MP3/WMA CD, certain text may be displayed (when a CD encoded with text is
being used) . Depending on how the CD or MP3/WMA CD is encoded, the text is displayed listing the artist,
album and song title. There are other keys displayed on the screen when a CD is playing:
Random Touch the “Random” key to apply a random play pattern to the CD. If an MP3 CD is playing, touching “Ran-
dom” or alternates between Random Folder, and Random All. This text will appear on the display. To cancel
Random mode, touch the “Random” key until the key is no longer highlighted.
Repeat Touch the “Repeat” key to apply a repeat play pattern to the CD. If an MP3 CD is playing, touching “Repeat”
alternates between repeating the current song and repeating the current folder. This text will appear on the
display. To cancel Repeat mode, touch the “Repeat” key until the key is no longer highlighted
Browse Touch the “Browse” key to display the titles on the CD in list format. Touch the title of a song in the list to begin
playing that song. If an MP3 CD is playing, touching the “Browse” key will also list the folders on the disc. Fol-
low the procedure for selecting a song with the touch-screen to choose a folder.
4-50Monitor, climate, audio, phone and voice recognition systems
Page 235 of 478
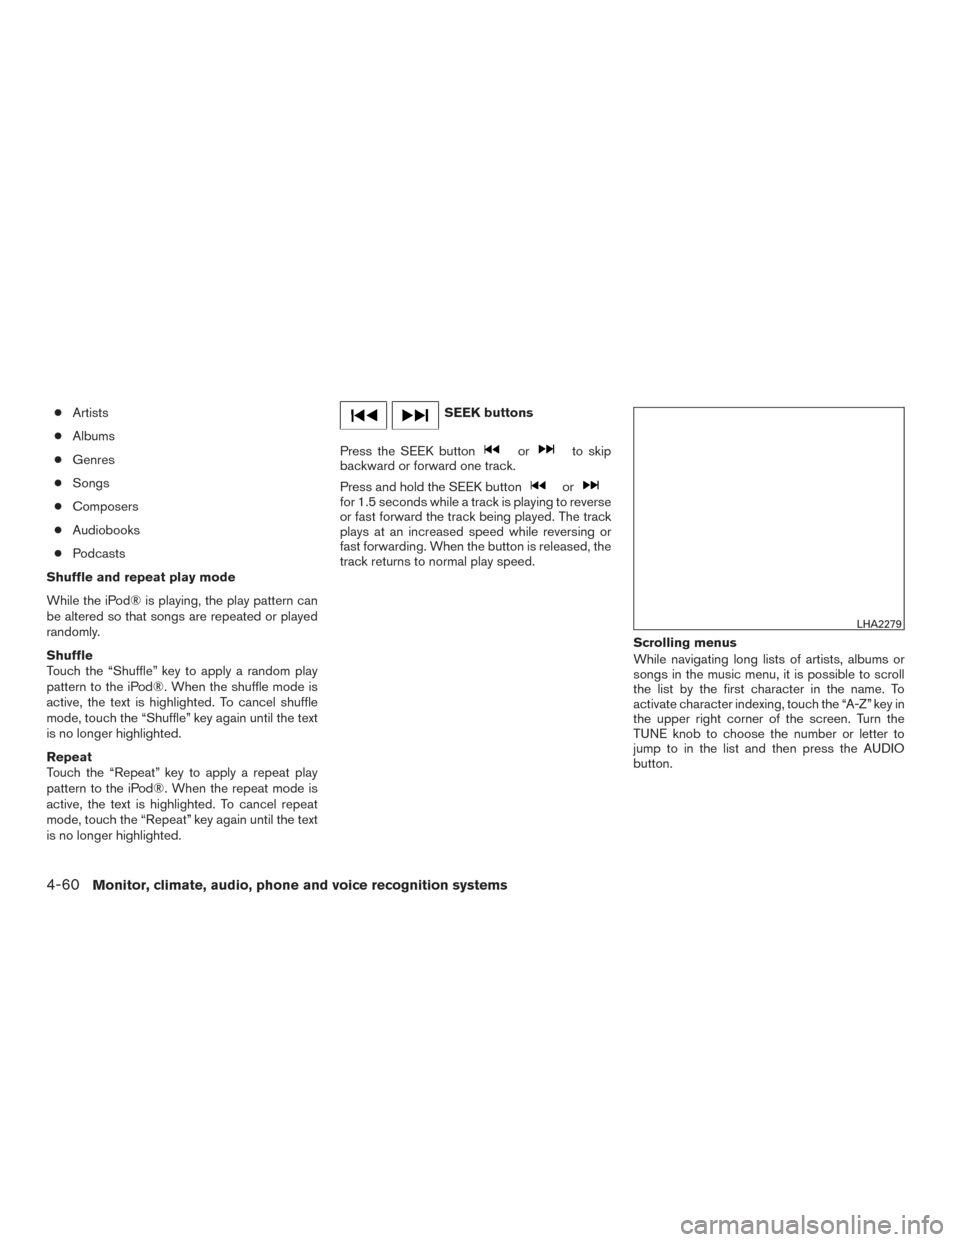
●Artists
● Albums
● Genres
● Songs
● Composers
● Audiobooks
● Podcasts
Shuffle and repeat play mode
While the iPod® is playing, the play pattern can
be altered so that songs are repeated or played
randomly.
Shuffle
Touch the “Shuffle” key to apply a random play
pattern to the iPod®. When the shuffle mode is
active, the text is highlighted. To cancel shuffle
mode, touch the “Shuffle” key again until the text
is no longer highlighted.
Repeat
Touch the “Repeat” key to apply a repeat play
pattern to the iPod®. When the repeat mode is
active, the text is highlighted. To cancel repeat
mode, touch the “Repeat” key again until the text
is no longer highlighted.SEEK buttons
Press the SEEK button
orto skip
backward or forward one track.
Press and hold the SEEK button
orfor 1.5 seconds while a track is playing to reverse
or fast forward the track being played. The track
plays at an increased speed while reversing or
fast forwarding. When the button is released, the
track returns to normal play speed.
Scrolling menus
While navigating long lists of artists, albums or
songs in the music menu, it is possible to scroll
the list by the first character in the name. To
activate character indexing, touch the “A-Z” key in
the upper right corner of the screen. Turn the
TUNE knob to choose the number or letter to
jump to in the list and then press the AUDIO
button.
LHA2279
4-60Monitor, climate, audio, phone and voice recognition systems
Page 239 of 478
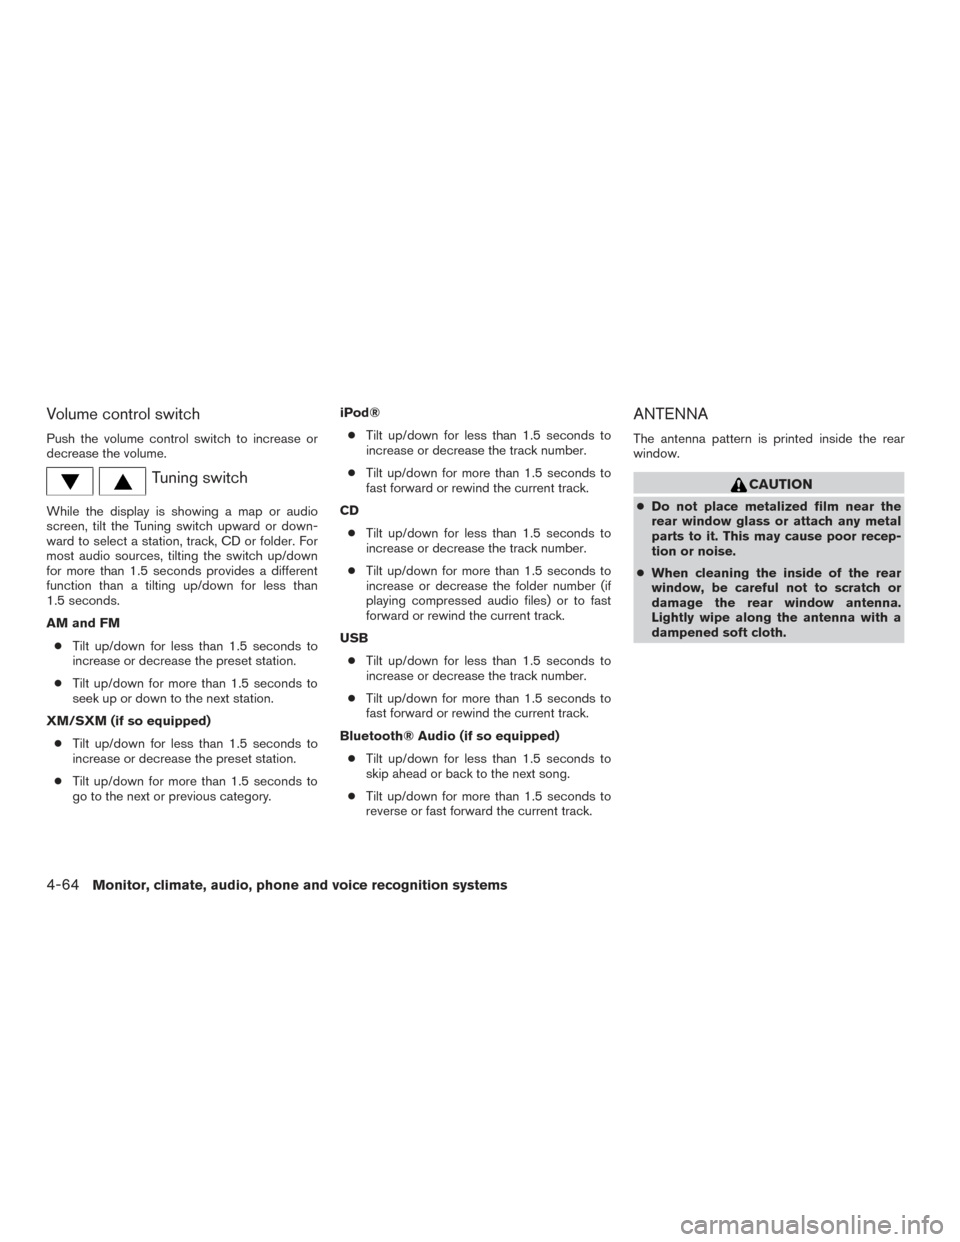
Volume control switch
Push the volume control switch to increase or
decrease the volume.
Tuning switch
While the display is showing a map or audio
screen, tilt the Tuning switch upward or down-
ward to select a station, track, CD or folder. For
most audio sources, tilting the switch up/down
for more than 1.5 seconds provides a different
function than a tilting up/down for less than
1.5 seconds.
AM and FM● Tilt up/down for less than 1.5 seconds to
increase or decrease the preset station.
● Tilt up/down for more than 1.5 seconds to
seek up or down to the next station.
XM/SXM (if so equipped) ● Tilt up/down for less than 1.5 seconds to
increase or decrease the preset station.
● Tilt up/down for more than 1.5 seconds to
go to the next or previous category. iPod®
● Tilt up/down for less than 1.5 seconds to
increase or decrease the track number.
● Tilt up/down for more than 1.5 seconds to
fast forward or rewind the current track.
CD ● Tilt up/down for less than 1.5 seconds to
increase or decrease the track number.
● Tilt up/down for more than 1.5 seconds to
increase or decrease the folder number (if
playing compressed audio files) or to fast
forward or rewind the current track.
USB ● Tilt up/down for less than 1.5 seconds to
increase or decrease the track number.
● Tilt up/down for more than 1.5 seconds to
fast forward or rewind the current track.
Bluetooth® Audio (if so equipped) ● Tilt up/down for less than 1.5 seconds to
skip ahead or back to the next song.
● Tilt up/down for more than 1.5 seconds to
reverse or fast forward the current track.
ANTENNA
The antenna pattern is printed inside the rear
window.
CAUTION
● Do not place metalized film near the
rear window glass or attach any metal
parts to it. This may cause poor recep-
tion or noise.
● When cleaning the inside of the rear
window, be careful not to scratch or
damage the rear window antenna.
Lightly wipe along the antenna with a
dampened soft cloth.
4-64Monitor, climate, audio, phone and voice recognition systems