2016 NISSAN ROGUE display
[x] Cancel search: displayPage 14 of 36
12
CLOCK SET/ADJUSTMENT
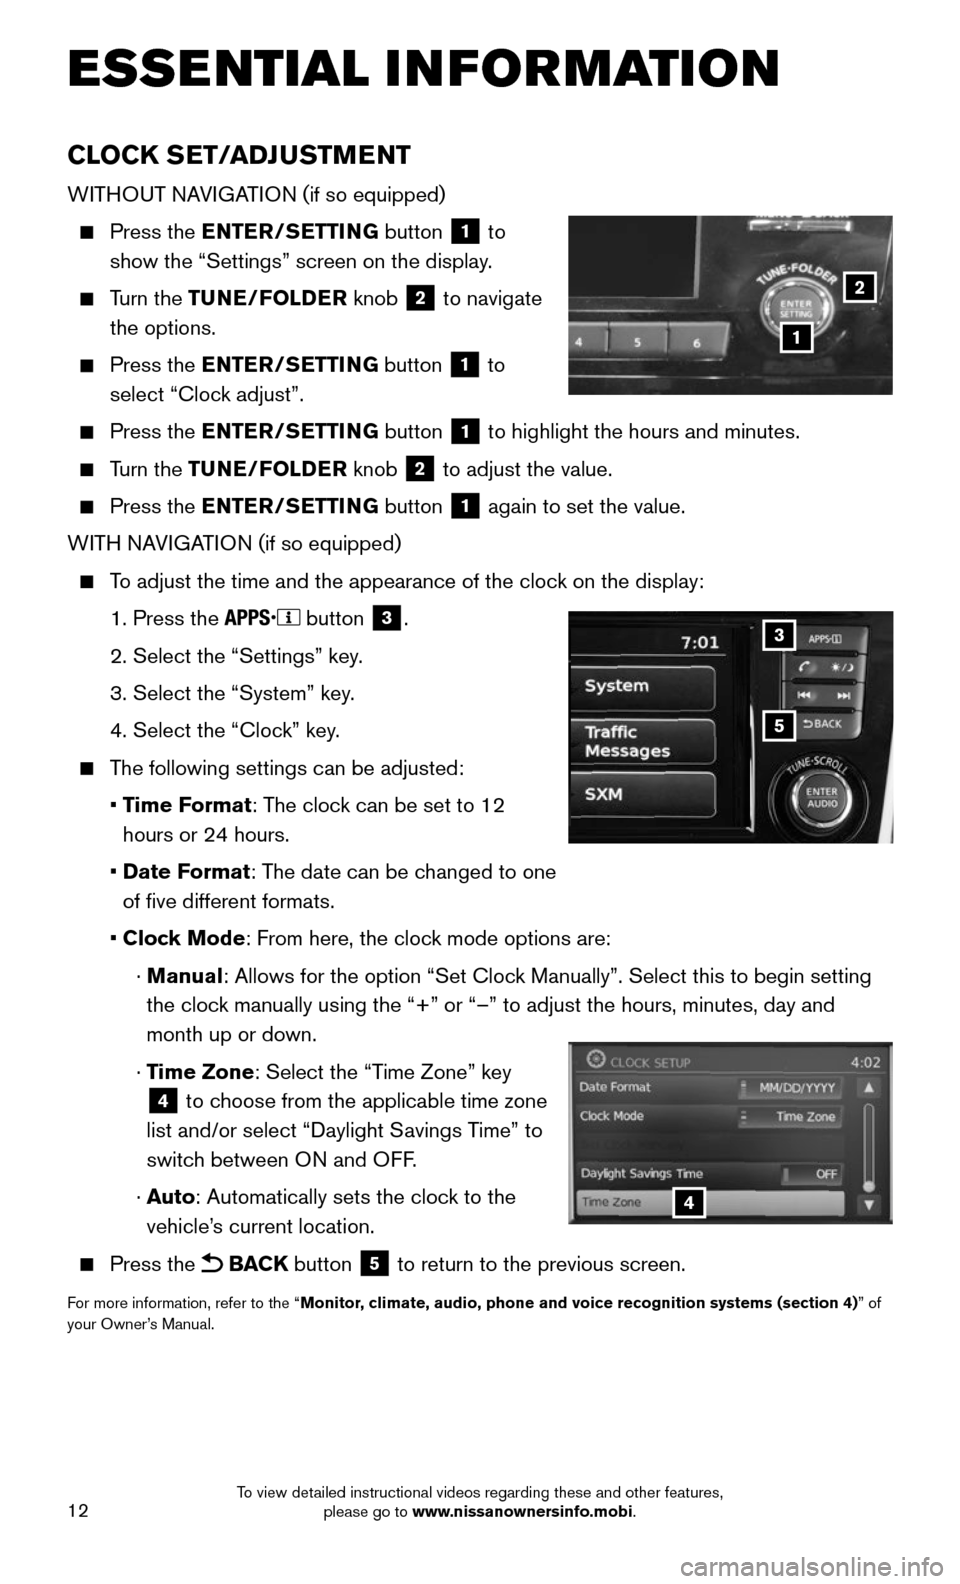
WITHOUT NAVIGATION (if so equipped)
Press the ENTER/SETTING button 1 to
show the “Settings” screen on the display.
Turn the TUNE/FOLDER knob 2 to navigate
the options.
Press the ENTER/SETTING button 1 to
select “Clock adjust”.
Press the ENTER/SETTING button 1 to highlight the hours and minutes.
Turn the TUNE/FOLDER knob 2 to adjust the value.
Press the ENTER/SETTING button 1 again to set the value.
WITH NAVIGATION (if so equipped)
To adjust the time and the appearance of the clock on the display:
1. Press the button 3.
2. Select the “Settings” key .
3. Select the “System” key.
4. Select the “Clock” key.
The following settings can be adjusted:
• Time Format: The clock can be set to 12
hours or 24 hours.
• Date Format: The date can be changed to one
of five different formats.
• Clock Mode: From here, the clock mode options are:
· Manual: Allows for the option “Set Clock Manually”. Select this to begin setting
the clock manually using the “+” or “–” to adjust the hours, minu\
tes, day and
month up or down.
· Time Zone: Select the “Time Zone” key
4 to choose from the applicable time zone
list and/or select “Daylight Savings Time” to
switch between ON and OFF.
· Auto: Automatically sets the clock to the
vehicle’s current location.
Press the BACK button 5 to return to the previous screen.
For more information, refer to the “Monitor, climate, audio, phone and voice recognition systems (section 4) ” of
your Owner’s Manual.
5
3
4
ESSE NTIAL I N FOR MATION
1
2
To view detailed instructional videos regarding these and other features, please go to www.nissanownersinfo.mobi.
Page 23 of 36
21
CRUISE CONTROL
The cruise control system enables you to set a
constant cruising speed once the vehicle has
reached 25 mph (40 km/h). The system will
automatically maintain the set speed until you tap
the brake pedal, accelerate, cancel or turn the
system off.
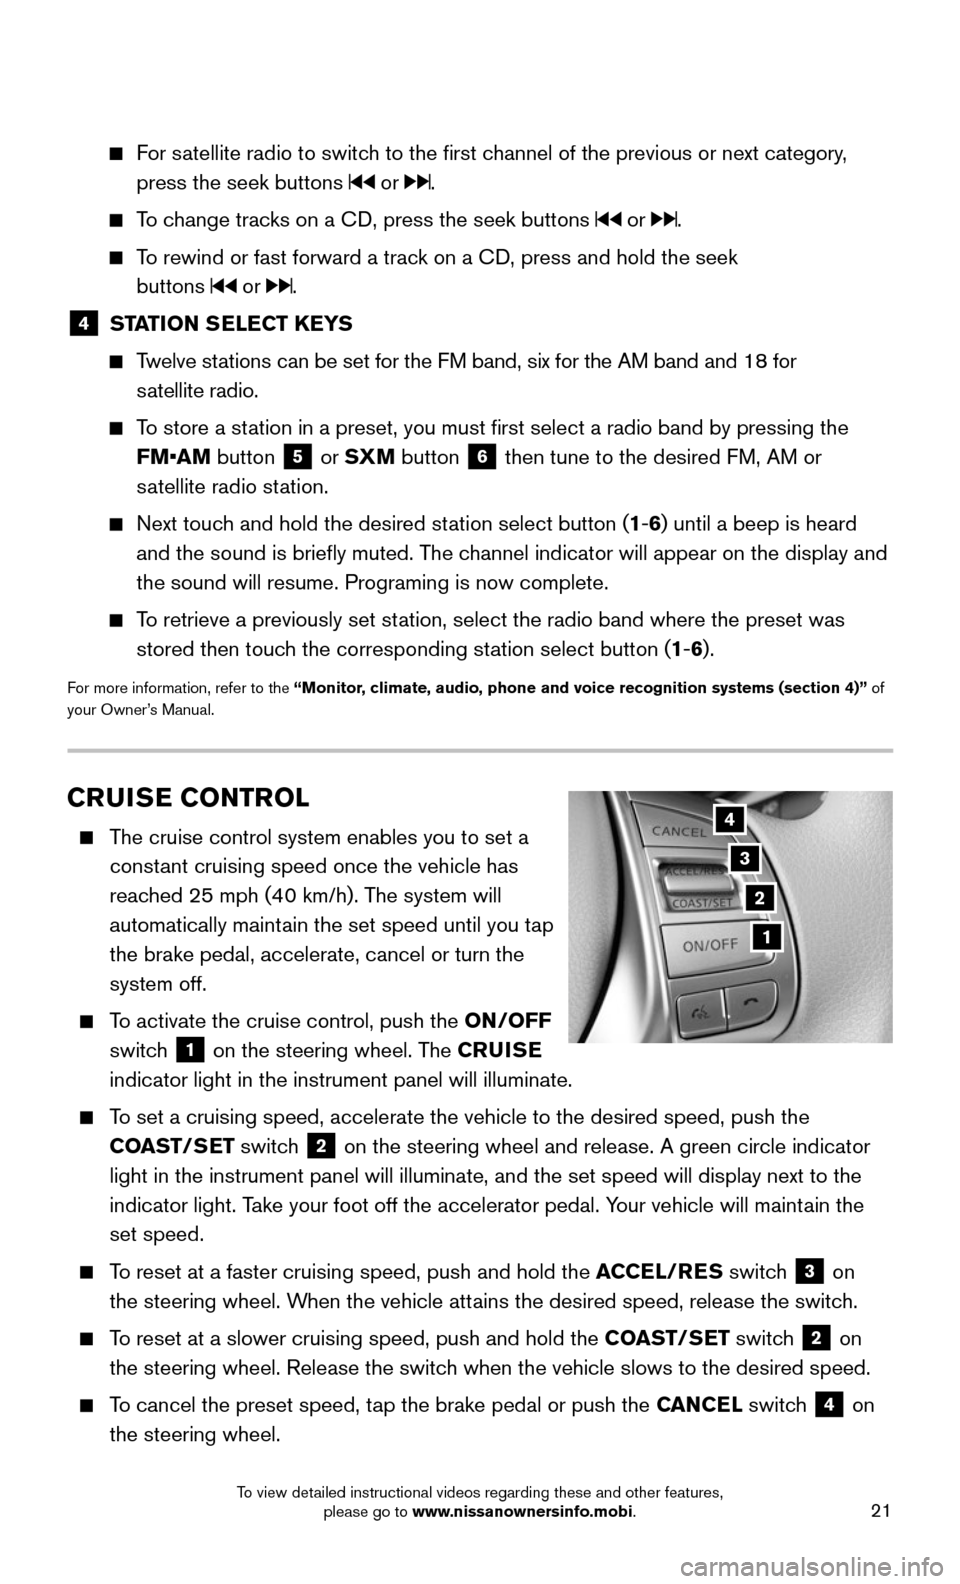
To activate the cruise control, push the ON/OFF
switch
1 on the steering wheel. The CRUISE
indicator light in the instrument panel will illuminate.
To set a cruising speed, accelerate the vehicle to the desired speed, pus\
h the
COAST/SET switch
2 on the steering wheel and release. A green circle indicator
light in the instrument panel will illuminate, and the set speed will di\
splay next to the
indicator light. Take your foot off the accelerator pedal. Your vehicle will maintain the
set speed.
To reset at a faster cruising speed, push and hold the ACCEL/RES switch 3 on
the steering wheel. When the vehicle attains the desired speed, release the switch.
To reset at a slower cruising speed, push and hold the COAST/SET switch 2 on
the steering wheel. Release the switch when the vehicle slows to the desired speed.
To cancel the preset speed, tap the brake pedal or push the CANCEL switch 4 on
the steering wheel.
3
2
1
4
For satellite radio to switch to the first channel of the previous or next category,
press the seek buttons or .
To change tracks on a CD, press the seek buttons or .
To rewind or fast forward a track on a CD, press and hold the seek
buttons
or .
4 STATION SELECT KEYS
Twelve stations can be set for the FM band, six for the AM band and 18 for
satellite radio.
To store a station in a preset, you must first select a radio band by pressing the \
FM•AM button
5 or SXM button 6 then tune to the desired FM, AM or
satellite radio station.
Next touch and hold the desired station select button (1-6) until a beep is heard
and the sound is briefly muted. The channel indicator will appear on the display and
the sound will resume. Programing is now complete.
To retrieve a previously set station, select the radio band where the preset was
stored then touch the corresponding station select button (1-6).
For more information, refer to the “Monitor, climate, audio, phone and voice recognition systems (section 4)” of
your Owner’s Manual.
To view detailed instructional videos regarding these and other features, please go to www.nissanownersinfo.mobi.
Page 26 of 36
24
SYSTEM GUIDE
VEHICLE INFORMATION DISPLAY
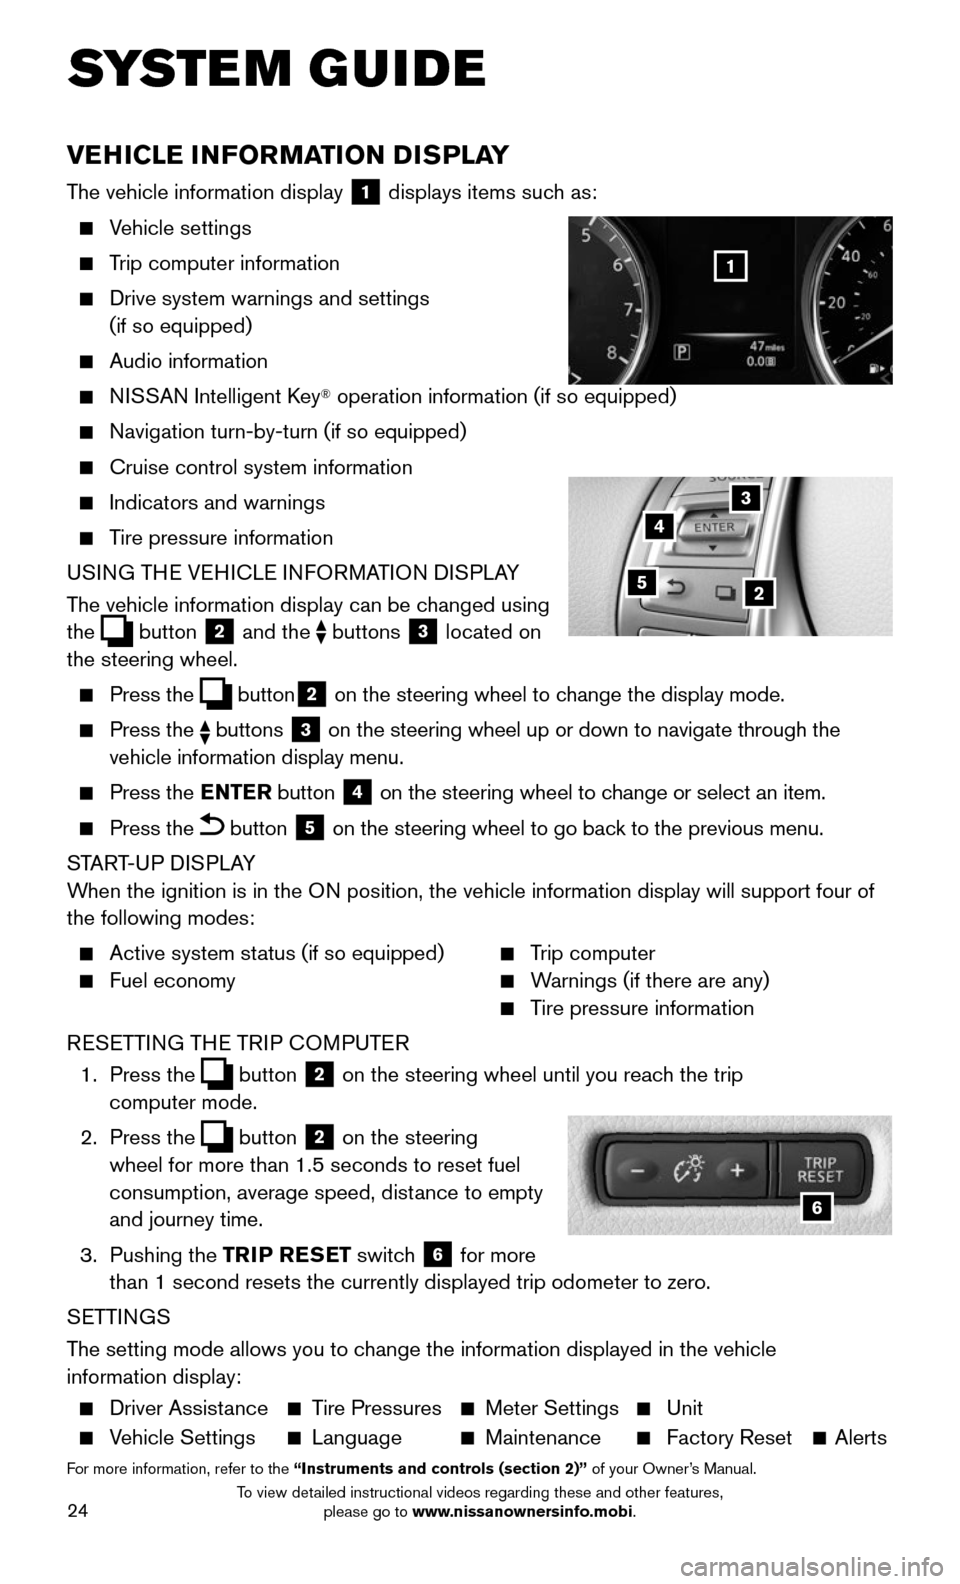
The vehicle information display 1 displays items such as:
Vehicle settings
Trip computer information
Drive system warnings and settings
(if so equipped)
Audio information
NISSAN Intelligent Key® operation information (if so equipped)
Navigation turn-by-turn (if so equipped)
Cruise control system information
Indicators and warnings
Tire pressure information
USING THE VEHICLE INFORMATION DISPLAY
The vehicle information display can be changed using
the
button 2 and the buttons 3 located on
the steering wheel.
Press the button2 on the steering wheel to change the display mode.
Press the buttons 3 on the steering wheel up or down to navigate through the
vehicle information display menu.
Press the ENTER button 4 on the steering wheel to change or select an item.
Press the button 5 on the steering wheel to go back to the previous menu.
START-UP DISPLAY
When the ignition is in the ON position, the vehicle information display will support four of
the following modes:
Active system st atus (if so equipped)
Fuel economy
Trip computer
Warnings (if there are any)
Tire pressure information
RESETTING THE TRIP COMPUTER
1. Press the button 2 on the steering wheel until you reach the trip
computer mode.
2. Press the button 2 on the steering
wheel for more than 1.5 seconds to reset fuel
consumption, average speed, distance to empty
and journey time.
3. Pushing the TRIP RESET switch 6 for more
than 1 second resets the currently displayed trip odometer to zero.
SETTINGS
The setting mode allows you to change the information displayed in the vehicle
information display:
Driver Assist ance Tire Pressures Meter Settings Unit
Vehicle Settings Language Maintenance Factory Reset Alerts
For more information, refer to the “Instruments and controls (section 2)” of your Owner’s Manual.
5
3
2
4
6
1
To view detailed instructional videos regarding these and other features, please go to www.nissanownersinfo.mobi.
Page 28 of 36
26
SYSTEM GUIDE
BLUETOOTH® HANDS-FREE PHONE SYSTEM1
A cellular telephone should not be used
while driving so full attention may be given to
vehicle operation
2.
SYSTEM OPERATING TIPS
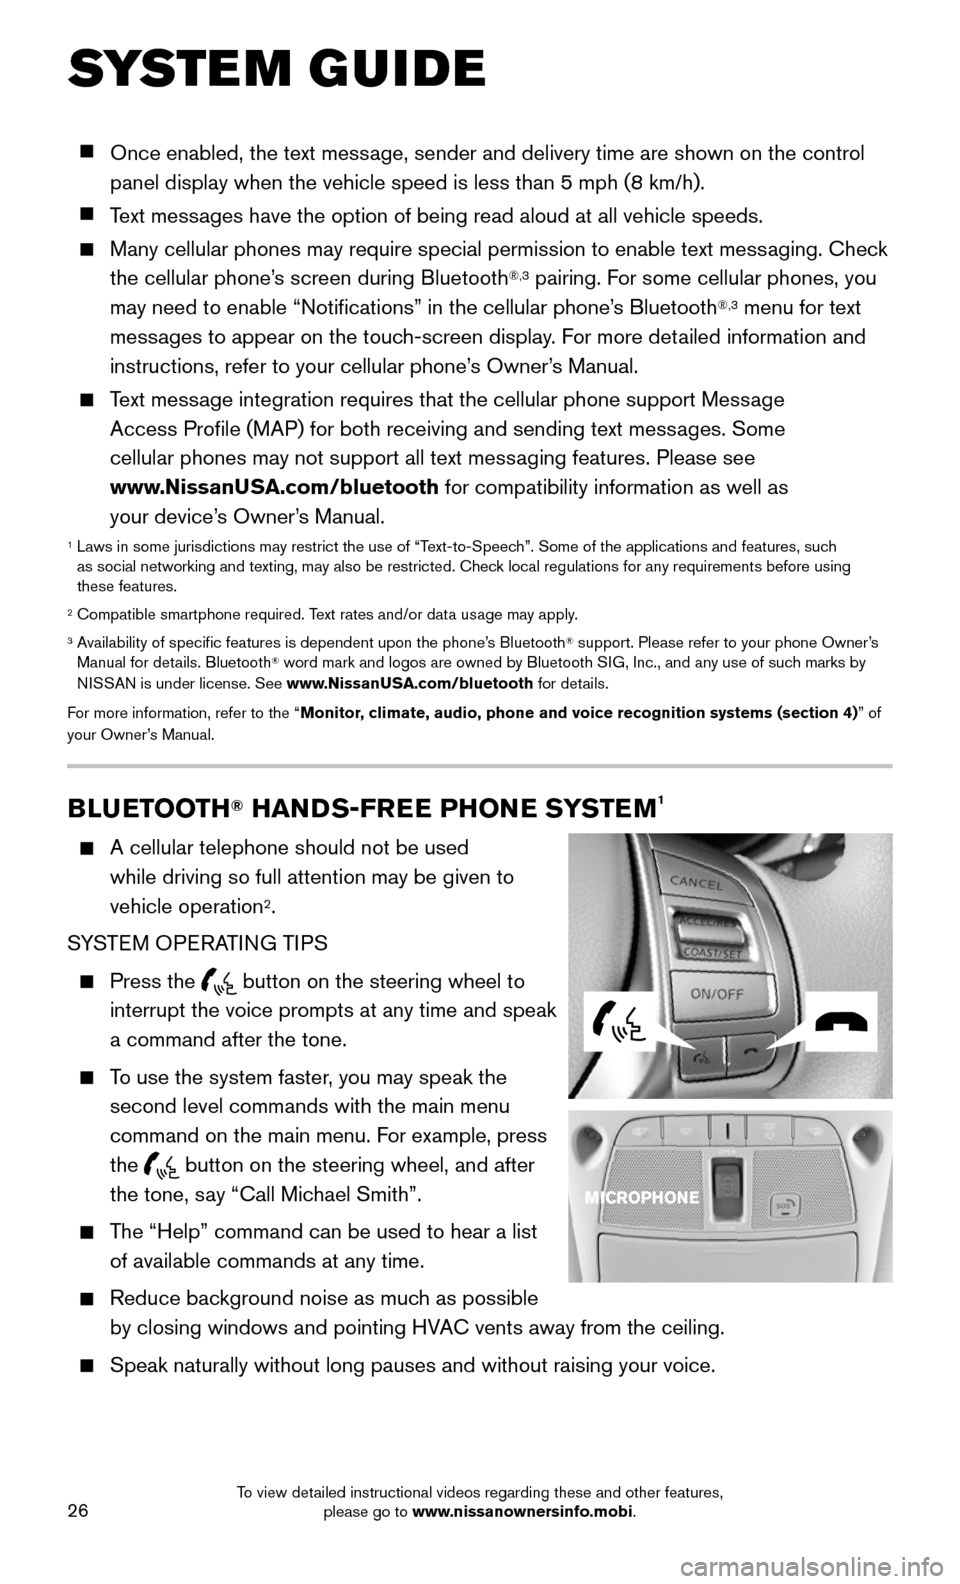
Press the button on the steering wheel to
interrupt the voice prompts at any time and speak
a command after the tone.
To use the system faster, you may speak the
second level commands with the main menu
command on the main menu. For example, press
the
button on the steering wheel, and after
the tone, say “Call Michael Smith”.
The “Help” command can be used to hear a list
of available commands at any time.
Reduce bac kground noise as much as possible
by closing windows and pointing HVAC vents away from the ceiling.
Speak naturally without long pauses and without raising your voice.
Once enabled, the text message, sender and delivery time are shown on the control
panel display when the vehicle speed is less than 5 mph (8 km/h).
Text messages have the option of being read aloud at all vehicle speeds.
Many cellular phones may require special permission to enable text mess aging. Check
the cellular phone’s screen during Bluetooth®,3 pairing. For some cellular phones, you
may need to enable “Notifications” in the cellular phone’s Bluetooth®,3 menu for text
messages to appear on the touch-screen display. For more detailed information and
instructions, refer to your cellular phone’s Owner’s Manual.
Text message integration requires that the cellular phone support Message
Access Profile (MAP) for both receiving and sending text messages. Some
cellular phones may not support all text messaging features. Please see
www.NissanUSA.com/bluetooth for compatibility information as well as
your device’s Owner’s Manual.
1 Laws in some jurisdictions may restrict the use of “T ext-to-Speech”. Some of the applications and features, such
as social networking and texting, may also be restricted. Check local regulations for any requirements before using
these features.
2 Compatible smartphone required. Text rates and/or data usage may apply.3 Availability of specific features is dependent upon the phone’s Bluetooth® support. Please refer to your phone Owner’s
Manual for details. Bluetooth® word mark and logos are owned by Bluetooth SIG, Inc., and any use of such marks by
NISSAN is under license. See www.NissanUSA.com/bluetooth for details.
For more information, refer to the “Monitor, climate, audio, phone and voice recognition systems (section 4) ” of
your Owner’s Manual.
To view detailed instructional videos regarding these and other features, please go to www.nissanownersinfo.mobi.
Page 29 of 36
27
When speaking phonebook names, please be aware some cellular phones requi\
re the
last name to be spoken before the first name. For example, “Michael Smith” may be
spoken as “Smith Michael”.
To cancel a Nissan Voice Recognition session, say “Exit” or press and hold the
button on the steering wheel.
To decrease or increase the volume of the voice prompts, push the volume \
control
switches or on the steering wheel or turn the VOLUME control knob on the
audio system while the system is responding.
Voice commands can be used to operate various Bluetooth®,1 system features
using the NISSAN Voice Recognition system. See your Owner’s Manual for
detailed information.
For more detailed information and instructions, refer to your cellular phone’s Owner’s
Manual and visit www.NissanUSA.com/bluetooth.
1 Availability of specific features is dependent upon the phone’s Bluetooth® support. Please refer to your phone Owner’s
Manual for details. Bluetooth® word mark and logos are owned by Bluetooth SIG, Inc., and any use of such marks by
NISSAN is under license. See www.NissanUSA.com/bluetooth for details.
2 Some jurisdictions prohibit the use of cellular telephones while drivin\
g.
BLUETOOTH® SYSTEM WITHOUT NAVIGATION1,2 (if so equipped)
PAIRING PROCEDUR E3
1. Press the button on the steering wheel. The system announces the
available commands.
2. Say: “Add Phone”. The system acknowledges the command and asks you to initiate connecting from the cellular phone handset.
• A cellular phone can also be added at any time by selecting
“Settings” > “Bluetooth” > “Add Phone”.
3. Initiate pairing from the cellular phone.
• The connecting procedure varies according to each cellular phone model.
For detailed connecting instructions and a list of compatible cellular phones,
please visit www.NissanUSA.com/bluetooth.
• When prompted, compare the PIN on the display with the PIN shown on the handset. If your device does not support Secure Simple Pairing and reque\
sts you to
input a PIN, enter “1234” from the handset.
PHONEBOOK REGISTRATION
When the cellular phone is connected to the in-vehicle module, the data stored in the cellular phone, such as phonebook, outgoing call logs, incoming call logs and missed
call logs, is automatically transferred and registered to the system.
The availability of this function depends on each cellular phone. The copying procedure also varies according to each cellular phone. See your cellular phone’s
Owner’s Manual for more information.
Up to 1,000 entries per registered cellular phone can be stored in
the phonebook.
To view detailed instructional videos regarding these and other features, please go to www.nissanownersinfo.mobi.
Page 30 of 36
28
SYSTEM GUIDE
2
1
MAKING A CALL
1. Press the button on the steering wheel. A tone will sound.
2. Say: “Call”. The system acknowledges the command and announces the next set of
available commands.
3. Say the registered person’s name. The system acknowledges the command and announces the next set of available commands.
4. Say: “Yes”. The system acknowledges the command and makes the call.
RECEIVING/ENDING A CALL
To accept the call, press the button on the steering wheel.
To reject the call, press the button on the steering wheel.
To hang up, press the button on the steering wheel.
1 Some jurisdictions prohibit the use of cellular telephones while drivin\
g.2 Availability of specific features is dependent upon the phone’s Bluetooth® support. Please refer to your phone Owner’s
Manual for details. Bluetooth® word mark and logos are owned by Bluetooth SIG, Inc., and any use of such marks by
NISSAN is under license. See www.NissanUSA.com/bluetooth for details.
3 Laws in some jurisdictions may restrict the use of “T ext-to-Speech”. Some applications and features such as social networking and texting, may also be restricted. Check local regulations for any requirements before using these features.
Compatible smartphone required. Text rates and/or data usage may apply.
To view detailed instructional videos regarding these and other features, please go\
to www.nissanownersinfo.mobi.
BLUETOOTH® SYSTEM WITH NAVIGATION1,2 (if so equipped)
Send predefined or custom text messages3 through your vehicle’s Bluetooth®,2 system.
Receive texts through your vehicle’ s Bluetooth®,2 system that can be read to you.
Bluetooth®,2 Streaming Audio allows you to use a compatible Bluetooth®,2 device
to play audio files. Once your compatible device is connected to the v\
ehicle’s audio
system, the audio files will play through the vehicle’s speakers.
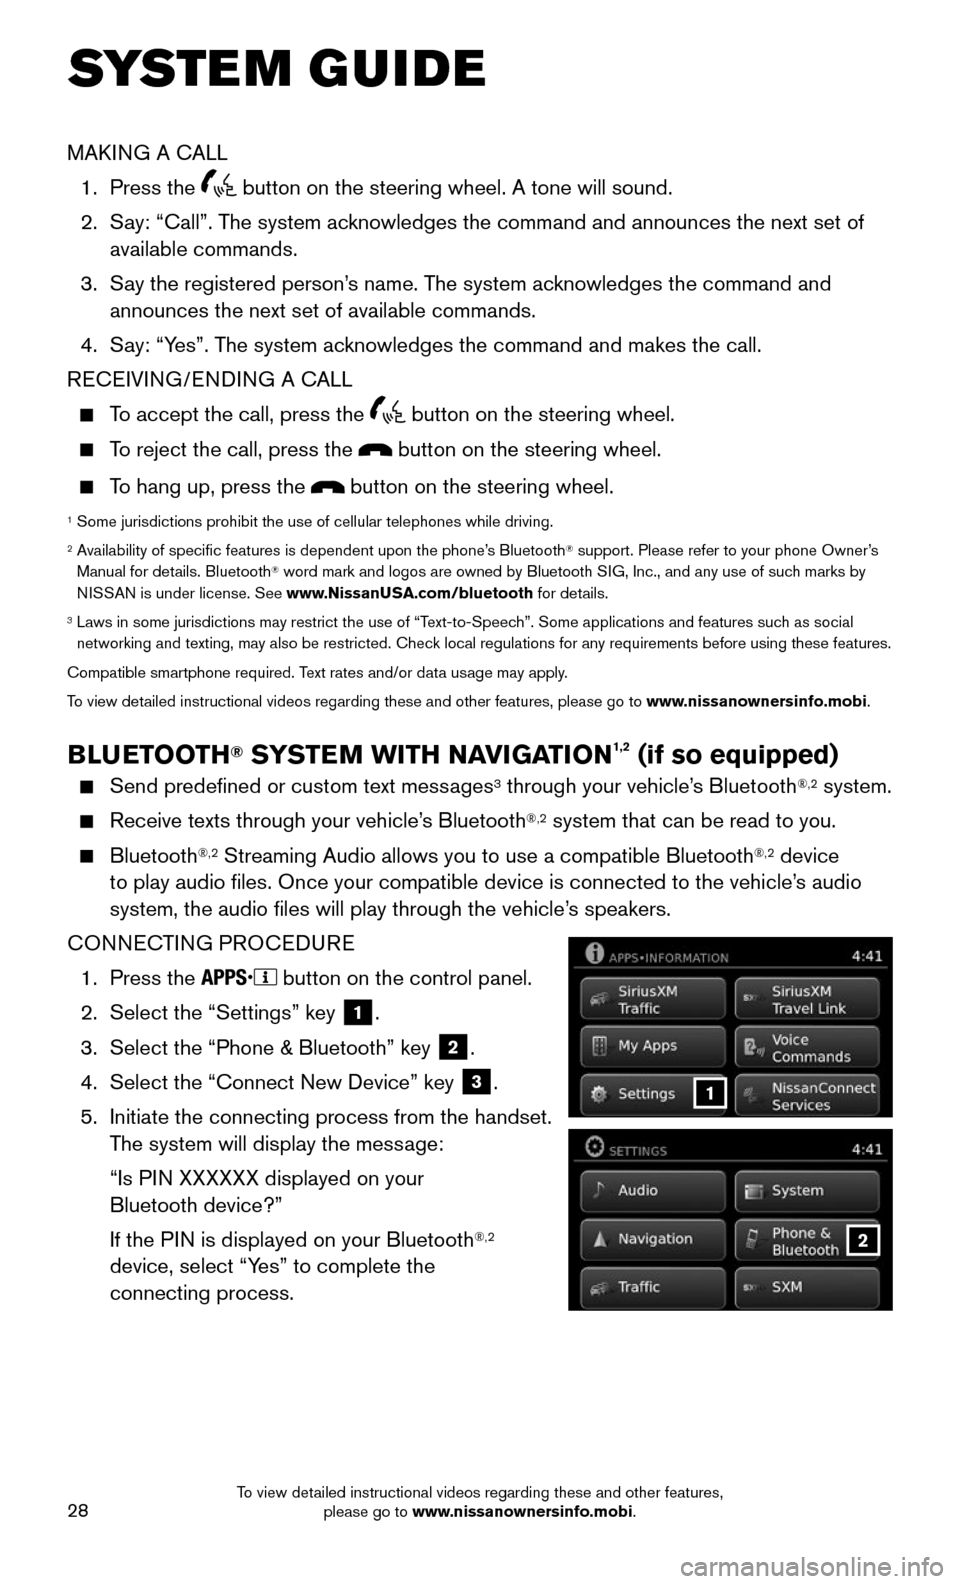
CONNECTING PROCEDURE
1. Press the button on the control panel.
2. Select the “Settings” key 1.
3. Select the “Phone & Bluetooth” key 2.
4. Select the “Connect New Device” key 3.
5. Initiate the connecting process from the handset. The system will display the message:
“Is PIN XXXXXX displayed on your
Bluetooth device?”
If the P IN is displayed on your Bluetooth®,2
device, select “Yes” to complete the
connecting process.
To view detailed instructional videos regarding these and other features, please go to www.nissanownersinfo.mobi.
Page 31 of 36
29
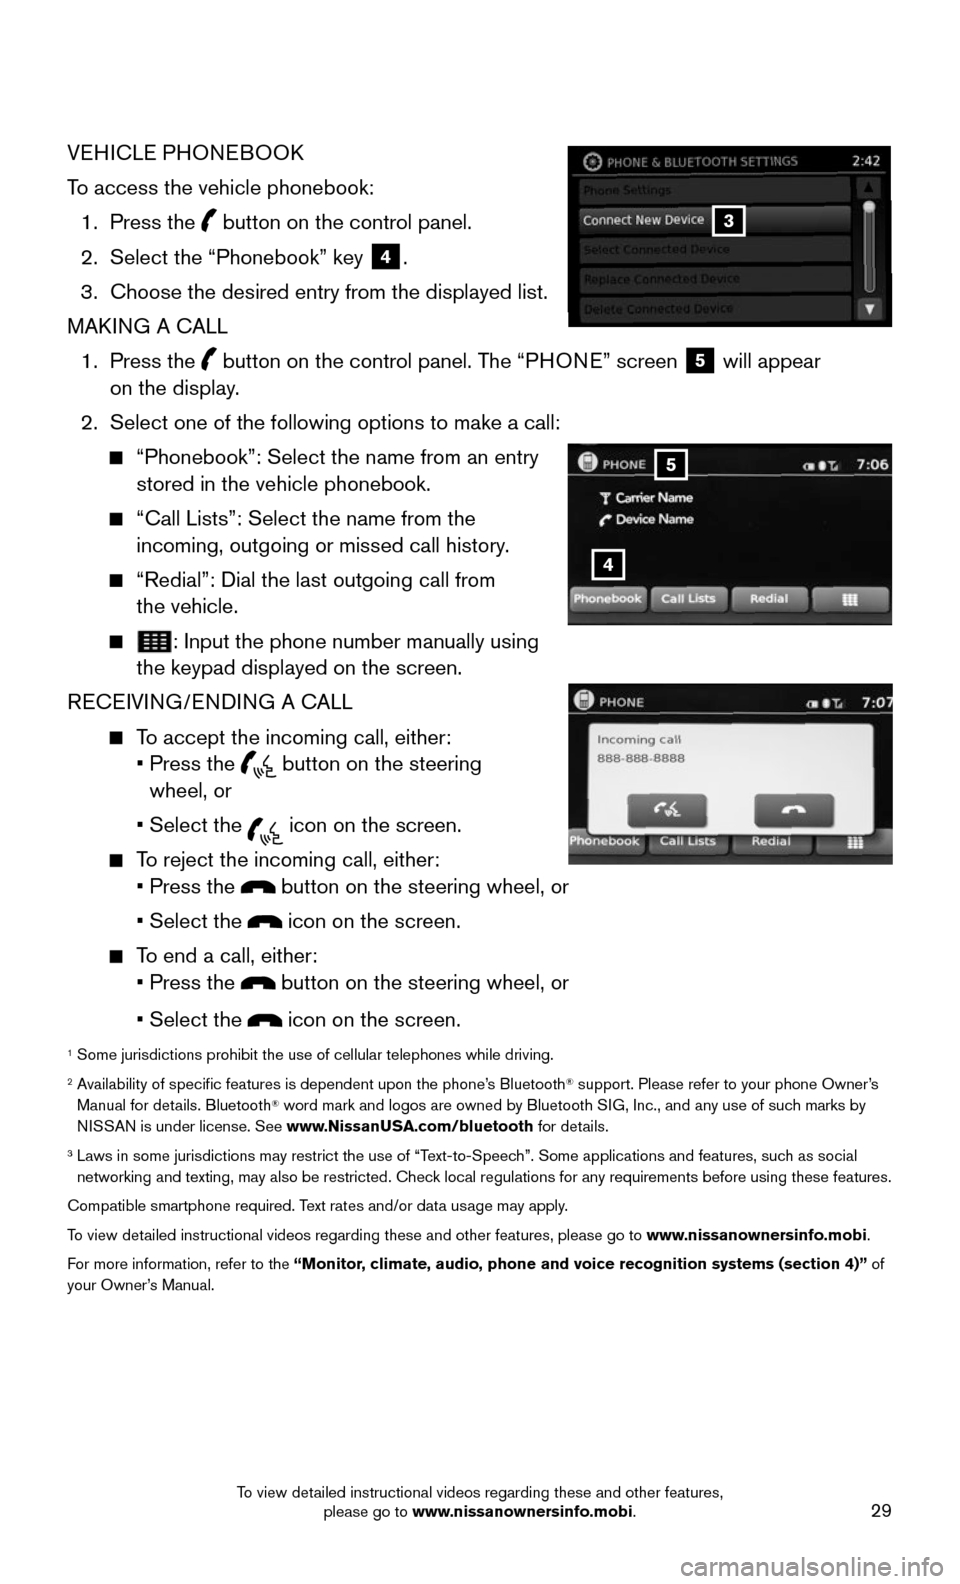
VEHICLE PHONEBOOK
To access the vehicle phonebook:
1. Press the button on the control panel.
2. Select the “Phonebook” key 4.
3. Choose the desired entry from the displayed list.
MAKING A CALL
1. Press the button on the control panel. The “ PHONE” screen 5 will appear
on the display.
2. Select one of the following options to make a call:
“Phonebook”: Select the name from an entry stored in the vehicle phonebook.
“Call Lists”: Select the name from the incoming, outgoing or missed call history.
“Redial”: Dial the last outgoing call from
the vehicle.
: Input the phone number manually using the keypad displayed on the screen.
RECEIVING/ENDING A CALL
To accept the incoming call, either: • Press the button on the steering
wheel, or
• Select the icon on the screen.
To reject the incoming call, either: • Press the button on the steering wheel, or
• Select the icon on the screen.
To end a call, either: • Press the button on the steering wheel, or
• Select the icon on the screen.
1 Some jurisdictions prohibit the use of cellular telephones while driving\
.2 Availability of specific features is dependent upon the phone’s Bluetooth® support. Please refer to your phone Owner’s
Manual for details. Bluetooth® word mark and logos are owned by Bluetooth SIG, Inc., and any use of such marks by
NISSAN is under license. See www.NissanUSA.com/bluetooth for details.
3 Laws in some jurisdictions may restrict the use of “T ext-to-Speech”. Some applications and features, such as social networking and texting, may also be restricted. Check local regulations for any requirements before using these features.
Compatible smartphone required. Text rates and/or data usage may apply.
To view detailed instructional videos regarding these and other features, please go\
to www.nissanownersinfo.mobi.
For more information, refer to the “Monitor, climate, audio, phone and voice recognition systems (section 4)” of
your Owner’s Manual.
4
5
3
To view detailed instructional videos regarding these and other features, please go to www.nissanownersinfo.mobi.
Page 32 of 36
30
SYSTEM GUIDE
1
11
4
7
108
2
39
5
6
NAVIGATION SYSTEM (if so equipped)
Your Navigation System can calculate a route from your current location t\
o a preferred
destination. The real-time map display and turn-by-turn voice guidance will lead you
along the route.
The Navigation System will continually update your vehicle’s position. If you have
deviated from the original route, it will recalculate the route from you\
r current location.
To help promote safe driving, some functions cannot be operated or have limited
operation when the vehicle speed is above 5 mph (8 km/h). The on-screen text and
keys for these restricted functions will be grayed-out or muted and cann\
ot be selected
while driving. These functions will become available again when the vehicle speed
is reduced to 5 mph (8 km/h). Voice commands may be available for some of the
restricted functions. For more information, refer to the “Monitor, climate, audio, phone
and voice recognition systems (section 4)” of your Owner’s Manual.
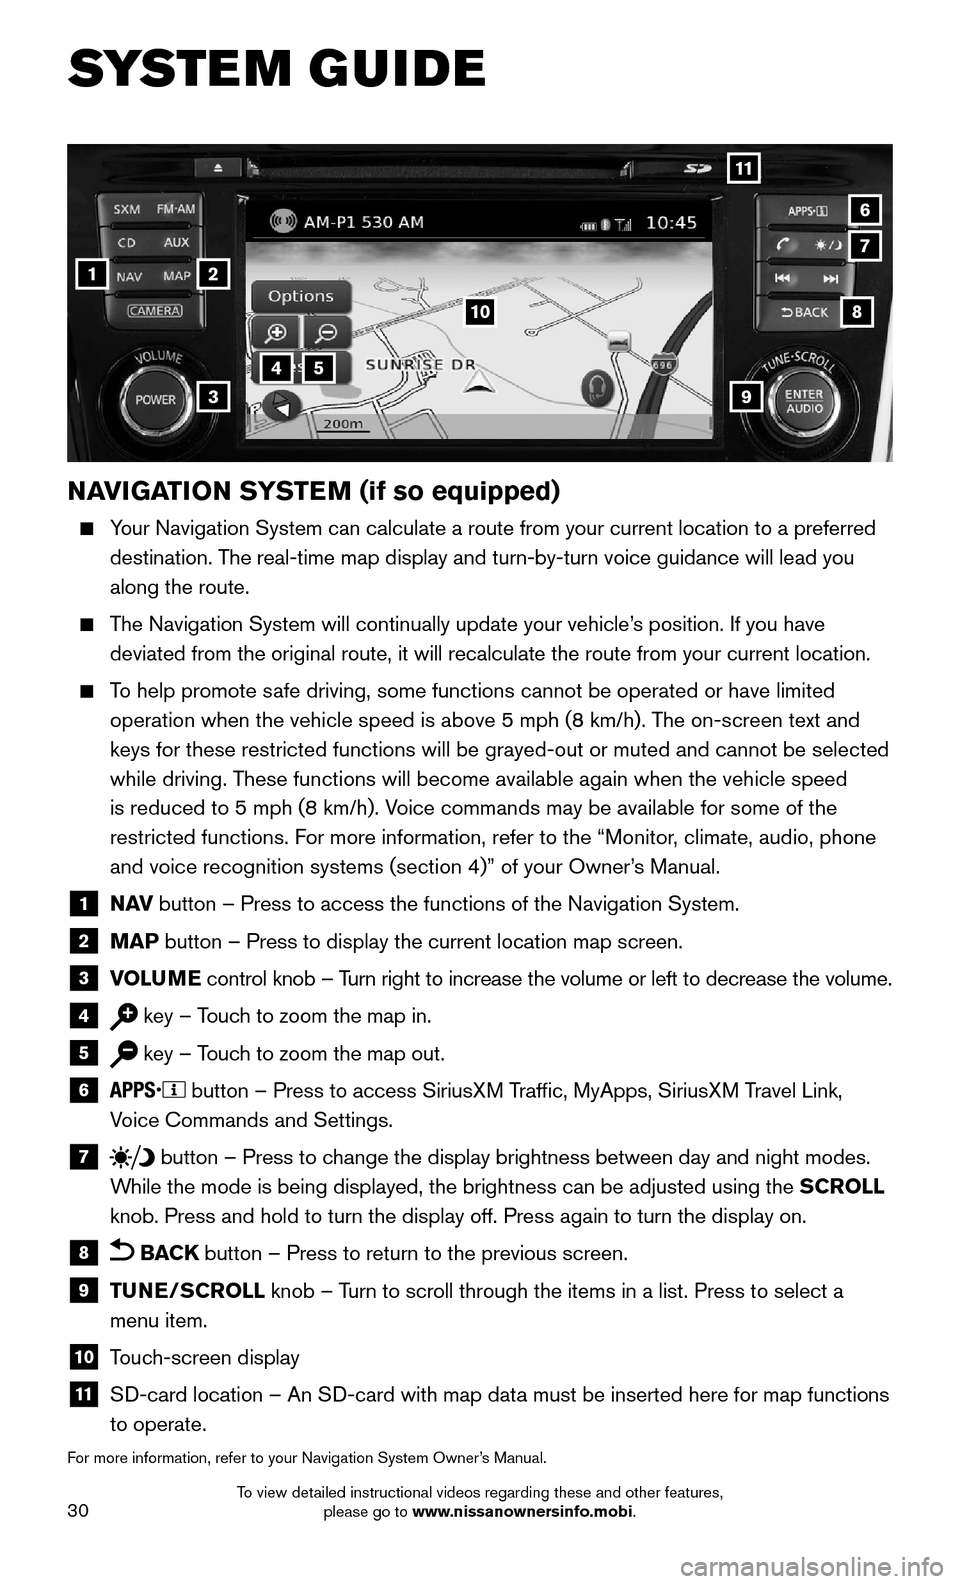
1 N AV button – Press to access the functions of the Navigation System.
2 MAP button – Press to display the current location map screen.
3 VOLUME control knob – Turn right to increase the volume or left to decrease the volume.
4 key – Touch to zoom the map in.
5 key – Touch to zoom the map out.
6 button – Press to access SiriusXM Traffic, MyApps, SiriusXM Travel Link,
Voice Commands and Settings.
7 button – Press to change the display brightness between day and night modes.
While the mode is being displayed, the brightness can be adjusted using t\
he SCROLL
knob. Press and hold to turn the display off. Press again to turn the di\
splay on.
8 BACK button – Press to return to the previous screen.
9 TUNE/SCROLL knob – Turn to scroll through the items in a list. Press to select a
menu item.
10 Touch-screen display
11 SD-card location – An SD-card with map data must be inserted here for map functions
to operate.
For more information, refer to your Navigation System Owner’s Manual.
To view detailed instructional videos regarding these and other features, please go to www.nissanownersinfo.mobi.