Page 9 of 36
7
HILL START ASSIST (HSA)
The HSA system allows time for the driver to release the brake pedal and appl\
y the
accelerator when the vehicle is parked on a hill. The brakes are applied automatically for 2
seconds after the driver releases the brake pedal.
The HSA system will operate automatically under these conditions:
• The shift lever is shifted into a forward or a reverse gear.
• The vehicle is stopped completely on a hill by applying the brake.
The HSA system will not operate when the shift lever is in the N (NEUTRAL ) or
P ( PA R K ) position or on a flat and level road.
For more information, refer to the “Starting and driving (section 5)” of your Owner’s Manual.
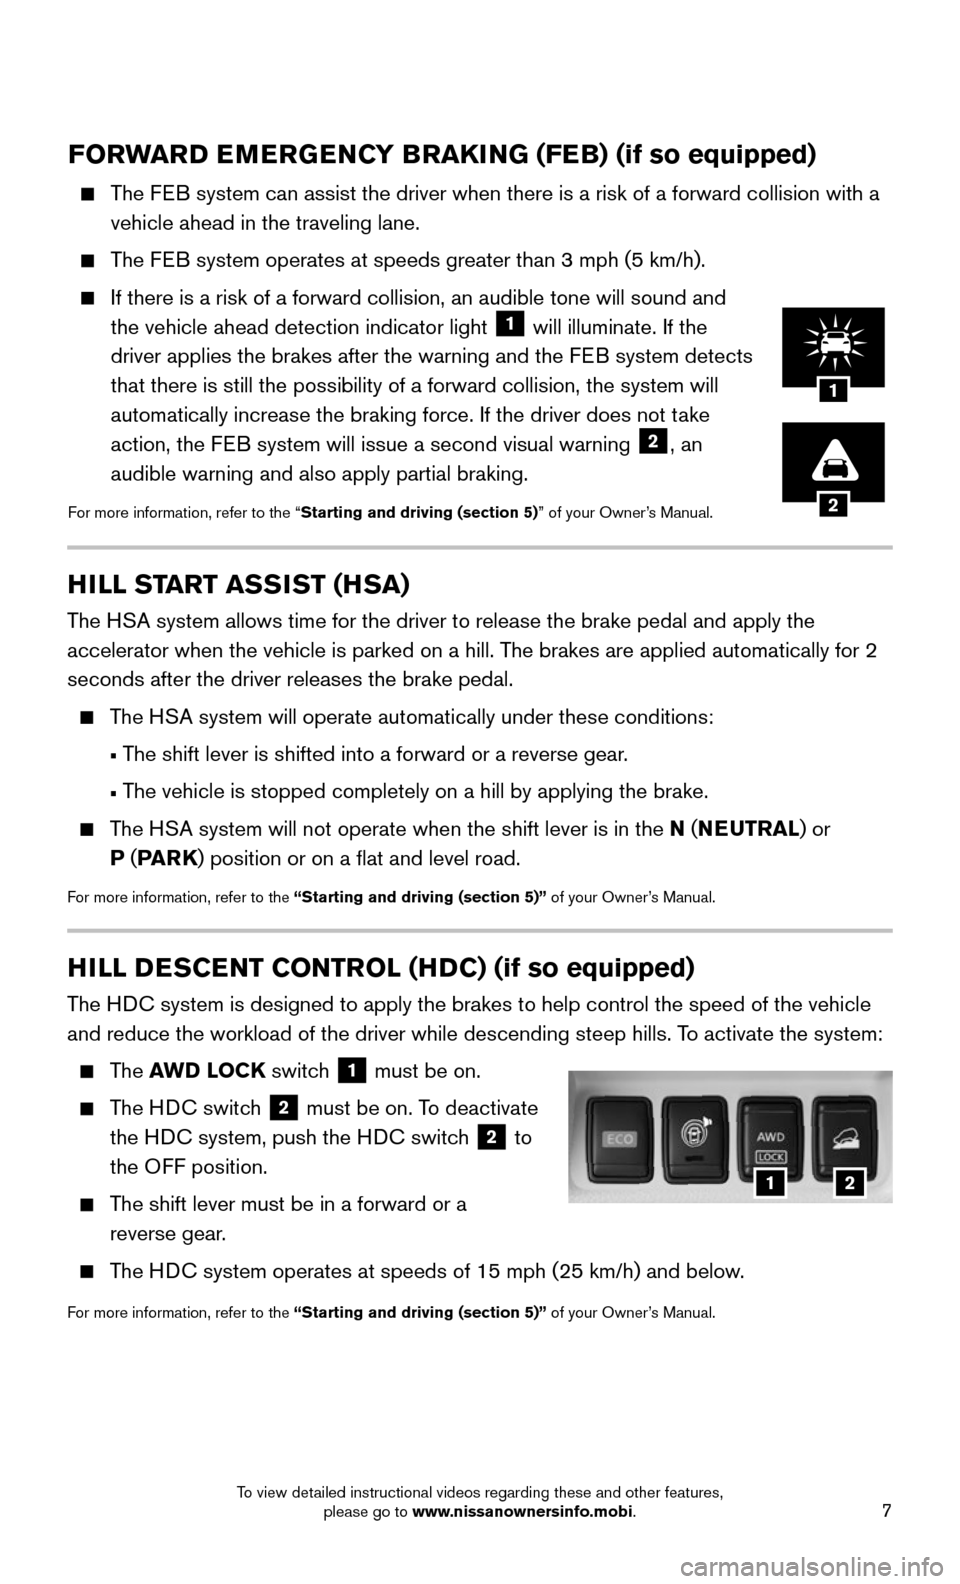
FORWARD EMERGENCY BRAKING (FEB) (if so equipped)
The FEB system can assist the driver when there is a risk of a forward collisi\
on with a
vehicle ahead in the traveling lane.
The FEB system operates at speeds greater than 3 mph (5 km/h).
If there is a risk of a forward collision, an audible tone will sound an\
d
the vehicle ahead detection indicator light 1 will illuminate. If the
driver applies the brakes after the warning and the FEB system detects
that there is still the possibility of a forward collision, the system w\
ill
automatically increase the braking force. If the driver does not take
action, the FEB system will issue a second visual warning
2, an
audible warning and also apply partial braking.
For more information, refer to the “Starting and driving (section 5)” of your Owner’s Manual.2
1
HILL DESCENT CONTROL (HDC) (if so equipped)
The HDC system is designed to apply the brakes to help control the speed of th\
e vehicle
and reduce the workload of the driver while descending steep hills. To activate the system:
The AWD LOCK switch 1 must be on.
The HDC switch 2 must be on. To deactivate
the HDC system, push the HDC switch
2 to
the OFF position.
The shift lever must be in a forward or a
reverse gear.
The HDC system operates at speeds of 15 mph (25 km/h) and below.
For more information, refer to the “Starting and driving (section 5)” of your Owner’s Manual.
21
To view detailed instructional videos regarding these and other features, please go to www.nissanownersinfo.mobi.
Page 10 of 36
8
SIRI® EYES FREE1 (if so equipped)
If you have a compatible iPhone®,2 with Siri®, you can
link your iPhone® to the Siri® Eyes Free function in
your vehicle’s Bluetooth®,3 system.
If you have a compatible iPhone
® connected to the
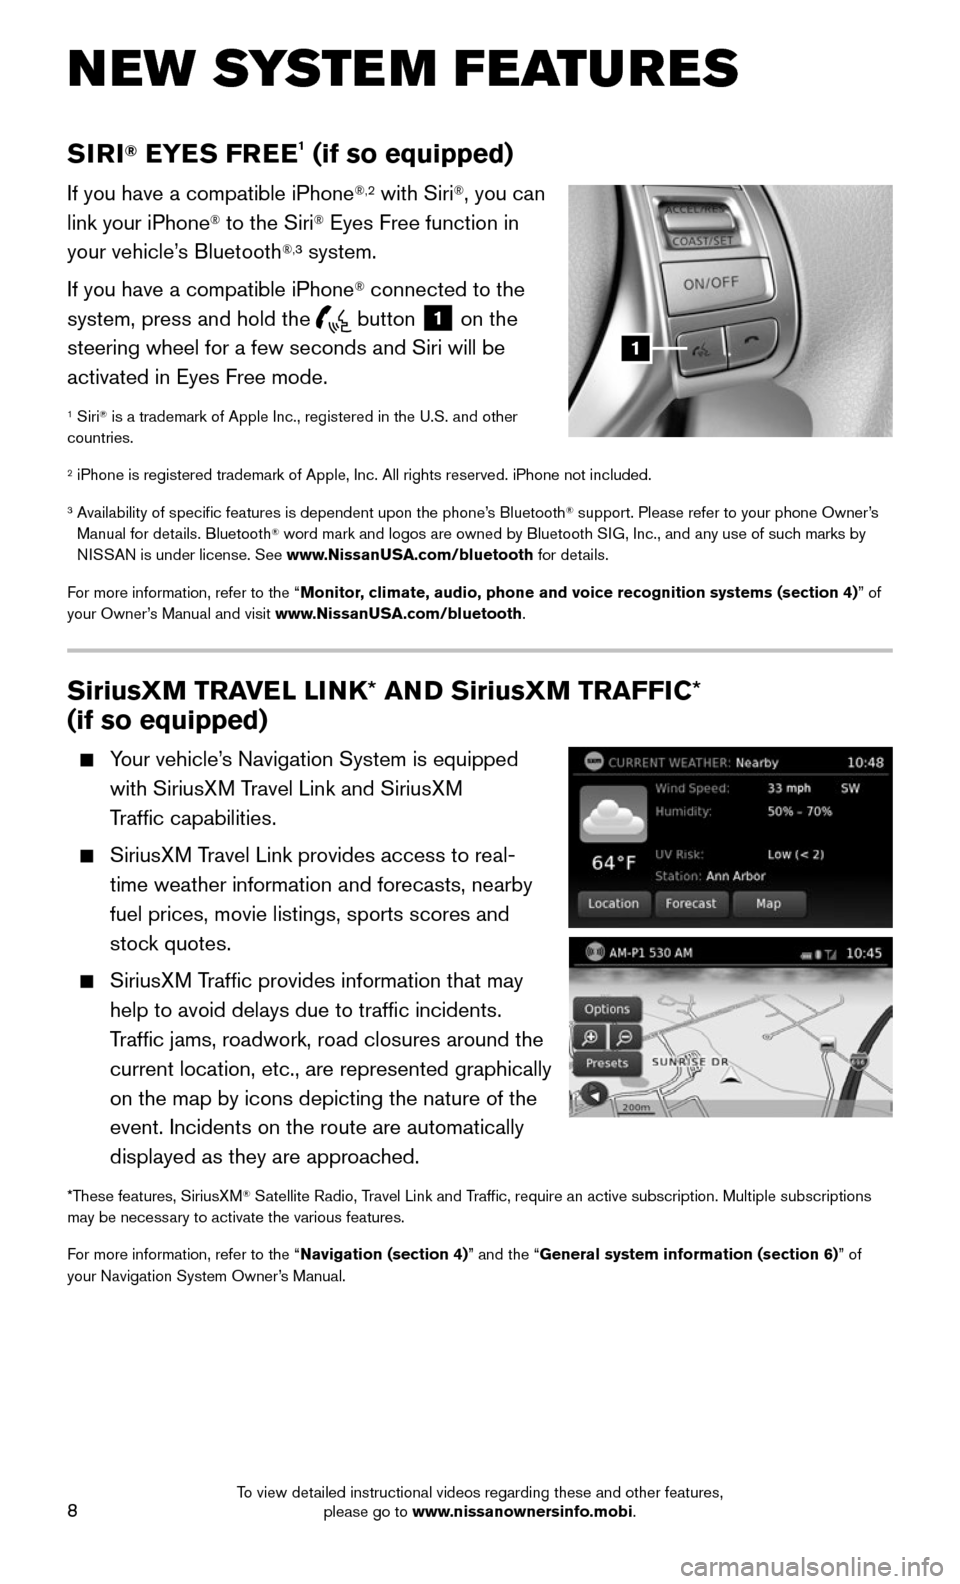
system, press and hold the
button 1 on the
steering wheel for a few seconds and Siri will be
activated in Eyes Free mode.
1 Siri® is a trademark of Apple Inc., registered in the U.S. and other
countries.
2 iPhone is registered trademark of Apple, Inc. All rights reserved. iPho\
ne not included.
3 Availability of specific features is dependent upon the phone’s Bluetooth® support. Please refer to your phone Owner’s
Manual for details. Bluetooth® word mark and logos are owned by Bluetooth SIG, Inc., and any use of such marks by
NISSAN is under license. See www.NissanUSA.com/bluetooth for details.
For more information, refer to the “Monitor, climate, audio, phone and voice recognition systems (section 4) ” of
your Owner’s Manual and visit www.NissanUSA.com/bluetooth.
NEW SYSTEM FEATURES
SiriusXM TRAVEL LINK* AND SiriusXM TRAFFIC*
(if so equipped)
Your vehicle’s Navigation System is equipped
with SiriusXM Travel Link and SiriusXM
Traffic capabilities.
SiriusXM Travel Link provides access to real-
time weather information and forecasts, nearby
fuel prices, movie listings, sports scores and
stock quotes.
SiriusXM Traffic provides information that may
help to avoid delays due to traffic incidents.
Traffic jams, roadwork, road closures around the
current location, etc., are represented graphically
on the map by icons depicting the nature of the
event. Incidents on the route are automatically
displayed as they are approached.
*These features, SiriusXM® Satellite Radio, Travel Link and Traffic, require an active subscription. Multiple subscriptions
may be necessary to activate the various features.
For more information, refer to the “Navigation (section 4)” and the “General system information (section 6)” of
your Navigation System Owner’s Manual.
1
To view detailed instructional videos regarding these and other features, please go to www.nissanownersinfo.mobi.
Page 11 of 36
9
ESSE NTIAL I N FOR MATION
TIRE PRESSURE MONITORING SYSTEM (TPMS)
WITH EASY FILL TIRE ALERT
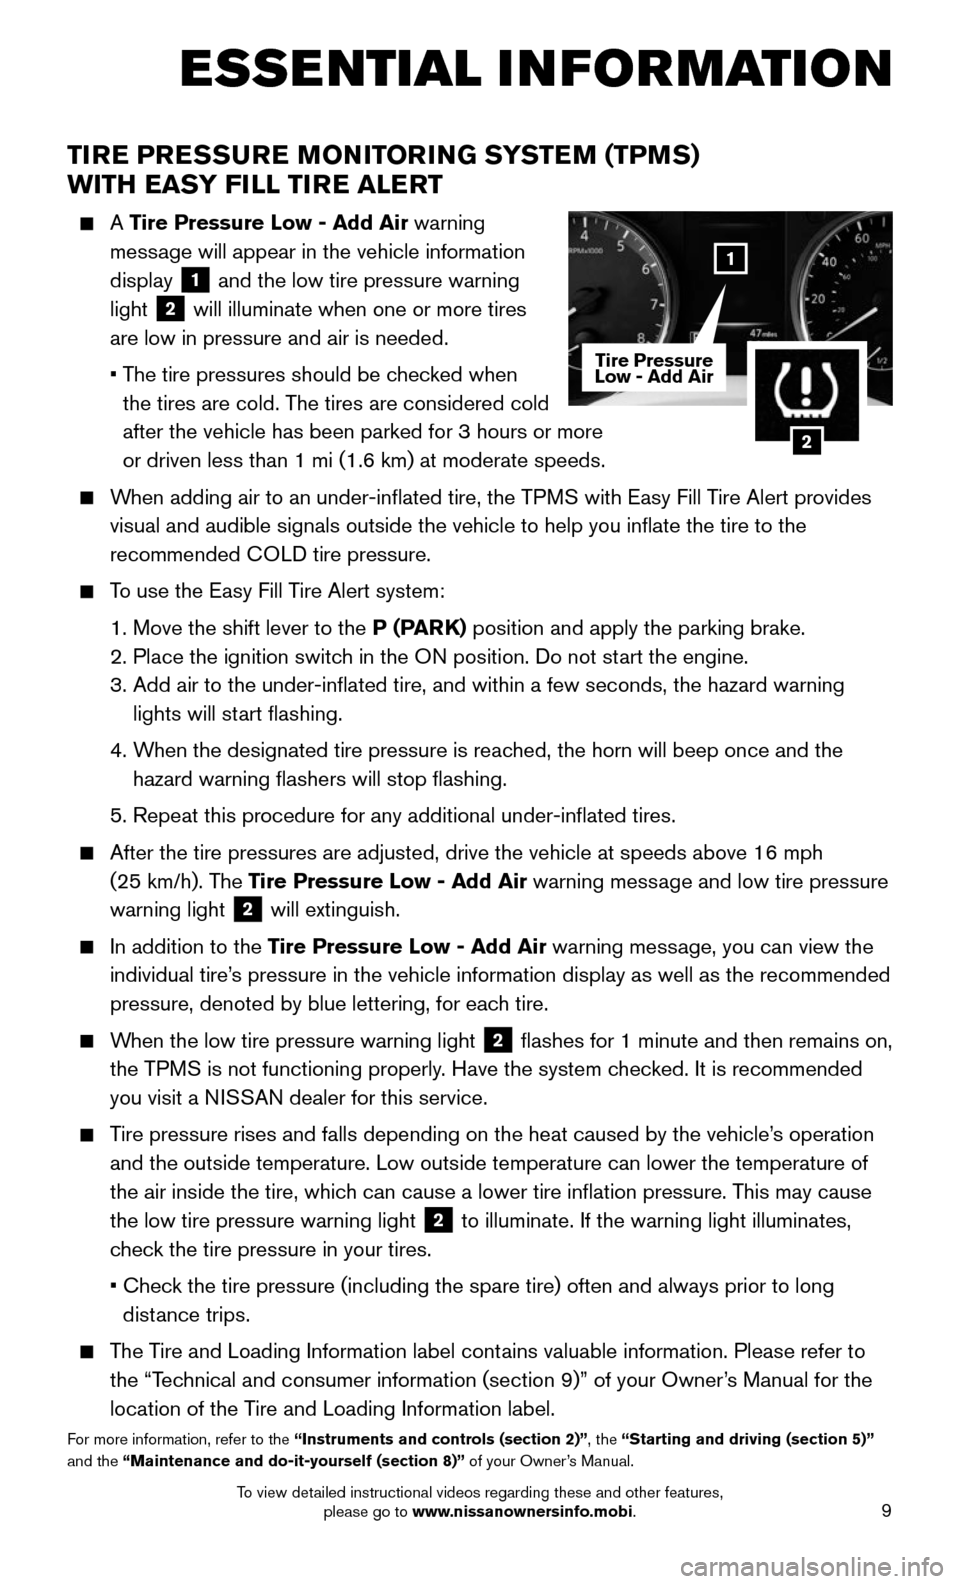
A Tire Pressure Low - Add Air warning
message will appear in the vehicle information
display
1 and the low tire pressure warning
light
2 will illuminate when one or more tires
are low in pressure and air is needed.
• The tire pressures should be checked when
the tires are cold. The tires are considered cold
after the vehicle has been parked for 3 hours or more
or driven less than 1 mi (1.6 km) at moderate speeds.
When adding air to an under-inflated tire, the TPMS with Easy Fill Tire Alert provides
visual and audible signals outside the vehicle to help you inflate the\
tire to the
recommended COLD tire pressure.
To use the Easy Fill Tire Alert system:
1. Move the shift lever to the P (PARK) position and apply the parking brake.
2. Place the ignition switc h in the ON position. Do not start the engine.
3. Add air to the under-inflated tire, and within a few seconds, the haza\
rd warning
lights will start flashing.
4. When the designated tire pressure is reached, the horn will beep once and the
hazard warning flashers will stop flashing.
5. Repeat this procedure for any additional under-inflated tires.
After the tire pressures are adjusted, drive the vehicle at speeds above\
16 mph
(25 km/h). The Tire Pressure Low - Add Air warning message and low tire pressure
warning light
2 will extinguish.
In addition to the Tire Pressure Low - Add Air warning message, you can view the
individual tire’s pressure in the vehicle information display as well as the recommended\
pressure, denoted by blue lettering, for each tire.
When the low tire pressure warning light 2 flashes for 1 minute and then remains on,
the TPMS is not functioning properly. Have the system checked. It is recommended
you visit a NISSAN dealer for this service.
Tire pressure rises and falls depending on the heat caused by the vehicle\
’s operation
and the outside temperature. Low outside temperature can lower the tempe\
rature of
the air inside the tire, which can cause a lower tire inflation pressure. This may cause
the low tire pressure warning light
2 to illuminate. If the warning light illuminates,
check the tire pressure in your tires.
• Check the tire pressure (including the spare tire) often and always prior \
to long
distance trips.
The Tire and Loading Information label contains valuable information. Please refer to
the “Technical and consumer information (section 9)” of your Owner’s Manual for the
location of the Tire and Loading Information label.
For more information, refer to the “Instruments and controls (section 2)”, the “Starting and driving (section 5)”
and the “Maintenance and do-it-yourself (section 8)” of your Owner’s Manual.
2
1
Tire Pressure
Low - Add Air
To view detailed instructional videos regarding these and other features, please go to www.nissanownersinfo.mobi.
Page 12 of 36
10
LOOSE FUEL CAP AND FUEL-FILLER DOOR
LOOSE FUEL CAP
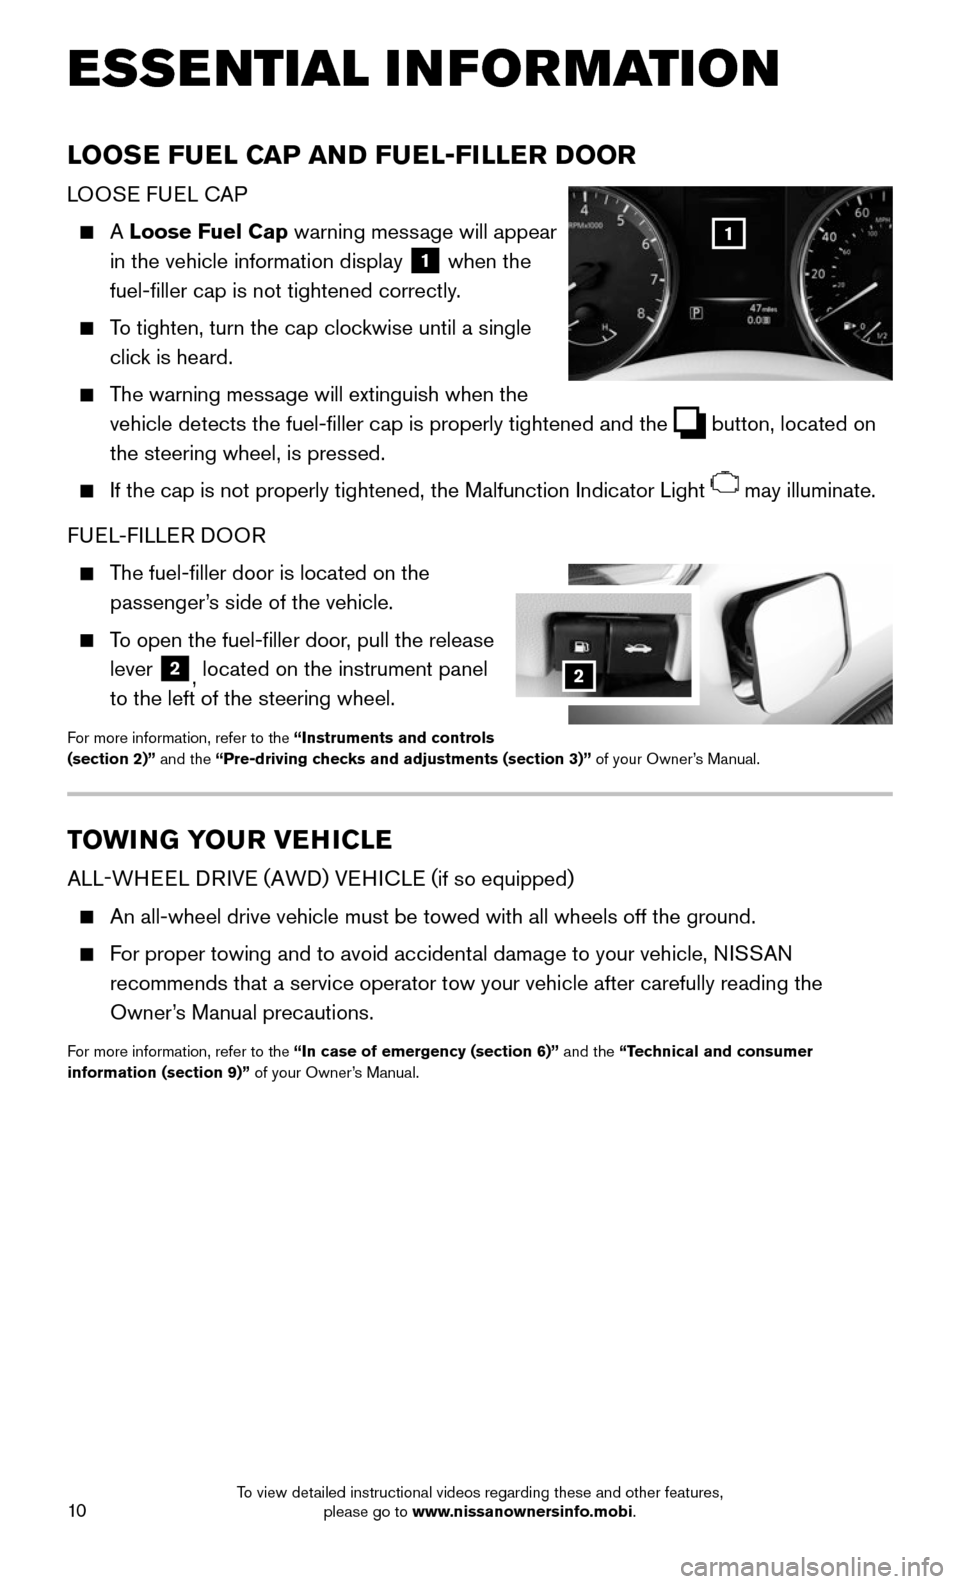
A Loose Fuel Cap warning message will appear
in the vehicle information display
1 when the
fuel-filler cap is not tightened correctly.
To tighten, turn the cap clockwise until a single
click is heard.
The warning message will extinguish when the
vehicle detects the fuel-filler cap is properly tightened and the button, located on
the steering wheel, is pressed.
If the cap is not properly tightened, the Malfunction Indicator Light may illuminate.
FUEL-FILLER DOOR
The fuel-filler door is located on the
passenger’s side of the vehicle.
To open the fuel-filler door, pull the release
lever 2, located on the instrument panel
to the left of the steering wheel.
For more information, refer to the “Instruments and controls
(section 2)” and the “Pre-driving checks and adjustments (section 3)” of your Owner’s Manual.
1
TOWING YOUR VEHICLE
ALL-WHEEL DRIVE (AWD) VEHICLE ( if so equipped)
An all-wheel drive vehicle must be towed with all wheels off the ground.\
For proper towing and to avoid accidental damage to your vehicle, NISSAN
recommends that a service operator tow your vehicle after carefully read\
ing the
Owner’s Manual precautions.
For more information, refer to the “In case of emergency (section 6)” and the “Technical and consumer
information (section 9)” of your Owner’s Manual.
2
ESSE NTIAL I N FOR MATION
To view detailed instructional videos regarding these and other features, please go to www.nissanownersinfo.mobi.
Page 13 of 36
11
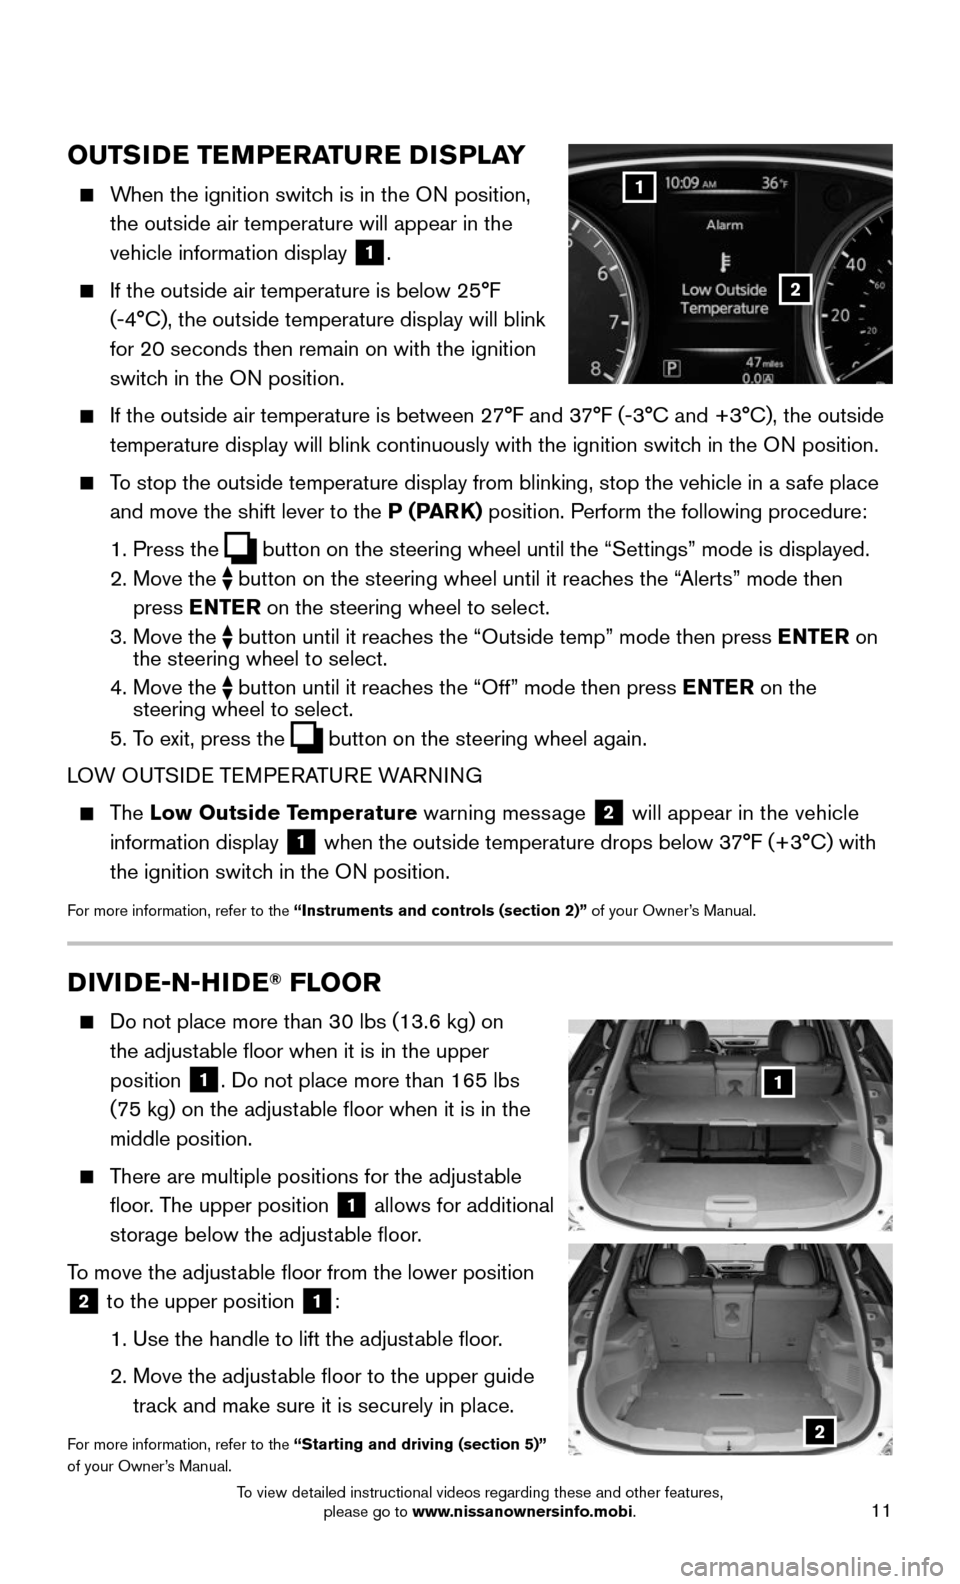
OUTSIDE TEMPERATURE DISPLAY
When the ignition switch is in the ON position,
the outside air temperature will appear in the
vehicle information display
1.
If the outside air temperature is below 25°F
(-4°C), the outside temperature display will blink
for 20 seconds then remain on with the ignition
switch in the ON position.
If the outside air temperature is between 2 7°F and 37°F (-3°C and +3°C), the outside
temperature display will blink continuously with the ignition switch in the ON position.
To stop the outside temperature display from blinking, stop the vehicle i\
n a safe place
and move the shift lever to the P (PARK) position. Perform the following procedure:
1. Press the button on the steering wheel until the “Settings” mode is display\
ed.
2. Move the button on the steering wheel until it reaches the “Alerts” mode then
press ENTER on the steering wheel to select.
3. Move the button until it reaches the “Outside temp” mode then press ENTER on
the steering wheel to select.
4. Move the button until it reaches the “Off” mode then press ENTER on the
steering wheel to select.
5. To exit, press the button on the steering wheel again.
LOW OUTSIDE TEMPERATURE WARNING
The Low Outside Temperature warning message 2 will appear in the vehicle
information display
1 when the outside temperature drops below 37°F (+3°C) with
the ignition switch in the ON position.
For more information, refer to the “Instruments and controls (section 2)” of your Owner’s Manual.
1
2
DIVIDE-N-HIDE® FLOOR
Do not place more than 3 0 lbs (13.6 kg) on
the adjustable floor when it is in the upper
position
1. Do not place more than 165 lbs
(75 kg) on the adjustable floor when it is in the
middle position.
There are multiple positions for the adjustable
floor. The upper position 1 allows for additional
storage below the adjustable floor.
To move the adjustable floor from the lower position
2 to the upper position 1:
1. Use the handle to lift the adjust able floor.
2. Move the adjust able floor to the upper guide
track and make sure it is securely in place.
For more information, refer to the “Starting and driving (section 5)”
of your Owner’s Manual.
1
2
To view detailed instructional videos regarding these and other features, please go to www.nissanownersinfo.mobi.
Page 14 of 36
12
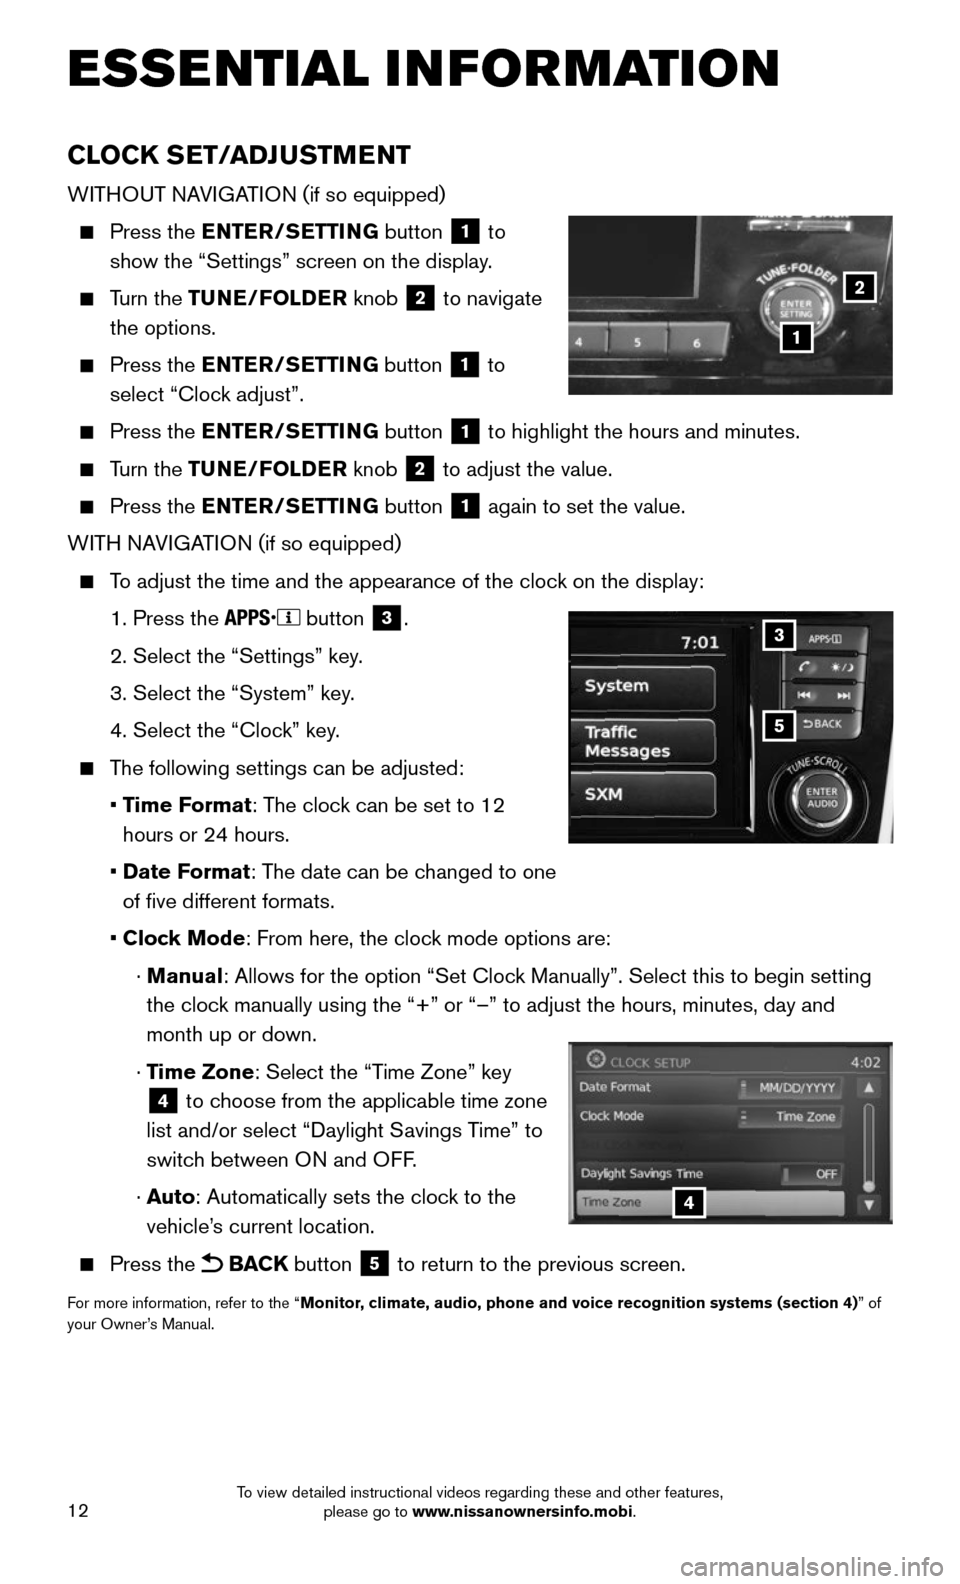
CLOCK SET/ADJUSTMENT
WITHOUT NAVIGATION (if so equipped)
Press the ENTER/SETTING button 1 to
show the “Settings” screen on the display.
Turn the TUNE/FOLDER knob 2 to navigate
the options.
Press the ENTER/SETTING button 1 to
select “Clock adjust”.
Press the ENTER/SETTING button 1 to highlight the hours and minutes.
Turn the TUNE/FOLDER knob 2 to adjust the value.
Press the ENTER/SETTING button 1 again to set the value.
WITH NAVIGATION (if so equipped)
To adjust the time and the appearance of the clock on the display:
1. Press the button 3.
2. Select the “Settings” key .
3. Select the “System” key.
4. Select the “Clock” key.
The following settings can be adjusted:
• Time Format: The clock can be set to 12
hours or 24 hours.
• Date Format: The date can be changed to one
of five different formats.
• Clock Mode: From here, the clock mode options are:
· Manual: Allows for the option “Set Clock Manually”. Select this to begin setting
the clock manually using the “+” or “–” to adjust the hours, minu\
tes, day and
month up or down.
· Time Zone: Select the “Time Zone” key
4 to choose from the applicable time zone
list and/or select “Daylight Savings Time” to
switch between ON and OFF.
· Auto: Automatically sets the clock to the
vehicle’s current location.
Press the BACK button 5 to return to the previous screen.
For more information, refer to the “Monitor, climate, audio, phone and voice recognition systems (section 4) ” of
your Owner’s Manual.
5
3
4
ESSE NTIAL I N FOR MATION
1
2
To view detailed instructional videos regarding these and other features, please go to www.nissanownersinfo.mobi.
Page 15 of 36
13
FIRST DRIVE FEATURES
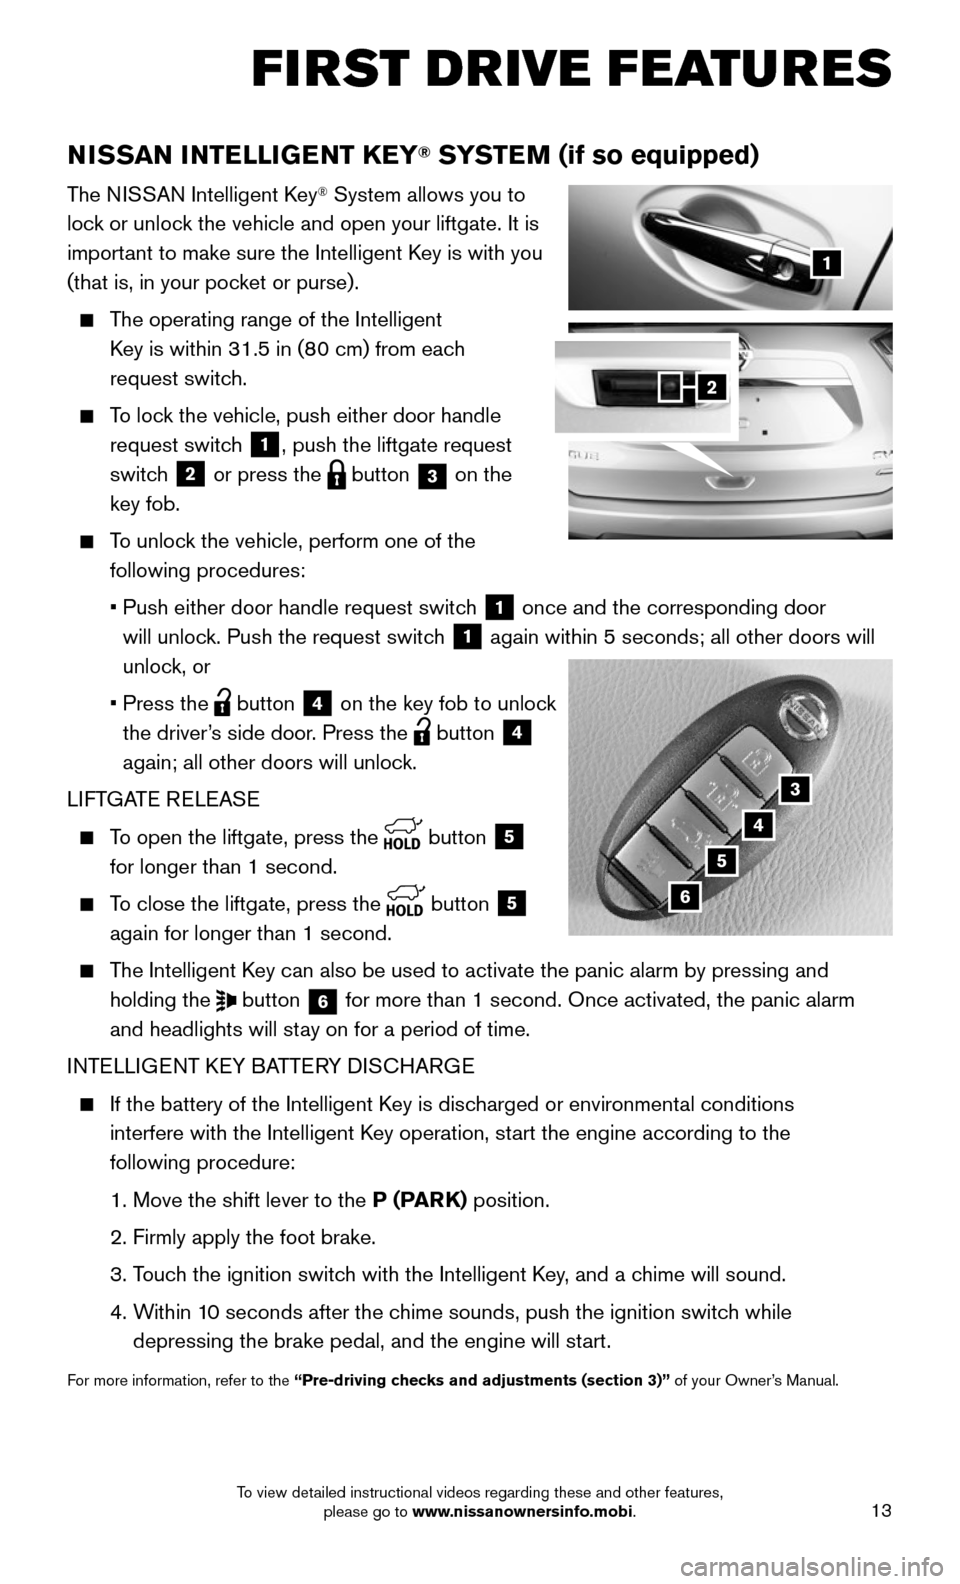
NISSAN INTELLIGENT KEY® SYSTEM (if so equipped)
The NISSAN Intelligent Key® System allows you to
lock or unlock the vehicle and open your liftgate. It is
important to make sure the Intelligent Key is with you
(that is, in your pocket or purse).
The operating range of the Intelligent
Key is within 31.5 in (80 cm) from each
request switch.
To lock the vehicle, push either door handle
request switch 1, push the liftgate request
switch
2 or press the button 3 on the
key fob.
To unlock the vehicle, perform one of the
following procedures:
• Push either door handle request switc h 1 once and the corresponding door
will unlock. Push the request switch
1 again within 5 seconds; all other doors will
unlock, or
• Press the button 4 on the key fob to unlock
the driver’s side door. Press the
button 4
again; all other doors will unlock.
LIFTGATE RELEASE
To open the liftgate, press the button 5
for longer than 1 second.
To close the liftgate, press the button 5
again for longer than 1 second.
The Intelligent Key can also be used to activate the panic alarm by pressing and
holding the button 6 for more than 1 second. Once activated, the panic alarm
and headlights will stay on for a period of time.
INTELLIGENT KEY BATTERY DISCHARGE
If the battery of the Intelligent K ey is discharged or environmental conditions
interfere with the Intelligent Key operation, start the engine according to the
following procedure:
1. Move the shift lever to the P (PARK) position.
2. Firmly apply the foot brake.
3. Touch the ignition switch with the Intelligent Key, and a chime will sound.
4. Within 10 seconds after the chime sounds, push the ignition switch while
depressing the brake pedal, and the engine will start.
For more information, refer to the “Pre-driving checks and adjustments (section 3)” of your Owner’s Manual.
1
3
4
5
2
6
To view detailed instructional videos regarding these and other features, please go to www.nissanownersinfo.mobi.
Page 16 of 36
14
POWER LIFTGATE (if so equipped)
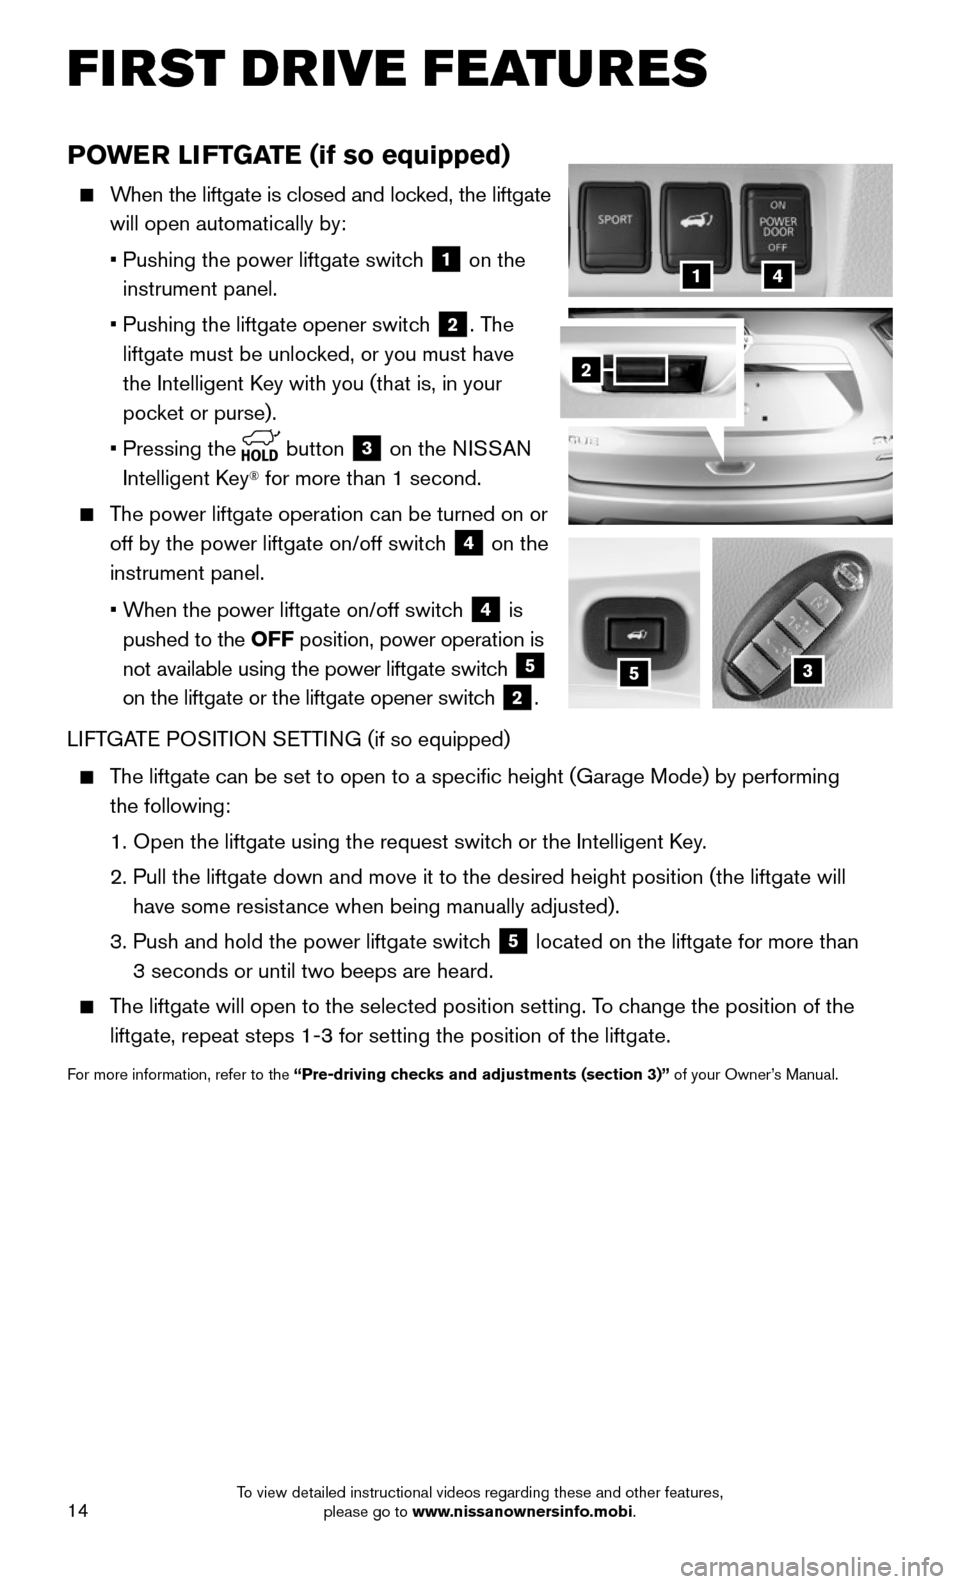
When the liftgate is closed and locked, the liftgate
will open automatically by:
• Pushing the power liftgate switc h 1 on the
instrument panel.
• Pushing the liftgate opener switc h 2. The
liftgate must be unlocked, or you must have
the Intelligent Key with you (that is, in your
pocket or purse).
• Pressing the button 3 on the NISSAN
Intelligent Key® for more than 1 second.
The power liftgate operation can be turned on or
off by the power liftgate on/off switch 4 on the
instrument panel.
• When the power liftgate on/off switch 4 is
pushed to the OFF position, power operation is
not available using the power liftgate switch
5
on the liftgate or the liftgate opener switch
2.
LIFTGATE POSITION SETTING (if so equipped)
The liftgate can be set to open to a specific height (Garage Mode) by\
performing
the following:
1. Open the liftgate using the request switc h or the Intelligent Key.
2. Pull the liftgate down and move it to the desired height position (the \
liftgate will
have some resistance when being manually adjusted).
3. Push and hold the power liftgate switc h 5 located on the liftgate for more than
3 seconds or until two beeps are heard.
The liftgate will open to the selected position setting. To change the position of the
liftgate, repeat steps 1-3 for setting the position of the liftgate.
For more information, refer to the “Pre-driving checks and adjustments (section 3)” of your Owner’s Manual.
3
41
2
5
FIRST DRIVE FEATURES
To view detailed instructional videos regarding these and other features, please go to www.nissanownersinfo.mobi.