2016 NISSAN ROGUE transmission
[x] Cancel search: transmissionPage 417 of 478
WARNING
●Although you can continue driving with
a punctured run-flat tire, remember that
vehicle handling stability is reduced,
which could lead to an accident and
personal injury. Also, driving a long dis-
tance at high speeds may damage the
tire.
● Do not drive at speeds above 50 mph
(80 km/h) and do not drive more than
approximately 93 miles (150 km) with a
punctured run-flat tire. The actual dis-
tance the vehicle can be driven on a flat
tire depends on outside temperature,
vehicle load, read conditions and other
factors.
● Drive safely at reduced speeds. Avoid
hard cornering or braking, which may
cause you to lose control of the vehicle.
● If you detect any unusual sounds or
vibrations while driving with a punc-
tured run-flat tire, pull off the road to a
safe location and stop the vehicle as
soon as possible. The tire may be seri-
ously damaged and need to be
replaced.
CAUTION
● Never install tire chains on a punctured
run-flat tire, as this could damage your
vehicle.
● Avoid driving over any projection or pot-
hole, as the clearance between the ve-
hicle and the ground is smaller than
normal.
● Do not enter an automated car wash
with a punctured run-flat tire.
● Have the punctured tire inspected by a
NISSAN dealer or other authorized re-
pair shop. Replace the tire as soon as
possible if the tire is seriously
damaged.
● Always use tires of the same type, size,
brand, construction (bias, bias-belted
or radial) , and tread pattern on all four
wheels. Failure to do so may result in a
circumference difference between tires
on the front and rear axles which will
cause excessive tire wear and may dam-
age the transmission, transfer case and
differential gears (AWD models) .
● ONLY use spare tires specified for the
AWD model. ●
If excessive tire wear is found, it is rec-
ommended that all four tires be re-
placed with tires of the same size,
brand, construction and tread pattern.
The tire pressure and wheel alignment
should also be checked and corrected
as necessary. Contact a NISSAN dealer.
TIRE CHAINS
Use of tire chains may be prohibited according to
location. Check the local laws before installing
tire chains. When installing tire chains, make sure
they are the proper size for the tires on your
vehicle and are installed according to the chain
manufacturer’s suggestions. Use only SAE
class “S” chains. Class “S” chains are used on
vehicles with restricted tire to vehicle clearance.
Vehicles that can use Class “S” chains are de-
signed to meet the minimum clearances between
the tire and the closest vehicle suspension or
body component required to accommodate the
use of a winter traction device (tire chains or
cables) . The minimum clearances are determined
using the factory equipped tire size. Other types
may damage your vehicle. Use chain tensioners
when recommended by the tire chain manufac-
turer to ensure a tight fit. Loose end links of the
tire chain must be secured or removed to prevent
the possibility of whipping action damage to the
fenders or underbody. If possible, avoid fully load-
8-40Maintenance and do-it-yourself
Page 420 of 478
●For 2WD models, if your vehicle was
originally equipped with 4 tires that
were the same size and you are only
replacing 2 of the 4 tires, install the new
tires on the rear axle. Placing new tires
on the front axle may cause loss of
vehicle control in some driving condi-
tions and cause an accident and per-
sonal injury
● If the wheels are changed for any rea-
son, always replace with wheels which
have the same off-set dimension.
Wheels of a different off-set could
cause premature tire wear, degrade ve-
hicle handling characteristics, affect the
VDC system and/or interference with
the brake discs/drums. Such interfer-
ence can lead to decreased braking ef-
ficiency and/or early brake pad/shoe
wear. For additional information on
wheel off-set dimensions, refer to
“Wheels and tires” in the “Technical and
consumer information” section of this
manual. ●
Since the spare tire is not equipped with
the TPMS, when a spare tire is mounted
or a wheel is replaced, tire pressure will
not be indicated, the TPMS will not
function and the low tire pressure warn-
ing light will flash for approximately
1 minute. The light will remain on after
1 minute. Have your tires replaced
and/or TPMS system reset as soon as
possible. It is recommended you visit a
NISSAN dealer for this service.
● Replacing tires with those not originally
specified by NISSAN could affect the
proper operation of the TPMS.
● The TPMS sensor may be damaged if it
is not handled correctly. Be careful
when handling the TPMS sensor.
● When replacing the TPMS sensor, the
ID registration may be required. Contact
a NISSAN dealer for ID registration.
● Do not use a valve stem cap that is not
specified by NISSAN. The valve stem
cap may become stuck.
● Be sure that the valve stem caps are
correctly fitted. Otherwise the valve may
be clogged up with dirt and cause a
malfunction or loss of pressure. ●
Do not install a damaged or deformed
wheel or tire even if it has been re-
paired. Such wheels or tires could have
structural damage and could fail with-
out warning.
● The use of retread tires is not
recommended.
● For additional information regarding
tires, refer to “Important Tire Safety In-
formation” (US) or “Tire Safety Informa-
tion” (Canada) in the Warranty Informa-
tion Booklet.
CAUTION
Always use tires of the same type, size,
brand, construction (bias, bias-belted or
radial) , and tread pattern on all four
wheels. Failure to do so may result in a
circumference difference between tires on
the front and rear axles which will cause
excessive tire wear and may damage the
transmission, transfer case and differen-
tial gears (AWD models) .
Maintenance and do-it-yourself8-43
Page 425 of 478
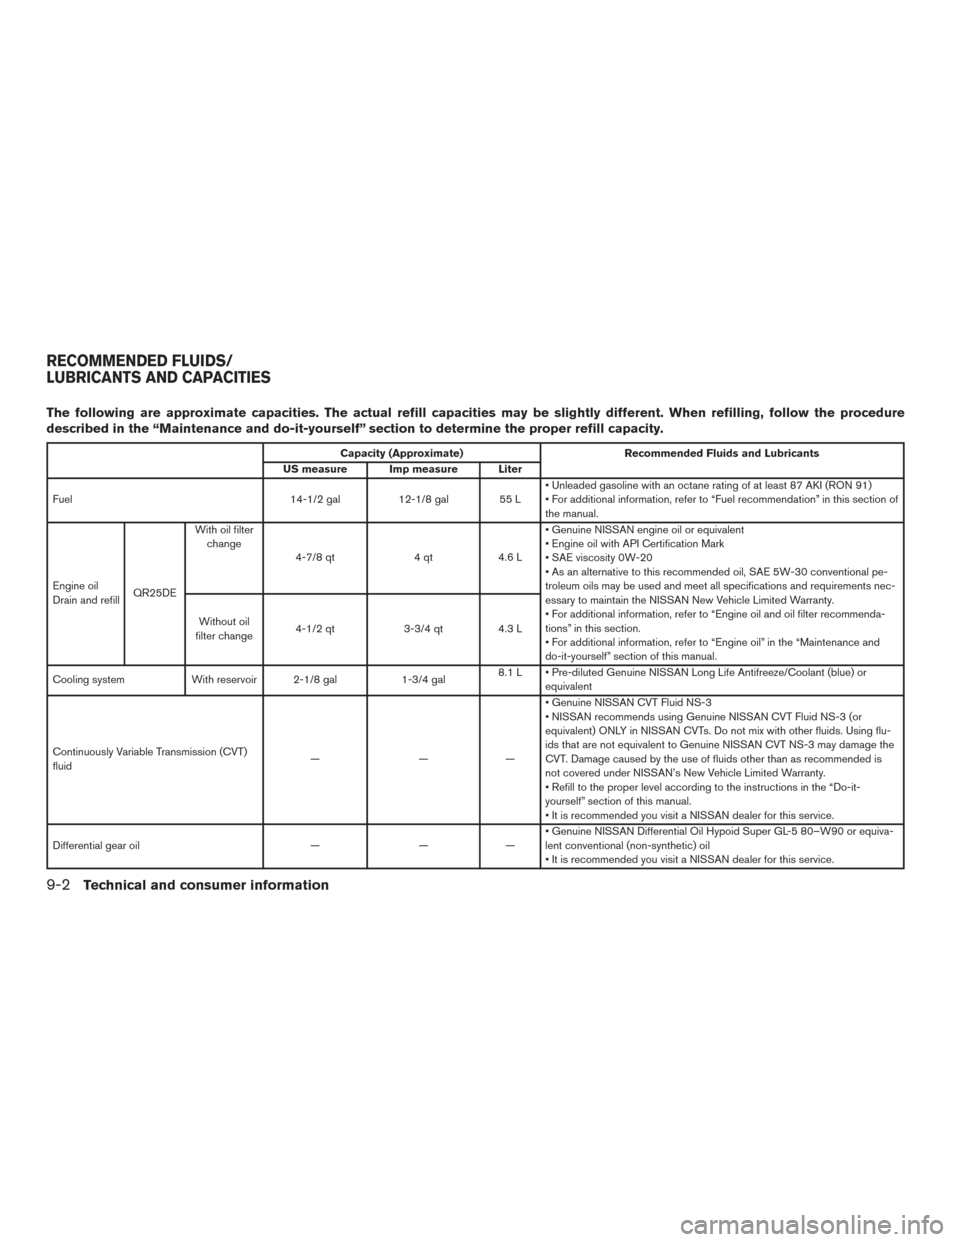
The following are approximate capacities. The actual refill capacities may be slightly different. When refilling, follow the procedure
described in the “Maintenance and do-it-yourself” section to determine the proper refill capacity.
Capacity (Approximate)Recommended Fluids and Lubricants
US measure Imp measure Liter
Fuel 14-1/2 gal12-1/8 gal 55 L • Unleaded gasoline with an octane rating of at least 87 AKI (RON 91)
• For additional information, refer to “Fuel recommendation” in this section of
the manual.
Engine oil
Drain and refill QR25DEWith oil filter
change 4-7/8 qt 4 qt4.6 L• Genuine NISSAN engine oil or equivalent
• Engine oil with API Certification Mark
• SAE viscosity 0W-20
• As an alternative to this recommended oil, SAE 5W-30 conventional pe-
troleum oils may be used and meet all specifications and requirements nec-
essary to maintain the NISSAN New Vehicle Limited Warranty.
• For additional information, refer to “Engine oil and oil filter recommenda-
tions” in this section.
• For additional information, refer to “Engine oil” in the “Maintenance and
do-it-yourself” section of this manual.
Without oil
filter change 4-1/2 qt
3-3/4 qt4.3 L
Cooling system With reservoir 2-1/8 gal 1-3/4 gal8.1 L • Pre-diluted Genuine NISSAN Long Life Antifreeze/Coolant (blue) or
equivalent
Continuously Variable Transmission (CVT)
fluid ———• Genuine NISSAN CVT Fluid NS-3
• NISSAN recommends using Genuine NISSAN CVT Fluid NS-3 (or
equivalent) ONLY in NISSAN CVTs. Do not mix with other fluids. Using flu-
ids that are not equivalent to Genuine NISSAN CVT NS-3 may damage the
CVT. Damage caused by the use of fluids other than as recommended is
not covered under NISSAN’s New Vehicle Limited Warranty.
• Refill to the proper level according to the instructions in the “Do-it-
yourself” section of this manual.
• It is recommended you visit a NISSAN dealer for this service.
Differential gear oil ———• Genuine NISSAN Differential Oil Hypoid Super GL-5 80–W90 or equiva-
lent conventional (non-synthetic) oil
• It is recommended you visit a NISSAN dealer for this service.
RECOMMENDED FLUIDS/
LUBRICANTS AND CAPACITIES
9-2Technical and consumer information
Page 447 of 478
Trailer towing tips
In order to gain skill and an understanding of the
vehicle’s behavior, you should practice turning,
stopping and backing up in an area which is free
from traffic. Steering stability and braking perfor-
mance will be somewhat different than under
normal driving conditions.● Always secure items in the trailer to prevent
load shift while driving.
● Lock the trailer hitch coupler with a pin or
lock to prevent the coupler from inadver-
tently becoming unlatched.
● Avoid abrupt starts, acceleration or stops.
● Avoid sharp turns or lane changes.
● Always drive your vehicle at a moderate
speed.
● When backing up, hold the bottom of the
steering wheel with one hand. Move your
hand in the direction in which you want the
trailer to go. Make small corrections and
back up slowly. If possible, have someone
guide you when you are backing up.
Always block the wheels on both vehicle and
trailer when parking. Parking on a slope is not
recommended; however, if you must do so:
CAUTION
If you move the shift lever to the P (Park)
position before blocking the wheels and
applying the parking brake, transmission
damage could occur.
1. Apply and hold the brake pedal.
2. Have someone place blocks on the downhill side of the vehicle and trailer wheels.
3. After the wheel blocks are in place, slowly release the brake pedal until the blocks ab-
sorb the vehicle load.
4. Apply the parking brake.
5. Shift the transmission into P (Park) .
6. Turn off the engine.
To drive away: 1. Start the vehicle.
2. Apply and hold the brake pedal.
3. Shift the transmission into gear.
4. Release the parking brake.
5. Drive slowly until the vehicle and trailer are clear from the blocks.
6. Apply and hold the brake pedal.
7. Have someone retrieve and store the blocks. ●
While going downhill, the weight of the
trailer pushing on the tow vehicle may de-
crease overall stability. Therefore, to main-
tain adequate control, reduce your speed
and shift to a lower gear. Avoid long or
repeated use of the brakes when descend-
ing a hill, as this reduces their effectiveness
and could cause overheating. Shifting to a
lower gear instead provides “engine brak-
ing” and reduces the need to brake as fre-
quently.
● If the engine coolant temperature rises to a
high temperature, refer to “If your vehicle
overheats” in the “In case of emergency”
section of this owner’s manual.
● Trailer towing requires more fuel than normal
circumstances.
● Avoid towing a trailer for your vehicle’s first
500 miles (805 km) .
● For the first 500 miles (805 km) that you do
tow, do not drive over 50 mph (80 km/h).
● Have your vehicle serviced more often than
at intervals specified in the recommended
Maintenance Schedule in the “NISSAN Ser-
vice and Maintenance Guide”.
9-24Technical and consumer information
Page 448 of 478
●When making a turn, your trailer wheels will
be closer to the inside of the turn than your
vehicle wheels. To compensate for this,
make a larger than normal turning radius
during the turn.
● Crosswinds and rough roads will adversely
affect vehicle/trailer handling, possibly caus-
ing vehicle sway. When being passed by
larger vehicles, be prepared for possible
changes in crosswinds that could affect ve-
hicle handling.
Do the following if the trailer begins to sway: 1. Take your foot off the accelerator pedal to allow the vehicle to coast and steer as
straight ahead as the road conditions allow.
This combination will help stabilize the ve-
hicle
– Do not correct trailer sway by steering or applying the brakes.
2. When the trailer sway stops, gently apply the brakes and pull to the side of the road in a
safe area.
3. Try to rearrange the trailer load so it is bal- anced as described in this section. ●
Be careful when passing other vehicles.
Passing while towing a trailer requires con-
siderably more distance than normal pass-
ing. Remember, the length of the trailer must
also pass the other vehicle before you can
safely change lanes.
● Downshift the transmission to a lower gear
for engine braking when driving down steep
or long hills. This will help slow the vehicle
without applying the brakes.
● Avoid holding the brake pedal down too long
or too frequently. This could cause the
brakes to overheat, resulting in reduced
braking efficiency.
● Increase your following distance to allow for
greater stopping distances while towing a
trailer. Anticipate stops and brake gradually.
● NISSAN recommends that the cruise con-
trol not be used while towing a trailer.
● Some states or provinces have specific
regulations and speed limits for vehicles that
are towing trailers. Obey the local speed
limits. ●
Check your hitch, trailer wiring harness con-
nections, and trailer wheel lug nuts after
50 miles (80 km) of travel and at every break.
● When launching a boat, don’t allow the wa-
ter level to go over the exhaust tail pipe or
rear bumper.
● Make sure you disconnect the trailer lights
before backing the trailer into the water or
the trailer lights may burn out.
When towing a trailer, final drive gear oil
should be replaced and transmission
oil/fluid should be changed more fre-
quently. For additional information, refer to
the “Maintenance and do-it-yourself” sec-
tion of this manual.
FLAT TOWING FOR ALL–WHEEL
DRIVE VEHICLE (if so equipped)
Towing your vehicle with all four wheels on the
ground is sometimes called flat towing. This
method is sometimes used when towing a vehicle
behind a recreational vehicle, such as a motor
home.
Technical and consumer information9-25
Page 449 of 478
CAUTION
●Failure to follow these guidelines can
result in severe transmission damage.
● Never flat tow your All-wheel drive
(AWD) vehicle.
● DO NOT tow your All-wheel drive (AWD)
vehicle with any wheels on the ground.
Doing so may cause serious and expen-
sive damage to the powertrain.
● For emergency towing procedures refer
to “Towing recommended by NISSAN”
in the “In case of emergency” section of
this manual.
FLAT TOWING FOR FRONT WHEEL
DRIVE VEHICLE (if so equipped)
Towing your vehicle with all four wheels on the
ground is sometimes called flat towing. This
method is sometimes used when towing a vehicle
behind a recreational vehicle, such as a motor
home.
CAUTION
● Failure to follow these guidelines can
result in severe transmission damage.
● Whenever flat towing your vehicle, al-
ways tow forward, never backward.
● Never tow your front wheel drive vehicle
with the front tires on the ground. Doing
so may cause serious and expensive
damage to the powertrain.
● DO NOT tow your front wheel drive con-
tinuously variable transmission vehicle
with all four wheels on the ground (flat
towing) . Doing so WILL DAMAGE inter-
nal transmission parts due to lack of
transmission lubrication.
● For emergency towing procedures refer
to “Towing recommended by NISSAN”
in the “In case of emergency” section of
this manual.
Continuously Variable Transmission
To tow a vehicle equipped with a continuously
variable transmission, an appropriate vehicle
dolly MUST be placed under the towed vehicle’s
drive wheels. Alwaysfollow the dolly manufac-
turer’s recommendations when using their prod-
uct. DOT (Department of Transportation) Quality
Grades: All passenger car tires must conform to
federal safety requirements in addition to these
grades.
Quality grades can be found where applicable on
the tire sidewall between tread shoulder and
maximum section width. For example:
Treadwear 200 Traction AA Temperature A
Treadwear
The treadwear grade is a comparative rating
based on the wear rate of the tire when tested
under controlled conditions on a specified gov-
ernment test course. For example, a tire graded
150 would wear one and one-half (1 1/2) times
as well on the government course as a tire graded
100. The relative performance of tires depends
upon the actual conditions of their use, however,
and may depart significantly from the norm due to
variations in driving habits, service practices and
differences in road characteristics and climate.
Traction AA, A, B and C
The traction grades, from highest to lowest, are
AA, A, B, and C. Those grades represent the
tire’s ability to stop on wet pavement as mea-
sured under controlled conditions on specified
government test surfaces of asphalt and con-
crete. A tire marked C may have poor traction
performance.
UNIFORM TIRE QUALITY GRADING
9-26Technical and consumer information
Page 455 of 478
C
Capacities and recommended fuel/lubricants . .9-2
Cargoareastoragebin.............2-54
Cargocover...................2-55
Cargolight....................2-64
Cargo(Seevehicleloadinginformation)....9-13
Car phone or CB radio .............4-79
CD care and cleaning ..............4-72
CD player (See audio system) ......4-53,4-60
Checkingbulbs .................2-11
Check tire pressure ...............2-30
Child restraints .......1-23,1-24,1-25,1-27
LATCH (Lower Anchors and Tethers for
CHildren) System ..............1-27
Precautions on child
restraints.........1-25,1-32,1-39,1-44
Top tether strap anchor point locations . .1-30
Child restraint with top tether strap .......1-30
Child safety rear door lock ............3-7
Chimes, audible reminders ...........2-18
Cleaningexteriorandinterior........7-2,7-4
Clock setting
(models with Navigation System) ........4-7
Clock setting
(models without Navigation System) ......4-51
C.M.V.S.S. certification label ..........9-11
Cold weather driving ...............5-57
Compact disc (CD) player ........4-53,4-60
Connect phone .................4-75
Consolebox...................2-53
Consolelight...................2-63
Continuously Variable Transmission (CVT) . . .5-18 Continuously Variable Transmission (CVT)
fluid ......................8-12 Driving with Continuously Variable
Transmission (CVT)
.............5-18
Control panel buttons ...............4-4
Brightness/contrast button ..........4-9
Enterbutton..................4-4
Setting button .................4-7
Controls Audio controls (steering wheel) .......4-73
Heater and air conditioner
controls................4-32,4-40
Coolant Capacities and recommended
fuel/lubricants .................9-2
Changingenginecoolant...........8-8
Checking engine coolant level ........8-8
Engine coolant temperature gauge .....2-5
Corrosion protection ...............7-5
Cruisecontrol..................5-33
Cupholders...................2-50
D
Daytime running light system (Canada only) . .2-40
Defroster switch Rear window and outside mirror defroster
switch.....................2-36
Dimensionsandweights.............9-9
Dimmer switch for instrument panel ......2-40
Display......................2-19
Display controls (see control panel buttons) . .4-4
Door locks .....................3-6
Doors ........................3-5
Drive belt .....................8-16
Driving Cold weather driving .............5-57 Driving with Continuously Variable
Transmission (CVT)
.............5-18
Precautions when starting and
driving ...................5-2,5-9
Driving the vehicle ................5-18
E
ECO mode switch ................5-23
Economy-fuel..................5-43
Emergency engine shutoff ............5-14
Emission control information label .......9-11
Emission control system warranty .......9-27
Engine Before starting the engine ..........5-15
Blockheater.................5-58
Capacities and recommended
fuel/lubricants.................9-2
Changing engine coolant ...........8-8
Changingengineoil.............8-10
Changing engine oil filter ..........8-11
Checking engine coolant level ........8-8
Checking
engine oil level ...........8-9
Engine compartment check locations ....8-6
Engine coolant temperature gauge .....2-5
Engine cooling system ............8-7
Engineoil ...................8-9
Engine oil and oil filter recommendation . . .9-6
Engine oil viscosity ..............9-7
Engine serial number ............9-11
Engine specifications .............9-8
Starting the engine .............5-16
Engine coolant temperature gauge .......2-5
Enter button ....................4-4
Event Data recorders ..............9-29
10-2
Page 456 of 478
Exhaust gas (Carbon monoxide).........5-2
Explanation of maintenance items ........8-2
Extendedstorageswitch ............2-48
Eyeglass case ..................2-50
F
Flashers (See hazard warning flasher switch) . .6-2
Flat tire .......................6-3
Floor mat positioning aid .............7-5
Fluid Brake fluid ..................8-12
Capacities and recommended
fuel/lubricants .................9-2
Continuously Variable Transmission (CVT)
fluid......................8-12
Engine coolant .................8-7
Engine oil ...................8-9
Windshield-washerfluid...........8-13
F.M.V.S.S. certification label ...........9-11
Foglightswitch .................2-41
Forward Emergency Braking (FEB) .......2-12
Front air bag system
(See supplemental restraint system) ......1-54
Front power seat adjustment ...........1-4
Frontseats.....................1-2
Fuel Capacities and recommended
fuel/lubricants .................9-2
Fuel economy ................5-43
Fuel-filler door and cap ...........3-30
Fuel gauge ...................2-6
Fuel octane rating ...............9-5
Fuel recommendation .............9-4
Loose fuel cap warning ...........2-30 Fuel Cell Vehicle (FCV) System
Tirepressure.................8-32
Fuel-filler door ...............3-30,3-30
Fuelgauge.....................2-6
Fuses.......................8-21
Fusiblelinks ...................8-22
G
Gascap .....................3-30
Gauge Engine coolant temperature gauge .....2-5
Fuel gauge ...................2-6
Odometer ...................2-4
Speedometer .................2-4
Tachometer ..................2-5
Trip odometer .................2-4
General maintenance ...............8-2
Glovebox.....................2-52
H
Hands-free phone system,
Bluetooth®................4-79,4-93
Hazard warning flasher switch ..........6-2
Headlight aiming control ............2-39
Headlight and turn signal switch ........2-37
Headlight control switch ............2-37
Headlights ....................8-29
Headlights, aiming control ............2-39
Head restraints ..................1-10
Heated seats ...................2-42 Heater
Heater and air conditioner
controls ................4-32,4-40
Heater operation ...........4-33,4-41
Hill descent control switch ...........2-44
Hill descent control system ...........5-55
Hill start assist system ..............5-56
Hood.......................3-23
Hook Luggage hook ................2-53
Horn .......................2-42
I
Ignition
switch ..................5-11
Ignition Switch Push-Button Ignition Switch ........5-12
Immobilizer system .........2-33,5-12,5-15
Important vehicle information label .......9-11
In-cabin microfilter ................8-18
Increasing fuel economy .............5-43
Indicator lights and audible reminders
(See warning/indicator lights and audible
reminders).............2-10,2-11,2-15
Information display ................2-19
Inside automatic anti-glare mirror ........3-34
Instrument brightness control ..........2-40
Instrumentpanel...............0-6,2-2
Instrument panel dimmer switch ........2-40
Intelligent Key system Key operating range .............3-13
Key operation ................3-15
Mechanical key ................3-4
Remote keyless entry operation.......3-18
Troubleshooting guide ............3-22
10-3