2016 NISSAN QUEST reset
[x] Cancel search: resetPage 2 of 32
*See your Owner’s Manual for information.
1
3
4
2
20
2122
23
5
8
6
13
24
15
7
16
17
12
25
11
24
14
9
10
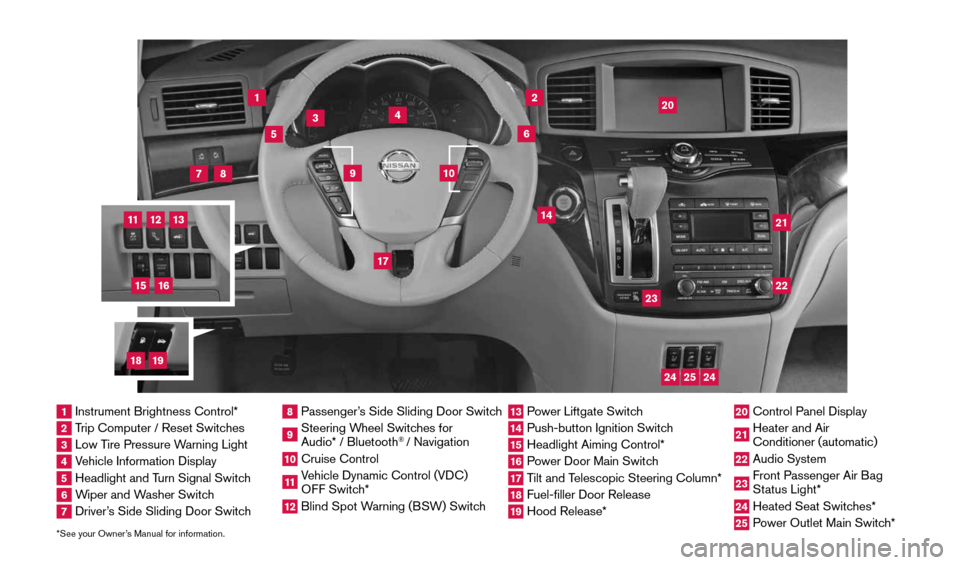
1 Instrument Brightness Control*2 Trip Computer / Reset Switches3 Low Tire Pressure Warning Light4 Vehicle Information Display5 Headlight and Turn Signal Switch6 Wiper and Washer Switch7 Driver’s Side Sliding Door Switch
8 Passenger’s Side Sliding Door Switch9 Steering Wheel Switches for
Audio* / Bluetooth
® / Navigation
10 Cruise Control11 Vehicle Dynamic Control (VDC)
OFF Switch* 12 Blind Spot Warning (BSW) Switch
13 Power Liftgate Switch14 Push-button Ignition Switch15 Headlight Aiming Control*16 Power Door Main Switch17 Tilt and Telescopic Steering Column*18 Fuel-filler Door Release19 Hood Release*
20 Control Panel Display21 Heater and Air
Conditioner (automatic)22 Audio System23 Front Passenger Air Bag
Status Light*24 Heated Seat Switches*25 Power Outlet Main Switch*
18
19
1964370_16a_Quest_US_pQRG_090215.indd 49/2/15 11:06 AM
Page 8 of 32
6
LOOSE FUEL CAP
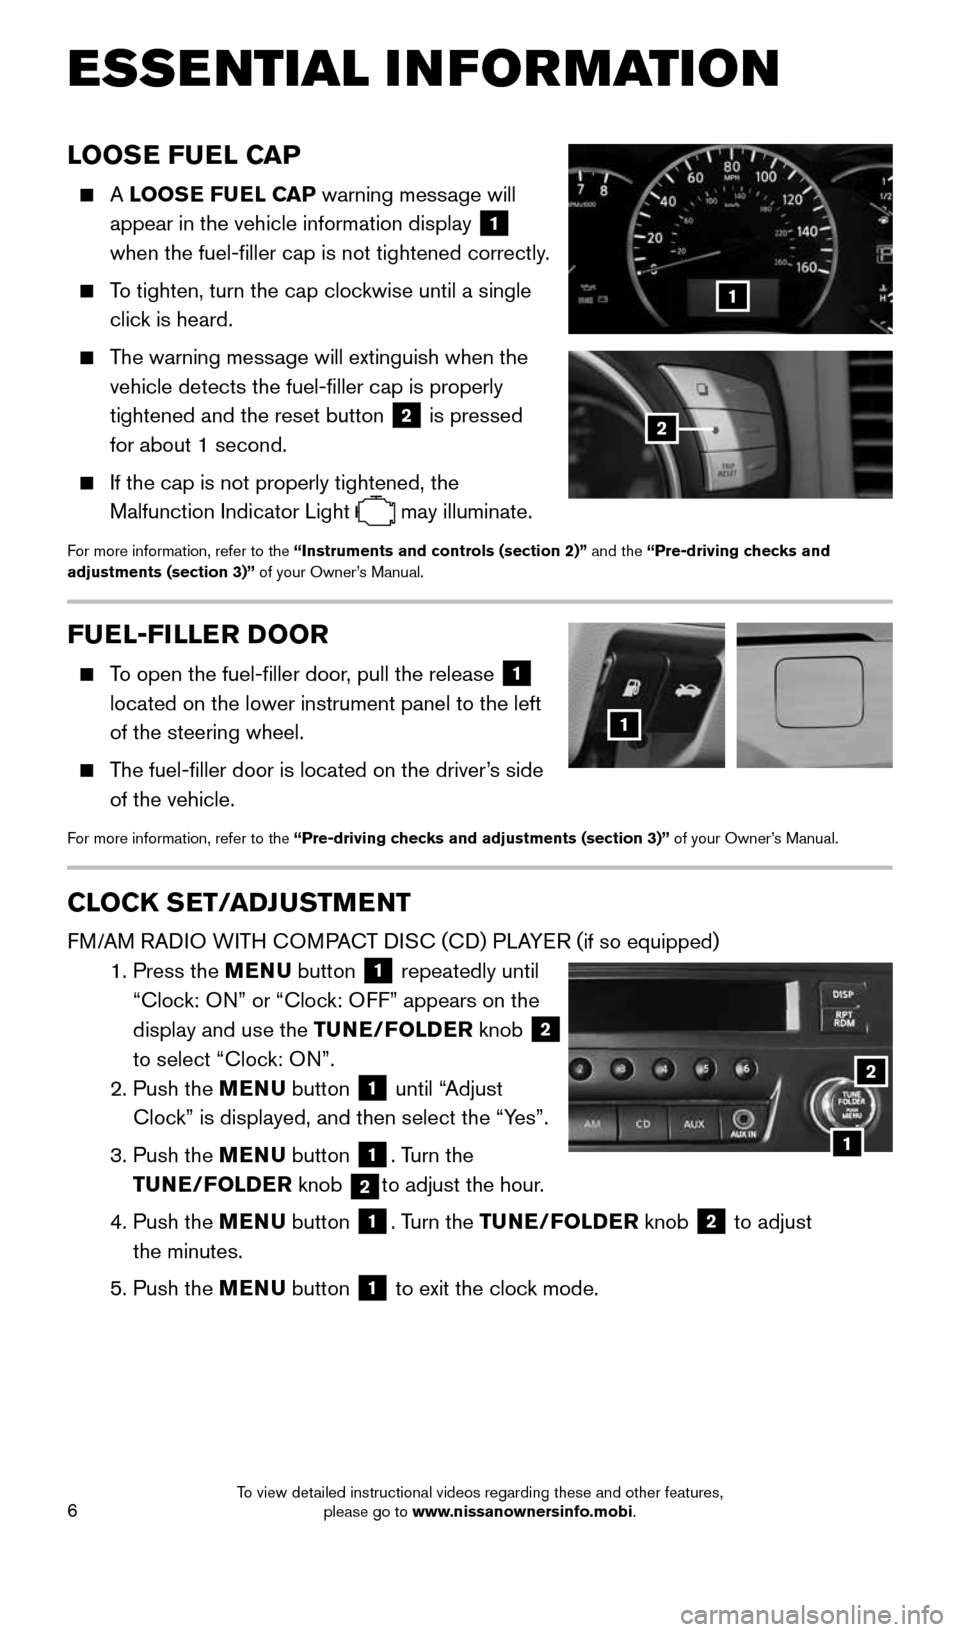
A LOOSE FUEL CAP warning message will
appear in the vehicle information display
1
when the fuel-filler cap is not tightened correctly.
To tighten, turn the cap clockwise until a single
click is heard.
The warning message will extinguish when the
vehicle detects the fuel-filler cap is properly
tightened and the reset button
2 is pressed
for about 1 second.
If the cap is not properly tightened, the
Malfunction Indicator Light
may illuminate.
For more information, refer to the “Instruments and controls (section 2)” and the “Pre-driving checks and
adjustments (section 3)” of your Owner’s Manual.
1
2
FUEL-FILLER DOOR
To open the fuel-filler door, pull the release 1
located on the lower instrument panel to the left
of the steering wheel.
The fuel-filler door is located on the driver’s side
of the vehicle.
For more information, refer to the “Pre-driving checks and adjustments (section 3)” of your Owner’s Manual.
1
CLOCK SET/ADJUSTMENT
FM/AM RADIO WITH COMPACT DISC (CD) PLAYER (if so equipped)
1. Press the MENU button
1 repeatedly until
“Clock: ON” or “Clock: OFF” appears on the
display and use the TUNE/FOLDER knob
2
to select “Clock: ON”.
2. Push the MENU button
1 until “Adjust
Clock” is displayed, and then select the “Yes”.
3. Push the MENU button
1. Turn the
TUNE/FOLDER knob
2to adjust the hour.
4. Push the MENU button
1. Turn the TUNE/FOLDER knob 2 to adjust
the minutes.
5. Push the MENU button
1 to exit the clock mode.
ESSE NTIAL I N FOR MATION
1
2
1964370_16a_Quest_US_pQRG_090215.indd 69/2/15 11:06 AM
To view detailed instructional videos regarding these and other features, please go to www.nissanownersinfo.mobi.
Page 20 of 32
18
1
65
3
2
FM/AM/SiriusXM®* SATELLITE RADIO WITH CD/DVD PLAYER
(if so equipped)
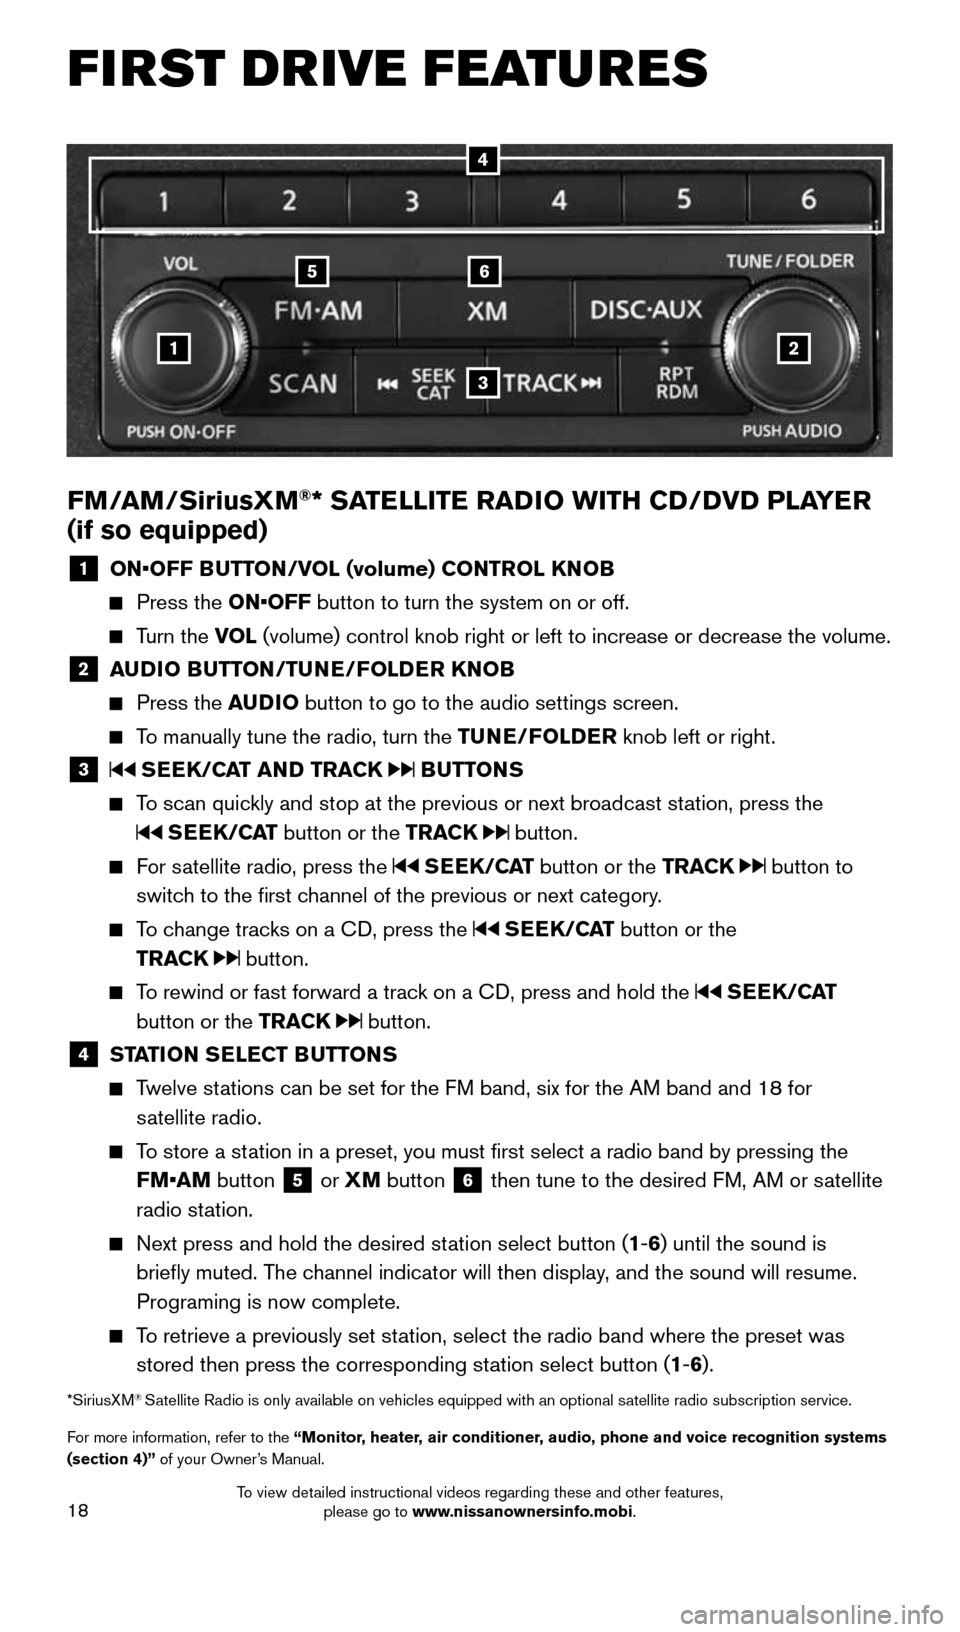
1 ON•OFF BUTTON/VOL (volume) CONTROL KNOB
Press the ON•OFF button to turn the system on or off.
Turn the VOL (volume) control knob right or left to increase or decrease the volum\
e.
2 AUDIO BUTTON/TUNE/FOLDER KNOB
Press the AUDIO button to go to the audio settings screen.
To manually tune the radio, turn the TUNE/FOLDER knob left or right.
3 SEEK/CAT AND TRACK BUTTONS
To scan quickly and stop at the previous or next broadcast station, press the
SEEK/CAT button or the TRACK button.
For satellite radio, press the SEEK/CAT button or the TRACK button to
switch to the first channel of the previous or next category.
To change tracks on a CD, press the SEEK/CAT button or the
TRACK
button.
To rewind or fast forward a track on a CD, press and hold the SEEK/CAT
button or the TRACK
button.
4 STATION SELECT BUTTONS
Twelve stations can be set for the FM band, six for the AM band and 18 for
satellite radio.
To store a station in a preset, you must first select a radio band by pressing the \
FM•AM button
5 or XM
button 6 then tune to the desired FM, AM or satellite
radio station.
Next press and hold the desired station select button (1-6) until the sound is
briefly muted. The channel indicator will then display, and the sound will resume.
Programing is now complete.
To retrieve a previously set station, select the radio band where the preset was
stored then press the corresponding station select button (1-6).
*SiriusXM® Satellite Radio is only available on vehicles equipped with an optional s\
atellite radio subscription service.
For more information, refer to the “Monitor, heater, air conditioner, audio, phone and voice recognition systems
(section 4)” of your Owner’s Manual.
4
FIRST DRIVE FEATURES
1964370_16a_Quest_US_pQRG_090215.indd 189/2/15 11:07 AM
To view detailed instructional videos regarding these and other features, please go to www.nissanownersinfo.mobi.
Page 21 of 32
19
CRUISE CONTROL
The cruise control system enables you to set a
constant cruising speed once the vehicle has
reached 25 mph (40 km/h).
The system will automatically maintain the set
speed until you tap the brake pedal, accelerate,
cancel or turn the system off.
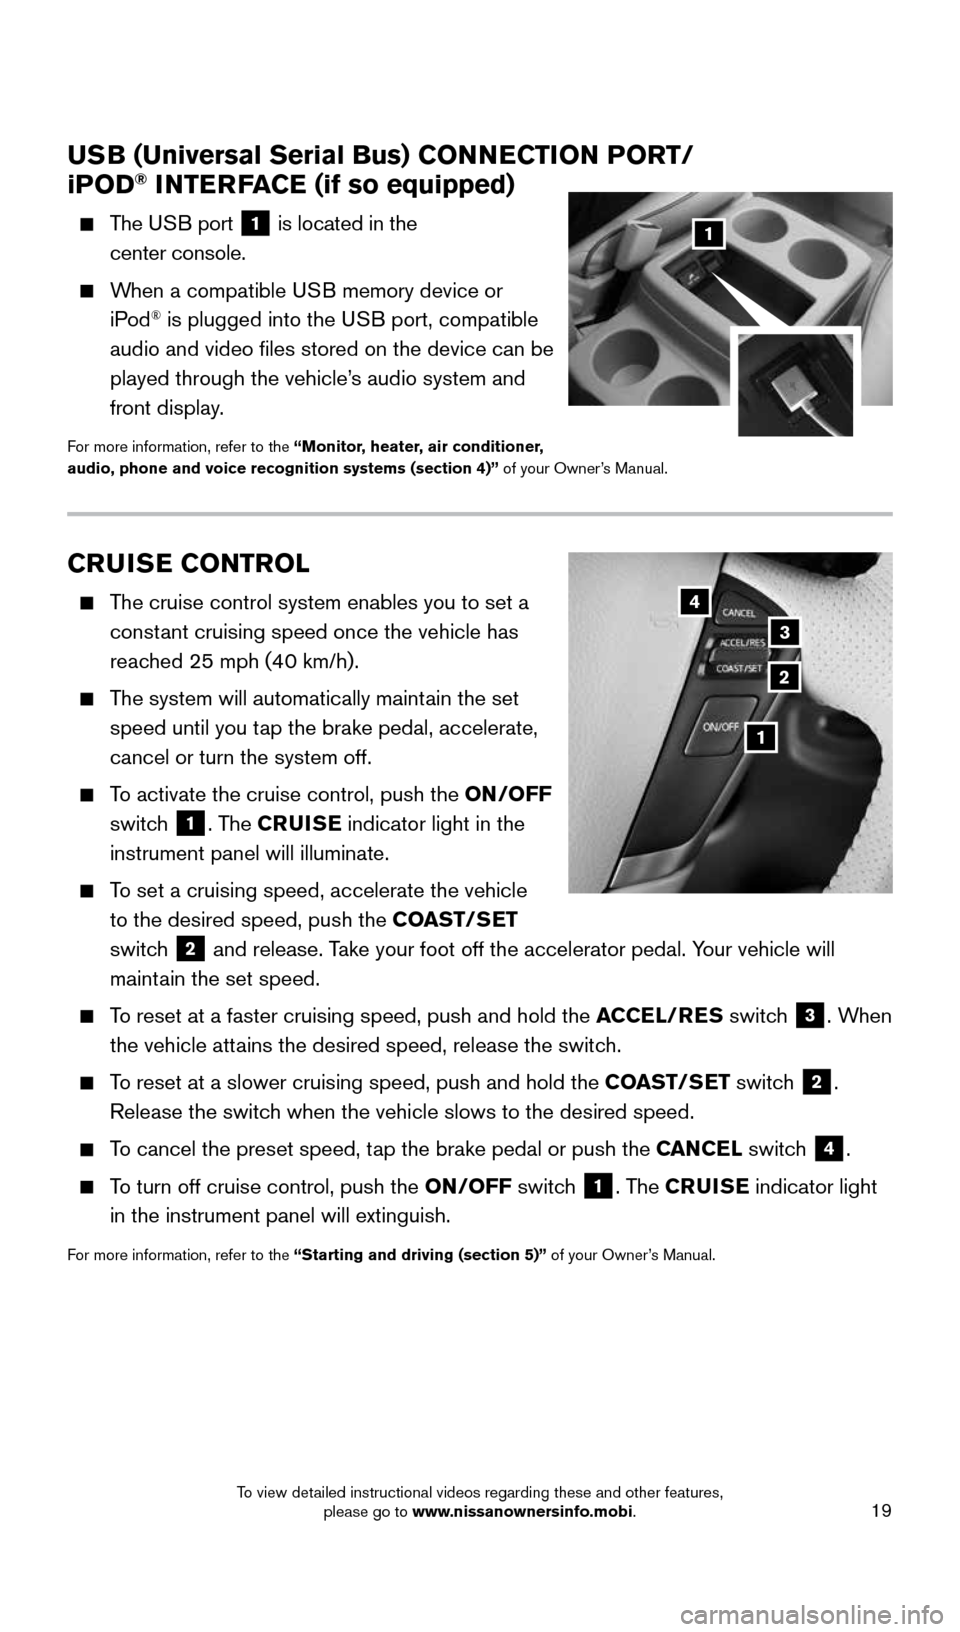
To activate the cruise control, push the ON/OFF
switch
1. The CRUISE indicator light in the
instrument panel will illuminate.
To set a cruising speed, accelerate the vehicle
to the desired speed, push the COAST/SET
switch
2 and release. Take your foot off the accelerator pedal. Your vehicle will
maintain the set speed.
To reset at a faster cruising speed, push and hold the ACCEL/RES switch 3. When
the vehicle attains the desired speed, release the switch.
To reset at a slower cruising speed, push and hold the COAST/SET switch 2.
Release the switch when the vehicle slows to the desired speed.
To cancel the preset speed, tap the brake pedal or push the CANCEL switch 4.
To turn off cruise control, push the ON/OFF switch 1. The CRUISE indicator light
in the instrument panel will extinguish.
For more information, refer to the “Starting and driving (section 5)” of your Owner’s Manual.
USB (Universal Serial Bus) CONNECTION PORT/
iPOD® INTERFACE (if so equipped)
The USB port 1 is located in the
center console.
When a compatible USB memory device or
iPod® is plugged into the USB port, compatible
audio and video files stored on the device can be
played through the vehicle’s audio system and
front display.
For more information, refer to the “Monitor, heater, air conditioner,
audio, phone and voice recognition systems (section 4)” of your Owner’s Manual.
1
2
3
4
1
1964370_16a_Quest_US_pQRG_090215.indd 199/2/15 11:07 AM
To view detailed instructional videos regarding these and other features, please go to www.nissanownersinfo.mobi.
Page 23 of 32
21
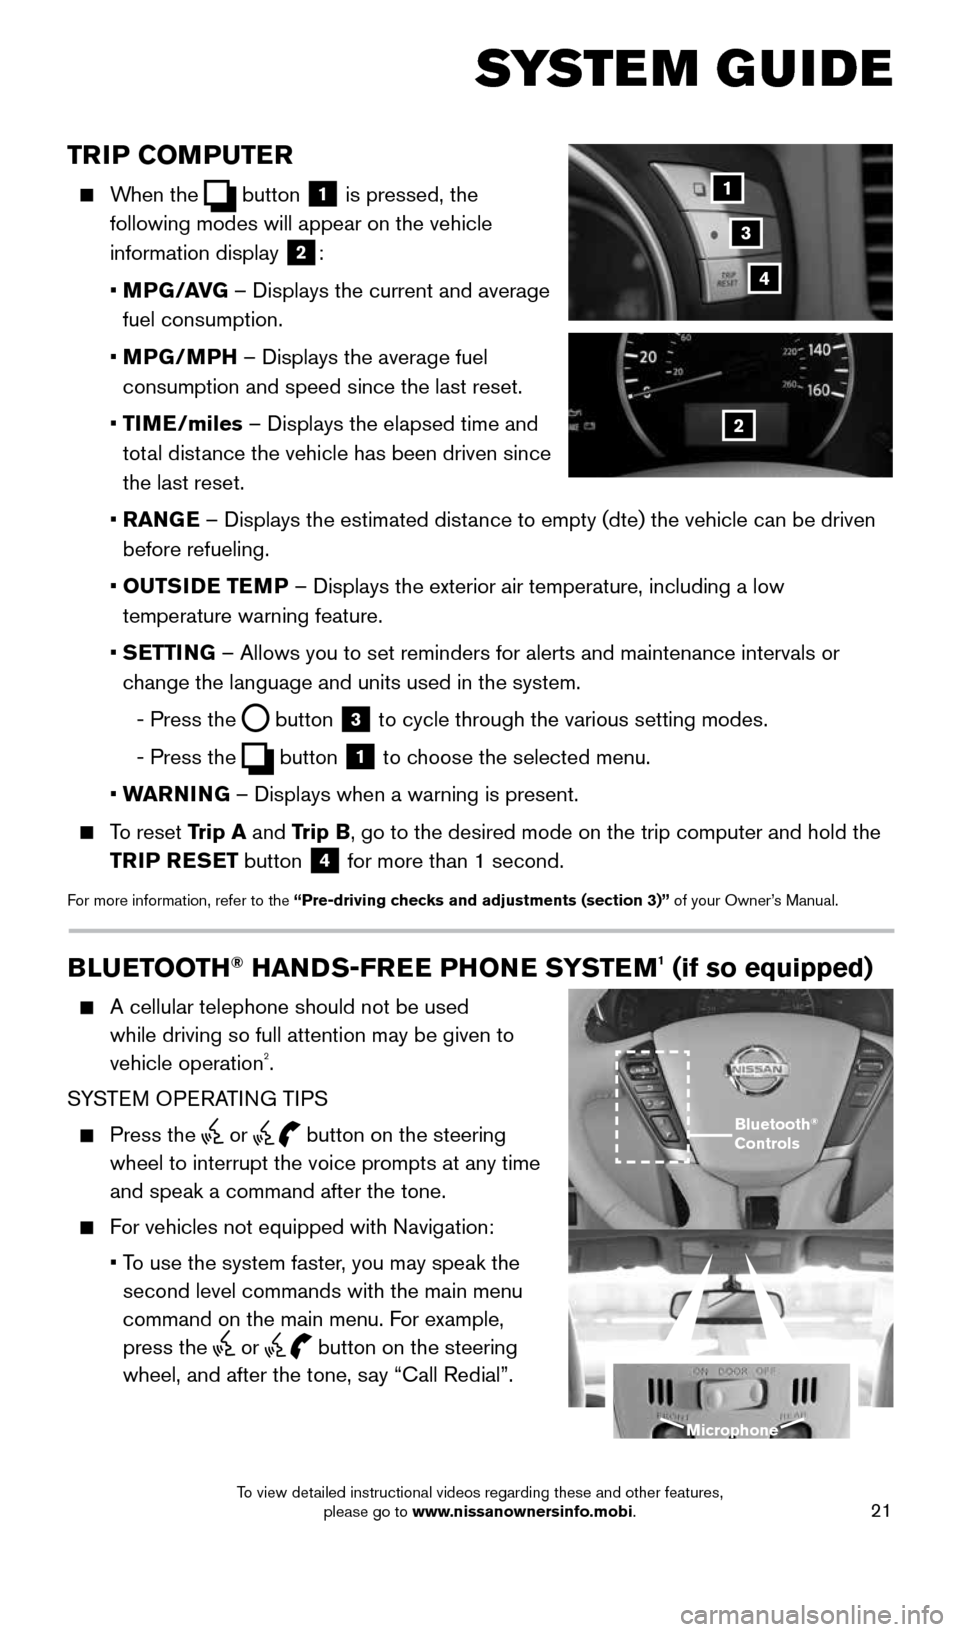
TRIP COMPUTER
When the button 1 is pressed, the
following modes will appear on the vehicle
information display
2:
• MPG/AVG – Displays the current and average
fuel consumption.
• MPG/MPH – Displays the average fuel
consumption and speed since the last reset.
• TIME/miles – Displays the elapsed time and
total distance the vehicle has been driven since
the last reset.
• RANGE – Displays the estimated distance to empty (dte) the vehicle can be driven
before refueling.
• OUTSIDE TEMP – Displays the exterior air temperature, including a low
temperature warning feature.
• SETTING – Allows you to set reminders for alerts and maintenance intervals o\
r
change the language and units used in the system.
- Press the
button 3 to cycle through the various setting modes.
- Press the
button 1 to choose the selected menu.
• WARNING – Displays when a warning is present.
To reset Trip A and Trip B, go to the desired mode on the trip computer and hold the
TRIP RESET button
4 for more than 1 second.
For more information, refer to the “Pre-driving checks and adjustments (section 3)” of your Owner’s Manual.
1
2
3
SYSTEM GUIDE
4
BLUETOOTH® HANDS-FREE PHONE SYSTEM1 (if so equipped)
A cellular telephone should not be used
while driving so full attention may be given to
vehicle operation
2.
SYSTEM OPERATING TIPS
Press the or button on the steering
wheel to interrupt the voice prompts at any time
and speak a command after the tone.
For vehicles not equipped with Navigation:
• To use the system faster, you may speak the
second level commands with the main menu
command on the main menu. For example,
press the
or button on the steering
wheel, and after the tone, say “Call Redial”.
Bluetooth®
Controls
Microphone
1964370_16a_Quest_US_pQRG_090215.indd 219/2/15 11:07 AM
To view detailed instructional videos regarding these and other features, please go to www.nissanownersinfo.mobi.