2016 NISSAN QUEST radio
[x] Cancel search: radioPage 3 of 32

NEW SYSTEM FEATURES
Around View® Monitor with Moving Object Detection (MOD) (if so equipped)...............2
Blind Spot Warning (BSW) (if so equipped) ........................................... 4
Advanced Climate Control System (if so equipped) .....................................4
ESSENTIAL INFORMATION
Tire Pressure Monitoring System (TPMS) with Easy Fill Tire Alert .........................5
Loose Fuel Cap ................................................................... 6
Fuel-filler Door ................................................................... 6
Clock Set/Adjustment ............................................................. 6
FIRST DRIVE FEATURES
NISSAN Intelligent Key® System .................................................... 8
Power Sliding Door Release (if so equipped) .......................................... 9
Power Liftgate Release (if so equipped) ............................................. 10
Front Power Seat Adjustments (if so equipped) ....................................... 10
2
nd Row Seat Adjustments ......................................................... 11
Folding the 2nd Row Seats ......................................................... 11
Entering/Exiting the 3rd Row Seats .................................................. 11
3rd Row Seat Adjustments ........................................................ 12
3rd Row Power Folding Seats (if so equipped) ........................................ 12
Automatic Drive Positioner (if so equipped) ........................................... 12
Outside Mirror Control Switch ..................................................... 13
Starting/Stopping the Engine ...................................................... 13
Headlight Control Switch .......................................................... 14
Wiper and Washer Switch ........................................................ 15
Heater and Air Conditioner (automatic) (if so equipped) ................................ 16
FM/AM/SiriusXM
® Satellite Radio with CD/DVD Player (if so equipped) .................. 18
USB (Universal Serial Bus) Connection Port/iPod® Interface (if so equipped) .............. 19
Cruise Control .................................................................. 19
Power Outlets ................................................................... 20
SYSTEM GUIDE
Trip Computer................................................................... 21
Bluetooth® Hands-free Phone System (if so equipped) .................................21
System Operating Tips ......................................................... 21
Bluetooth
® System without Navigation (if so equipped) .................................22
Bluetooth® System with Navigation (if so equipped) ................................... 23
Bluetooth® Streaming Audio with Navigation (if so equipped) ........................... 25
Navigation System (if so equipped) ................................................. 26
NISSAN Mobile Entertainment System (MES) (if so equipped) ..........................27
HomeLink
® Universal Transceiver (if so equipped) ..................................... 28
Please see your Owner’s Manual for important safety information and system operation limitations.
• A cellular telephone should not be used for any purpose while driving so\
full
attention may be given to vehicle operation.
• Always wear your seat belt.
• Supplemental air bags do not replace proper seat belt usage.
• Children 12 and under should always ride in the rear seat properly secur\
ed in
child restraints or seat belts according to their age and weight.
• Do not drink and drive.
For more information, refer to the “Safety –– Seats, seat belts and supplemental restraint system (section
1)”, the “Monitor, heater, air conditioner, audio, phone and voice recognition systems (section 4)” and the
“Starting and driving (section 5)” of your Owner’s Manual.
Additional information about your vehicle is also available in your Owne\
r’s Manual, Navigation System
Owner’s Manual and at www.NissanUSA.com.
TAB LE OF CONTE NTS
1964370_16a_Quest_US_pQRG_090215.indd 59/2/15 11:06 AM
Page 8 of 32

6
LOOSE FUEL CAP
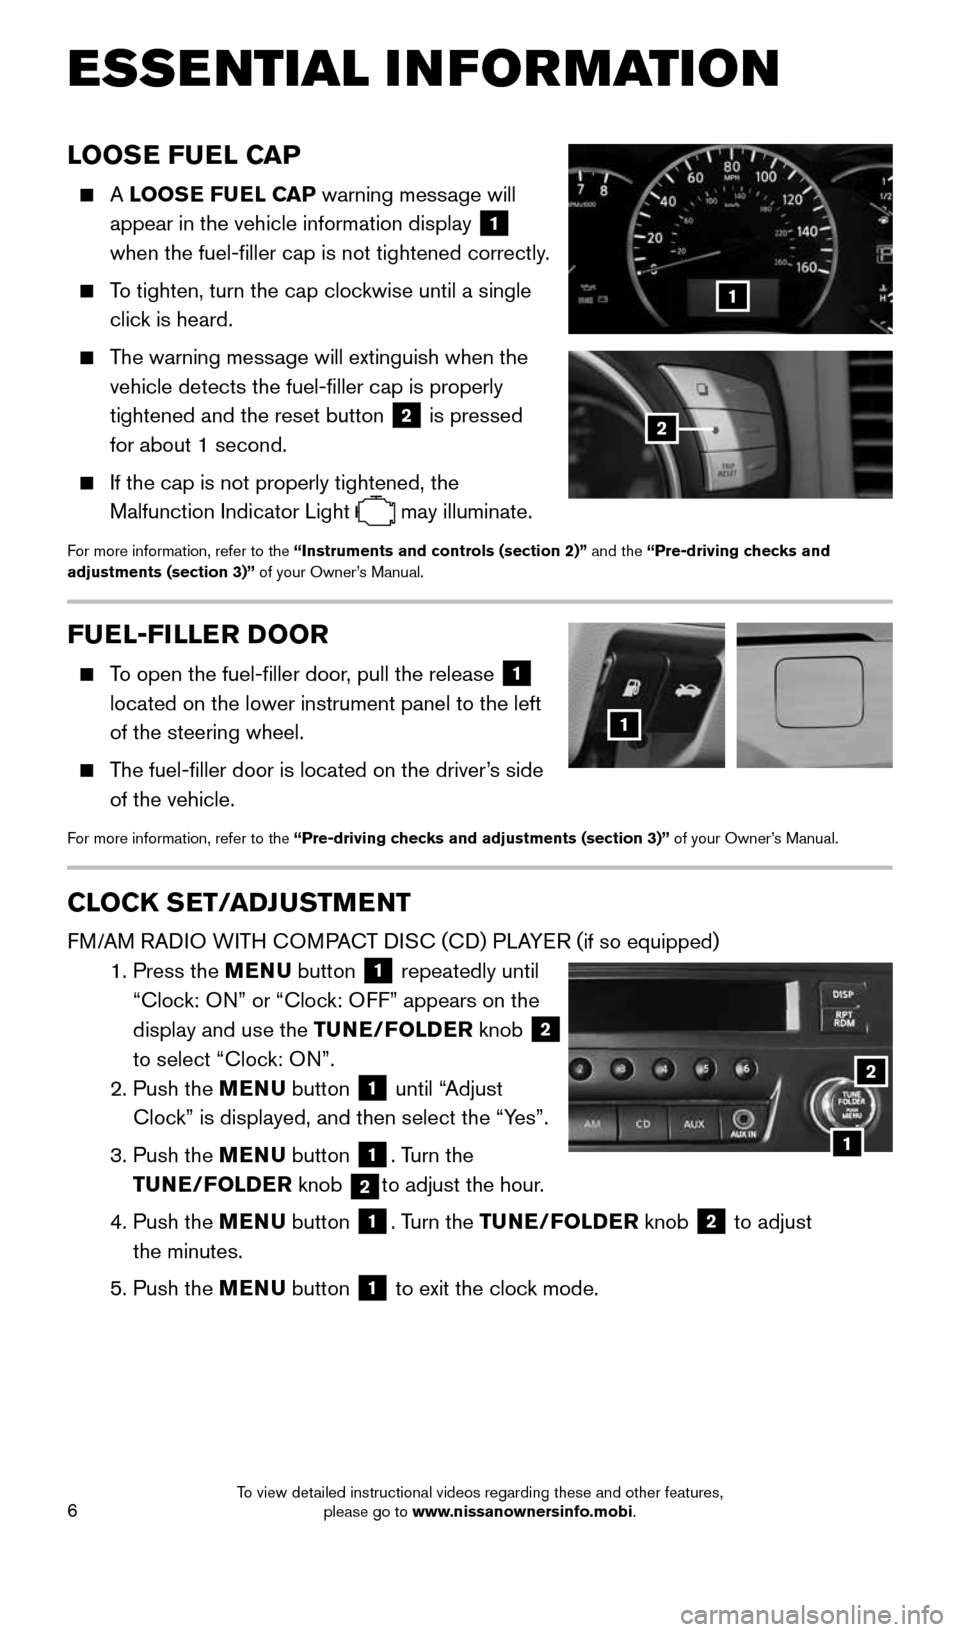
A LOOSE FUEL CAP warning message will
appear in the vehicle information display
1
when the fuel-filler cap is not tightened correctly.
To tighten, turn the cap clockwise until a single
click is heard.
The warning message will extinguish when the
vehicle detects the fuel-filler cap is properly
tightened and the reset button
2 is pressed
for about 1 second.
If the cap is not properly tightened, the
Malfunction Indicator Light
may illuminate.
For more information, refer to the “Instruments and controls (section 2)” and the “Pre-driving checks and
adjustments (section 3)” of your Owner’s Manual.
1
2
FUEL-FILLER DOOR
To open the fuel-filler door, pull the release 1
located on the lower instrument panel to the left
of the steering wheel.
The fuel-filler door is located on the driver’s side
of the vehicle.
For more information, refer to the “Pre-driving checks and adjustments (section 3)” of your Owner’s Manual.
1
CLOCK SET/ADJUSTMENT
FM/AM RADIO WITH COMPACT DISC (CD) PLAYER (if so equipped)
1. Press the MENU button
1 repeatedly until
“Clock: ON” or “Clock: OFF” appears on the
display and use the TUNE/FOLDER knob
2
to select “Clock: ON”.
2. Push the MENU button
1 until “Adjust
Clock” is displayed, and then select the “Yes”.
3. Push the MENU button
1. Turn the
TUNE/FOLDER knob
2to adjust the hour.
4. Push the MENU button
1. Turn the TUNE/FOLDER knob 2 to adjust
the minutes.
5. Push the MENU button
1 to exit the clock mode.
ESSE NTIAL I N FOR MATION
1
2
1964370_16a_Quest_US_pQRG_090215.indd 69/2/15 11:06 AM
To view detailed instructional videos regarding these and other features, please go to www.nissanownersinfo.mobi.
Page 9 of 32

7
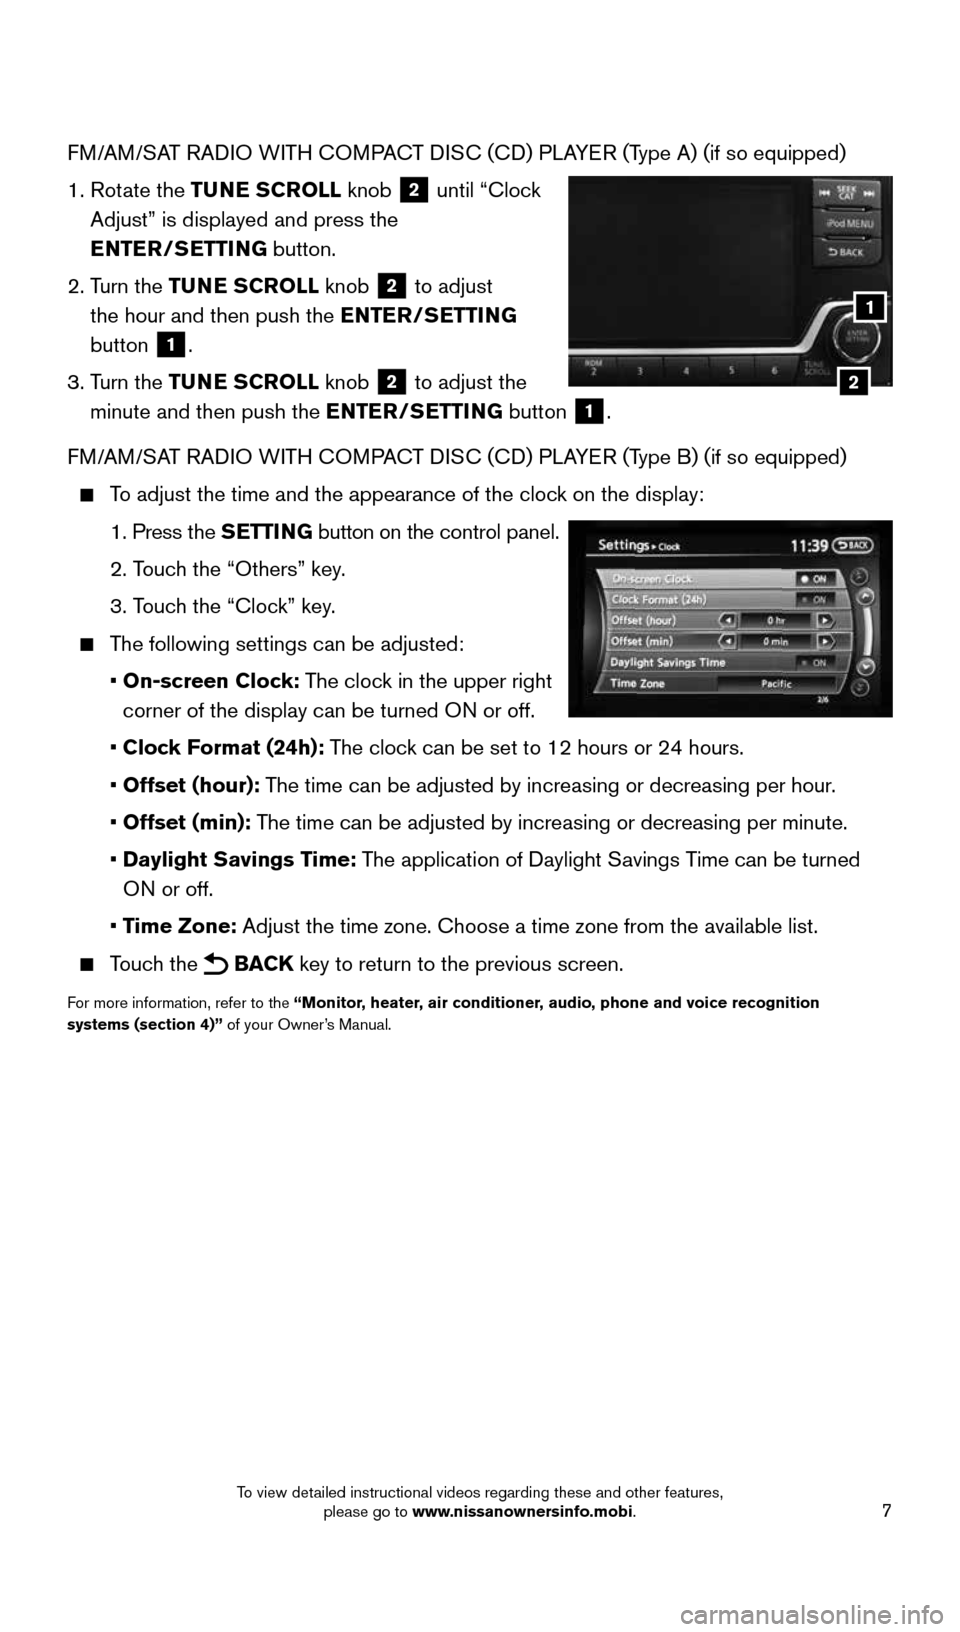
FM/AM/SAT RADIO WITH COMPACT DISC (CD) PLAYER (Type A) (if so equipped)
1. Rotate the TUNE SCROLL knob
2 until “Clock
Adjust” is displayed and press the
ENTER/SETTING button.
2. Turn the TUNE SCROLL knob
2 to adjust
the hour and then push the ENTER/SETTING
button
1.
3. Turn the TUNE SCROLL knob
2 to adjust the
minute and then push the ENTER/SETTING button
1.
FM/AM/SAT RADIO WITH COMPACT DISC (CD) PLAYER (Type B) (if so equipped)
To adjust the time and the appearance of the clock on the display:
1. Press the SETTING button on the control panel.
2. Touch the “Others” key.
3. Touch the “Clock” key.
The following settings can be adjusted:
• On-screen Clock: The clock in the upper right
corner of the display can be turned ON or off.
• Clock Format (24h): The clock can be set to 12 hours or 24 hours.
• Offset (hour): The time can be adjusted by increasing or decreasing per hour.
• Offset (min): The time can be adjusted by increasing or decreasing per minute.
• Daylight Savings Time: The application of Daylight Savings Time can be turned
ON or off.
• Time Zone: Adjust the time zone. Choose a time zone from the available list.
Touch the BACK key to return to the previous screen.
For more information, refer to the “Monitor, heater, air conditioner, audio, phone and voice recognition
systems (section 4)” of your Owner’s Manual.
2
1
1964370_16a_Quest_US_pQRG_090215.indd 79/2/15 11:06 AM
To view detailed instructional videos regarding these and other features, please go to www.nissanownersinfo.mobi.
Page 20 of 32

18
1
65
3
2
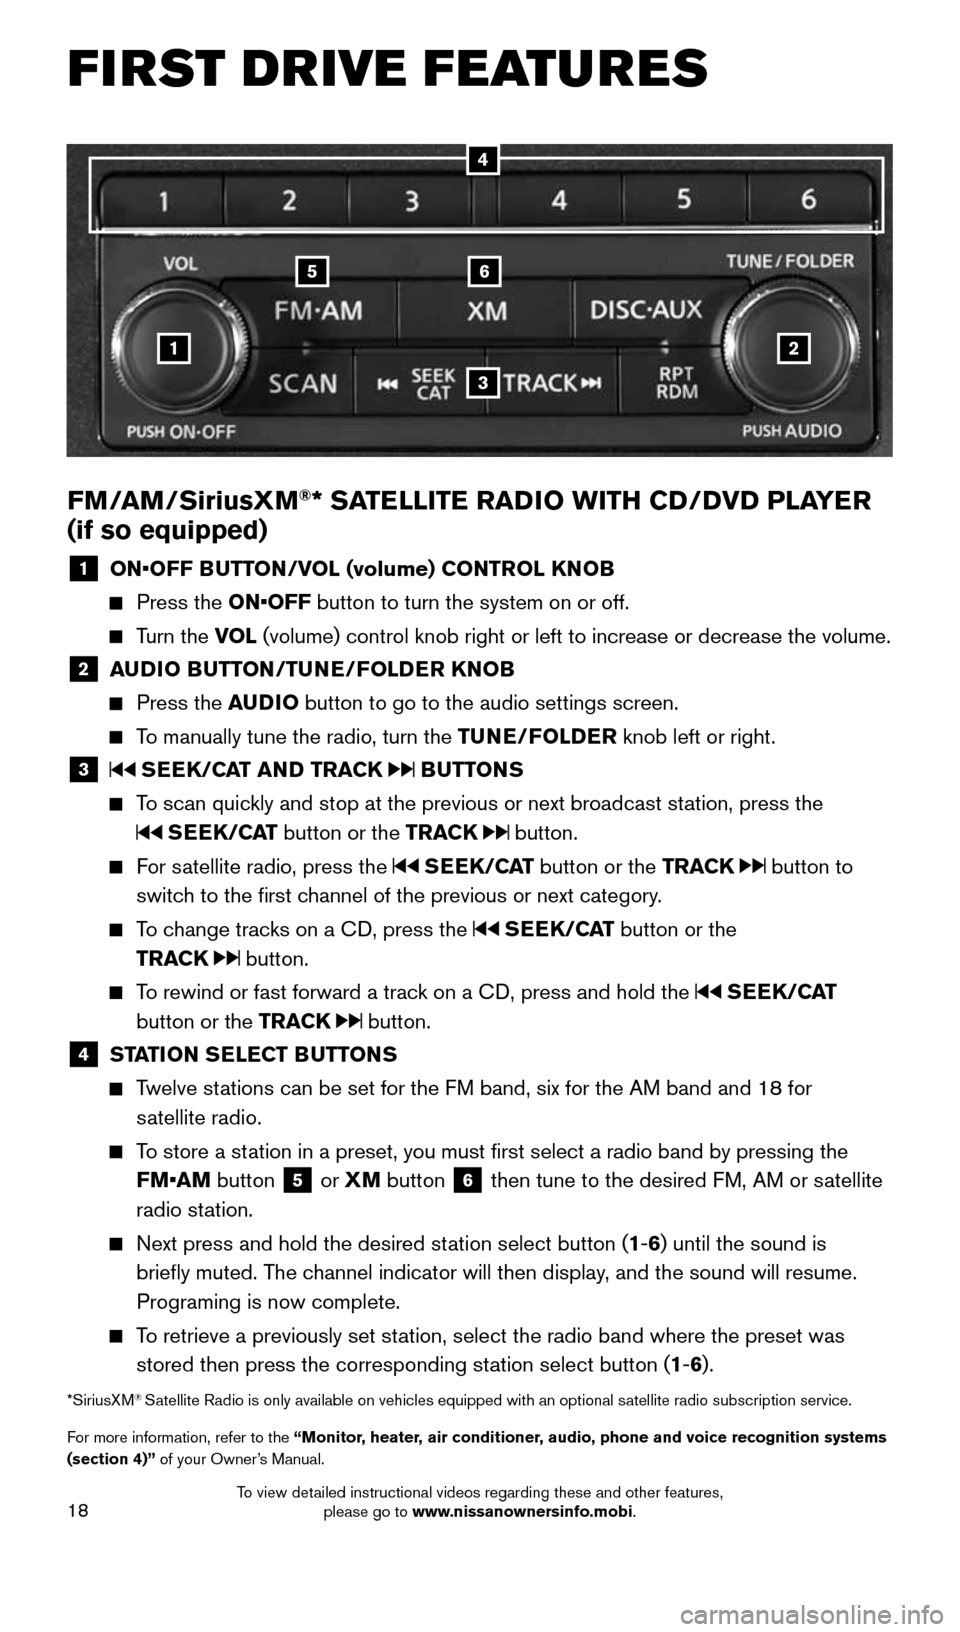
FM/AM/SiriusXM®* SATELLITE RADIO WITH CD/DVD PLAYER
(if so equipped)
1 ON•OFF BUTTON/VOL (volume) CONTROL KNOB
Press the ON•OFF button to turn the system on or off.
Turn the VOL (volume) control knob right or left to increase or decrease the volum\
e.
2 AUDIO BUTTON/TUNE/FOLDER KNOB
Press the AUDIO button to go to the audio settings screen.
To manually tune the radio, turn the TUNE/FOLDER knob left or right.
3 SEEK/CAT AND TRACK BUTTONS
To scan quickly and stop at the previous or next broadcast station, press the
SEEK/CAT button or the TRACK button.
For satellite radio, press the SEEK/CAT button or the TRACK button to
switch to the first channel of the previous or next category.
To change tracks on a CD, press the SEEK/CAT button or the
TRACK
button.
To rewind or fast forward a track on a CD, press and hold the SEEK/CAT
button or the TRACK
button.
4 STATION SELECT BUTTONS
Twelve stations can be set for the FM band, six for the AM band and 18 for
satellite radio.
To store a station in a preset, you must first select a radio band by pressing the \
FM•AM button
5 or XM
button 6 then tune to the desired FM, AM or satellite
radio station.
Next press and hold the desired station select button (1-6) until the sound is
briefly muted. The channel indicator will then display, and the sound will resume.
Programing is now complete.
To retrieve a previously set station, select the radio band where the preset was
stored then press the corresponding station select button (1-6).
*SiriusXM® Satellite Radio is only available on vehicles equipped with an optional s\
atellite radio subscription service.
For more information, refer to the “Monitor, heater, air conditioner, audio, phone and voice recognition systems
(section 4)” of your Owner’s Manual.
4
FIRST DRIVE FEATURES
1964370_16a_Quest_US_pQRG_090215.indd 189/2/15 11:07 AM
To view detailed instructional videos regarding these and other features, please go to www.nissanownersinfo.mobi.