Page 239 of 558
WARNING
Listed below are the system limitations for
Around View® Monitor. Failure to operate
the vehicle in accordance with these sys-
tem limitations could result in serious in-
jury or death.
●
Do not use the Around View® Monitor
with the outside mirrors in the stored
position, and make sure that the liftgate
is securely closed when operating the
vehicle using the Around View® Monitor.
●The apparent distance between objects
viewed on the Around View® Monitor
differs from the actual distance.
● The cameras are installed on the front
grille, the outside mirrors and above the
rear license plate. Do not put anything
on the vehicle that covers the cameras.
● When washing the vehicle with high
pressure water, be sure not to spray it
around the cameras. Otherwise, water
may enter the camera unit causing wa-
ter condensation on the lens, a mal-
function, fire or an electric shock.
● Do not strike the cameras. They are
precision instruments. Doing so could
cause a malfunction or cause damage
resulting in a fire or an electric shock. There are some areas where the system will not
show objects and the system does not warn of
moving objects. When in the front or rear view
display, an object below the bumper or on the
ground may not be viewed
�1. When in the
bird’s-eye view, a tall object near the seam
�2of
the camera viewing areas will not appear in the
monitor.
The following are operating limitations and do not
represent a system malfunction:
● There may be a delay when switching be-
tween views.
● When the temperature is extremely high or
low, the screen may not display objects
clearly.
● When strong light directly shines on the
camera, objects may not be displayed
clearly.
● The screen may flicker under fluorescent
light.
● The colors of objects on the Around View®
Monitor may differ somewhat from the actual
color of objects.
● Objects on the Around View® Monitor may
not be clear and the color of the object may
differ in a dark environment. ●
There may be differences in sharpness be-
tween each camera view of the bird’s-eye
view.
● Do not use wax on the camera lens. Wipe off
any wax with a clean cloth that has been
dampened with a diluted mild cleaning
agent, then wipe with a dry cloth.
Monitor, climate, audio, phone and voice recognition systems4-37
Page 240 of 558
System temporarily unavailable
When the “!” icon is displayed on the screen,
there are abnormal conditions in the Around
View® Monitor. This will not hinder normal driving
operation but the system should be inspected. It
is recommended that you visit a NISSAN dealer
for this service.When the “[X]” icon is displayed on the screen,
the camera image may be receiving temporary
electronic disturbances from surrounding de-
vices. This will not hinder normal driving opera-
tion but the system should be inspected if it
occurs frequently. It is recommended that you
visit a NISSAN dealer for this service.
SYSTEM MAINTENANCE
Page 241 of 558
WARNING
Failure to follow the warnings and instruc-
tions for proper use of the sonar function
as outlined in this section could result in
serious injury or death.
●The sonar is a convenience feature. It is
not a substitute for proper parking.
● This function is designed as an aid to
the driver in detecting large stationary
objects to help avoid damaging the
vehicle.
● The driver is always responsible for
safety during parking and other
maneuvers.
● Always look around and check that it is
safe to move before parking.
● Read and understand the limitations of
the sonar as contained in this section.
The sonar function helps to inform the driver of
large stationary objects around the vehicle when
parking by issuing an audible and visual alert. 1. Center display
2. CAMERA button
3. SETTING button
Page 243 of 558
Sonar function settings
To set up the sonar function to your preferred
settings, press the SETTING button, select the
“Others” key and then select the “Camera” key on
the center display.
Designs and items displayed on the screen
may vary depending on the models.
Sonar Volume:Adjust the volume of the buzzer.
Sonar: When this item is turned ON, the rear
sonar is activated. When this item is turned OFF
(indicator turns off) , the rear sonar is deactivated.
The amber markers are displayed at the corners
of the vehicle icon. The next time the ignition
switch is placed in the “ON” position, “sonar is
OFF” is displayed briefly.
Towing mode: When this item is turned ON,
only the rear sonar is OFF. The amber markers are
displayed at the rear corners of the vehicle icon.
Show Camera when Sonar Activate: When
this item is turned ON, the camera view is auto-
matically shown on the display in the case that
the distance to the objects measured by the
sonar is becoming short.
Sonar Sensitivity: Adjust the sensitivity level of
the sonar higher (right) or lower (left) .
SONAR SYSTEM LIMITATIONS
Page 245 of 558
WARNING
●Failure to follow the warnings and in-
structions for proper use of the Moving
Object Detection system could result in
serious injury or death.
● The MOD system is not a substitute for
proper vehicle operation and is not de-
signed to prevent contact with objects
surrounding the vehicle. When maneu-
vering, always use the outside mirrors
and rearview mirror and turn and check
the surroundings to ensure it is safe to
maneuver.
● The system is deactivated at speeds
above 6 mph (10 km/h). It is reactivated
at lower speeds.
● The MOD system is not designed to
detect surrounding stationary objects.
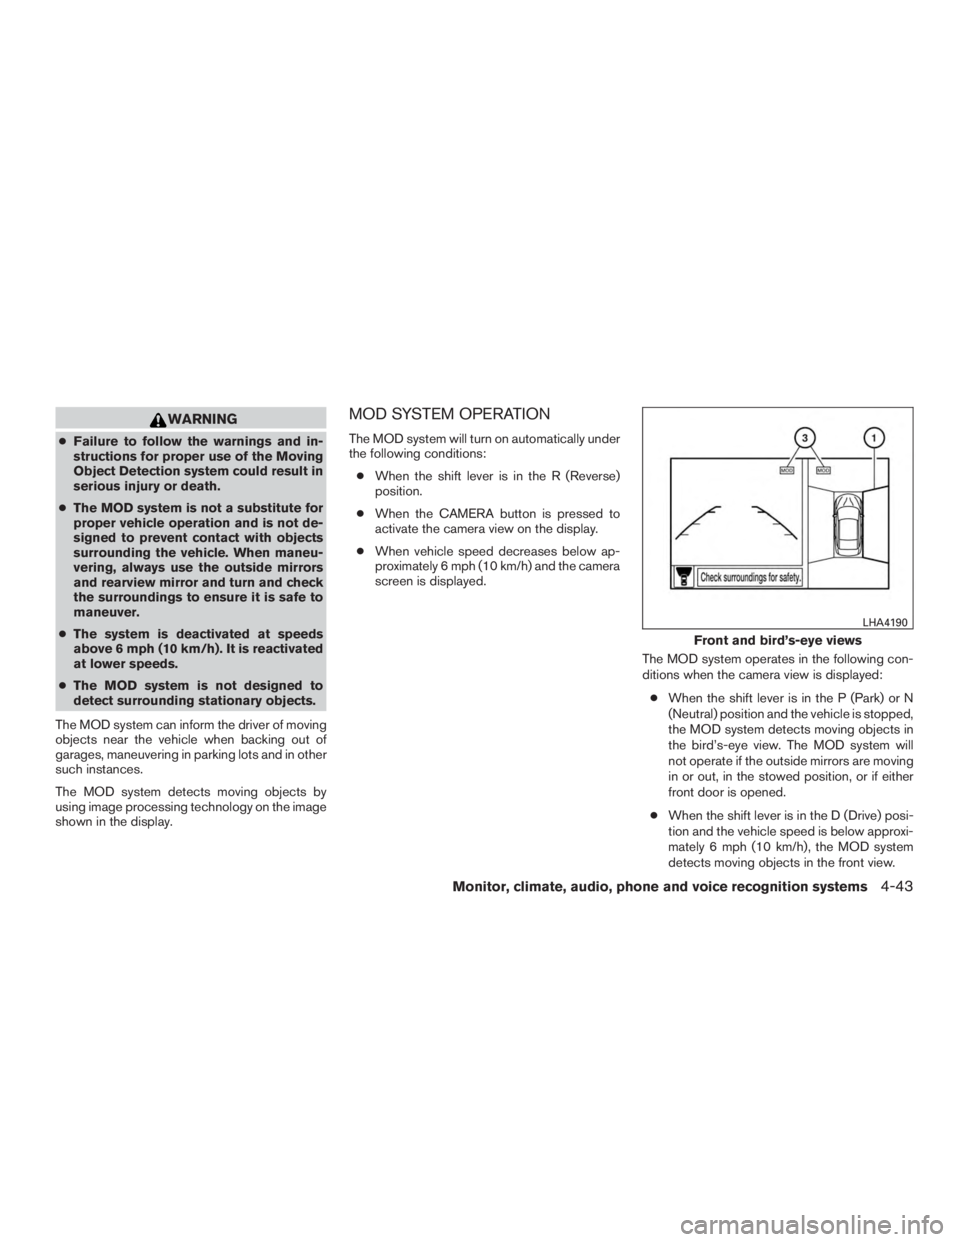
The MOD system can inform the driver of moving
objects near the vehicle when backing out of
garages, maneuvering in parking lots and in other
such instances.
The MOD system detects moving objects by
using image processing technology on the image
shown in the display.
MOD SYSTEM OPERATION
The MOD system will turn on automatically under
the following conditions: ● When the shift lever is in the R (Reverse)
position.
● When the CAMERA button is pressed to
activate the camera view on the display.
● When vehicle speed decreases below ap-
proximately 6 mph (10 km/h) and the camera
screen is displayed.
The MOD system operates in the following con-
ditions when the camera view is displayed:● When the shift lever is in the P (Park) or N
(Neutral) position and the vehicle is stopped,
the MOD system detects moving objects in
the bird’s-eye view. The MOD system will
not operate if the outside mirrors are moving
in or out, in the stowed position, or if either
front door is opened.
● When the shift lever is in the D (Drive) posi-
tion and the vehicle speed is below approxi-
mately 6 mph (10 km/h), the MOD system
detects moving objects in the front view.
Page 246 of 558
●When the shift lever is in the R (Reverse)
position and the vehicle speed is below ap-
proximately 6 mph (10 km/h), the MOD sys-
tem detects moving objects in the rear view.
The MOD system will not operate if the
liftgate is open.
The MOD system does not detect moving ob-
jects in the front-side view. The MOD icon is not
displayed on the screen when in this view.
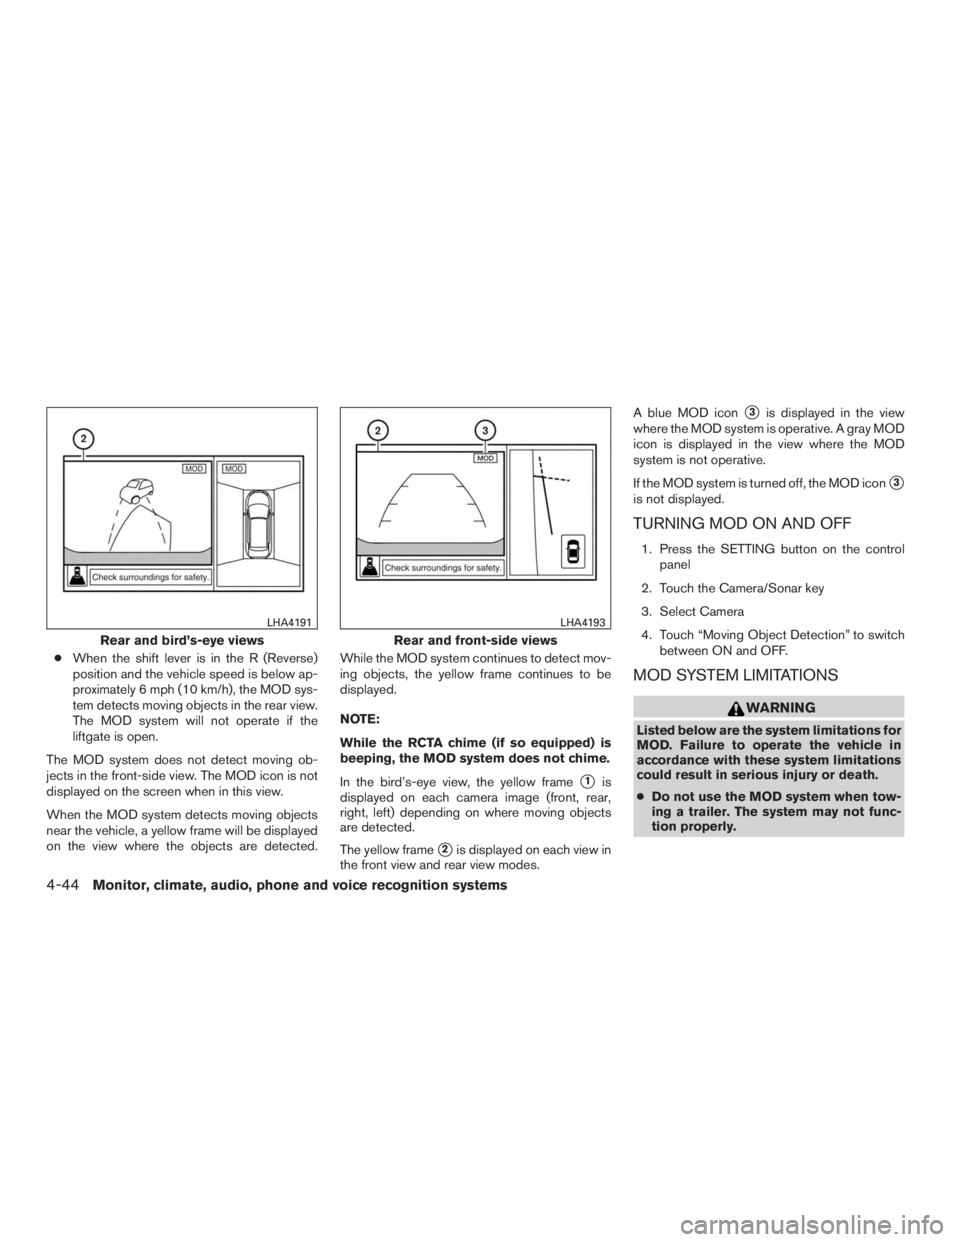
When the MOD system detects moving objects
near the vehicle, a yellow frame will be displayed
on the view where the objects are detected. While the MOD system continues to detect mov-
ing objects, the yellow frame continues to be
displayed.
NOTE:
While the RCTA chime (if so equipped) is
beeping, the MOD system does not chime.
In the bird’s-eye view, the yellow frame
�1is
displayed on each camera image (front, rear,
right, left) depending on where moving objects
are detected.
The yellow frame
�2is displayed on each view in
the front view and rear view modes. A blue MOD icon
�3is displayed in the view
where the MOD system is operative. A gray MOD
icon is displayed in the view where the MOD
system is not operative.
If the MOD system is turned off, the MOD icon
�3
is not displayed.
TURNING MOD ON AND OFF
1. Press the SETTING button on the control panel
2. Touch the Camera/Sonar key
3. Select Camera
4. Touch “Moving Object Detection” to switch between ON and OFF.
MOD SYSTEM LIMITATIONS
Page 247 of 558
●Excessive noise (for example, audio
system volume or open vehicle window)
will interfere with the chime sound, and
it may not be heard.
● The MOD system performance will be
limited according to environmental con-
ditions and surrounding objects such
as:
– When there is low contrast between background and the moving objects.
– When there is a blinking source of light.
– When strong light such as another vehicle’s headlight or sunlight is
present.
– When camera orientation is not in its usual position, such as when a mirror
is folded.
– When there is dirt, water drops or snow on the camera lens.
– When the position of the moving ob- jects in the display is not changed.
● The MOD system might detect flowing
water droplets on the camera lens,
white smoke from the muffler, moving
shadows, etc. ●
The MOD system may not function
properly depending on the speed, direc-
tion, distance or shape of the moving
objects.
● If your vehicle sustains damage to the
parts where the camera is installed,
leaving it misaligned or bent, the sens-
ing zone may be altered and the MOD
system may not detect objects properly.
● When the temperature is extremely
high or low, the screen may not display
objects clearly. This is not a
malfunction.
NOTE:
The blue MOD icon will change to orange if
one of the following has occurred ● When the system is malfunctioning.
● When the component temperature reaches
a high level (icon will blink) .
● When the Rear View camera has detected a
blockage (icon will blink) . :
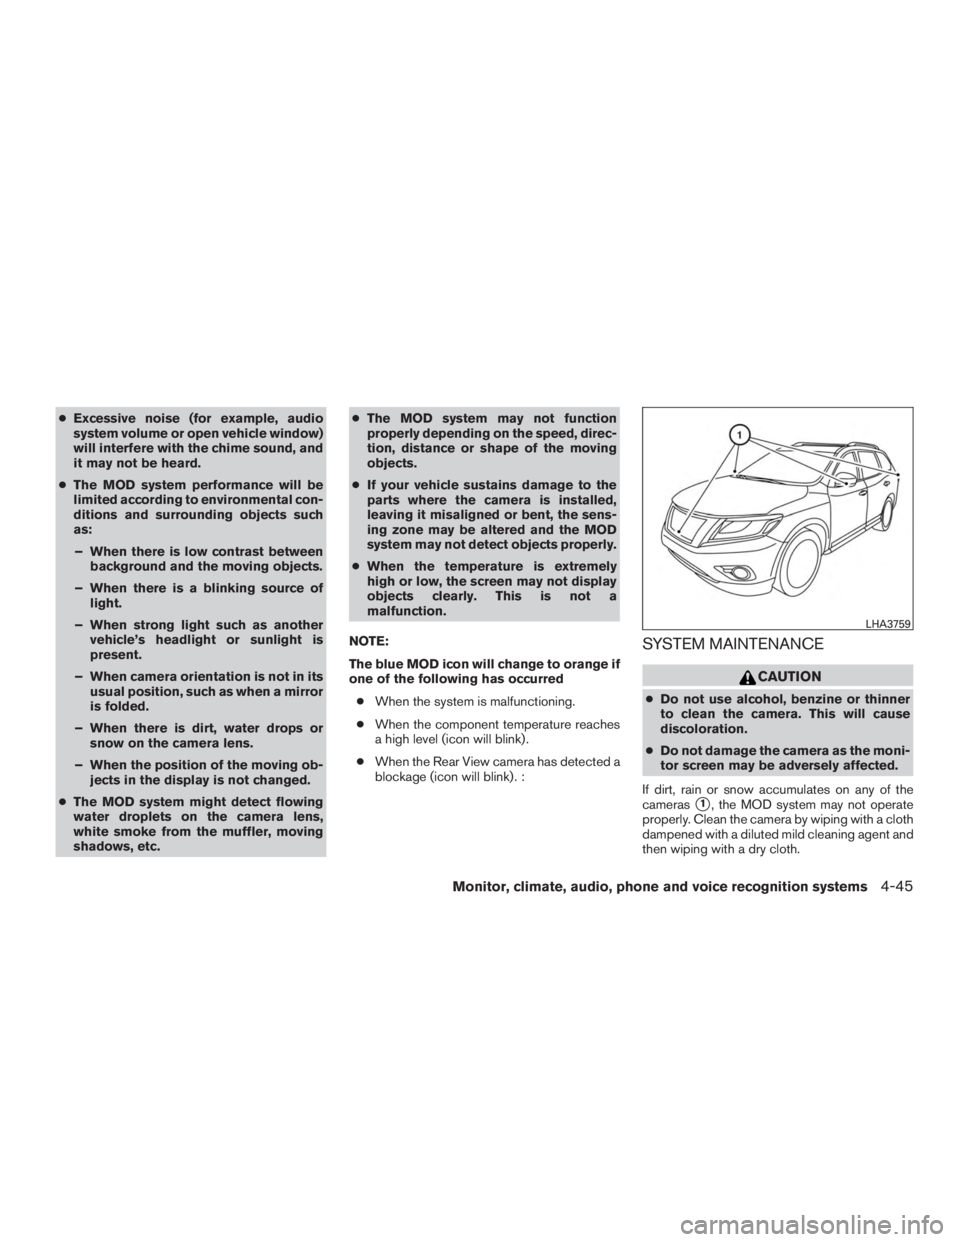
SYSTEM MAINTENANCE
Page 280 of 558
●Do not grab the USB port cover (if so
equipped) when pulling the USB device
out of the port. This could damage the
port and the cover.
● Do not leave the USB cable in a place
where it can be pulled unintentionally.
Pulling the cable may damage the port.
Refer to your device manufacturer’s owner infor-
mation regarding the proper use and care of the
device.
Two USB connection ports are located on the
center console box. For additional information,
refer to “USB/iPod® connection port” in this
section.
When compatible storage devices are plugged
into the jack, compatible audio files on the stor-
age devices can be played through the vehicle’s
audio system.
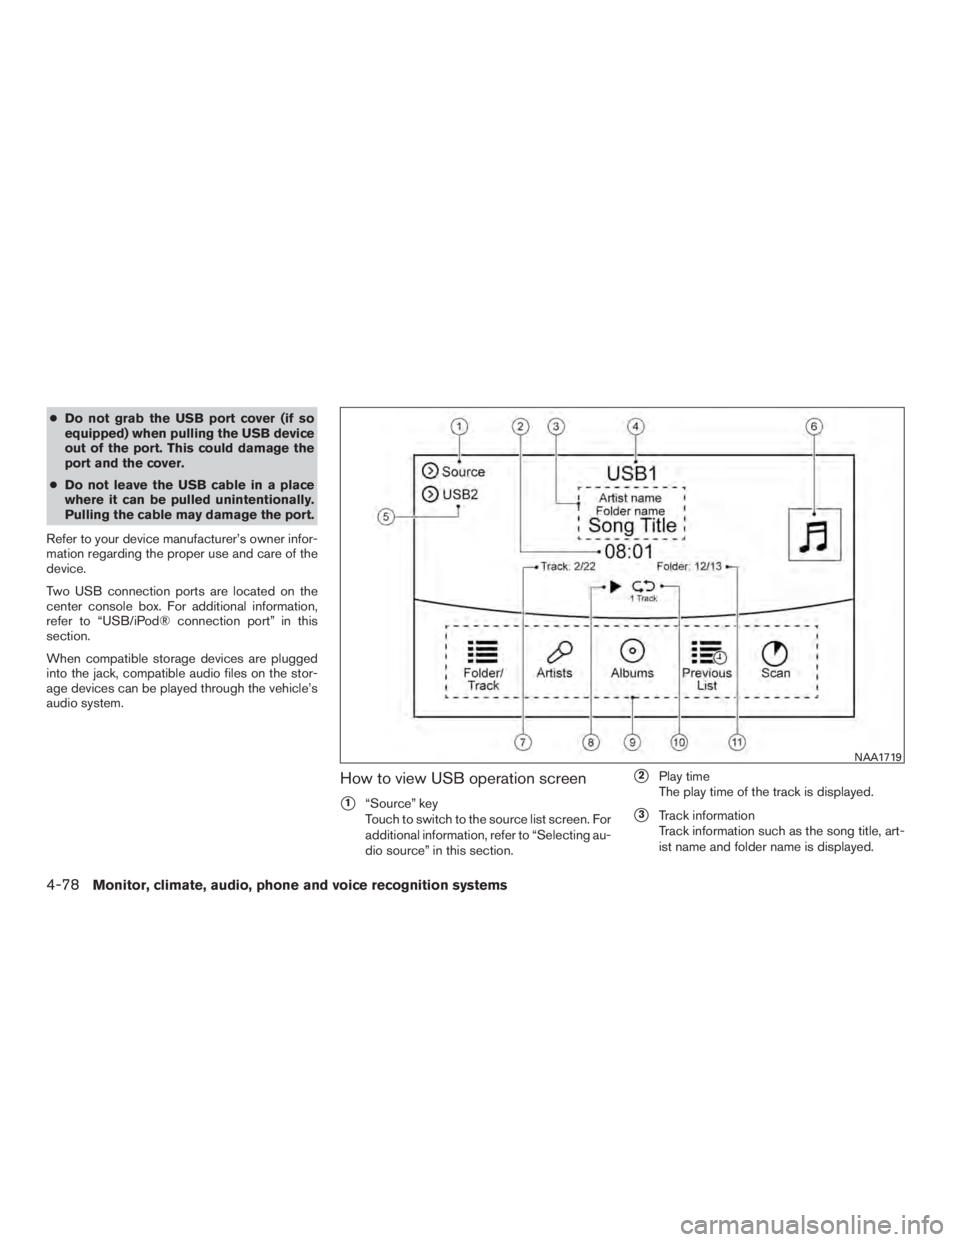
How to view USB operation screen
�1“Source” key
Touch to switch to the source list screen. For
additional information, refer to “Selecting au-
dio source” in this section.
�2Play time
The play time of the track is displayed.
�3Track information
Track information such as the song title, art-
ist name and folder name is displayed.