Page 30 of 540

Folding the 2nd row bench seat
To fold the 2nd row bench seat flat for maximum
cargo hauling:1. Make sure that the head restraints are low- ered or removed. To remove the head
restraint/headrest, push and hold the lock
knob while moving the head
restraint/headrest in an upward direction.
Store the head restraint/headrest properly
so it is not loose in the vehicle.
2. Stow the 2nd row seat belts in the seat belt hooks found on the sides of the vehicle. 3. Lift up on the recline lever on the side of the
outboard seats to fold the seatbacks flat.
4. To return the 2nd row bench seats to a seating position, push up on the seatback
until it latches in place.
Folding the 3rd row seats
To fold the 3rd row seats flat for maximum cargo
capacity:
1. Pull the strap
�Ato release the head
restraint/headrest forward.
2. Stow the 3rd row seat belts in the seat belt hooks
�Dfound on the sides of the cargo
area.
3. Pull up on the latch
�Blocated in the upper
corner of each seatback and lower the seat-
back forward over the seat base.
LRS2144LRS2737
Safety—Seats, seat belts and supplemental restraint system1-11
Page 32 of 540
 to lock
them in a desired adjustment position.
● The non-adjustable head
restraints/headrests have a single locking
n")
●Adjustable head restraints/headrests have
multiple notches along the stalk(s) to lock
them in a desired adjustment position.
● The non-adjustable head
restraints/headrests have a single locking
notch to secure them to the seat frame.
● Proper Adjustment:
– For the adjustable type, align the head restraint/headrest so the center of your
ear is approximately level with the center
of the head restraint/headrest.
– If your ear position is still higher than the recommended alignment, place the head
restraint/headrest at the highest position.
● If the head restraint/headrest has been re-
moved, ensure that it is reinstalled and
locked in place before riding in that desig-
nated seating position.
ADJUSTABLE HEAD RESTRAINT/
HEADREST COMPONENTS
1. Removable head restraint/headrest
2. Multiple notches
3. Lock knob
4. Stalks
NON-ADJUSTABLE HEAD
RESTRAINT/HEADREST
COMPONENTS
1. Removable head restraint/headrest
2. Single notch
3. Lock knob
4. Stalks
LRS2300LRS2299
Safety—Seats, seat belts and supplemental restraint system1-13
Page 33 of 540
REMOVE
Use the following procedure to remove the head
restraint/headrest:1. Pull the head restraint/headrest up to the highest position.
2. Push and hold the lock knob.
3. Remove the head restraint/headrest from the seat.
4. Store the head restraint/headrest properly in a secure place so it is not loose in the
vehicle. 5. Reinstall and properly adjust the head
restraint/headrest before an occupant uses
the seating position.
REMOVABLE (without Dual head
restraint/headrest DVD system only)
CAUTION
Do not remove head restraint/headrest
from vehicles equipped with Dual head
restraint/headrest DVD system. Removal
may damage the system wiring.
LRS2302LRS2302
1-14Safety—Seats, seat belts and supplemental restraint system
Page 34 of 540
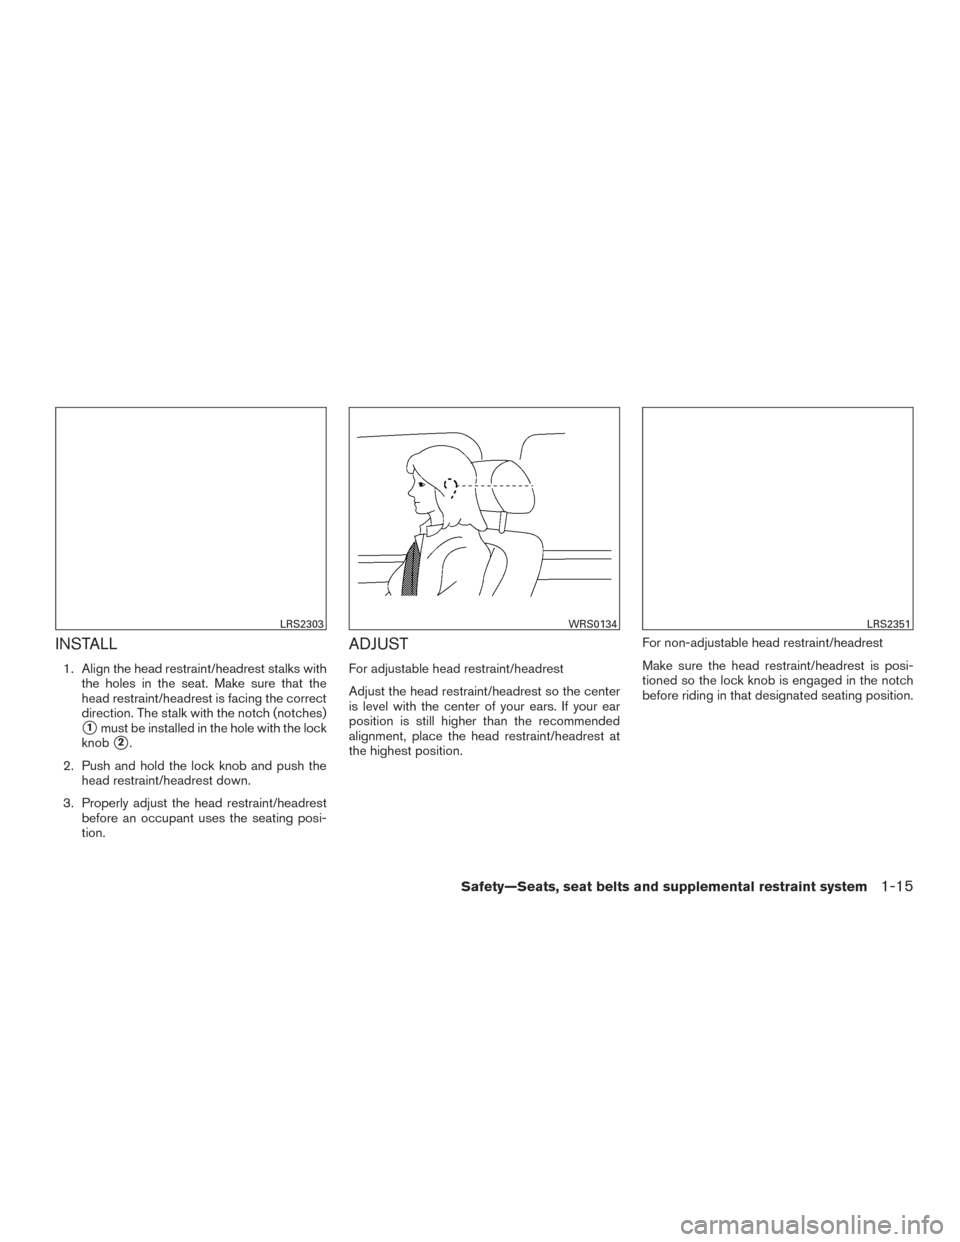
INSTALL
1. Align the head restraint/headrest stalks withthe holes in the seat. Make sure that the
head restraint/headrest is facing the correct
direction. The stalk with the notch (notches)
�1must be installed in the hole with the lock
knob
�2.
2. Push and hold the lock knob and push the head restraint/headrest down.
3. Properly adjust the head restraint/headrest before an occupant uses the seating posi-
tion.
ADJUST
For adjustable head restraint/headrest
Adjust the head restraint/headrest so the center
is level with the center of your ears. If your ear
position is still higher than the recommended
alignment, place the head restraint/headrest at
the highest position. For non-adjustable head restraint/headrest
Make sure the head restraint/headrest is posi-
tioned so the lock knob is engaged in the notch
before riding in that designated seating position.
LRS2303WRS0134LRS2351
Safety—Seats, seat belts and supplemental restraint system1-15
Page 35 of 540
Raise
To raise the head restraint/headrest, pull it up.
Make sure the head restraint/headrest is posi-
tioned so the lock knob is engaged in the notch
before riding in that designated seating position.
Lower
To lower, push and hold the lock knob and push
the head restraint/headrest down.
Make sure the head restraint/headrest is posi-
tioned so the lock knob is engaged in the notch
before riding in that designated seating position.
FOLDING HEAD RESTRAINT/
HEADREST
To fold the head restraint/headrest, pull the strap
located on the rear of the head
restraint/headrest.
If the head restraint/headrest has been folded,
make sure that it is returned to the upright posi-
tion.
Make sure the head restraint/headrest is posi-
tioned so the lock knob is engaged in the notch
before riding in that designated seating position.
LRS2305LRS2306LRS2307
1-16Safety—Seats, seat belts and supplemental restraint system
Page 39 of 540

SEAT BELT WARNING LIGHT
Both the driver’s and passenger’s front seats are
equipped with a seat belt warning light. The
warning light, located on the instrument panel,
will show the status of the driver and passenger
seat belt.
NOTE:
The front passenger seat belt warning light
will not light up if the seat is not occupied.
For additional information, refer to “Warning
lights, indicator lights and audible reminders” in
the “Instruments and controls” section of this
manual.
PREGNANT WOMEN
NISSAN recommends that pregnant women use
seat belts. The seat belt should be worn snug and
always position the lap belt as low as possible
around the hips, not the waist. Place the shoulder
belt over your shoulder and across your chest.
Never run the lap/shoulder belt over your ab-
dominal area. Contact your doctor for specific
recommendations.
INJURED PERSONS
NISSAN recommends that injured persons use
seat belts. Check with your doctor for specific
recommendations.
THREE-POINT TYPE SEAT BELT
WITH RETRACTOR
WARNING
●Every person who drives or rides in this
vehicle should use a seat belt at all
times. Children should be in the rear
seats and in an appropriate restraint. ●
Do not ride in a moving vehicle when
the seatback is reclined. This can be
dangerous. The shoulder belt will not
be against your body. In an accident,
you could be thrown into it and receive
neck or other serious injuries. You
could also slide under the lap belt and
receive serious internal injuries.
● For the most effective protection when
the vehicle is in motion, the seat should
be upright. Always sit well back and
upright in the seat with both feet on the
floor and adjust the seat belt properly.
● Do not allow children to play with the
seat belts. Most seating positions are
equipped with Automatic Locking Re-
tractor (ALR) mode seat belts. If the seat
belt becomes wrapped around a child’s
neck with the ALR mode activated, the
child can be seriously injured or killed if
the seat belt retracts and becomes
tight. This can occur even if the vehicle
is parked. Unbuckle the seat belt to
release the child. If the seat belt cannot
be unbuckled or is already unbuckled,
release the child by cutting the seat belt
with a suitable tool (such as a knife or
scissors) to release the seat belt.
LRS0786
1-20Safety—Seats, seat belts and supplemental restraint system
Page 41 of 540

2. Slowly pull the seat belt out of the retractorand insert the tongue into the buckle
�Auntil
you hear and feel the latch engage.
● The retractor is designed to lock dur-
ing a sudden stop or on impact. A
slow pulling motion permits the seat
belt to move and allows you some
freedom of movement in the seat.
● If the seat belt cannot be pulled from
its fully retracted position, firmly pull
the belt and release it. Then
smoothly pull the belt out of the re-
tractor. 3. Position the lap belt portion
low and snug
on the hips�Bas shown.
4. Pull the shoulder belt portion toward the retractor to take up extra slack
�C. Be sure
the shoulder belt is routed over your shoul-
der and across your chest.
The front passenger seat and the rear seating
positions three-point seat belts have two modes
of operation: ● Emergency Locking Retractor (ELR)
● Automatic Locking Retractor (ALR)
The ELR mode allows the seat belt to extend and
retract to allow the driver and passengers some freedom of movement in the seat. The ELR locks
the seat belt when the vehicle slows down rapidly
or during certain impacts.
The ALR mode (child restraint mode) locks the
seat belt for child restraint installation.
When the ALR mode is activated, the seat belt
cannot be extended again until the seat belt
tongue is detached from the buckle and fully
retracted. The seat belt returns to the ELR mode
after the seat belt fully retracts. For additional
information, refer to “Child restraints” in this sec-
tion.
The ALR mode should be used only for
child restraint installation. During normal
seat belt use by an occupant, the ALR mode
should not be activated. If it is activated, it
may cause uncomfortable seat belt ten-
sion. It can also change the operation of
the front passenger air bag. For additional
information, refer to “Front passenger air
bag and status light” in this section.
WARNING
When fastening the seat belts, be certain
that the seatbacks are completely secured
in the latched position. If they are not
completely secured, passengers may be
injured in an accident or sudden stop.
LRS2674LRS2675
1-22Safety—Seats, seat belts and supplemental restraint system
Page 42 of 540

Unfastening the seat belts
To unfasten the seat belt, press the button on the
buckle
�1. The seat belt automatically retracts.
Checking seat belt operation
Seat belt retractors are designed to lock seat belt
movement by two separate methods:● When the seat belt is pulled quickly from the
retractor
● When the vehicle slows down rapidly To increase your confidence in the seat belts,
check the operation as follows:
● Grasp the shoulder belt and pull forward
quickly. The retractor should lock and re-
strict further belt movement.
If the retractor does not lock during this check,
get the system checked. It is recommended that
you visit a NISSAN dealer for this service, or to
learn more about seat belt operation.
�AShoulder belt height adjust button
Shoulder belt height adjustment (front
and 2nd row outboard seats)
The shoulder belt anchor height should be ad-
justed to the position best for you. For additional
information, refer to “Precautions on seat belt
usage” in this section.
To adjust, push the button and then move the
shoulder belt anchor to the desired position so
that the belt passes over the center of the shoul-
der. The belt should be away from your face and
WRS0139SSS0896
Safety—Seats, seat belts and supplemental restraint system1-23