Page 12 of 312
1. Engine hood (P. 3-13)
2. Windshield wiper and washer switch(P. 2-18)
3. Windshield (P. 8-18)
4. Roof light (P. 8-24)
5. Moonroof, Panoramic sunshade
(P. 2-28)
6. Power windows (P. 2-25)
7. Auto step (P. 2-31)
8. Door locks, keys (P. 3-3, 3-2)
9. Mirrors (P. 3-17)
10. Tire pressure (P. 8-33)
11. Flat tire (P. 6-2)
12. Tire chains (P. 8-33)
13. Replacing bulbs (P. 8-24)
14. Headlight and turn signal switch
(P. 2-19)
15. Trouble light (P. 2-30)
16. License bracket (P. 9-12)
Refer to the page number indicated in
parentheses for operating details.
LII2276
EXTERIOR FRONT
Illustrated table of contents0-3
Page 13 of 312
1. Rear exit light (P. 8-24)
2. Slide window (P. 2-25)
3. Fuel-filler cap, recommended fuel(P. 3-14, 9-2)
4. Auto step (P. 2-31)
5. Replacing bulbs (P. 8-24)
6. Rearview camera (P. 4-8)
7. Back doors (P. 3-3)
Refer to the page number indicated in
parentheses for operating details.
LII2431
EXTERIOR REAR
0-4Illustrated table of contents
Page 80 of 312

2 Instruments and controls
Instrument panel...................................2-2
Meters and gauges ................................2-3
Speedometer and odometer .....................2-4
Tachometer ....................................2-6
Fuel gauge ....................................2-6
Trip computer ..................................2-7
Outside temperature display .....................2-8
Warning/indicator lights and audible reminders .......2-9
Checking bulbs ................................2-9
Warning lights ................................ 2-10
Indicator lights ................................ 2-14
Audible reminders ............................. 2-16
Security systems ................................. 2-17
NISSAN vehicle immobilizer system .............2-17
Windshield wiper and washer switch ...............2-18
Switch operation .............................. 2-18
Rear window and outside mirror defroster switch .....2-19
Headlight and turn signal switch ....................2-19
Headlight control switch ........................ 2-19
Instrument brightness control ...................2-20
Turn signal switch ............................. 2-21Horn
............................................ 2-21
Vehicle Dynamic Control (VDC) off switch ...........2-22
Power outlet ..................................... 2-22
Storage ......................................... 2-23
Map pockets .................................. 2-24
Under-seat storage bins ........................ 2-24
Cup holders .................................. 2-24
Glove box .................................... 2-25
Windows ........................................ 2-25
Power windows ............................... 2-25
Sliding rear window ............................ 2-27
Moonroof ........................................ 2-28
Panoramic sunshade ........................... 2-28
Cargo light ...................................... 2-28
Personal lights ................................... 2-29
Map light ........................................ 2-29
Rear
room light ................................... 2-30
Trouble light switch ............................... 2-30
Intercom system switch ........................... 2-30
Personal light switches ............................ 2-31
Auto step switch ................................. 2-31
Page 88 of 312

warning lightLow windshield-washer fluid warning lightHigh beam indicator light (blue)
orBrake warning lightPower steering warning lightMalfunction Indicator Light (MI")
orAnti-lock Braking System (ABS)
warning lightLow windshield-washer fluid warning lightHigh beam indicator light (blue)
orBrake warning lightPower steering warning lightMalfunction Indicator Light (MIL)
Charge warning lightSeat belt warning light and chimeOverdrive OFF indicator light
Door open warning lightSupplemental air bag warning lightSecurity indicator light
Engine oil pressure warning lightAuto step indicator lightSlip indicator light
High temperature warning light (red)Continuously Variable Transmission (CVT)
position indicator lightTurn signal/hazard indicator lights
Low fuel warning lightCruise main switch indicator lightVehicle Dynamic Control (VDC) OFF indicator
light
Low tire pressure warning lightFront passenger air bag status light
CHECKING BULBS
With all doors closed, apply the parking brake
and place the ignition switch in the ON position
without starting the engine. The following lights
will come on:
or,,,,,
If equipped, the following lights come on briefly
and then go off:
or,(red) ,,
,,,
If any light fails to come on, it may indicate
a burned-out bulb or an open circuit in the
electrical system. Have the system repaired
promptly.
WARNING/INDICATOR LIGHTS AND
AUDIBLE REMINDERS
Instruments and controls2-9
Page 264 of 312
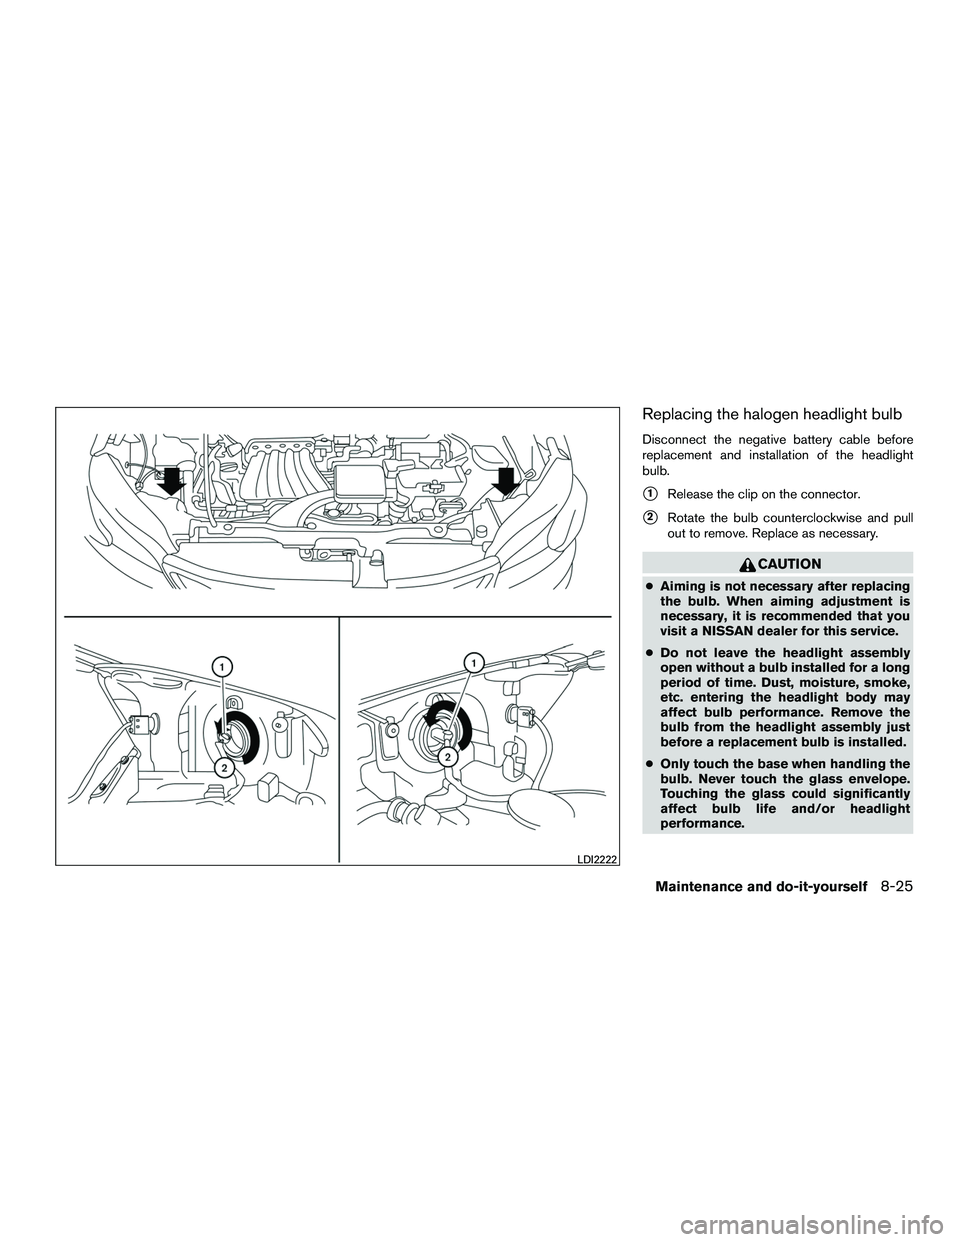
Replacing the halogen headlight bulb
Disconnect the negative battery cable before
replacement and installation of the headlight
bulb.
�1Release the clip on the connector.
�2Rotate the bulb counterclockwise and pull
out to remove. Replace as necessary.
CAUTION
● Aiming is not necessary after replacing
the bulb. When aiming adjustment is
necessary, it is recommended that you
visit a NISSAN dealer for this service.
● Do not leave the headlight assembly
open without a bulb installed for a long
period of time. Dust, moisture, smoke,
etc. entering the headlight body may
affect bulb performance. Remove the
bulb from the headlight assembly just
before a replacement bulb is installed.
● Only touch the base when handling the
bulb. Never touch the glass envelope.
Touching the glass could significantly
affect bulb life and/or headlight
performance.
LDI2222
Maintenance and do-it-yourself8-25
Page 265 of 312

●High pressure halogen gas is sealed
inside the halogen bulb. The bulb may
break if the glass envelope is scratched
or the bulb is dropped.
● Use the same number and wattage as
shown in the chart.
Fog may temporarily form inside the lens of the
exterior lights in the rain or in a car wash. A
temperature difference between the inside and
the outside of the lens causes the fog. This is not
a malfunction. If large drops of water collect
inside the lens, it is recommended that you visit a
NISSAN dealer for this service.
Aiming the headlights
The headlights on your vehicle are properly aimed
at the assembly plant. If your vehicle has been in
a collision, the alignment of your headlights
should be checked by a NISSAN dealer. Vertical aim adjustment
NOTE:
Due to a maximum load condition of the
vehicle, headlight aiming adjustment may
be necessary. Please perform the following
procedure:
1. Park the vehicle directly in front of a wall or screen on a level surface, approximately
25 feet (7.6 meters) away.
●
�18 feet (2.4 meters)
●
�2Center height of headlight to ground
●
�325 feet (7.6 meters) ●
�4Horizontal reference line
2. Measure the height from the center of the headlight to the ground and mark an 8 foot
(2.4 meter) horizontal reference line on the
vertical wall or screen at this height (a piece
of masking tape works well) .
3. Turn on the low beam headlights to illumi- nate the wall or screen and open the hood.
LDI2252
8-26Maintenance and do-it-yourself
Page 266 of 312
4. On the wall or screen you will observe anarea of high intensity light. The top of the
high intensity area should touch the horizon-
tal reference line. If not, the beam will need to
be adjusted. 5. Locate the vertical adjuster�Aon each
headlight, then use a suitable tool to adjust
the headlight up or down.
6. Close the hood and turn off the headlights.
NOTE:
Horizontal aim is not required for this ve-
hicle and is not adjustable.
PARK/TURN SIGNAL LIGHTS
Replacing the park/turn signal bulb
LDI2255LDI2685
Maintenance and do-it-yourself8-27
Page 267 of 312
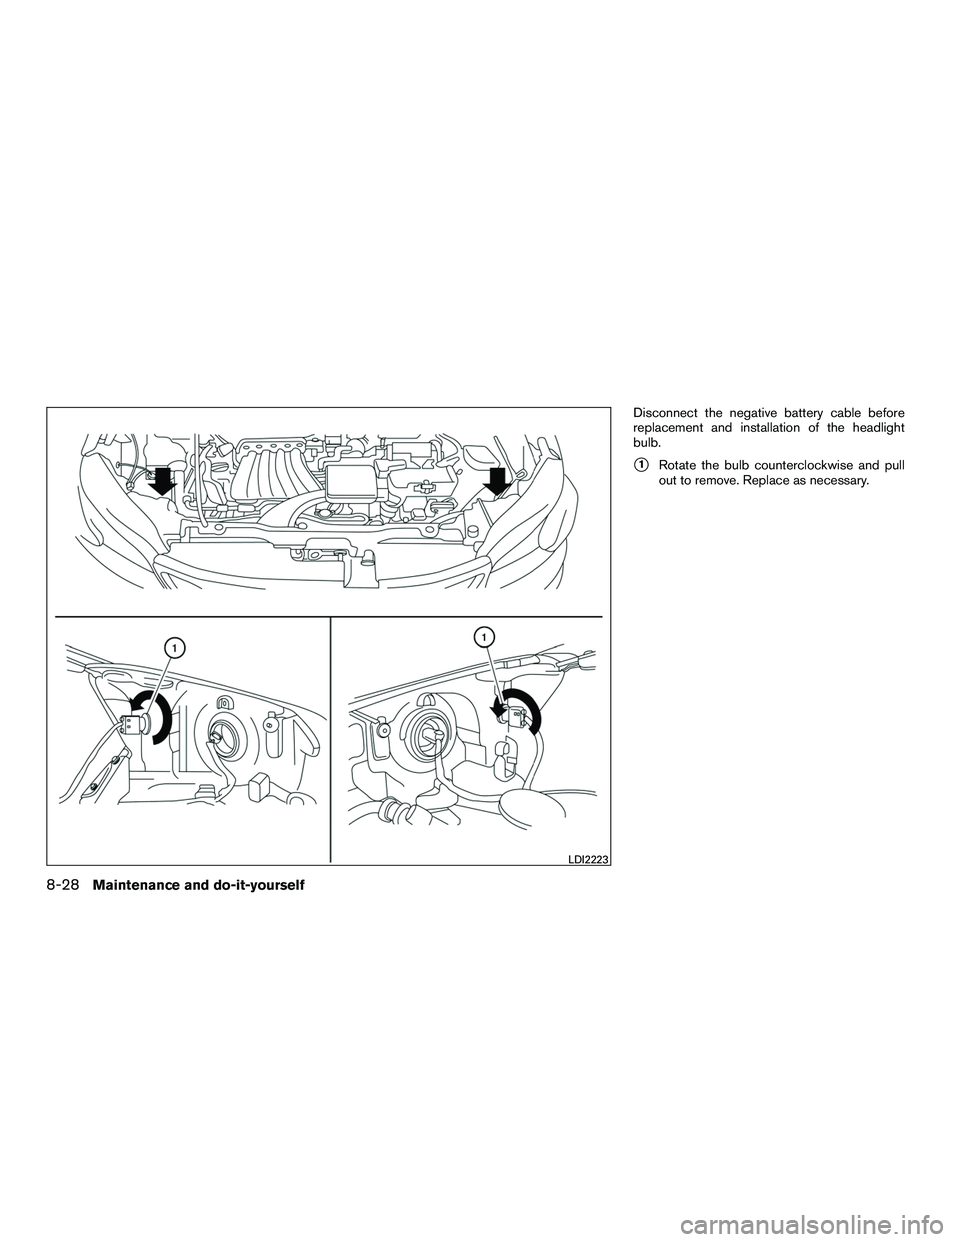
Disconnect the negative battery cable before
replacement and installation of the headlight
bulb.
�1Rotate the bulb counterclockwise and pull
out to remove. Replace as necessary.
LDI2223
8-28Maintenance and do-it-yourself

2. Windshield wiper and washer switch(P. 2-18)
3. Windshield (P. 8-18)
4. Roof light (P. 8-24)
5. Moonroof, Panoramic sunshade
(P. 2-28)
6. Power windows (P. 2-25)
7. Auto ste")

2. Slide window (P. 2-25)
3. Fuel-filler cap, recommended fuel(P. 3-14, 9-2)
4. Auto step (P. 2-31)
5. Replacing bulbs (P. 8-24)
6. Rearview camera (P. 4-8)
7. Back doors")