Page 300 of 380

UnderbodyThe underbody is frequently ex-
posed to corrosive substances such as those
used on icy roads or to control dust. It is very
important to remove these substances from the
underbody, otherwise rust may form on the floor
pan, frame, fuel lines and exhaust system. At the
end of winter, the underbody should be thor-
oughly flushed with plain water, in those areas
where mud and dirt may have accumulated. For
additional information, refer to “Underbody” in the
“Appearance and care” section of this manual.
Windshield-washer fluid* Check that there is
adequate fluid in the reservoir. When performing any inspection or maintenance
work on your vehicle, always take care to prevent
serious accidental injury to yourself or damage to
the vehicle. The following are general precau-
tions which should be closely observed.
WARNING
●
Park the vehicle on a level surface, ap-
ply the parking brake securely and
block the wheels to prevent the vehicle
from moving. Move the shift lever to P
(Park) .
● Be sure the ignition key is in the OFF or
LOCK position when performing any
parts replacement or repairs.
● If you must work with the engine run-
ning, keep your hands, clothing, hair
and tools away from moving fans, belts
and any other moving parts.
● It is advisable to secure or remove any
loose clothing and remove any jewelry,
such as rings, watches, etc. before
working on your vehicle.
● Always wear eye protection whenever
you work on your vehicle. ●
The automatic engine cooling fan (if so
equipped) may come on at any time
without warning, even if the ignition
switch is in the OFF position and the
engine is not running. To avoid injury,
always disconnect the negative battery
cable before working near the fan.
● If you must run the engine in an en-
closed space such as a garage, be sure
there is proper ventilation for exhaust
gases to escape.
● Never get under the vehicle while it is
supported only by a jack. If it is neces-
sary to work under the vehicle, support
it with safety stands.
● Keep smoking materials, flame and
sparks away from the fuel tank and
battery.
● On gasoline engine models, the fuel
filter or fuel lines should be serviced by
a NISSAN dealer because the fuel lines
are under high pressure even when the
engine is off.
MAINTENANCE PRECAUTIONS
Maintenance and do-it-yourself8-5
Page 308 of 380

2. Start the engine and let it idle until it reachesoperating temperature, then turn it off.
3. Remove the oil filler cap
�Aby turning it
counterclockwise.
4. Place a large drain pan under the drain plug
�B.
5. Remove the drain plug
�Bwith a wrench by
turning it counterclockwise and completely
drain the oil.
If the oil filter is to be changed, remove and
replace it at this time. For additional informa-
tion, refer to “Changing engine oil filter” in
this section.
● Waste oil must be disposed of prop-
erly.
● Check your local regulations.
WARNING
●Prolonged and repeated contact with
used engine oil may cause skin cancer.
● Try to avoid direct skin contact with
used oil. If skin contact is made, wash
thoroughly with soap or hand cleaner as
soon as possible.
● Keep used engine oil out of reach of
children.
CAUTION
Be careful not to burn yourself. The engine
oil may be hot.
6. Clean and reinstall the drain plug and a new washer. Securely tighten the drain plug with
a wrench. Do not use excessive force.
Drain plug tightening torque: 25 ft-lb (34 N·m)
7. Refill engine with recommended oil through the oil filler opening, then install the oil filler
cap securely.
For additional information, refer to “Recom-
mended fluids/lubricants and capacities” in
the “Technical and consumer information”
section of this manual for drain and refill
capacity.
The drain and refill capacity depends on the
oil temperature and drain time. Use these
specifications for reference only. Always use
the dipstick to determine when the proper
amount of oil is in the engine.
8. Start the engine. Check for leakage around the drain plug and oil filter. Correct as re-
quired. 9. Turn the engine off and wait more than
10 minutes. Check the oil level with the
dipstick. Add engine oil if necessary.
Maintenance and do-it-yourself8-13
Page 309 of 380

CHANGING ENGINE OIL FILTER
1. Park the vehicle on a level surface and applythe parking brake.
2. Turn the engine off.
3. Place a large drain pan under the oil filter.
4. Unscrew the plate covering the oil filter ex- posing the filter.
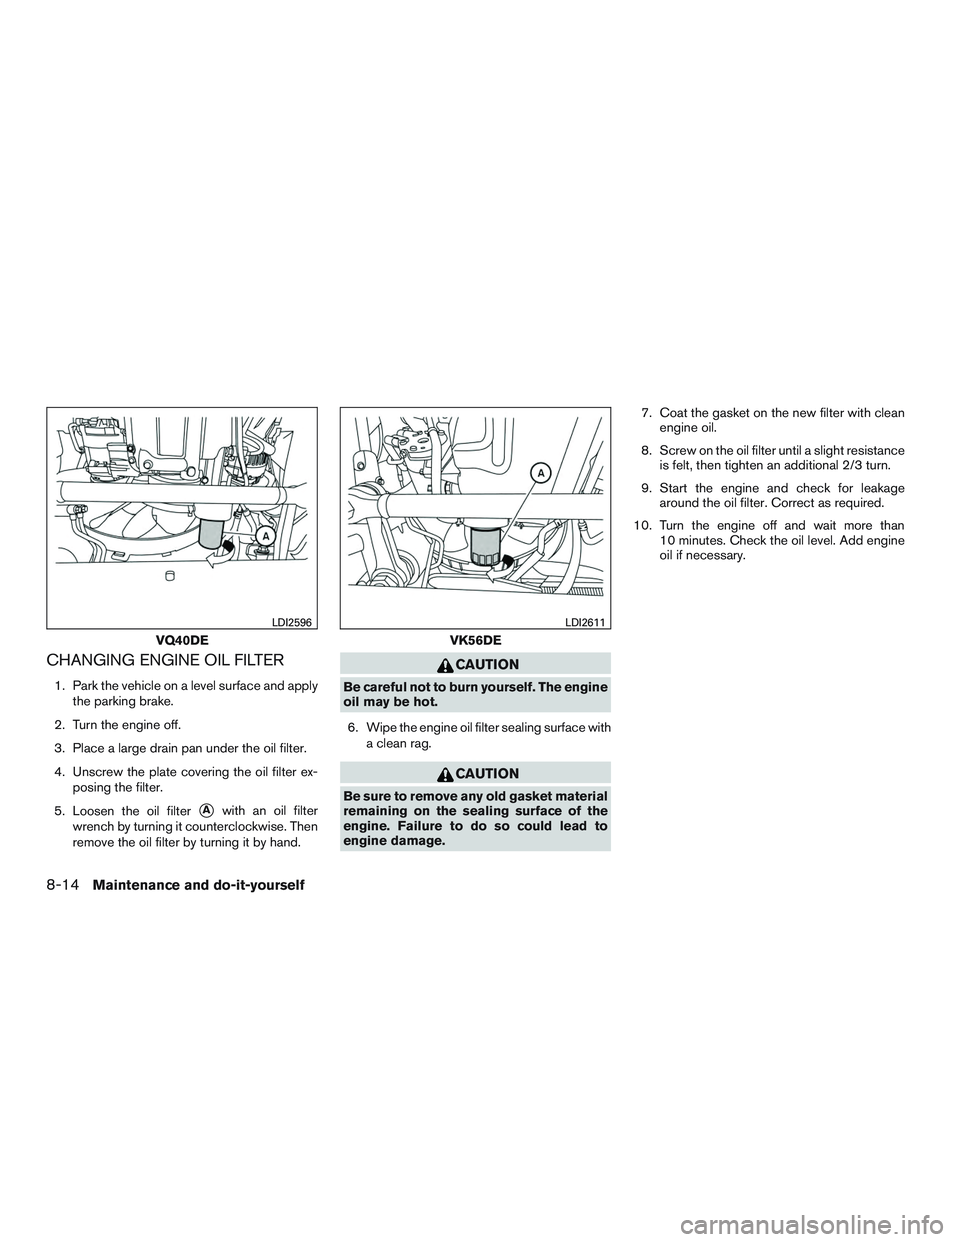
5. Loosen the oil filter
�Awith an oil filter
wrench by turning it counterclockwise. Then
remove the oil filter by turning it by hand.
CAUTION
Be careful not to burn yourself. The engine
oil may be hot.
6. Wipe the engine oil filter sealing surface with a clean rag.
CAUTION
Be sure to remove any old gasket material
remaining on the sealing surface of the
engine. Failure to do so could lead to
engine damage. 7. Coat the gasket on the new filter with clean
engine oil.
8. Screw on the oil filter until a slight resistance is felt, then tighten an additional 2/3 turn.
9. Start the engine and check for leakage around the oil filter. Correct as required.
10. Turn the engine off and wait more than 10 minutes. Check the oil level. Add engine
oil if necessary.
VQ40DE
LDI2596
VK56DE
LDI2611
8-14Maintenance and do-it-yourself
Page 314 of 380
Vehicles operated in high temperatures or under
severe conditions require frequent checks of the
battery fluid level.
JUMP STARTING
If jump starting is necessary, refer to “Jump start-
ing” in the “In case of emergency” section of this
manual. If the engine does not start by jump
starting, the battery may have to be replaced.
Contact a NISSAN dealer.
1. Power steering fluid pump pulley
2. Automatic drive belt tensioner pulley
3. Idler pulley
4. Cooling fan pulley
5. Air conditioner compressor pulley
6. Crankshaft pulley
7. Generator pulley1. Power steering fluid pump pulley
2. Automatic drive belt tensioner pulley
3. Water pump pulley
4. Cooling fan pulley
5. Air conditioner compressor pulley
6. Crankshaft pulley
7. Generator pulley
WARNING
Be sure the ignition switch is in the OFF or
LOCK position before servicing drive belt.
The engine could rotate unexpectedly.
VQ40DE
WDI0674
VK56DE
WDI0675
DRIVE BELT
Maintenance and do-it-yourself8-19
Page 320 of 380
ENGINE COMPARTMENT
WARNING
Never use a fuse of a higher or lower
amperage rating than specified on the
fuse box cover. This could damage the
electrical system or cause a fire.
If any electrical equipment does not come on,
check for an open fuse. 1. Be sure the ignition switch and the headlight switch are OFF.
2. Open the engine hood. 3. Remove the fuse box cover by pushing the
tab and lifting the cover up.
4. Remove the fuse with the fuse puller. The fuse puller is located in the center of the fuse
block in the passenger compartment.
5. If the fuse is open
�A, replace it with a new
fuse
�B.
6. If a new fuse also opens, have the electrical system checked and repaired by a NISSAN
dealer.
Fusible links
If the electrical equipment does not operate and
fuses are in good condition, check the fusible
links. If any of these fusible links are melted,
replace with only Genuine NISSAN parts.
LDI2825LDI2826
Maintenance and do-it-yourself8-25
Page 322 of 380
Extended storage switch
If any electrical equipment does not operate,
remove the extended storage switch and check
for an open fuse.
NOTE:
The extended storage switch is used for
long term vehicle storage. Even if the ex-
tended storage switch is broken it is not
necessary to replace it. Replace only the
open fuse in the switch with a new fuse.How to replace the extended storage switch:
1. To remove the extended storage switch, be sure the ignition switch is in the OFF or
LOCK position.
2. Be sure the headlight switch is in the OFF position.
3. Remove the fuse box cover.
4. Pinch the locking tabs
�Afound on each
side of the storage switch.
5. Pull the storage switch straight out from the fuse box
�B.
CAUTION
Be careful not to allow children to swallow
the battery or removed parts.
LDI2761
BATTERY REPLACEMENT
Maintenance and do-it-yourself8-27
Page 325 of 380
●When handling the bulb, do not touch
the glass envelope.
● Use the same number and wattage as
originally installed as shown in the
chart.
● Do not leave the bulb out of the fog light
for a long period of time as dust, mois-
ture and smoke may enter the fog light
body and affect the performance of the
fog light.
1. Disconnect the negative (-) battery cable.
2. The fog light is accessible in front of the fronttire and behind the bumper.
3. Disconnect the bulb connector
�1.
4. Rotate the bulb counterclockwise and re- move.
5. Remove by pulling it straight out of the fog light assembly. Do not shake or rotate the
bulb when removing it. Do not touch the
glass envelope.
6. Install in the reverse order of removal.
LDI2082
8-30Maintenance and do-it-yourself
Page 347 of 380
ENGINE
ModelVQ40DE VK56DE
Type Gasoline, 4-cycle, DOHC Gasoline, 4-cycle, DOHC
Cylinder arrangement 6-cylinder, V-block, Slanted at 60°8-cylinder, V-block, Slanted at 90°
Bore x Stroke in (mm) 3.76 x 3.622 (95.5 x 92)in (mm) 3.858 x 3.622 (98 x 92)
Displacement cu in (cm
3) 241.30 (3,954)cu in (cm3) 338.78 (5,552)
Firing order 1–2–3–4–5–61–8–7–3–6–5–4–2
Idle speed
No adjustment is necessary.
A/T (in “N” position)
Ignition timing (degree B.T.D.C. at idle speed)
CO%atidle
Spark plug
DILFR5A-11
Spark plug gap (Nominal) in (mm) 0.043 (1.1)
Camshaft operation Timing chain
This spark ignition system complies with the Canadian standard ICES-002.
SPECIFICATIONS
9-8Technical and consumer information