Page 189 of 465
SYSTEM OPERATION
The automatic drive positioner system will not
work or will stop operating under the following
conditions:
●When the vehicle speed is above 0 mph
(0 km/h) or 4 mph (7 km/h) for some limited
functions such as linking a key fob to the
meter when the power source is turned on
from off or during the Exit function.
●When any of the memory switches are
pushed while the automatic drive positioner
is operating.
●When the adjusting switch for the driver’s
seat and steering column is turned on while
the automatic drive positioner is operating.
●When the seat has already been moved to
the memorized position.
●When no seat position is stored in the
memory switch.
●When the shift lever is moved from P (Park)
to any other position.
3-38Pre-driving checks and adjustments
Page 191 of 465

4 Display screen, heater, air conditioner,
audio and phone systems
RearView Monitor.................................4-2
RearView Monitor system operation..............4-3
How to read the displayed lines..................4-3
Difference between predicted and actual
distances......................................4-4
How to park with predicted course lines...........4-5
Adjusting the screen............................4-7
How to turn on and off predicted course
lines (models with navigation)....................4-7
RearView Monitor system limitations..............4-8
System maintenance............................4-9
Around View® Monitor (if so equipped).............4-10
Around View® Monitor system operation.........4-11
Difference between predicted and actual
distances.....................................4-14
How to park with predicted course lines..........4-16
How to switch the display......................4-17
Adjusting the screen...........................4-18
Around View® Monitor system limitations........4-18
System maintenance...........................4-20
Moving Object Detection (MOD) (if so equipped)....4-21
MOD system operation.........................4-22
Turning MOD on and off........................4-23
MOD system limitations........................4-23System maintenance...........................4-24
Vents...........................................4-25
Heater and Air Conditioner (automatic)..............4-26
Automatic operation...........................4-27
Manual operation..............................4-28
Operating tips.................................4-28
Servicing air conditioner...........................4-29
Audio system....................................4-29
Radio........................................4-29
FM radio reception............................4-30
AM radio reception............................4-30
Satellite radio reception........................4-30
Audio operation precautions....................4-31
FM/AM/SAT radio with compact disc (CD)
player (if so equipped).........................4-38
USB (Universal Serial Bus) Connection Port
(models without Navigation System)
(if so equipped)...............................4-42
iPod®* player operation without Navigation
System (if so equipped)........................4-45
Bluetooth® streaming audio without
Navigation System.............................4-47
CD care and cleaning..........................4-48
Steering wheel switch for audio control..........4-48
Page 196 of 465

Backing up near a projecting object
The predicted course lines�Ado not touch the
object in the display. However, the vehicle may hit
the object if it projects over the actual backing up
course.
Backing up behind a projecting object
The position�Cis shown farther than the position
�Bin the display. However, the position�Cis
actually at the same distance as the position
�A.
The vehicle may hit the object when backing up tothe position
�Aif the object projects over the
actual backing up course.
HOW TO PARK WITH PREDICTED
COURSE LINES
WARNING
●If the tires are replaced with different
sized tires, the predicted course lines
may be displayed incorrectly.
●On a snow-covered or slippery road,
there may be a difference between the
predicted course line and the actual
course line.
●If the battery is disconnected or be-
comes discharged, the predicted course
lines may be displayed incorrectly. If
this occurs, please perform the follow-
ing procedures:
– Turn the steering wheel from lock to
lock while the engine is running.
– Drive the vehicle on a straight road
for more than 5 minutes.
●When the steering wheel is turned with
the ignition switch in the ACC position,
the predicted course lines may be dis-
played incorrectly.
LHA1201LHA3525
Display screen, heater, air conditioner, audio and phone systems4-5
Page 197 of 465
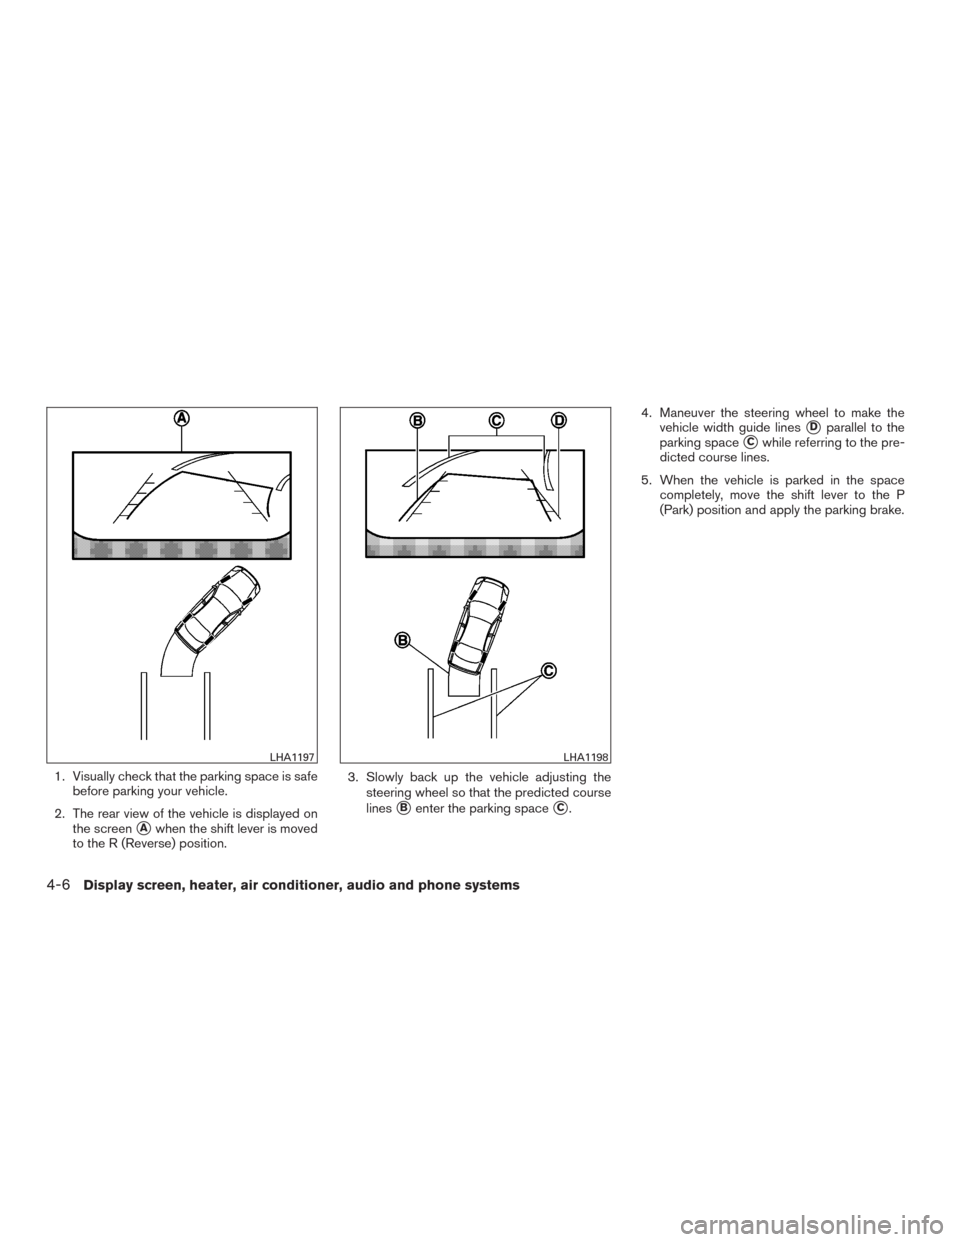
1. Visually check that the parking space is safe
before parking your vehicle.
2. The rear view of the vehicle is displayed on
the screen
�Awhen the shift lever is moved
to the R (Reverse) position.3. Slowly back up the vehicle adjusting the
steering wheel so that the predicted course
lines
�Benter the parking space�C.4. Maneuver the steering wheel to make the
vehicle width guide lines
�Dparallel to the
parking space
�Cwhile referring to the pre-
dicted course lines.
5. When the vehicle is parked in the space
completely, move the shift lever to the P
(Park) position and apply the parking brake.
LHA1197LHA1198
4-6Display screen, heater, air conditioner, audio and phone systems
Page 204 of 465

Vehicle width guide lines�5:
Indicate the approximate vehicle width when
backing up.
Predicted course lines
�6:
Indicate the predicted course when operating the
vehicle. The predicted course lines will be dis-
played on the monitor when the steering wheel is
turned. The predicted course lines will move de-
pending on how much the steering wheel is
turned and will not be displayed while the steer-
ing wheel is in the straight-ahead position.The front view will not be displayed when the
vehicle speed is above 6 mph (10 km/h).
NOTE:
When the monitor displays the front view
and the steering wheel turns about 90 de-
grees or less from the straight-ahead posi-
tion, both the right and left predicted
course lines
�6are displayed. When the
steering wheel turns about 90 degrees or
more, a line is displayed only on the oppo-
site side of the turn.
Bird’s-eye view
The bird’s-eye view shows the overhead view of
the vehicle, which helps confirm the vehicle po-
sition and the predicted course to a parking
space.
The vehicle icon
�1shows the position of the
vehicle. Note that the apparent distance between
objects viewed in the bird’s-eye view may differ
somewhat from the actual distance to the vehicle.
The areas that the cameras cannot cover
�2are
indicated in black.
Rear view
SAA1896LHA3730
Display screen, heater, air conditioner, audio and phone systems4-13
Page 207 of 465

Backing up behind a projecting object
The position�Cis shown farther than the position
�Bin the display. However, the position�Cis
actually at the same distance as the position
�A.
The vehicle may hit the object when backing up tothe position
�Aif the object projects over the
actual backing up course.
HOW TO PARK WITH PREDICTED
COURSE LINES
WARNING
●If the tires are replaced with different
sized tires, the predicted course lines
may be displayed incorrectly.
●On a snow-covered or slippery road,
there may be a difference between the
predicted course line and the actual
course line.
●If the battery is disconnected or be-
comes discharged, the predicted course
lines may be displayed incorrectly. If
this occurs, please perform the follow-
ing procedures:
– Turn the steering wheel from lock to
lock while the engine is running.
– Drive the vehicle on a straight road
for more than 5 minutes.
●When the steering wheel is turned with
the ignition switch in the ACC position,
the predicted course lines may be dis-
played incorrectly.1. Visually check that the parking space is safe
before parking your vehicle.
2. The rear view of the vehicle is displayed on
the screen
�Awhen the shift lever is moved
to the R (Reverse) position.
LHA3525LHA1197
4-16Display screen, heater, air conditioner, audio and phone systems
Page 208 of 465

3. Slowly back up the vehicle adjusting the
steering wheel so that the predicted course
lines
�Benter the parking space�C.4. Maneuver the steering wheel to make the
vehicle width guide lines
�Dparallel to the
parking space
�Cwhile referring to the pre-
dicted course lines.
5. When the vehicle is parked in the space
completely, move the shift lever to the P
(Park) position and apply the parking brake.
HOW TO SWITCH THE DISPLAY
With the ignition switch in the ON position, press
the CAMERA button or move the shift lever to the
R (Reverse) position to operate the Around
View® Monitor.
The Around View® Monitor displays different
split screen views depending on the position of
the shift lever. Press the CAMERA button to
switch between the available views.
If the shift lever is in the R (Reverse) position, the
available views are:
●Rear view/bird’s-eye view split screen
●Rear view/front-side view split screen
If the shift lever is in the P (Park) position, the
available views are:
●Front view/bird’s-eye view split screen
●Front view/front-side view split screenIf the shift lever is in the D (Drive) position, the
only available view is front view/front-side view
split screen.
The display will switch from the Around View®
Monitor screen when:
●The shift lever is in the D (Drive) position and
the vehicle speed increases above approxi-
mately 6 mph (10 km/h)
●A different screen is selected.
LHA1198
Display screen, heater, air conditioner, audio and phone systems4-17
Page 239 of 465

CD CARE AND CLEANING
●Handle a CD by its edges. Do not bend the
disc. Never touch the surface of the disc.
●Always place the discs in the storage case
when they are not being used.
●To clean a disc, wipe the surface from the
center to the outer edge using a clean, soft
cloth. Do not wipe the disc using a circular
motion.
●Do not use a conventional record cleaner or
alcohol intended for industrial use.●A new disc may be rough on the inner and
outer edges. Remove the rough edges by
rubbing the inner and outer edges with the
side of a pen or pencil as illustrated.
1.menu control switch/OK button
2. SOURCE switch
3. Volume control switches
STEERING WHEEL SWITCH FOR
AUDIO CONTROL
SOURCE switch
With the ignition switch in the ACC or ON posi-
tion, push the SOURCE switch to turn the audio
system on.
Push the SOURCE switch to change the mode in
the following sequence:
AM→FM→XM→USB/iPod®*→Bluetooth®
Audio*→AUX*→AM.
LHA0049LHA3204
4-48Display screen, heater, air conditioner, audio and phone systems
 or 4 mph (7 km/h) for some")