2016 NISSAN MURANO HYBRID ad blue
[x] Cancel search: ad bluePage 2 of 36
*See your Owner’s Manual for information.
19
20
16
12
5
6
18
8
3
10
9
211
1
47
17
21
Behind
steering
wheel
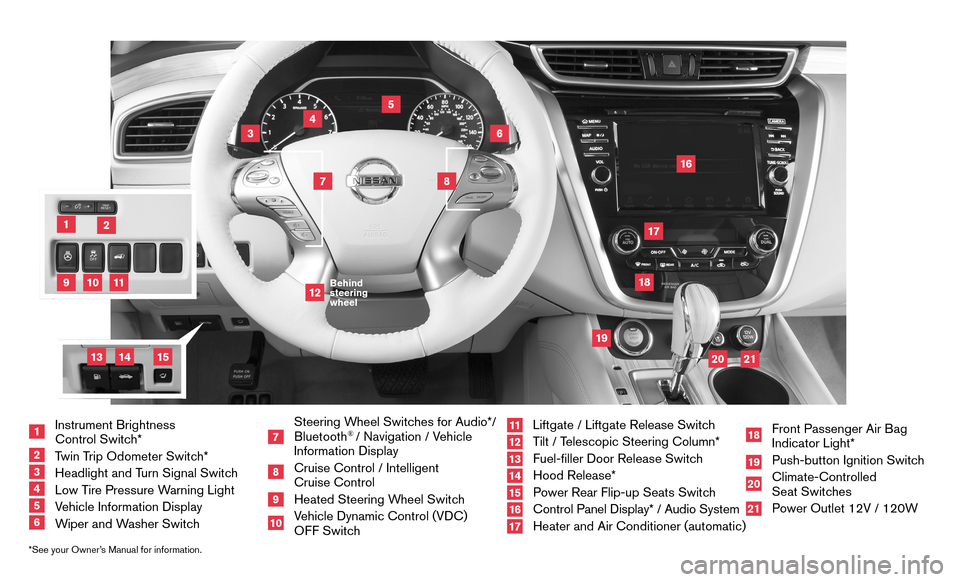
1 Instrument Brightness
Control Switch*
2 Twin Trip Odometer Switch*3 Headlight and T urn Signal Switch4 Low Tire Pressure Warning Light5 Vehicle Information Display6 Wiper and Washer Switch
7 Steering Wheel Switches for Audio*/ Bluetooth
® / Navigation / Vehicle
Information Display
8 Cruise Control / Intelligent
Cruise Control
9 Heated Steering W heel Switch10 Vehicle Dynamic Control (VDC)
OFF Switch
11 Liftgate / Liftgate Release Switc h12 Tilt / Telescopic Steering Column*13 Fuel-filler Door Release Switch14 Hood Release*
15 Power Rear Flip-up Seats Switch16 Control Panel Display* / Audio System
17 Heater and Air Conditioner (automatic)
18 Front Passenger Air Bag
Indicator Light*
19 Push-button Ignition Switc h20 Climate-Controlled
Seat Switches
21 Power Outlet 12V / 120W
14
15
13
Page 3 of 36
Please see your Owner’s Manual for important safety information and system operation limitations.• A cellular telephone should not be used for any purpose while driving so\
full attention may be given to vehicle operation.
• Always wear your seat belt.
• Supplemental air bags do not replace proper seat belt usage.
• Children 12 and under should always ride in the rear seat properly secur\
ed in c hild restraints or seat belts according to their age and weight.
• Do not drink and drive.
For more information, refer to the “Safety — Seats, seat belts and supplemental restraint system (sectio\
n 1) ”,
the “Monitor, climate, audio, phone and voice recognition systems (section 4) ” and the “Starting and driving
(section 5)” of your Owner’s Manual.
Additional information about your vehicle is also available in your Owne\
r’s Manual, Navigation System Owner’s Manual and at www.NissanUSA.com.
NEW SYSTEM FEATURESHow to Use Your Murano’s Touch-screen Display.......................................2
Approaching Vehicle Sound for Pedestrians (VSP) .....................................3
Heated Steering Wheel (if so equipped) ..............................................3
Around View® Monitor (AVM) with Moving Object Detection (MOD) (if so equipped).........3
Blind Spot Warning (BSW) (if so equipped)...........................................5
Predictive Forward Collision Warning (PFCW) (if so equipped)...........................5
Vehicle Dynamic Control (VDC) .....................................................5
Hill Start Assist (HSA).............................................................5
Forward Emergency Braking (FEB) (if so equipped) ....................................6
SiriusXM Travel Link and SiriusXM Traffic (if so equipped) ...............................6
ESSENTIAL INFORMATIONTire Pressure Monitoring System (TPMS) with Easy Fill Tire Alert..........................7
Loose Fuel Cap...................................................................8
Fuel-filler Door....................................................................8
PureDrive™ Hybrid System Warning Light and Hybrid Awareness . . . . . . . . . . . . . . . . . . . . . . . . . 8
Towing Your Vehicle (if so equipped)
.................................................9
Clock Set/Adjustment .............................................................9
FIRST DRIVE FEATURESNissan Intelligent Key® System.....................................................10
Power Liftgate Release (if so equipped) .............................................12
Front Seat Adjustments...........................................................12
Automatic Drive Positioner (if so equipped)...........................................13
Assist Charge Gauge.............................................................13
Rear Seat Adjustments ...........................................................14
Starting/Stopping the Hybrid System................................................14
Outside Mirror Control Switch .....................................................15
Headlight Control Switch .........................................................15
Wiper and Washer Switch.........................................................16
Heater and Air Conditioner (automatic) ..............................................17
FM/AM/SiriusXM® Satellite Radio with CD Player and Navigation........................18
USB (Universal Serial Bus) Connection Port/iPod® Interface and AUX Jack................20
Front Armrest/Center Console Storage Box ..........................................20
Cruise Control...................................................................20
Intelligent Cruise Control (ICC) (if so equipped).......................................21
SYSTEM GUIDETrip Computer...................................................................22
Hand-free Text Messaging Assistant ................................................23
NissanConnectsm Mobile Apps .....................................................24
Bluetooth® Hands-free Phone System...............................................25
System Operating Tips............................................................25
Bluetooth® Streaming Audio .......................................................28
Navigation System ...............................................................29
HomeLink® Universal Transceiver (if so equipped) .....................................30
TAB LE OF CONTE NTS
Page 6 of 36
4
NEW SYSTEM FEATURES
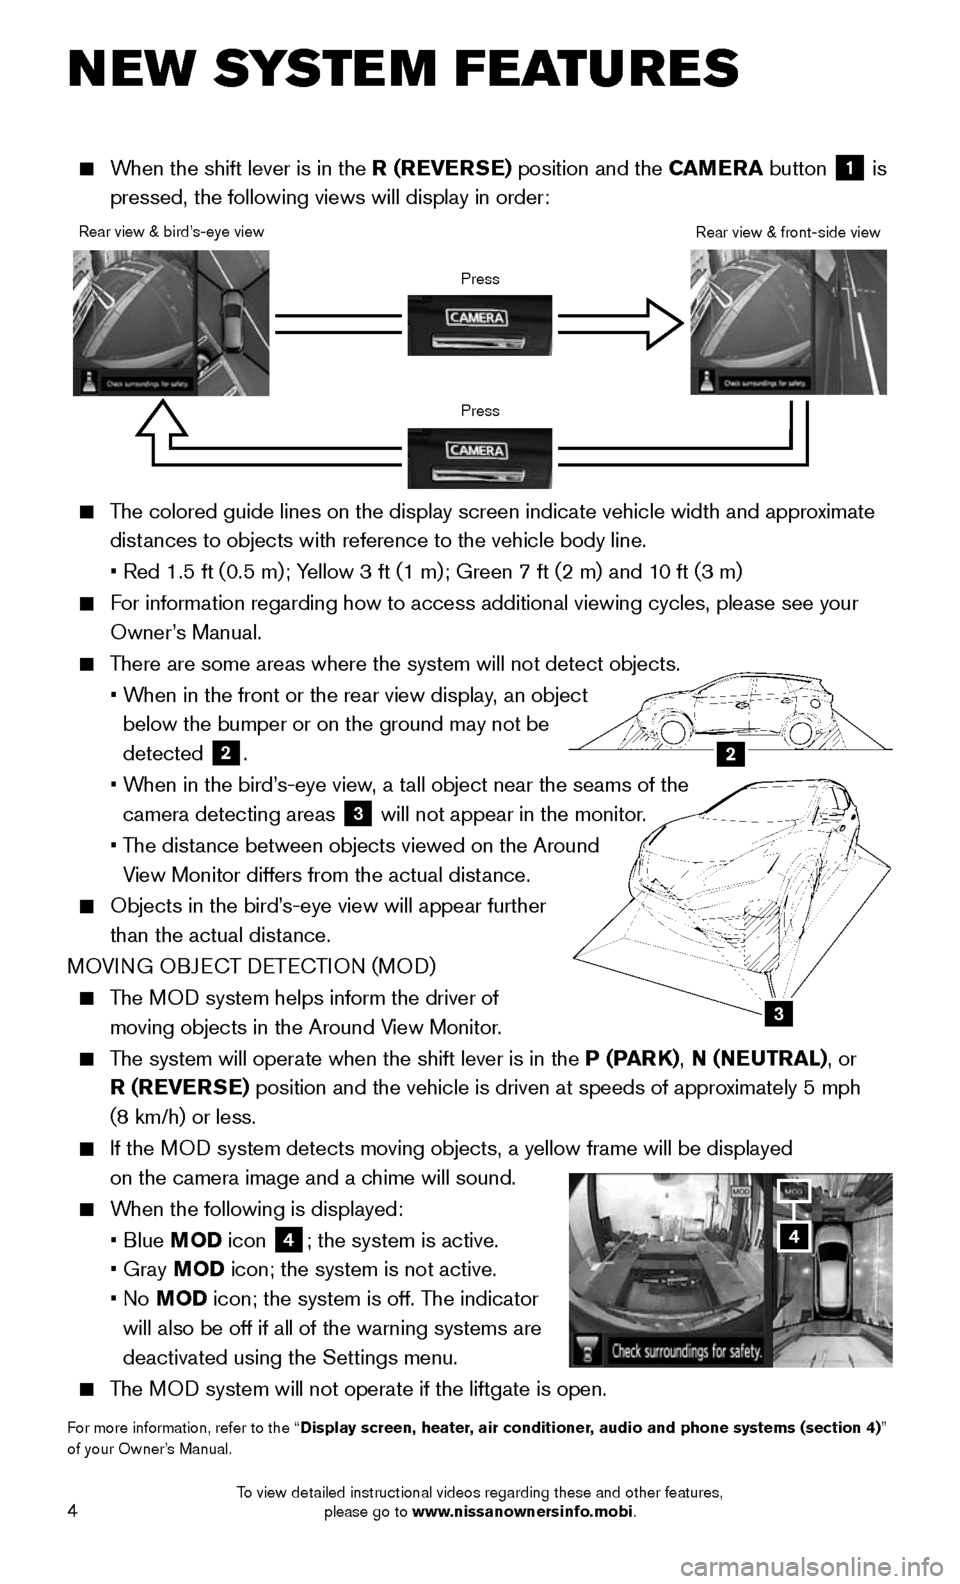
The colored guide lines on the display screen indicate vehicle width and \
approximate
distances to objects with reference to the vehicle body line.
• Red 1.5 ft (0.5 m); Yellow 3 ft (1 m); Green 7 ft (2 m) and 10 ft (3 m)
For information regarding how to access additional viewing cycles, please\
see your
Owner’s Manual.
There are some areas where the system will not detect objects.
• When in the front or the rear view display, an object
below the bumper or on the ground may not be
detected
2.
• When in the bird’s-eye view, a tall object near the seams of the
camera detecting areas
3 will not appear in the monitor.
• The distance between objects viewed on the Around
View Monitor differs from the actual distance.
Objects in the bird’ s-eye view will appear further
than the actual distance.
MOVING OBJECT DETECTION (MOD)
The MOD system helps inform the driver of
moving objects in the Around View Monitor.
The system will operate when the shift lever is in the P (PARK), N (NEUTRAL), or
R (REVERSE) position and the vehicle is driven at speeds of approximately 5 mph
(8 km/h) or less.
If the MOD system detects moving objects, a yellow frame will be displayed
on the camera image and a chime will sound.
When the following is displayed:
• Blue MOD icon 4; the system is active.
• Gray MOD icon; the system is not active.
• No MOD icon; the system is off. The indicator
will also be off if all of the warning systems are
deactivated using the Settings menu.
The MOD system will not operate if the liftgate is open.
For more information, refer to the “Display screen, heater, air conditioner, audio and phone systems (section 4)”
of your Owner’s Manual.
3
2
Rear view & bird’s-eye view
Press
PressRear view & front-side view
When the shift lever is in the R (REVERSE) position and the CAMERA button 1 is
pressed, the following views will display in order:
4
To view detailed instructional videos regarding these and other features, please go to www.nissanownersinfo.mobi.
Page 9 of 36
7
ESSE NTIAL I N FOR MATION
TIRE PRESSURE MONITORING SYSTEM (TPMS)
WITH EASY FILL TIRE ALERT
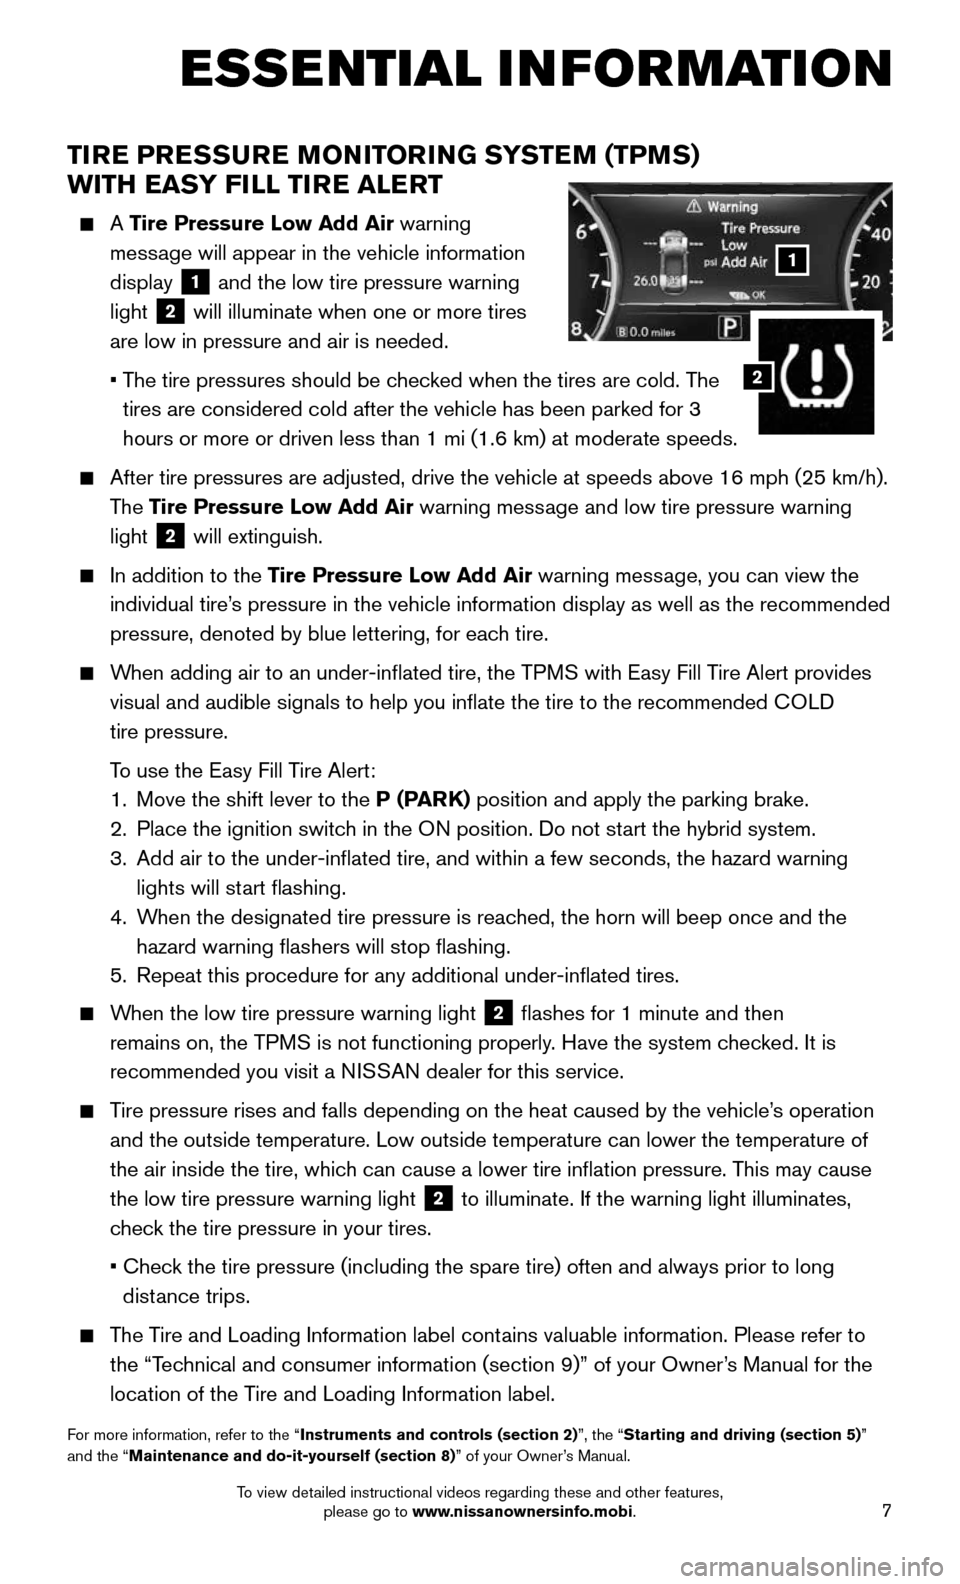
A Tire Pressure Low Add Air warning
message will appear in the vehicle information
display
1 and the low tire pressure warning
light
2 will illuminate when one or more tires
are low in pressure and air is needed.
• The tire pressures should be checked when the tires are cold. The
tires are considered cold after the vehicle has been parked for 3
hours or more or driven less than 1 mi (1.6 km) at moderate speeds.
After tire pressures are adjusted, drive the vehicle at speeds above 16 \
mph (25 km/h).
The Tire Pressure Low Add Air warning message and low tire pressure warning
light
2 will extinguish.
In addition to the Tire Pressure Low Add Air warning message, you can view the
individual tire’s pressure in the vehicle information display as well as the recommended\
pressure, denoted by blue lettering, for each tire.
When adding air to an under-inflated tire, the TPMS with Easy Fill Tire Alert provides
visual and audible signals to help you inflate the tire to the recomme\
nded COLD
tire pressure.
To use the Easy Fill Tire Alert:
1. Move the shift lever to the P (PARK) position and apply the parking brake.
2. Place the ignition switc h in the ON position. Do not start the hybrid system.
3. Add air to the under-inflated tire, and within a few seconds, the haza\
rd warning
lights will start flashing.
4. When the designated tire pressure is reached, the horn will beep once and the
hazard warning flashers will stop flashing.
5. Repeat this procedure for any additional under-inflated tires.
When the low tire pressure warning light 2 flashes for 1 minute and then
remains on, the TPMS is not functioning properly. Have the system checked. It is
recommended you visit a NISSAN dealer for this service.
Tire pressure rises and falls depending on the heat caused by the vehicle\
’s operation
and the outside temperature. Low outside temperature can lower the tempe\
rature of
the air inside the tire, which can cause a lower tire inflation pressure. This may cause
the low tire pressure warning light
2 to illuminate. If the warning light illuminates,
check the tire pressure in your tires.
• Check the tire pressure (including the spare tire) often and always prior \
to long
distance trips.
The Tire and Loading Information label contains valuable information. Please refer to
the “Technical and consumer information (section 9)” of your Owner’s Manual for the
location of the Tire and Loading Information label.
For more information, refer to the “Instruments and controls (section 2)”, the “Starting and driving (section 5)”
and the “Maintenance and do-it-yourself (section 8)” of your Owner’s Manual.
1
2
To view detailed instructional videos regarding these and other features, please go to www.nissanownersinfo.mobi.
Page 17 of 36
15
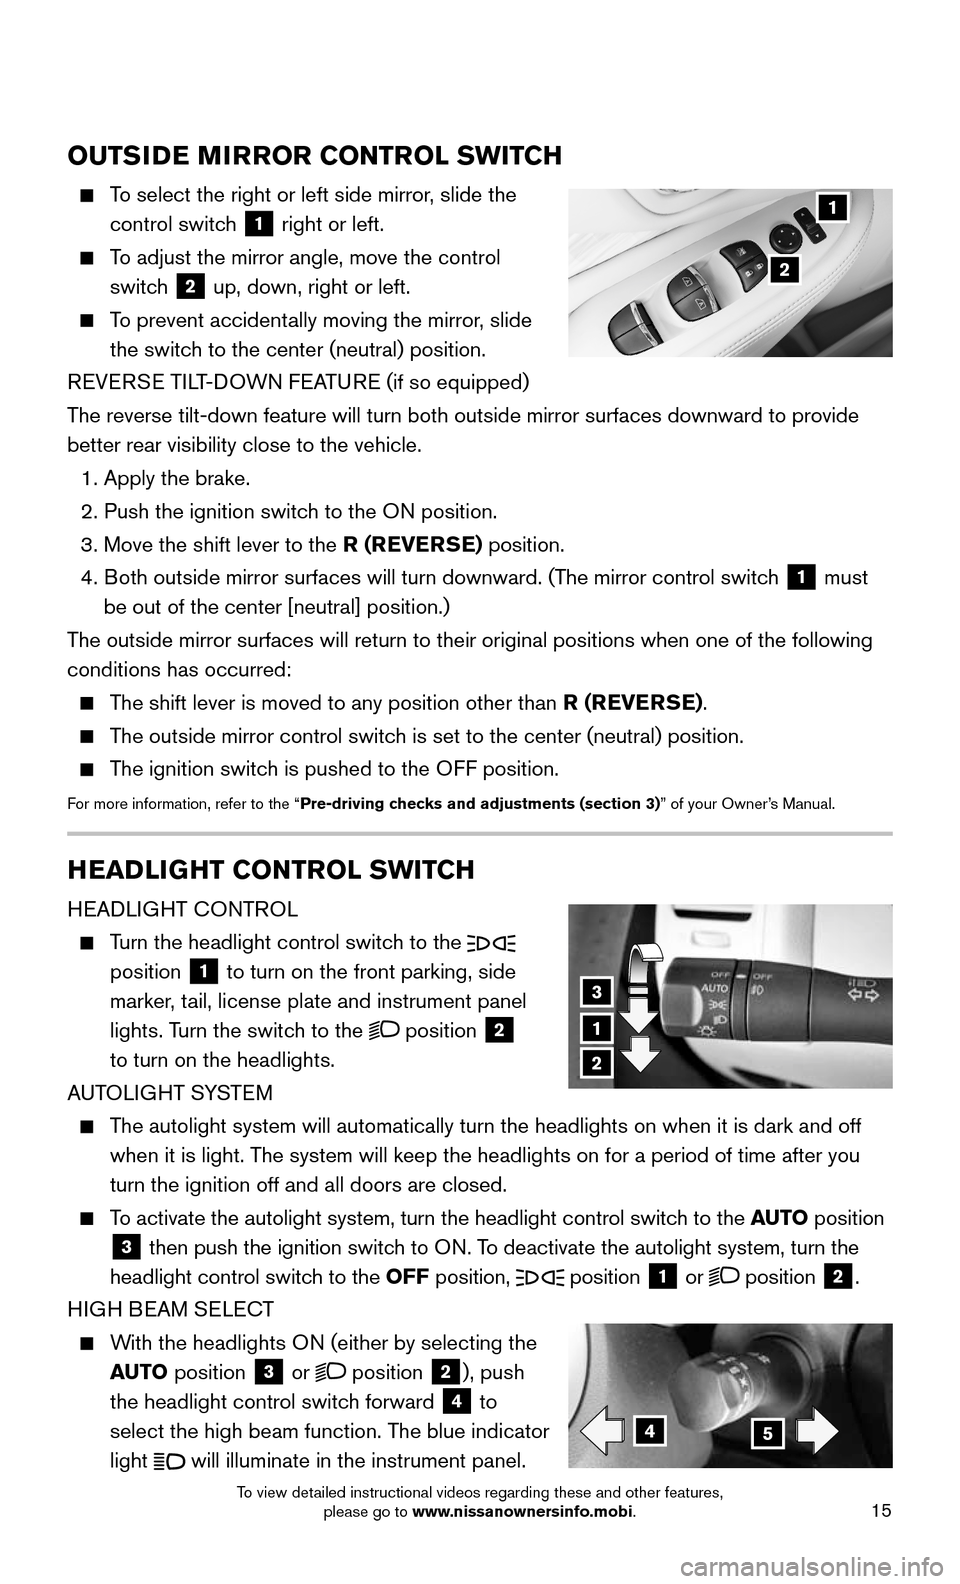
HEADLIGHT CONTROL SWITCH
HEADLIGHT CONTROL
Turn the headlight control switch to the
position
1 to turn on the front parking, side
marker, tail, license plate and instrument panel
lights. Turn the switch to the
position 2
to turn on the headlights.
AUTOLIGHT SYSTEM
The autolight system will automatically turn the headlights on when it is\
dark and off
when it is light. The system will keep the headlights on for a period of time after you
turn the ignition off and all doors are closed.
To activate the autolight system, turn the headlight control switch to the AUTO position
3 then push the ignition switch to ON. To deactivate the autolight system, turn the
headlight control switch to the OFF position,
position 1 or position 2.
HIGH BEAM SELECT
With the headlights ON (either by selecting the
AUTO position
3 or position 2), push
the headlight control switch forward
4 to
select the high beam function. The blue indicator
light
will illuminate in the instrument panel.
1
3
2
45
OUTSIDE MIRROR CONTROL SWITCH
To select the right or left side mirror, slide the
control switch 1 right or left.
To adjust the mirror angle, move the control
switch 2 up, down, right or left.
To prevent accidentally moving the mirror, slide
the switch to the center (neutral) position.
REVERSE TILT-DOWN FEATURE (if so equipped)
The reverse tilt-down feature will turn both outside mirror surfaces down\
ward to provide
better rear visibility close to the vehicle.
1. Apply the brake.
2. Push the ignition switc h to the ON position.
3. Move the shift lever to the R (REVERSE) position.
4. Both outside mirror surfaces will turn downward. (The mirror control switch 1 must
be out of the center [neutral] position.)
The outside mirror surfaces will return to their original positions when \
one of the following
conditions has occurred:
The shift lever is moved to any position other than R (REVERSE).
The outside mirror control switch is set to the center (neutral) position.
The ignition switch is pushed to the OFF position.
For more information, refer to the “Pre-driving checks and adjustments (section 3)” of your Owner’s Manual.
1
2
To view detailed instructional videos regarding these and other features, please go to www.nissanownersinfo.mobi.
Page 18 of 36
16
FIRST DRIVE FEATURES
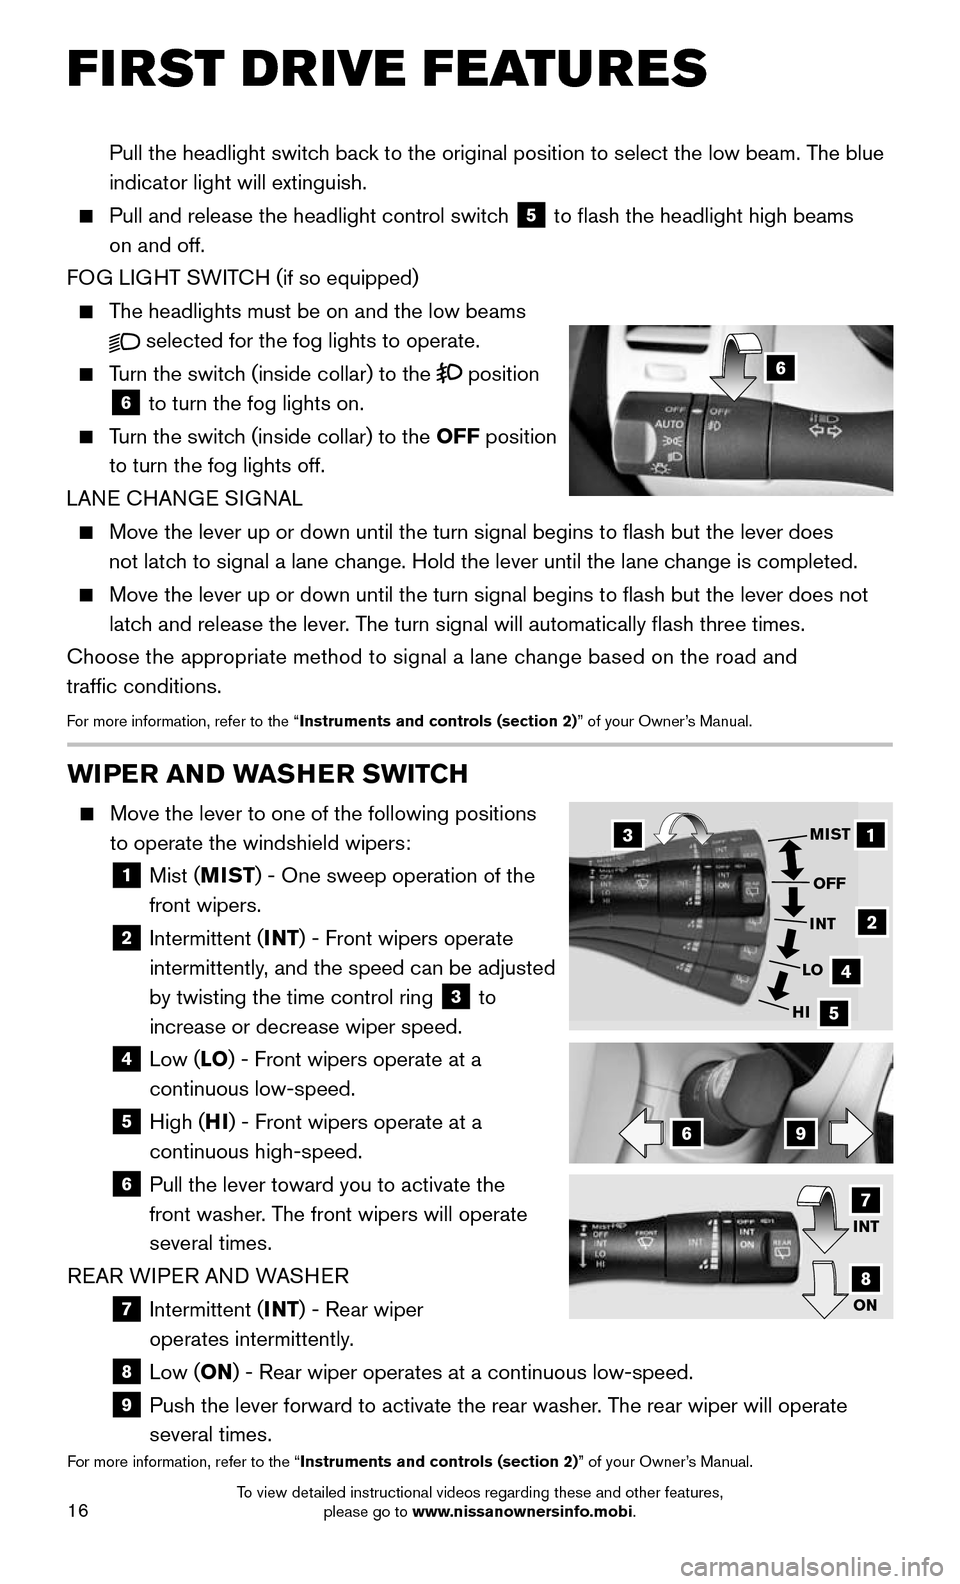
WIPER AND WASHER SWITCH
Move the lever to one of the following positions
to operate the windshield wipers:
1 Mist (MIST) - One sweep operation of the
front wipers.
2 Intermittent (INT) - Front wipers operate
intermittently, and the speed can be adjusted
by twisting the time control ring
3 to
increase or decrease wiper speed.
4 Low (LO ) - Front wipers operate at a
continuous low-speed.
5 High (HI ) - Front wipers operate at a
continuous high-speed.
6 Pull the lever toward you to activate the
front washer. The front wipers will operate
several times.
REAR WIPER AND WASHER
7 Intermittent (INT) - Rear wiper
operates intermittently.
8 Low (ON) - Rear wiper operates at a continuous low-speed.
9 Push the lever forward to activate the rear washer . The rear wiper will operate
several times.For more information, refer to the “Instruments and controls (section 2)” of your Owner’s Manual.
1
2
4
5
MIST
OFF
INT
LO
HI
69
3
INT
ON
7
8
Pull the headlight switch back to the original position to select the low beam. The blue
indicator light will extinguish.
Pull and release the headlight control switc h 5 to flash the headlight high beams
on and off.
FOG LIGHT SWITCH (if so equipped)
The headlights must be on and the low beams
selected for the fog lights to operate.
Turn the switch (inside collar) to the position
6 to turn the fog lights on.
Turn the switch (inside collar) to the OFF position
to turn the fog lights off.
LANE CHANGE SIGNAL
Move the lever up or down until the turn signal begins to flash but th\
e lever does
not latch to signal a lane change. Hold the lever until the lane change is completed.
Move the lever up or down until the turn signal begins to flash but th\
e lever does not
latch and release the lever. The turn signal will automatically flash three times.
Choose the appropriate method to signal a lane change based on the road and
traffic conditions.
For more information, refer to the “Instruments and controls (section 2)” of your Owner’s Manual.
6
To view detailed instructional videos regarding these and other features, please go to www.nissanownersinfo.mobi.
Page 21 of 36
19
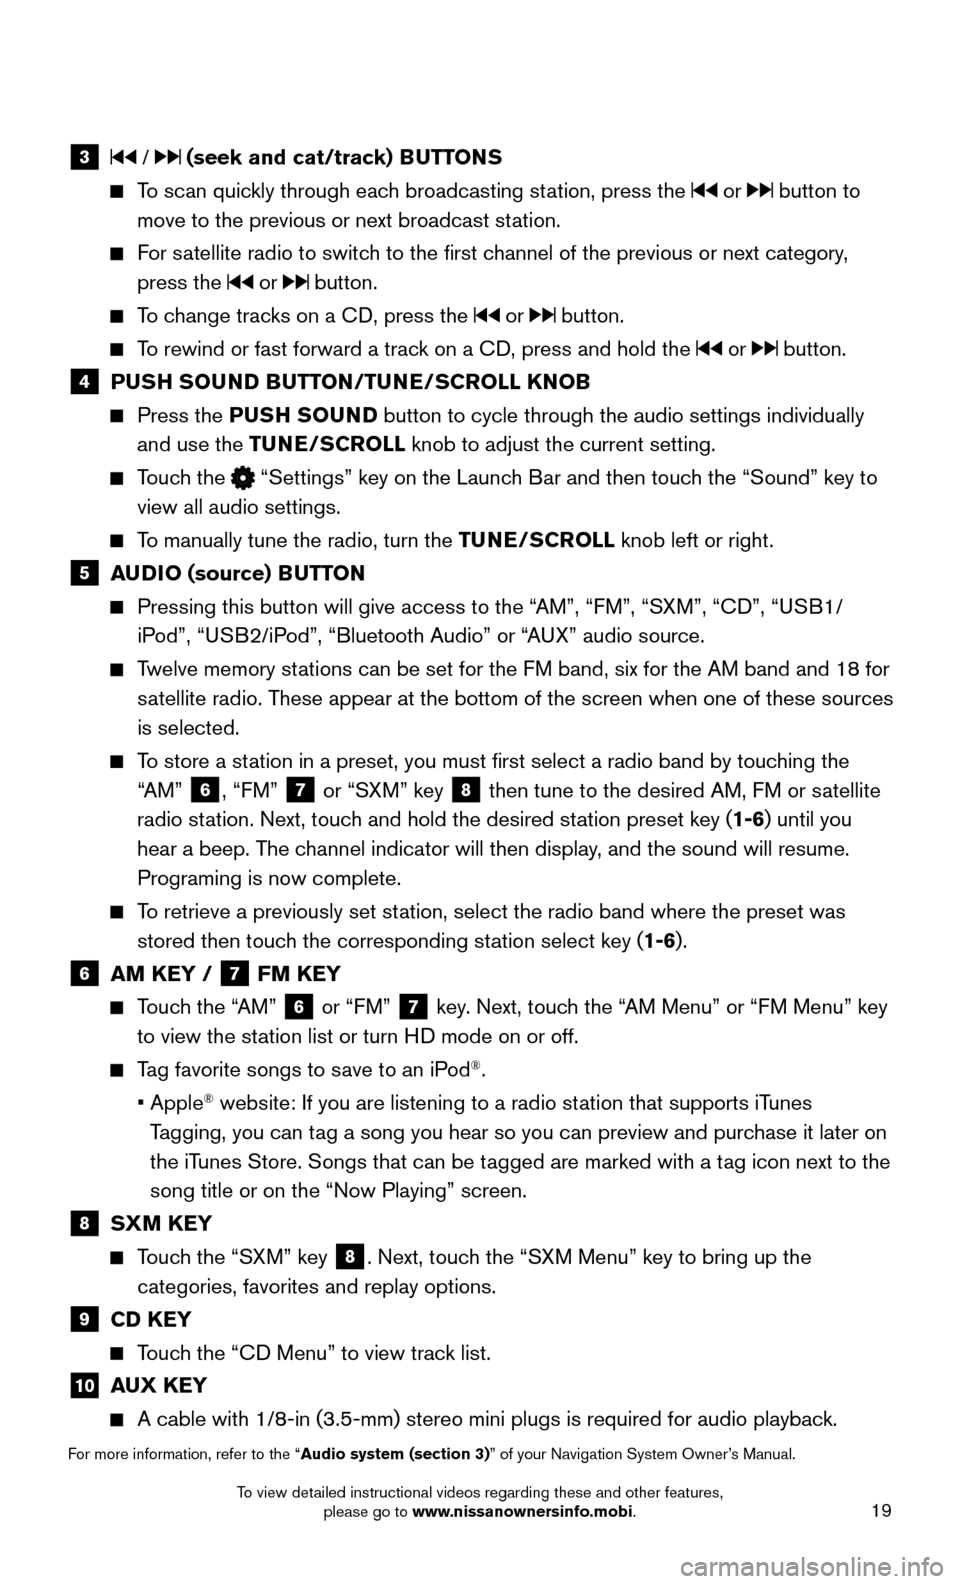
3 / (seek and cat/track) BUTTONS
To scan quickly through each broadcasting station, press the or button to
move to the previous or next broadcast station.
For satellite radio to switch to the first channel of the previous or next category,
press the or button.
To change tracks on a CD, press the or button.
To rewind or fast forward a track on a CD, press and hold the or button.
4 PUSH SOUND BUTTON/TUNE/SCROLL KNOB
Press the PUSH SOUND button to cycle through the audio settings individually
and use the TUNE/SCROLL knob to adjust the current setting.
Touch the “Settings” key on the Launch Bar and then touch the “Sound” key to
view all audio settings.
To manually tune the radio, turn the TUNE/SCROLL knob left or right.
5 AUDIO (source) BUTTON
Pressing this button will give access to the “ AM”, “FM”, “SXM”, “CD”, “USB1/
iPod”, “USB2/iPod”, “Bluetooth Audio” or “AUX” audio source.
Twelve memory stations can be set for the FM band, six for the AM band and 18 for
satellite radio. These appear at the bottom of the screen when one of these sources
is selected.
To store a station in a preset, you must first select a radio band by touching the
“AM” 6, “FM” 7 or “SXM” key 8 then tune to the desired AM, FM or satellite
radio station. Next, touch and hold the desired station preset key (1-6) until you
hear a beep. The channel indicator will then display, and the sound will resume.
Programing is now complete.
To retrieve a previously set station, select the radio band where the preset was
stored then touch the corresponding station select key (1-6).
6 AM KEY / 7 FM KEY
Touch the “AM” 6 or “FM” 7 key. Next, touch the “AM Menu” or “FM Menu” key
to view the station list or turn HD mode on or off.
Tag favorite songs to save to an iPod®.
• Apple® website: If you are listening to a radio station that supports iTunes
Tagging, you can tag a song you hear so you can preview and purchase it later on
the iTunes Store. Songs that can be tagged are marked with a tag icon next to the
song title or on the “Now Playing” screen.
8 SXM KEY
Touch the “SXM” key 8. Next, touch the “SXM Menu” key to bring up the
categories, favorites and replay options.
9 CD KEY
Touch the “CD Menu” to view track list.
10 AUX KEY
A cable with 1/8-in (3.5-mm) stereo mini plugs is required for audio p\
laybac k.
For more information, refer to the “Audio system (section 3)” of your Navigation System Owner’s Manual.
To view detailed instructional videos regarding these and other features, please go to www.nissanownersinfo.mobi.
Page 25 of 36
23
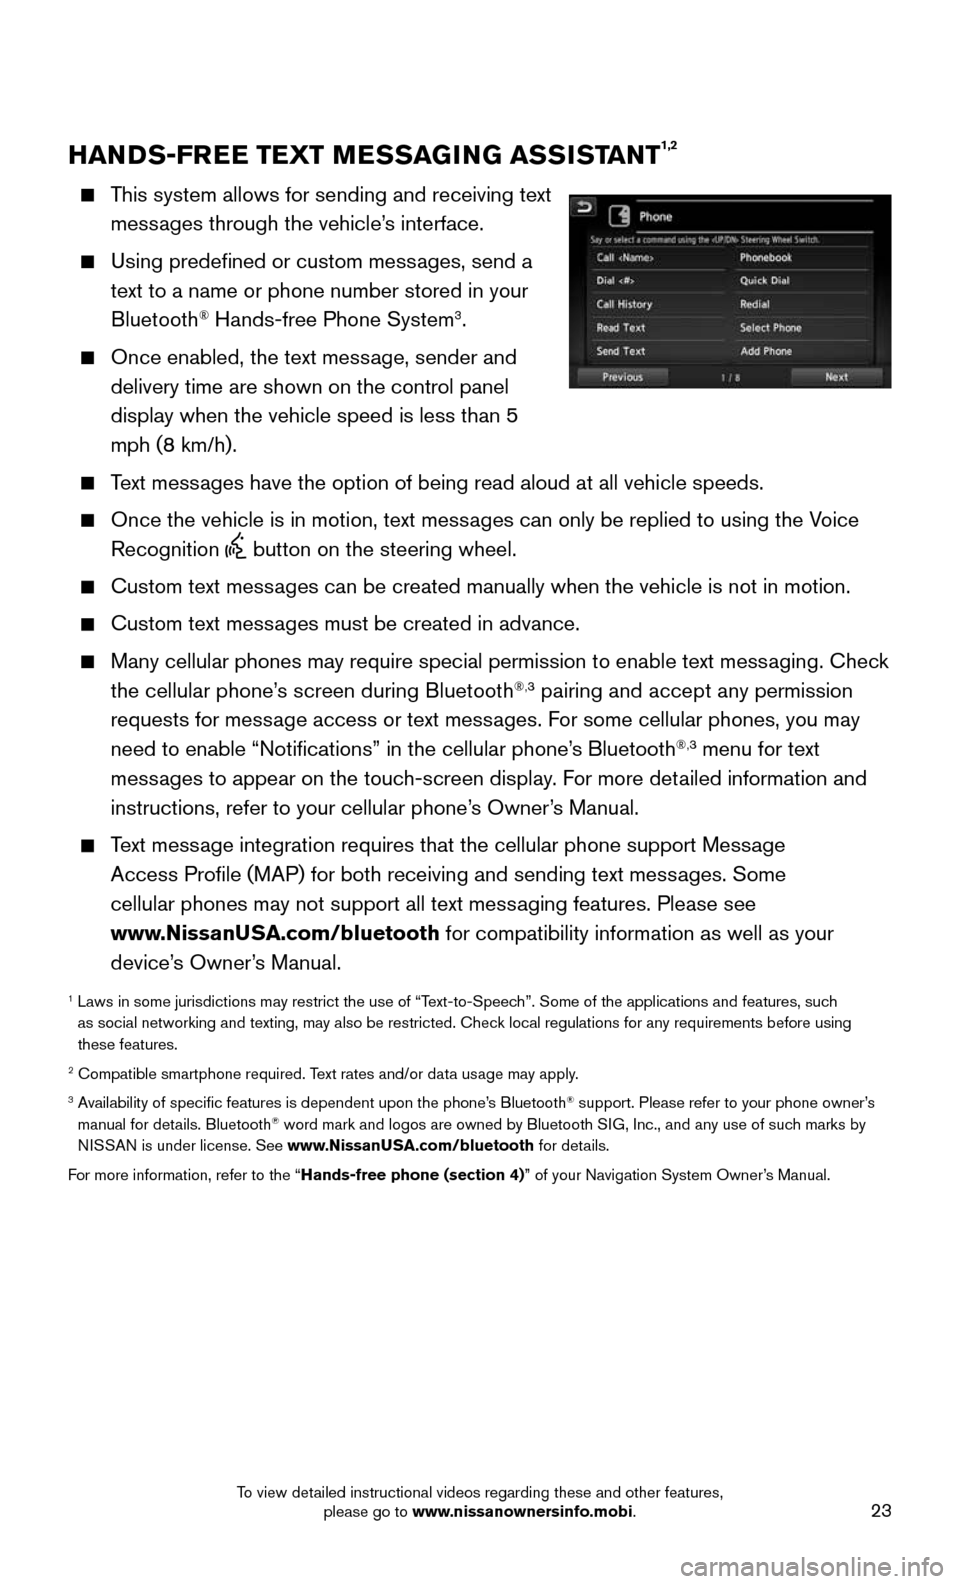
HANDS-FREE TEXT MESSAGING ASSISTANT1,2
This system allows for sending and receiving text
messages through the vehicle’s interface.
Using predefined or custom messages, send a
text to a name or phone number stored in your
Bluetooth® Hands-free Phone System3.
Once enabled, the text message, sender and
delivery time are shown on the control panel
display when the vehicle speed is less than 5
mph (8 km/h).
Text messages have the option of being read aloud at all vehicle speeds.
Once the vehicle is in motion, text mess ages can only be replied to using the Voice
Recognition button on the steering wheel.
Custom text messages can be created manually when the vehicle is not in motion.
Custom text messages must be created in advance.
Many cellular phones may require special permission to enable text mess aging. Check
the cellular phone’s screen during Bluetooth®,3 pairing and accept any permission
requests for message access or text messages. For some cellular phones, you may
need to enable “Notifications” in the cellular phone’s Bluetooth
®,3 menu for text
messages to appear on the touch-screen display. For more detailed information and
instructions, refer to your cellular phone’s Owner’s Manual.
Text message integration requires that the cellular phone support Message
Access Profile (MAP) for both receiving and sending text messages. Some
cellular phones may not support all text messaging features. Please see
www.NissanUSA.com/bluetooth for compatibility information as well as your
device’s Owner’s Manual.
1 Laws in some jurisdictions may restrict the use of “T ext-to-Speech”. Some of the applications and features, such
as social networking and texting, may also be restricted. Check local regulations for any requirements before using
these features.
2 Compatible smartphone required. Text rates and/or data usage may apply.3 Availability of specific features is dependent upon the phone’s Bluetooth® support. Please refer to your phone owner’s
manual for details. Bluetooth® word mark and logos are owned by Bluetooth SIG, Inc., and any use of such marks by
NISSAN is under license. See www.NissanUSA.com/bluetooth for details.
For more information, refer to the “Hands-free phone (section 4)” of your Navigation System Owner’s Manual.
To view detailed instructional videos regarding these and other features, please go to www.nissanownersinfo.mobi.