Page 9 of 401
1. Top tether strap anchor (P. 1-21)
2. Rear head restraints/headrests (P. 1-6)
3. Rear seat belts (P. 1-11)
4. Roof-mounted curtain side-impact androllover supplemental air bag (P. 1-40)
5. Front seat-mounted side-impact
supplemental air bags (P. 1-40)
6. Front head restraints/headrests (P. 1-6)
7. Front seat belt with pretensioner and
shoulder height adjuster (P. 1-11, 1-40)
8. Supplemental front-impact air bags
(P. 1-40)
9. Door pressure sensor (passenger side
shown, driver’s side similar) (P. 1-40)
10. Seats (P. 1-2)
11. Occupant classification sensor
(weight sensor) (P.1-40)
12. LATCH (Lower Anchors and Tethers for
CHildren) system (P. 1-21)
Refer to the page number indicated in pa-
rentheses for operating details.
LII2293
AIR BAGS, SEAT BELTS AND CHILD
RESTRAINTS
0-2Illustrated table of contents
Page 18 of 401

1 Safety—Seats, seat belts and
supplemental restraint system
Seats............................................1-2
Front power seat adjustment .....................1-3
Folding rear seat ...............................1-5
Center armrest .................................1-6
Head restraints/headrests ..........................1-6
Adjustable head restraint/headrest
components ...................................1-7
Non-adjustable head restraint/headrest
components ...................................1-8
Remove .......................................1-8
Install .........................................1-9
Adjust .........................................1-9
Seat belts ....................................... 1-11
Precautions on seat belt usage ..................1-11
Seat belt warning light ......................... 1-14
Pregnant women .............................. 1-14
Injured persons ................................ 1-14
Three-point type seat belt with retractor ..........1-14
Seat belt extenders ............................ 1-17
Seat belt maintenance ......................... 1-18Child safety
...................................... 1-18
Infants ........................................ 1-19
Small children ................................. 1-19
Larger children ................................ 1-19
Child restraints ................................... 1-21
Precautions on child restraints ..................1-21
LATCH (Lower Anchors and Tethers for
CHildren) system .............................. 1-23
Rear-facing child restraint installation using
LATCH....................................... 1-25
Rear-facing child restraint installation using
the seat belts ................................. 1-27
Forward-facing child restraint installation
using LATCH .................................. 1-30
Forward-facing child restraint installation
using the seat belts ............................ 1-33
Booster seats ................................. 1-37
Supplemental Restraint System (SRS) ..............1-40
Precautions on SRS ........................... 1-40
Supplemental air bag warning labels .............1-57
Supplemental air bag warning light ..............1-57
Page 23 of 401

To fold down the driver side of the rear seat, open
the trunk and pull on the strap
�1.
The rear seats can be locked using the mechani-
cal key to prevent unauthorized access. For ad-
ditional information on keys, refer to “Keys” in the
“Pre-driving checks and adjustments” section of
this manual.CENTER ARMREST
Pull the armrest down until it rests on the seat
cushion.
WARNING
Head restraints/headrests supplement
the other vehicle safety systems. They may
provide additional protection against in-
jury in certain rear end collisions. Adjust-
able head restraints/headrests must be
adjusted properly, as specified in this sec-
tion. Check the adjustment after someone
else uses the seat. Do not attach anything
to the head restraint/headrest stalks or
remove the head restraint/headrest. Do
not use the seat if the head
restraint/headrest has been removed. If
the head restraint/headrest was removed,
reinstall and properly adjust the head
restraint/headrest before an occupant
uses the seating position. Failure to fol-
low these instructions can reduce the ef-
fectiveness of the head
restraints/headrests. This may increase
the risk of serious injury or death in a
collision.
LRS2168LRS2694
HEAD RESTRAINTS/HEADRESTS
1-6Safety—Seats, seat belts and supplemental restraint system
Page 24 of 401

The illustration shows the seating positions
equipped with head restraints/headrests.
�Indicates the seating position is equipped with
a head restraint.
� Indicates the seating position is equipped with
a headrest.
+ Indicates the seating position is not equipped
with a head restraint or headrest (if applicable) .
● Your vehicle is equipped with a head
restraint/headrest that may be integrated,
adjustable or non-adjustable. ●
Adjustable head restraints/headrests have
multiple notches along the stalk(s) to lock
them in a desired adjustment position.
● The non-adjustable head
restraints/headrests have a single locking
notch to secure them to the seat frame.
● Proper Adjustment:
– For the adjustable type, align the head restraint/headrest so the center of your
ear is approximately level with the center
of the head restraint/headrest.
– If your ear position is still higher than the recommended alignment, place the head
restraint/headrest at the highest position.
● If the head restraint/headrest has been re-
moved, ensure that it is reinstalled and
locked in place before riding in that desig-
nated seating position.ADJUSTABLE HEAD RESTRAINT/
HEADREST COMPONENTS
1. Removable head restraint/headrest
2. Multiple notches
3. Lock knob
4. Stalks
LRS2695LRS2300
Safety—Seats, seat belts and supplemental restraint system1-7
Page 25 of 401
NON-ADJUSTABLE HEAD
RESTRAINT/HEADREST
COMPONENTS
1. Removable head restraint/headrest
2. Single notch
3. Lock knob
4. Stalks
REMOVE
Use the following procedure to remove the head
restraint/headrest:1. Pull the head restraint/headrest up to the highest position.
2. Push and hold the lock knob.
3. Remove the head restraint/headrest from the seat.
4. Store the head restraint/headrest properly in a secure place so it is not loose in the
vehicle. 5. Reinstall and properly adjust the head
restraint/headrest before an occupant uses
the seating position.
LRS2299LRS2302
1-8Safety—Seats, seat belts and supplemental restraint system
Page 26 of 401
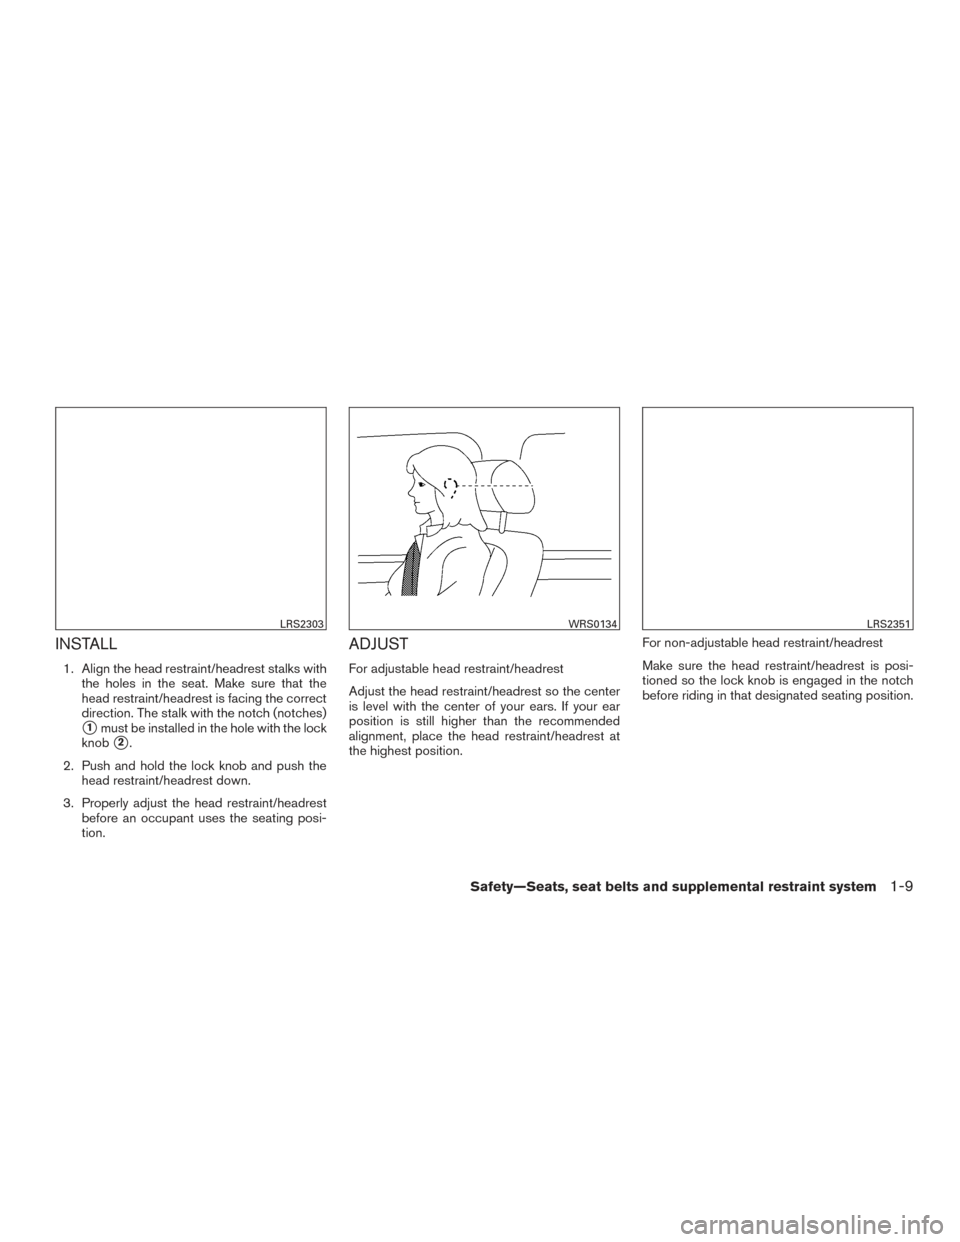
INSTALL
1. Align the head restraint/headrest stalks withthe holes in the seat. Make sure that the
head restraint/headrest is facing the correct
direction. The stalk with the notch (notches)
�1must be installed in the hole with the lock
knob
�2.
2. Push and hold the lock knob and push the head restraint/headrest down.
3. Properly adjust the head restraint/headrest before an occupant uses the seating posi-
tion.
ADJUST
For adjustable head restraint/headrest
Adjust the head restraint/headrest so the center
is level with the center of your ears. If your ear
position is still higher than the recommended
alignment, place the head restraint/headrest at
the highest position. For non-adjustable head restraint/headrest
Make sure the head restraint/headrest is posi-
tioned so the lock knob is engaged in the notch
before riding in that designated seating position.
LRS2303WRS0134LRS2351
Safety—Seats, seat belts and supplemental restraint system1-9
Page 27 of 401
Raise
To raise the head restraint/headrest, pull it up.
Make sure the head restraint/headrest is posi-
tioned so the lock knob is engaged in the notch
before riding in that designated seating position.
Lower
To lower, push and hold the lock knob and push
the head restraint/headrest down.
Make sure the head restraint/headrest is posi-
tioned so the lock knob is engaged in the notch
before riding in that designated seating position.
LRS2305LRS2306
1-10Safety—Seats, seat belts and supplemental restraint system
Page 37 of 401

Once a child outgrows the height or weight limit
of the harness-equipped forward-facing child re-
straint, NISSAN recommends that the child be
placed in a commercially available booster seat to
obtain proper seat belt fit. For a seat belt to fit
properly, the booster seat should raise the child
so that the shoulder belt is properly positioned
across the chest and the top, middle portion of
the shoulder. The shoulder belt should not cross
the neck or face and should not fall off the shoul-
der. The lap belt should lie snugly across the
lower hips or upper thighs, not the abdomen. A
booster seat can only be used in seating posi-
tions that have a three-point type seat belt. The
booster seat should fit the vehicle seat and have
a label certifying that it complies with Federal
Motor Vehicle Safety Standards or Canadian Mo-
tor Vehicle Safety Standards.
A booster seat should be used until the child can
pass the seat belt fit test below:● Are the child’s back and hips against the
vehicle seatback?
● Is the child able to sit without slouching?
● Do the child’s knees bend easily over the
front edge of the seat with feet flat on the
floor? ●
Can the child safely wear the seat belt (lap
belt low and snug across the hips and shoul-
der belt across mid-chest and shoulder)?
● Is the child able to use the properly adjusted
head restraint/headrest?
● Will the child be able to stay in position for
the entire ride?
If you answered no to any of these questions, the
child should remain in a booster seat using a
three-point type seat belt.
NOTE:
Laws in some communities may follow dif-
ferent guidelines. Check local and state
regulations to confirm your child is using the
correct restraint system before traveling.
LRS2690
1-20Safety—Seats, seat belts and supplemental restraint system

2. Rear head restraints/headrests (P. 1-6)
3. Rear seat belts (P. 1-11)
4. Roof-mounted curtain side-impact androllover supplemental air bag (P. 1-40)
5. Front sea")