2016 NISSAN LEAF steering
[x] Cancel search: steeringPage 2 of 35
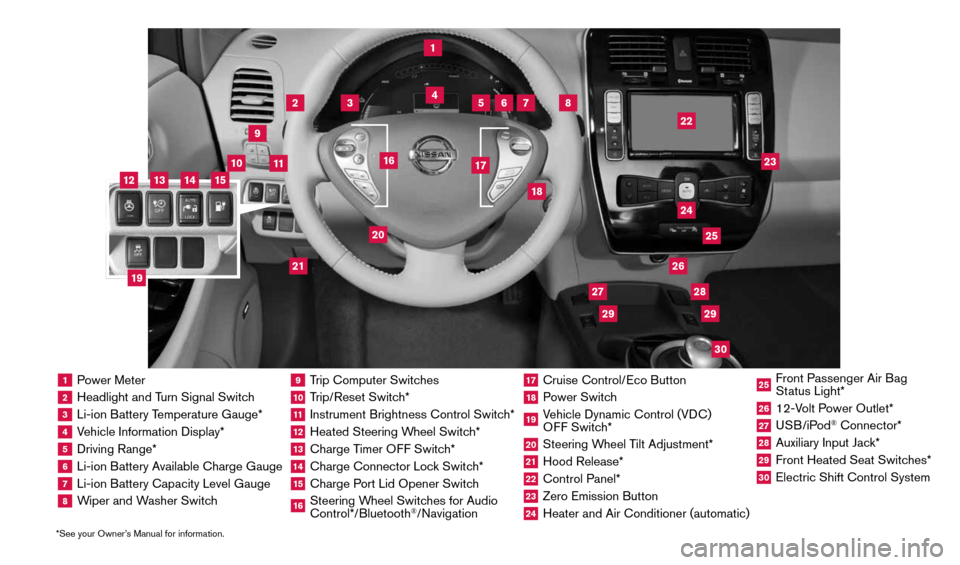
1 Power Meter2 Headlight and Turn Signal Switch3 Li-ion Battery Temperature Gauge*4 Vehicle Information Display*5 Driving Range*6 Li-ion Battery Available Charge Gauge7 Li-ion Battery Capacity Level Gauge8 Wiper and Washer Switch
9 Trip Computer Switches10 Trip/Reset Switch*11 Instrument Brightness Control Switch*12 Heated Steering Wheel Switch*13 Charge Timer OFF Switch*14 Charge Connector Lock Switch*15 Charge Port Lid Opener Switch16 Steering Wheel Switches for Audio
Control*/Bluetooth
®/Navigation
17 Cruise Control/Eco Button18 Power Switch19 Vehicle Dynamic Control (VDC)
OFF Switch*20 Steering Wheel Tilt Adjustment*21 Hood Release*22 Control Panel*23 Zero Emission Button24 Heater and Air Conditioner (automatic)
25 Front Passenger Air Bag
Status Light*26 12-Volt Power Outlet*27 USB/iPod
® Connector*
28 Auxiliary Input Jack*29 Front Heated Seat Switches*30 Electric Shift Control System
1
3
4
2
5
10
6
7
22
2528
26
2930
23
24
21
9
11
8
20
18
16
17
2729
12
14
19
13
15
*See your Owner’s Manual for information.
1996737_16a_Leaf_QRG_071015.indd 37/10/15 11:28 AM
Page 7 of 35
5
2
3
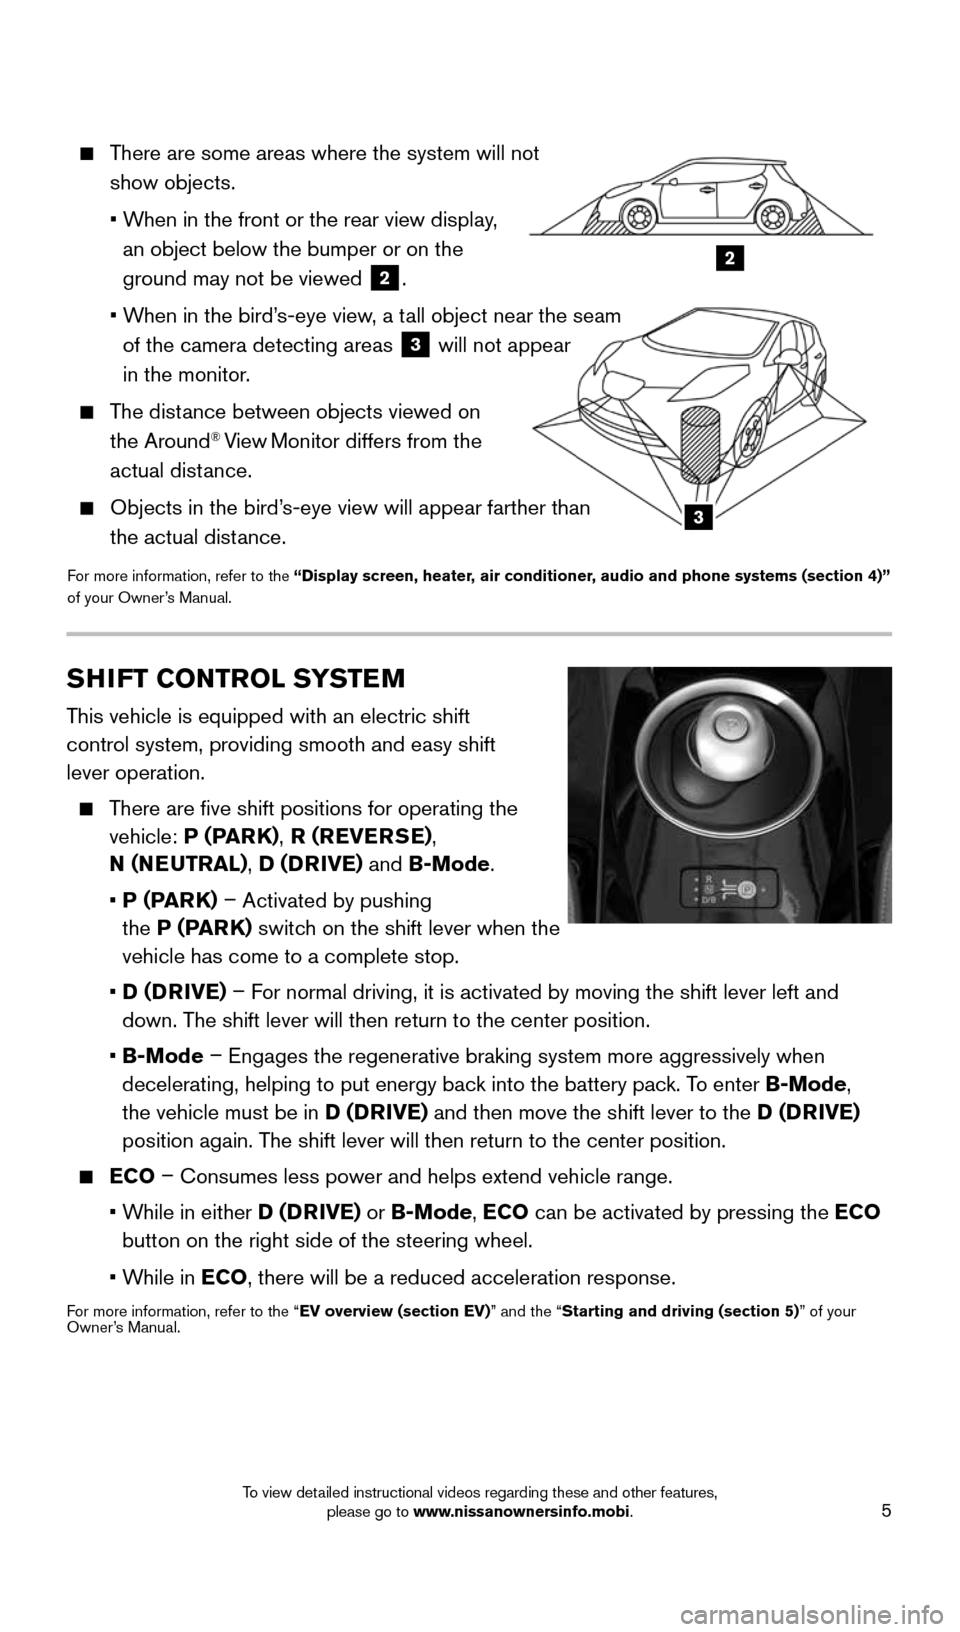
There are some areas where the system will not
show objects.
• When in the front or the rear view display,
an object below the bumper or on the
ground may not be viewed
2.
• When in the bird’s-eye view, a tall object near the seam
of the camera detecting areas
3 will not appear
in the monitor.
The distance between objects viewed on
the Around® View Monitor differs from the
actual distance.
Objects in the bird’s-eye view will appear farther than
the actual distance.
For more information, refer to the “Display screen, heater, air conditioner, audio and phone systems (section 4)”
of your Owner’s Manual.
SHIFT CONTROL SYSTEM
This vehicle is equipped with an electric shift
control system, providing smooth and easy shift
lever operation.
There are five shift positions for operating the
vehicle: P (PARK) , R (REVERSE) ,
N (NEUTRAL) , D (DRIVE) and B-Mode.
• P (PARK) – Activated by pushing
the P (PARK) switch on the shift lever when the
vehicle has come to a complete stop.
• D (DRIVE) – For normal driving, it is activated by moving the shift lever left and
down. The shift lever will then return to the center position.
• B-Mode – Engages the regenerative braking system more aggressively when
decelerating, helping to put energy back into the battery pack. To enter B-Mode,
the vehicle must be in D (DRIVE) and then move the shift lever to the D (DRIVE)
position again. The shift lever will then return to the center position.
ECO – Consumes less power and helps extend vehicle range.
• While in either D (DRIVE) or B-Mode, ECO can be activated by pressing the ECO
button on the right side of the steering wheel.
• While in ECO, there will be a reduced acceleration response.
For more information, refer to the “EV overview (section EV)” and the “Starting and driving (section 5)” of your
Owner’s Manual.
1996737_16a_Leaf_QRG_071015.indd 57/10/15 11:28 AM
To view detailed instructional videos regarding these and other features, please go to www.nissanownersinfo.mobi.
Page 12 of 35
10
LI-ION BATTERY CHARGING
Before charging the Li-ion battery, see your Owner’s Manual for detailed warnings and
cautions when charging your battery.
There are three methods available to perform the charge operation: normal charge,
trickle charge and quick charge (if so equipped).
NORMAL CHARGE
Perform a normal charge using the charger installed in your home.
It takes approximately 4-7 hours for the 24 kW/h Li-ion battery and 5.5-9.5 hours for
the 30 kW/h Li-ion battery (if so equipped) to charge from empty to full with a 6.6 kW
charger (if so equipped).
To charge your vehicle:
• Place the power switch in the OFF position.
• Push the charge port lid opener switch located on the instrument panel to the left of
the steering wheel.
• Press the charge port tab and open the cap.
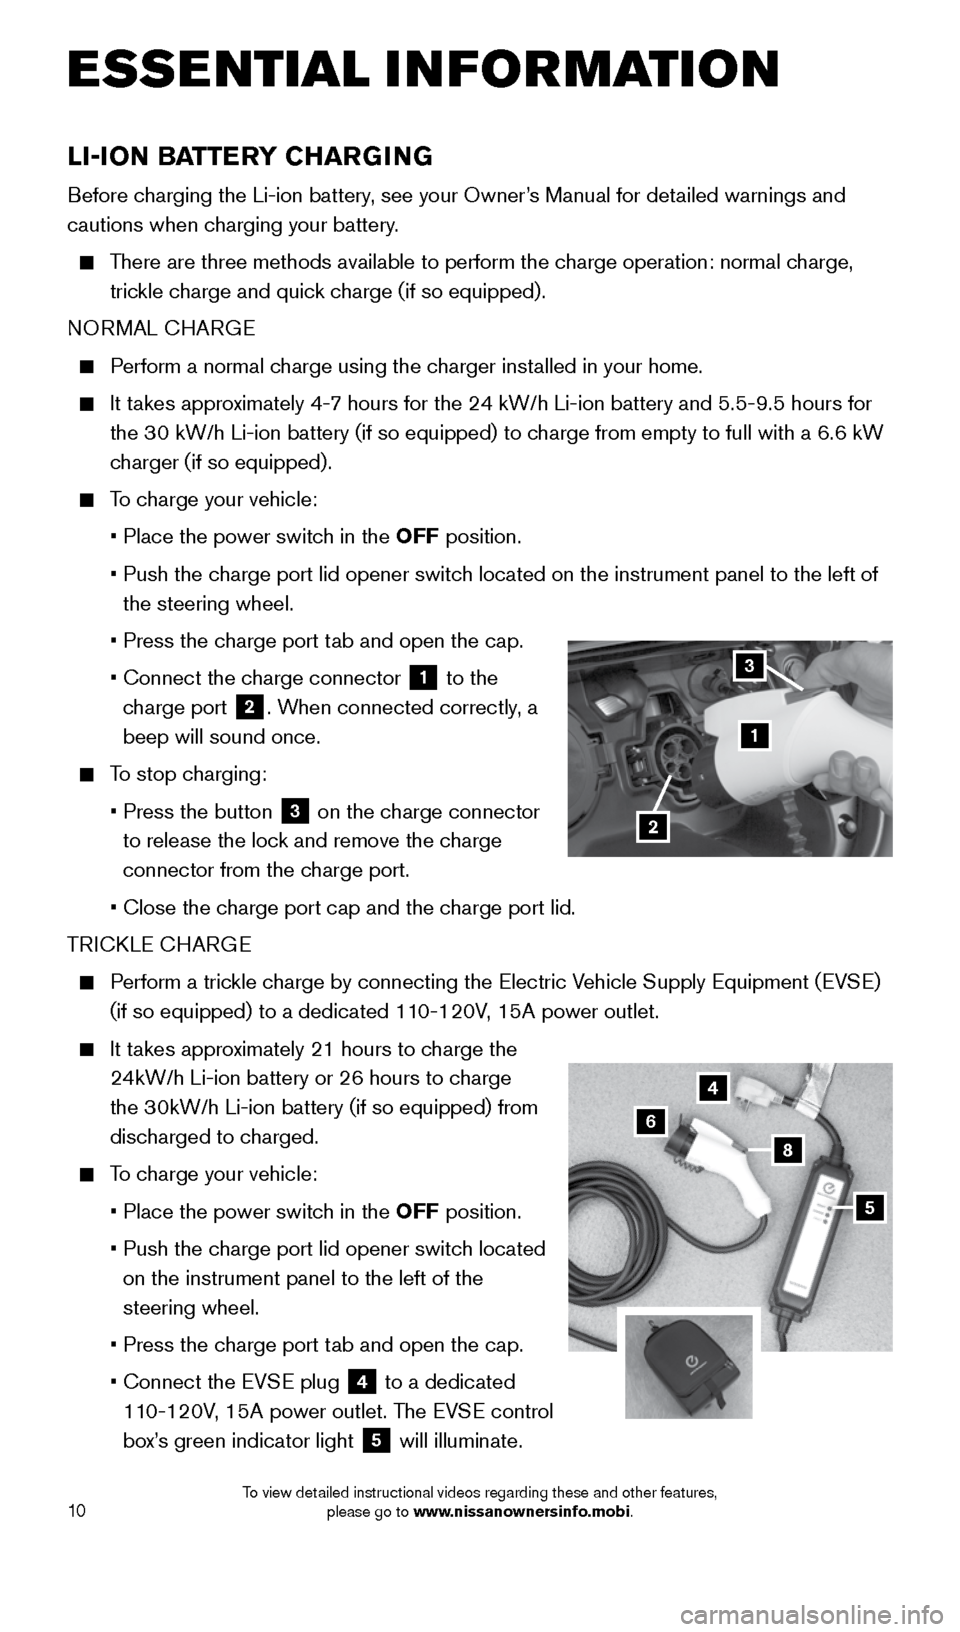
• Connect the charge connector
1 to the
charge port 2. When connected correctly, a
beep will sound once.
To stop charging:
• Press the button
3 on the charge connector
to release the lock and remove the charge
connector from the charge port.
• Close the charge port cap and the charge port lid.
TRICKLE CHARGE
Perform a trickle charge by connecting the Electric Vehicle Supply Equipment (EVSE)
(if so equipped) to a dedicated 110-120V, 15A power outlet.
It takes approximately 21 hours to charge the
24kW/h Li-ion battery or 26 hours to charge
the 30kW/h Li-ion battery (if so equipped) from
discharged to charged.
To charge your vehicle:
• Place the power switch in the OFF position.
• Push the charge port lid opener switch located
on the instrument panel to the left of the
steering wheel.
• Press the charge port tab and open the cap.
• Connect the EVSE plug
4 to a dedicated
110-120V, 15A power outlet. The EVSE control
box’s green indicator light
5 will illuminate.
4
6
8
5
1
2
3
ESSE NTIAL I N FOR MATION
1996737_16a_Leaf_QRG_071015.indd 107/10/15 11:28 AM
To view detailed instructional videos regarding these and other features, please go to www.nissanownersinfo.mobi.
Page 13 of 35
11
• Remove the safety cap from the charge connector.
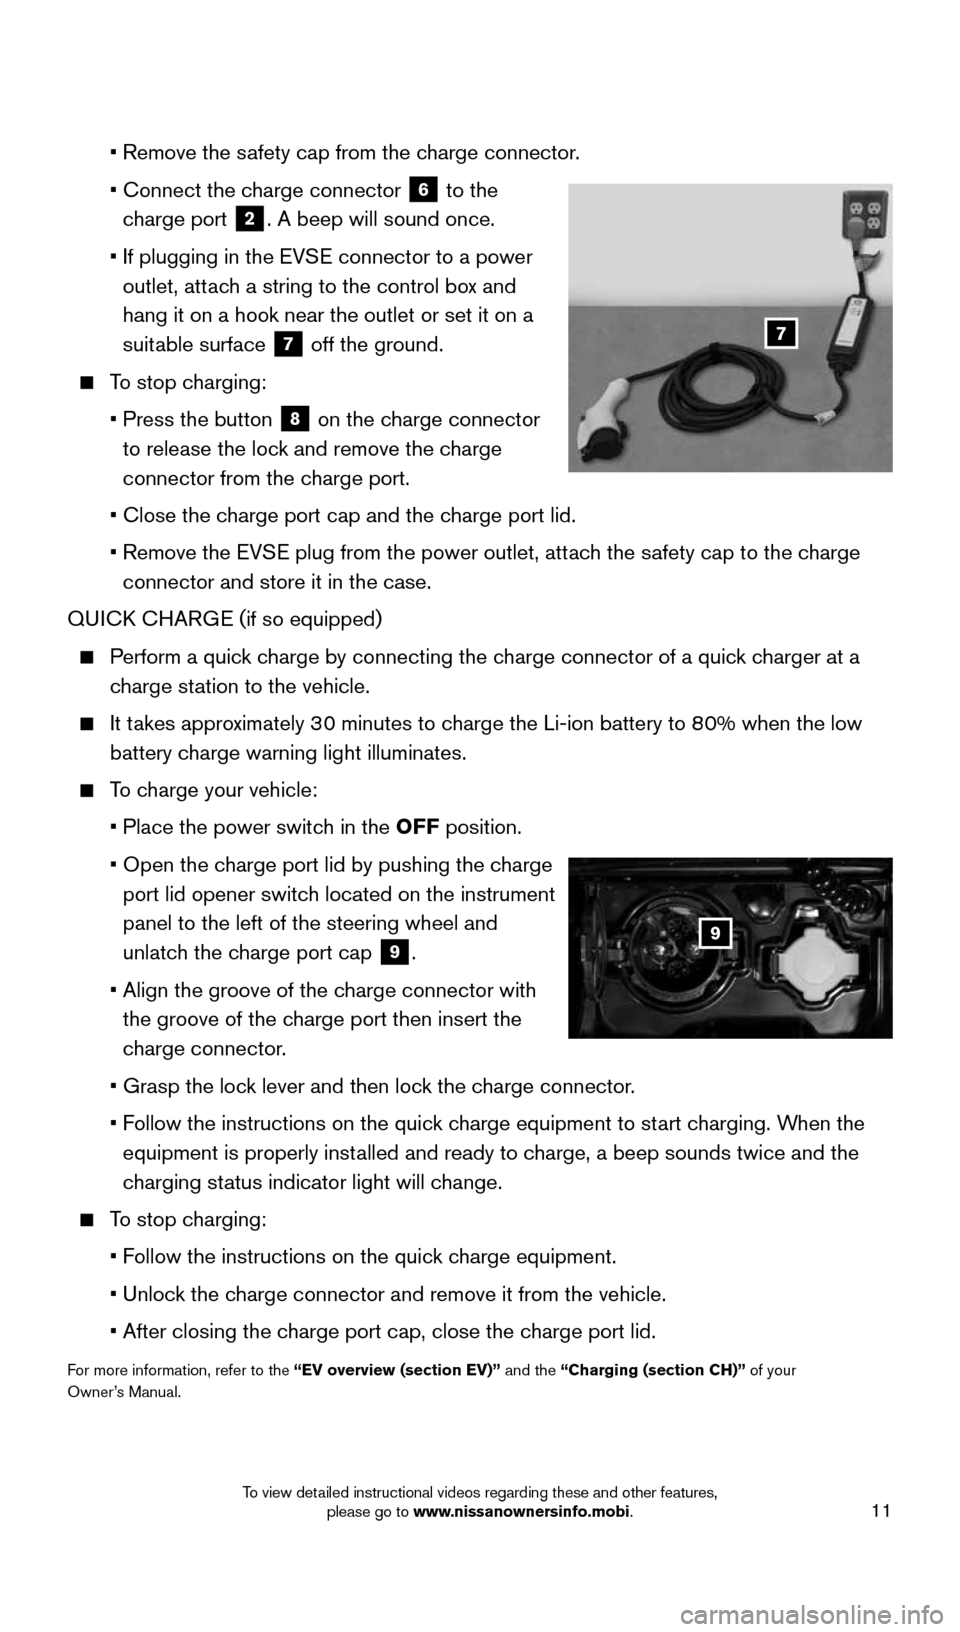
• Connect the charge connector
6 to the
charge port 2. A beep will sound once.
• If plugging in the EVSE connector to a power
outlet, attach a string to the control box
and
hang it on a hook near the outlet or set it on a
suitable surface
7 off the ground.
To stop charging:
• Press the button
8 on the charge connector
to release the lock and remove the charge
connector from the charge port.
• Close the charge port cap and the charge port lid.
• Remove the EVSE plug from the power outlet, attach the safety cap to the charge
connector and store it in the case.
QUICK CHARGE (if so equipped)
Perform a quick charge by connecting the charge connector of a quick charger at a
charge station to the vehicle.
It takes approximately 30 minutes to charge the Li-ion battery to 80% when the low
battery charge warning light illuminates.
To charge your vehicle:
• Place the power switch in the OFF position.
• Open the charge port lid by pushing the charge
port lid opener switch located on the instrument
panel to the left of the steering wheel and
unlatch the charge port cap
9.
• Align the groove of the charge connector with
the groove of the charge port then insert the
charge connector.
• Grasp the lock lever and then lock the charge connector.
• Follow the instructions on the quick charge equipment to start charging. When the
equipment is properly installed and ready to charge, a beep sounds twice and the
charging status indicator light will change.
To stop charging:
• Follow the instructions on the quick charge equipment.
• Unlock the charge connector and remove it from the vehicle.
• After closing the charge port cap, close the charge port lid.
For more information, refer to the “EV overview (section EV)” and the “Charging (section CH)” of your
Owner’s Manual.
9
7
1996737_16a_Leaf_QRG_071015.indd 117/10/15 11:28 AM
To view detailed instructional videos regarding these and other features, please go to www.nissanownersinfo.mobi.
Page 26 of 35

24
SYSTEM GUIDE
Once enabled, the text message, sender and delivery time are shown on the control
panel display when the vehicle speed is less than 5 mph (8km/h).
Text messages have the option of being read aloud at all speeds.
Once the vehicle is in motion, text messages can only be replied to using the Voice
Recognition
button on the steering wheel.
Text messages can be created manually when the vehicle is not in motion.
Custom text messages must be created in advance.
Many cellular phones may require special permission to enable text messaging. Check
the cellular phone’s screen during Bluetooth® pairing. For some cellular phones, you
may need to enable “Notifications” in the cellular phone’s Bluetooth® menu for text
messages to appear on the touch-screen display. For more detailed information and
instructions, refer to your cellular phone’s Owner’s Manual.
Text message integration requires that the cellular phone support Message
Access Profile (MAP) for both receiving and sending text messages. Some
cellular phones may not support all text messaging features. Please see
www.NissanUSA.com/bluetooth for compatibility information as well as your
device’s Owner’s Manual.
For more information, refer to the “Hands-Free Phone (section 7)” of your Navigation System Owner’s Manual.
NissanConnectSM MOBILE APPS ( if so equipped)
Press the MENU button on the control panel, touch the Info key on the Launch Bar
and then touch the NissanConnect Mobile Apps key.
Integrates popular smartphone apps and services into your vehicle.
The NissanConnect Mobile Apps companion app must be downloaded to your
smartphone, and you must be enrolled in a NissanConnect account.
FOR SYSTEM WITH NAVIGATION
• iPhone
®: Please connect via USB when using an iPhone® with NissanConnect
Mobile Apps.
• Android
®: Please connect via Bluetooth® when using an Android® device with
NissanConnect Mobile Apps.
FOR SYSTEM WITHOUT NAVIGATION
• iPhone
®: Please connect via Bluetooth® when using an iPhone® with NissanConnect
Mobile Apps.
• Android
®: Please connect via Bluetooth® when using an Android® device with
NissanConnect Mobile Apps.
For more information on how to pair your cellular phone and set up NissanConnect Mobile
Apps, visit: www.NissanUSA.com/connect/support.
For more information, refer to the “Display screen, heater, air conditioner, audio and phone systems (section 4)”
of your Owner’s Manual and the “Viewing information (section 6)” of your Navigation System Owner’s Manual.
1996737_16a_Leaf_QRG_071015.indd 247/10/15 11:28 AM
To view detailed instructional videos regarding these and other features, please go to www.nissanownersinfo.mobi.
Page 27 of 35
25
BLUETOOTH® HANDS-FREE PHONE SYSTEM
A cellular telephone should not be used
while driving so full attention may be given to
vehicle operation.*
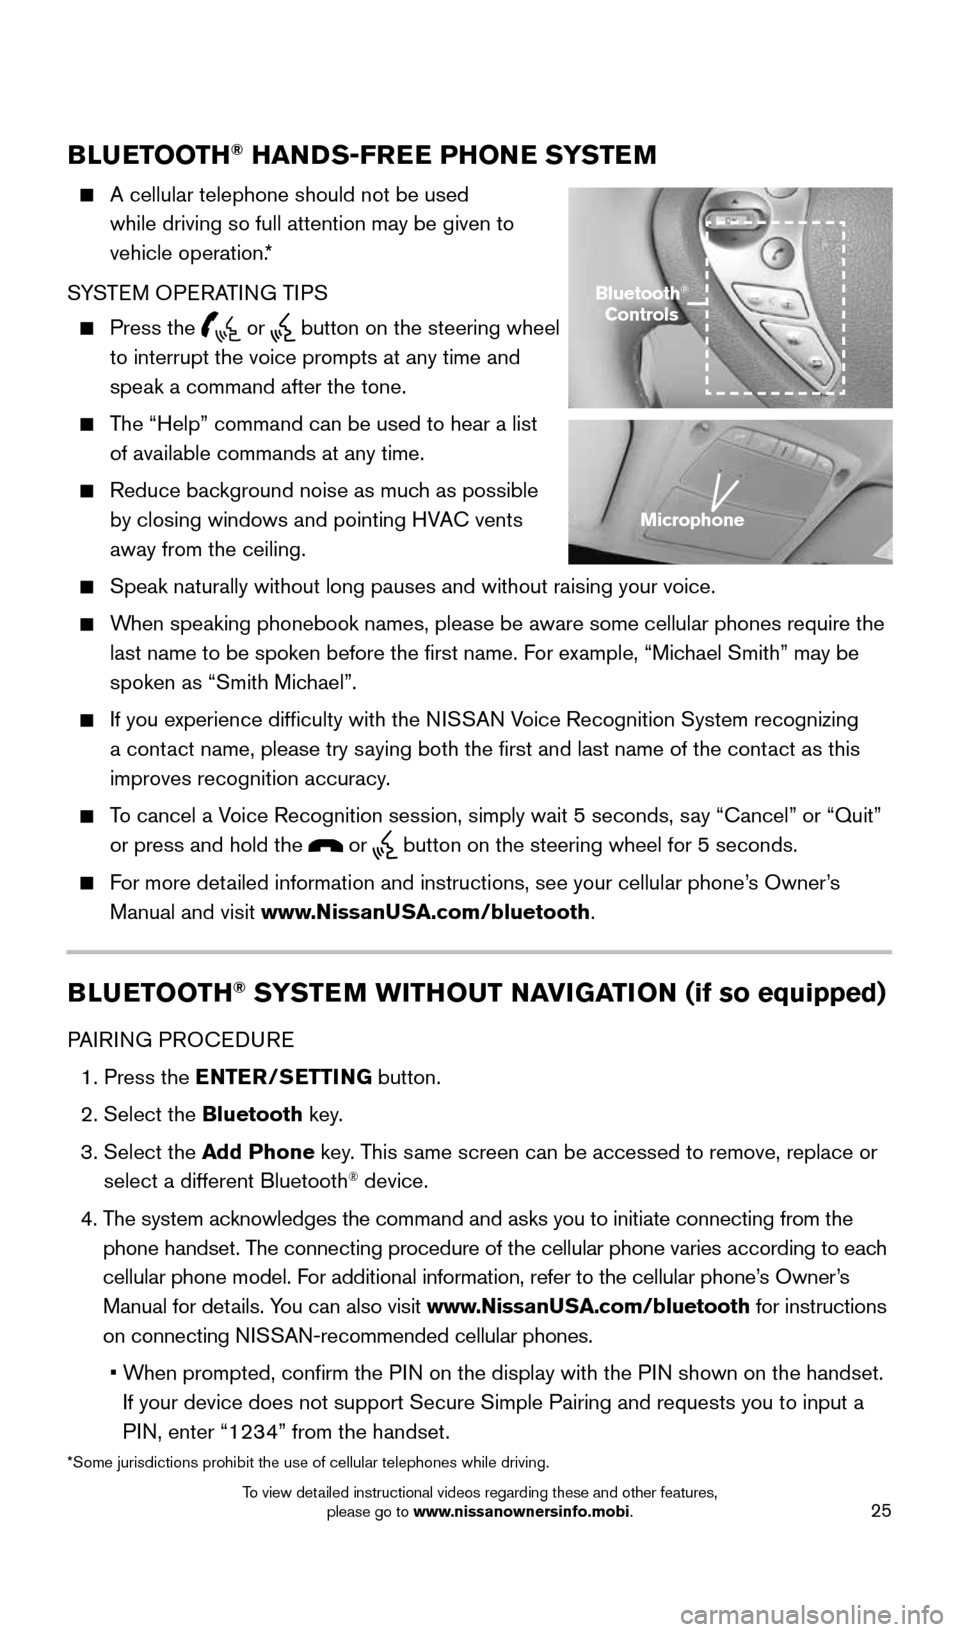
SYSTEM OPERATING TIPS
Press the or button on the steering wheel
to interrupt the voice prompts at any time and
speak a command after the tone.
The “Help” command can be used to hear a list
of available commands at any time.
Reduce background noise as much as possible
by closing windows and pointing HVAC vents
away from the ceiling.
Speak naturally without long pauses and without raising your voice.
When speaking phonebook names, please be aware some cellular phones requi\
re the
last name to be spoken before the first name. For example, “Michael Smith” may be
spoken as “Smith Michael”.
If you experience difficulty with the NISSAN Voice Recognition System recognizing
a contact name, please try saying both the first and last name of the contact as this
improves recognition accuracy.
To cancel a Voice Recognition session, simply wait 5 seconds, say “Cancel” or “Quit”
or press and hold the
or button on the steering wheel for 5 seconds.
For more detailed information and instructions, see your cellular phone’s Owner’s
Manual and visit www.NissanUSA.com/bluetooth.
BLUETOOTH® SYSTEM WITHOUT NAVIGATION (if so equipped)
PAIRING PROCEDURE
1. Press the ENTER/SETTING button.
2. Select the Bluetooth key.
3. Select the Add Phone key. This same screen can be accessed to remove, replace or
select a different Bluetooth
® device.
4. The system acknowledges the command and asks you to initiate connecting from the
phone handset. The connecting procedure of the cellular phone varies according to each
cellular phone model. For additional information, refer to the cellular phone’s Owner’s
Manual for details. You can also visit www.NissanUSA.com/bluetooth for instructions
on connecting NISSAN-recommended cellular phones.
• When prompted, confirm the PIN on the display with the PIN shown on the handset.
If your device does not support Secure Simple Pairing and requests you t\
o input a
PIN, enter “1234” from the handset.
Bluetooth®
Controls
Microphone
*Some jurisdictions prohibit the use of cellular telephones while drivin\
g.
1996737_16a_Leaf_QRG_071015.indd 257/10/15 11:28 AM
To view detailed instructional videos regarding these and other features, please go to www.nissanownersinfo.mobi.
Page 28 of 35
26
BLUETOOTH® SYSTEM WITH
NAVIGATION (if so equipped)
CONNECTING PROCEDURE
The vehicle must be stationary when connecting
the cellular phone.
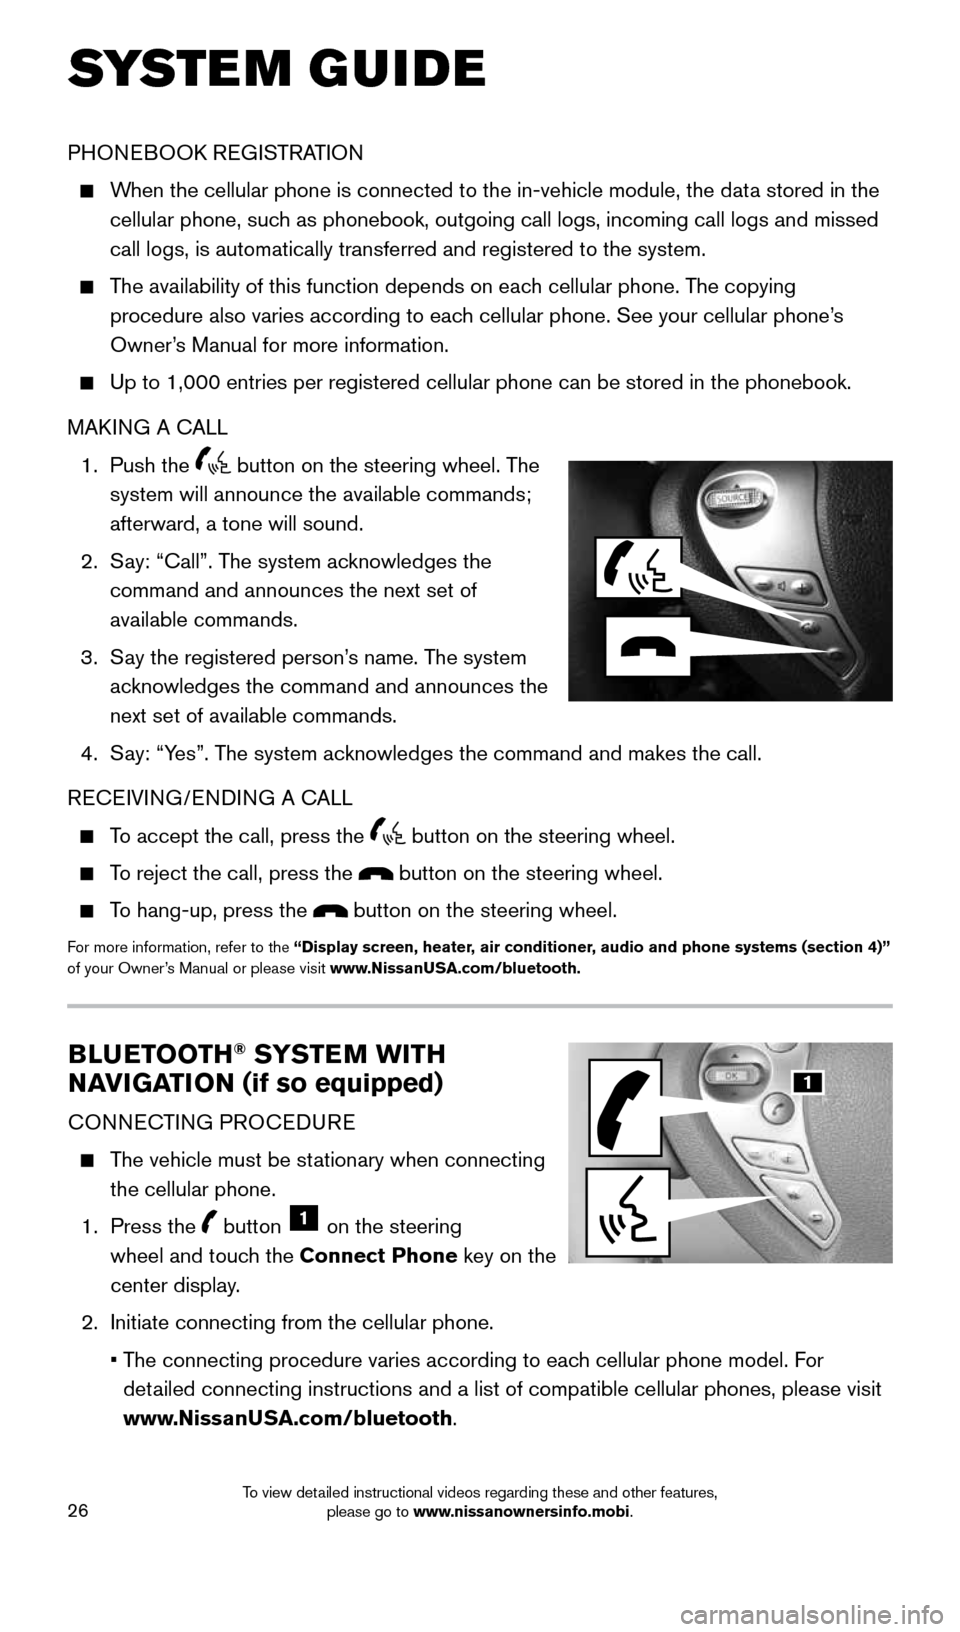
1. Press the
button 1 on the steering
wheel and touch the Connect Phone key on the
center display.
2. Initiate connecting from the cellular phone.
• The connecting procedure varies according to each cellular phone model. For
detailed connecting instructions and a list of compatible cellular phones, \
please visit
www.NissanUSA.com/bluetooth.
PHONEBOOK REGISTRATION
When the cellular phone is connected to the in-vehicle module, the data stored in the
cellular phone, such as phonebook, outgoing call logs, incoming call logs and missed
call logs, is automatically transferred and registered to the system.
The availability of this function depends on each cellular phone. The copying
procedure also varies according to each cellular phone. See your cellular phone’s
Owner’s Manual for more information.
Up to 1,000 entries per registered cellular phone can be stored in the p\
honebook.
MAKING A CALL
1. Push the
button on the steering wheel. The
system will announce the available commands;
afterward, a tone will sound.
2. Say: “Call”. The system acknowledges the
command and announces the next set of
available commands.
3. Say the registered person’s name. The system
acknowledges the command and announces the
next set of available commands.
4. Say: “Yes”. The system acknowledges the command and makes the call.
RECEIVING/ENDING A CALL
To accept the call, press the button on the steering wheel.
To reject the call, press the button on the steering wheel.
To hang-up, press the button on the steering wheel.
For more information, refer to the “Display screen, heater, air conditioner, audio and phone systems (section 4)”
of your Owner’s Manual or please visit www.NissanUSA.com/bluetooth.
SYSTEM GUIDE
1
1996737_16a_Leaf_QRG_071015.indd 267/10/15 11:28 AM
To view detailed instructional videos regarding these and other features, please go to www.nissanownersinfo.mobi.
Page 29 of 35
27
• When prompted, confirm the PIN on the display with the PIN shown on the handset.
If your device does not support Secure Simple Pairing and requests you t\
o input a
PIN, enter “1234” from the handset.
• Some cellular phones may incorrectly state that the connection was unsuccessful.
Please verify that the touch-screen displays that the connection is successful, or
touch
Settings > Bluetooth > Select BT Device > Phone and confirm that
your cellular phone is listed.
3. When connecting is complete, the screen will return to the Phone menu.
PHONEBOOK SETUP
Press the MENU button on the control panel.
Touch the Settings key on the Launch Bar and touch the Phonebook key.
Depending on your cellular phone, the system may automatically download \
your
cellular phone’s entire phonebook to the vehicle’s Bluetooth® system.
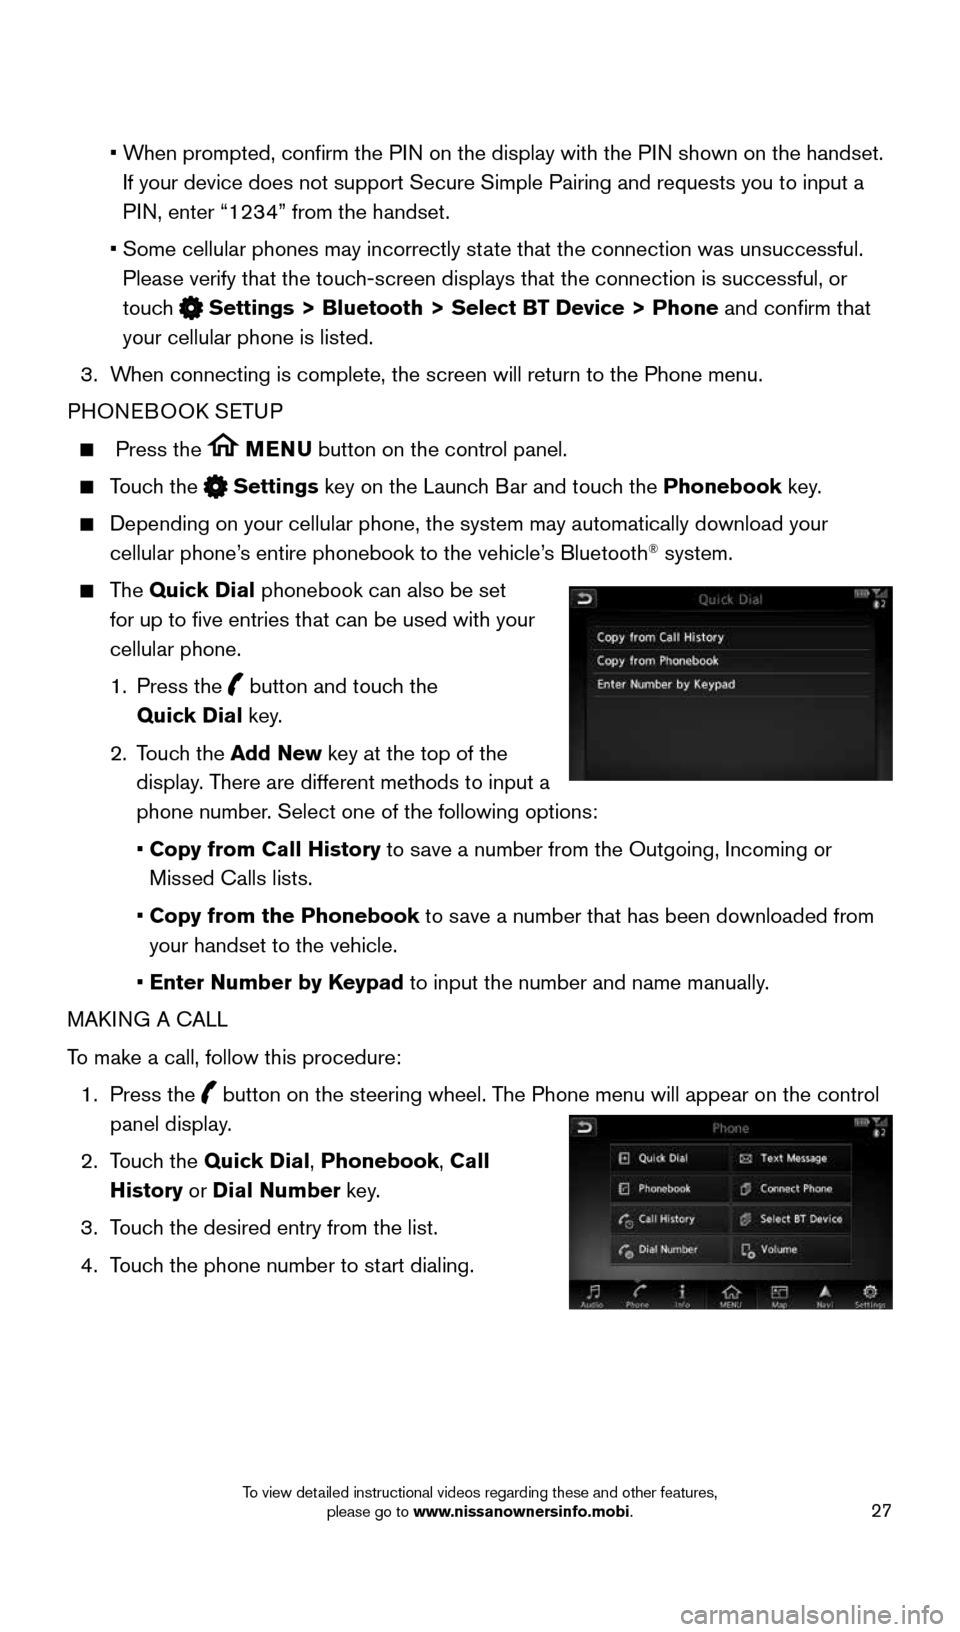
The Quick Dial phonebook can also be set
for up to five entries that can be used with your
cellular phone.
1. Press the
button and touch the
Quick Dial key.
2. Touch the Add New key at the top of the
display. There are different methods to input a
phone number. Select one of the following options:
• Copy from Call History to save a number from the Outgoing, Incoming or
Missed Calls lists.
• Copy from the Phonebook to save a number that has been downloaded from
your handset to the vehicle.
• Enter Number by Keypad to input the number and name manually.
MAKING A CALL
To make a call, follow this procedure:
1. Press the
button on the steering wheel. The Phone menu will appear on the control
panel display.
2. Touch the Quick Dial, Phonebook, Call
History or Dial Number key.
3. Touch the desired entry from the list.
4. Touch the phone number to start dialing.
1996737_16a_Leaf_QRG_071015.indd 277/10/15 11:28 AM
To view detailed instructional videos regarding these and other features, please go to www.nissanownersinfo.mobi.