2016 NISSAN LEAF light
[x] Cancel search: lightPage 16 of 35
14
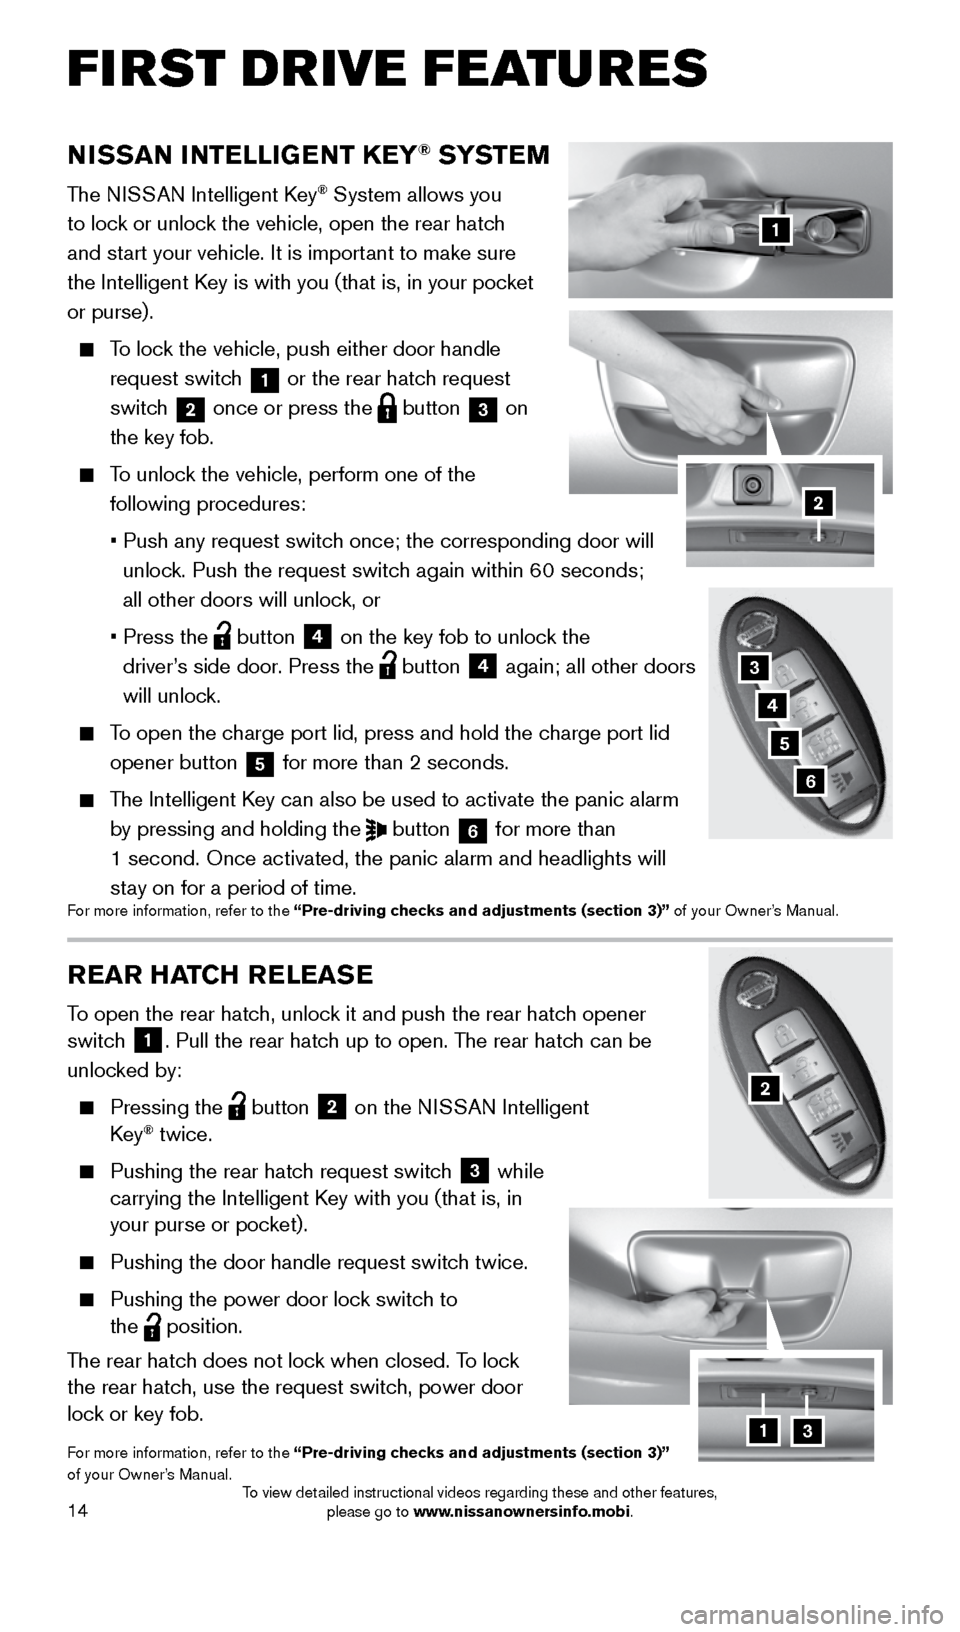
REAR HATCH RELEASE
To open the rear hatch, unlock it and push the rear hatch opener
switch 1. Pull the rear hatch up to open. The rear hatch can be
unlocked by:
Pressing the button
2 on the NISSAN Intelligent
Key® twice.
Pushing the rear hatch request switch
3 while
carrying the Intelligent Key with you (that is, in
your purse or pocket).
Pushing the door handle request switch twice.
Pushing the power door lock switch to
the
position.
The rear hatch does not lock when closed. To lock
the rear hatch, use the request switch, power door
lock or key fob.
For more information, refer to the “Pre-driving checks and adjustments (section 3)”
of your Owner’s Manual.
NISSAN INTELLIGENT KEY® SYSTE M
The NISSAN Intelligent Key® System allows you
to lock or unlock the vehicle, open the rear hatch
and start your vehicle. It is important to make sure
the Intelligent Key is with you (that is, in your pocket
or purse).
To lock the vehicle, push either door handle
request switch
1 or the rear hatch request
switch 2 once or press the
button
3 on
the key fob.
To unlock the vehicle, perform one of the
following procedures:
• Push any request switch once; the corresponding door will
unlock. Push the request switch again within 60 seconds;
all other doors will unlock, or
• Press the
button
4 on the key fob to unlock the
driver’s side door. Press the button 4 again; all other doors
will unlock.
To open the charge port lid, press and hold the charge port lid
opener button
5 for more than 2 seconds.
The Intelligent Key can also be used to activate the panic alarm
by pressing and holding the
button
6 for more than
1 second. Once activated, the panic alarm and headlights will
stay on for a period of time.
For more information, refer to the “Pre-driving checks and adjustments (section 3)” of your Owner’s Manual.
1
2
3
4
6
2
FIRST DRIVE FEATURES
5
13
1996737_16a_Leaf_QRG_071015.indd 147/10/15 11:28 AM
To view detailed instructional videos regarding these and other features, please go to www.nissanownersinfo.mobi.
Page 18 of 35
16
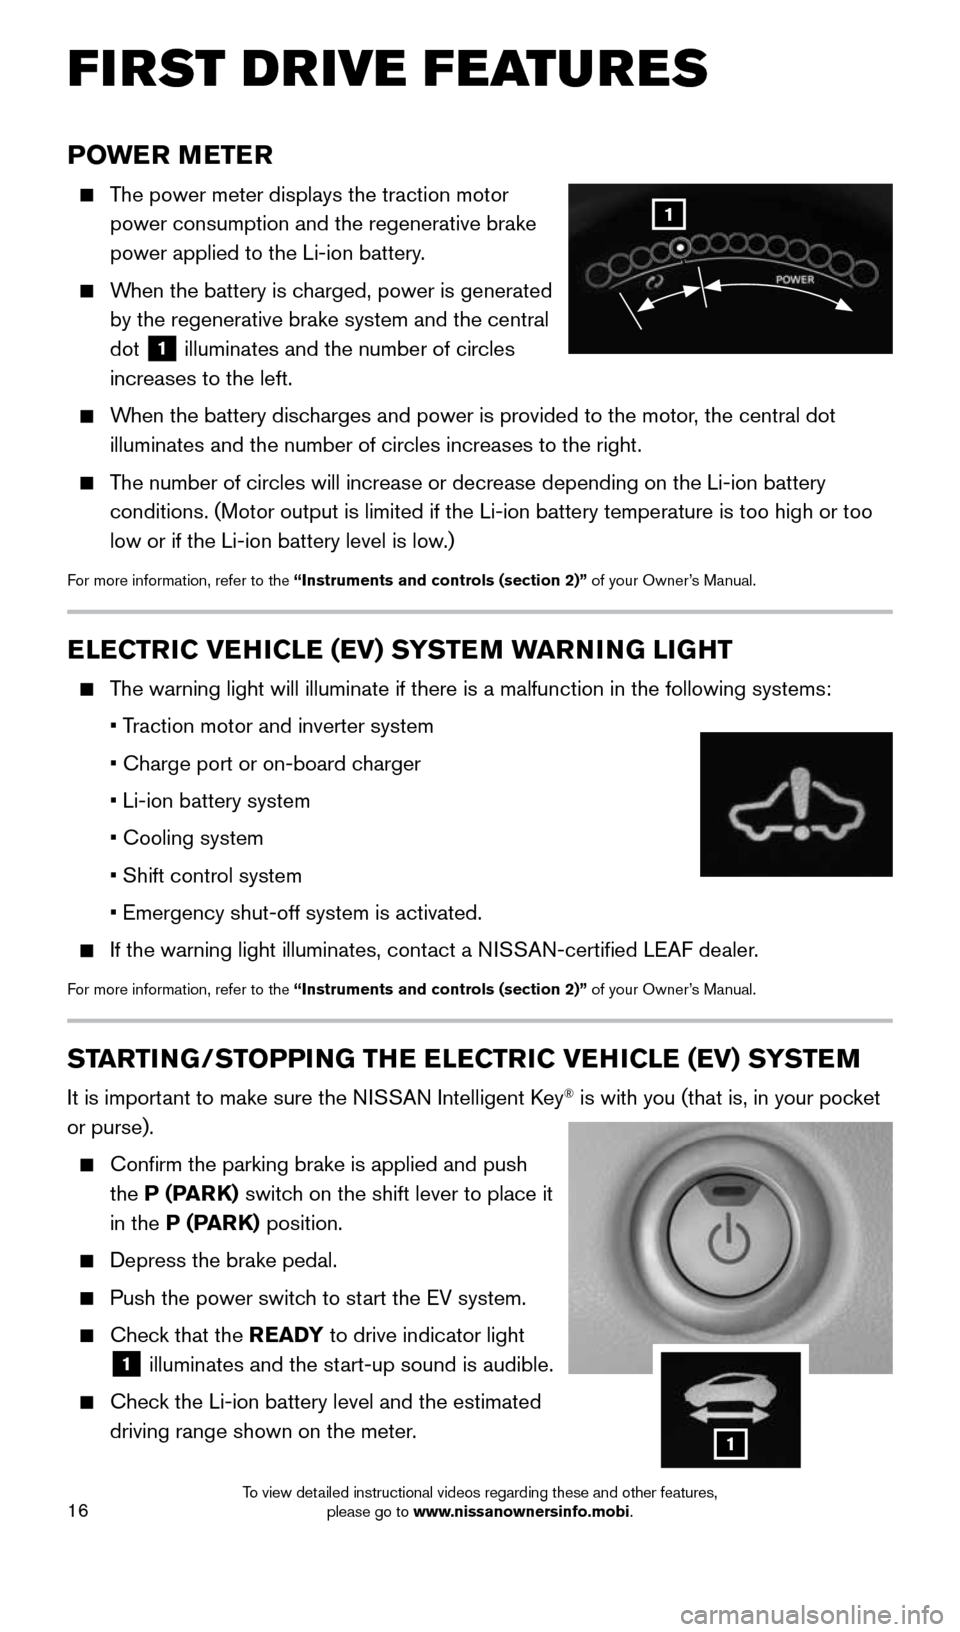
POWER METER
The power meter displays the traction motor
power consumption and the regenerative brake
power applied to the Li-ion battery.
When the battery is charged, power is generated
by the regenerative brake system and the central
dot
1 illuminates and the number of circles
increases to the left.
When the battery discharges and power is provided to the motor, the central dot
illuminates and the number of circles increases to the right.
The number of circles will increase or decrease depending on the Li-ion b\
attery
conditions. (Motor output is limited if the Li-ion battery temperature \
is too high or too
low or if the Li-ion battery level is low.)
For more information, refer to the “Instruments and controls (section 2)” of your Owner’s Manual.
ELECTRIC VEHICLE (EV) SYSTEM WARNING LIGHT
The warning light will illuminate if there is a malfunction in the follow\
ing systems:
• Traction motor and inverter system
• Charge port or on-board charger
• Li-ion battery system
• Cooling system
• Shift control system
• Emergency shut-off system is activated.
If the warning light illuminates, contact a NISSAN-certified LEAF dealer.
For more information, refer to the “Instruments and controls (section 2)” of your Owner’s Manual.
STARTING/STOPPING THE ELECTRIC VEHICLE (EV) SYSTEM
It is important to make sure the NISSAN Intelligent Key® is with you (that is, in your pocket
or purse).
Confirm the parking brake is applied and push
the P (PARK) switch on the shift lever to place it
in the P (PARK) position.
Depress the brake pedal.
Push the power switch to start the EV system.
Check that the READY to drive indicator light
1 illuminates and the start-up sound is audible.
Check the Li-ion battery level and the estimated
driving range shown on the meter.
1
FIRST DRIVE FEATURES
1
1996737_16a_Leaf_QRG_071015.indd 167/10/15 11:28 AM
To view detailed instructional videos regarding these and other features, please go to www.nissanownersinfo.mobi.
Page 19 of 35
17
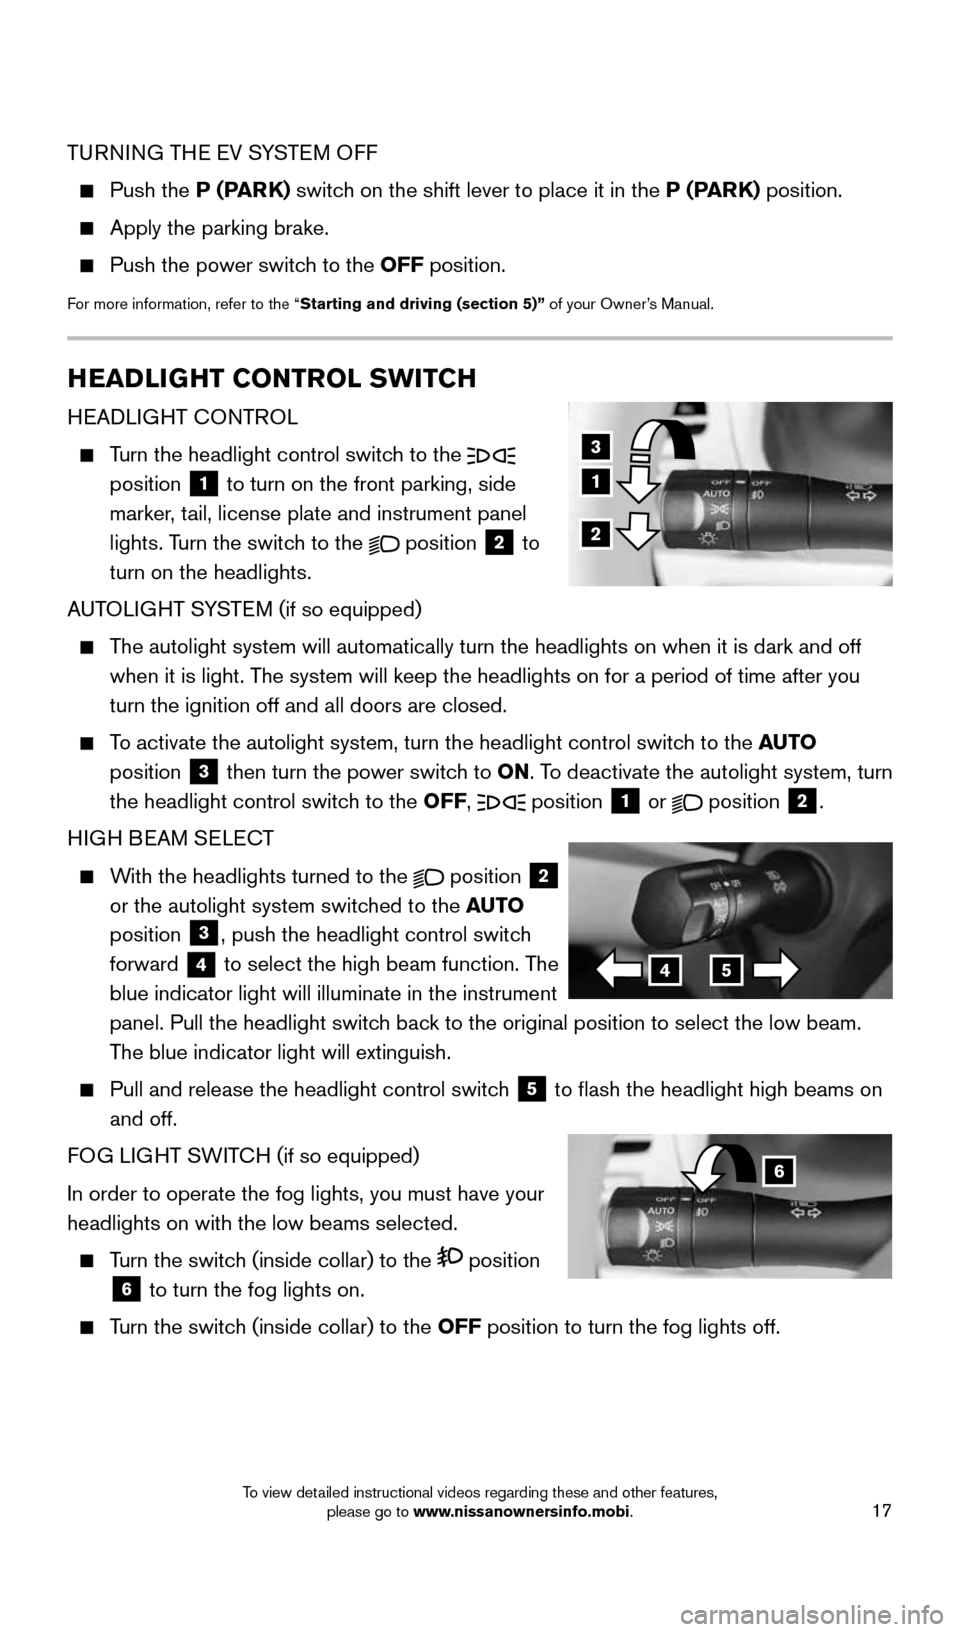
HEADLIGHT CONTROL SWITCH
HEADLIGHT CONTROL
Turn the headlight control switch to the
position 1 to turn on the front parking, side
marker, tail, license plate and instrument panel
lights. Turn the switch to the
position
2 to
turn on the headlights.
AUTOLIGHT SYSTEM (if so equipped)
The autolight system will automatically turn the headlights on when it is\
dark and off
when it is light. The system will keep the headlights on for a period of time after you
turn the ignition off and all doors are closed.
To activate the autolight system, turn the headlight control switch to the AUTO
position
3 then turn the power switch to ON. To deactivate the autolight system, turn
the headlight control switch to the OFF, position 1 or
position
2.
HIGH BEAM SELECT
With the headlights turned to the
position
2
or the autolight system switched to the AUTO
position
3, push the headlight control switch
forward
4 to select the high beam function. The
blue indicator light will illuminate in the instrument
panel. Pull the headlight switch back to the original position to select the low beam.
The blue indicator light will extinguish.
Pull and release the headlight control switch
5 to flash the headlight high beams on
and off.
FOG LIGHT SWITCH (if so equipped)
In order to operate the fog lights, you must have your
headlights on with the low beams selected.
Turn the switch (inside collar) to the position
6 to turn the fog lights on.
Turn the switch (inside collar)
to the OFF position to turn the fog lights off.
3
1
2
45
TURNING THE EV SYSTEM OFF
Push the
P (PARK) switch on the shift lever to place it in the P (PARK) position.
Apply the parking brake.
Push the power switch to the OFF position.
For more information, refer to the “Starting and driving (section 5)” of your Owner’s Manual.
6
1996737_16a_Leaf_QRG_071015.indd 177/10/15 11:28 AM
To view detailed instructional videos regarding these and other features, please go to www.nissanownersinfo.mobi.
Page 21 of 35
19
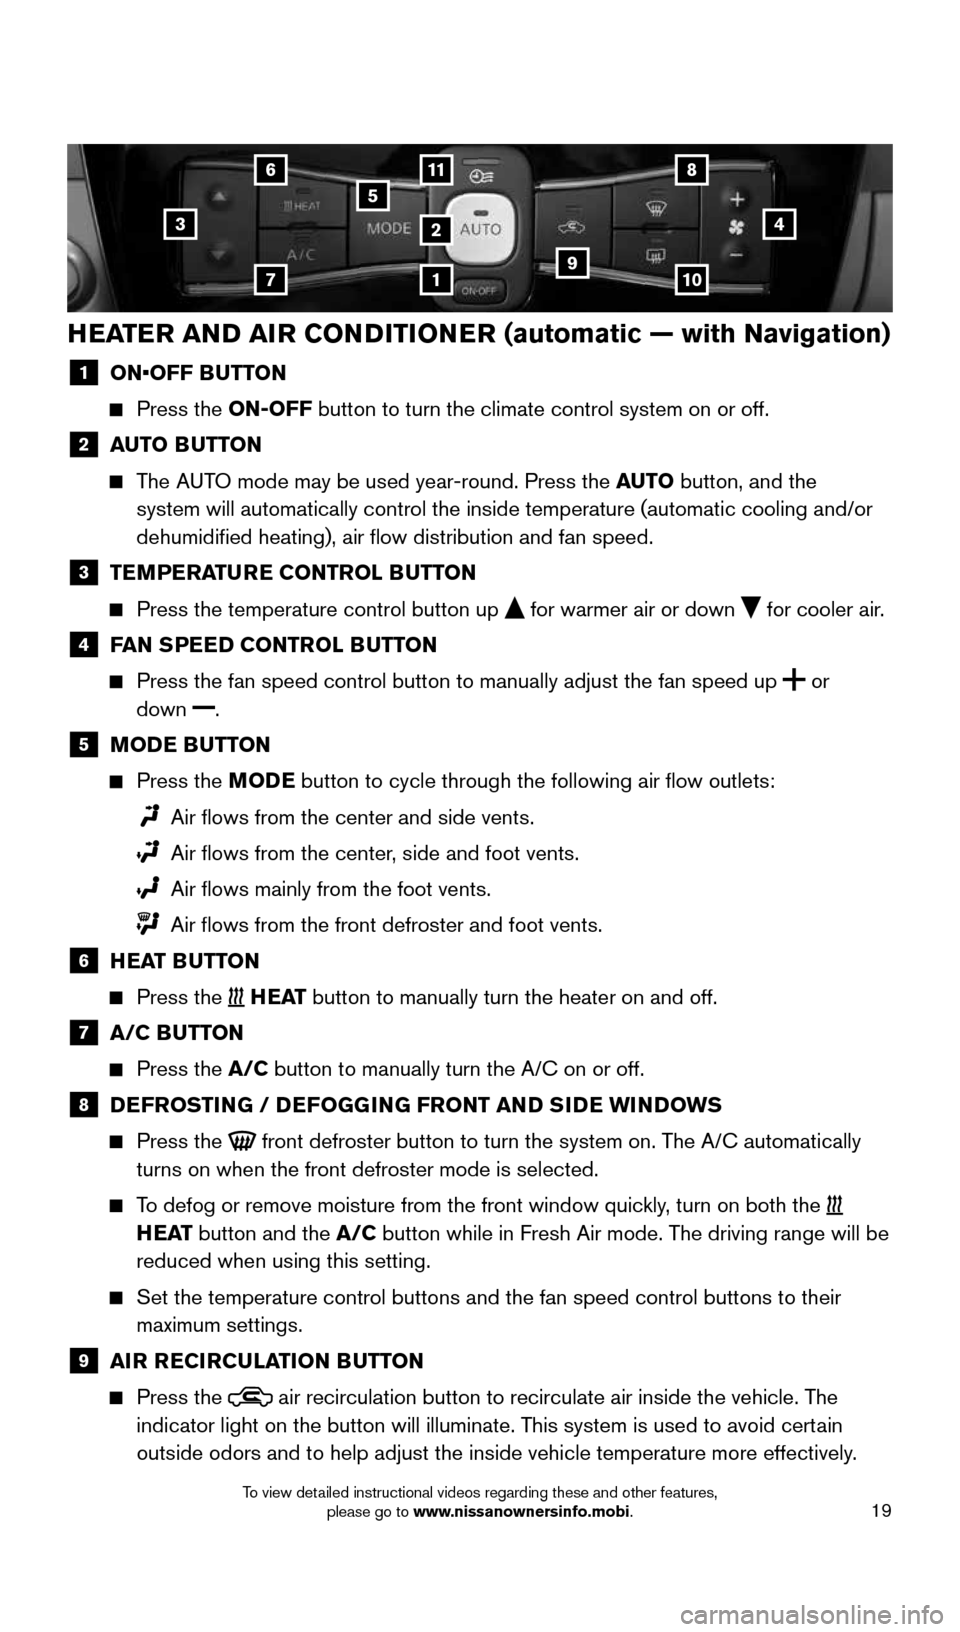
HEATER AND AIR CONDITIONER (automatic — with Navigation)
1 ON•OFF B UTTON
Press the ON-OFF button to turn the climate control system on or off.
2 AUTO BUTTON
The AUTO mode may be used year-round. Press the AUTO button, and the
system will automatically control the inside temperature (automatic coo\
ling and/or
dehumidified heating), air flow distribution and fan speed.
3 TEMPERATURE CONTROL BUTTON
Press the temperature control button up for warmer air or down for cooler air.
4
FAN SPEED CONTROL BUTTON
Press the fan speed control button to manually adjust the fan speed
up
or
down .
5 MODE BUTTON
Press the MODE button to cycle through the following air flow outlets:
Air flows from the center and side vents.
Air flows from the center, side and foot vents.
Air flows mainly from the foot vents.
Air flows from the front defroster and foot vents.
6
HEAT BUTTON
Press the H E AT button to manually turn the heater on and off.
7 A/C BUTTON
Press the A/C button to manually turn the A/C on or off.
8 DEFROSTING / DEFOGGING FRONT AND SIDE WINDOWS
Press the front defroster button to turn the system on. The A/C automatically
turns on when the front defroster mode is selected.
To defog or remove moisture from the front window quickly, turn on both the
H E AT button and the A/C button while in Fresh Air mode. The driving range will be
reduced when using this setting.
Set the temperature control buttons and the fan speed control buttons to\
their
maximum settings.
9 AIR RECIRCULATION BUTTON
Press the air recirculation button to recirculate air inside the vehicle. The
indicator light on the button will illuminate. This system is used to avoid certain
outside odors and to help adjust the inside vehicle temperature more eff\
ectively.
3
1
11
2
5
4
7109
68
1996737_16a_Leaf_QRG_071015.indd 197/10/15 11:28 AM
To view detailed instructional videos regarding these and other features, please go to www.nissanownersinfo.mobi.
Page 22 of 35
20
FM/AM/SiriusXM®* SATELLITE RADIO
WITH CD PLAYER (if so equipped)
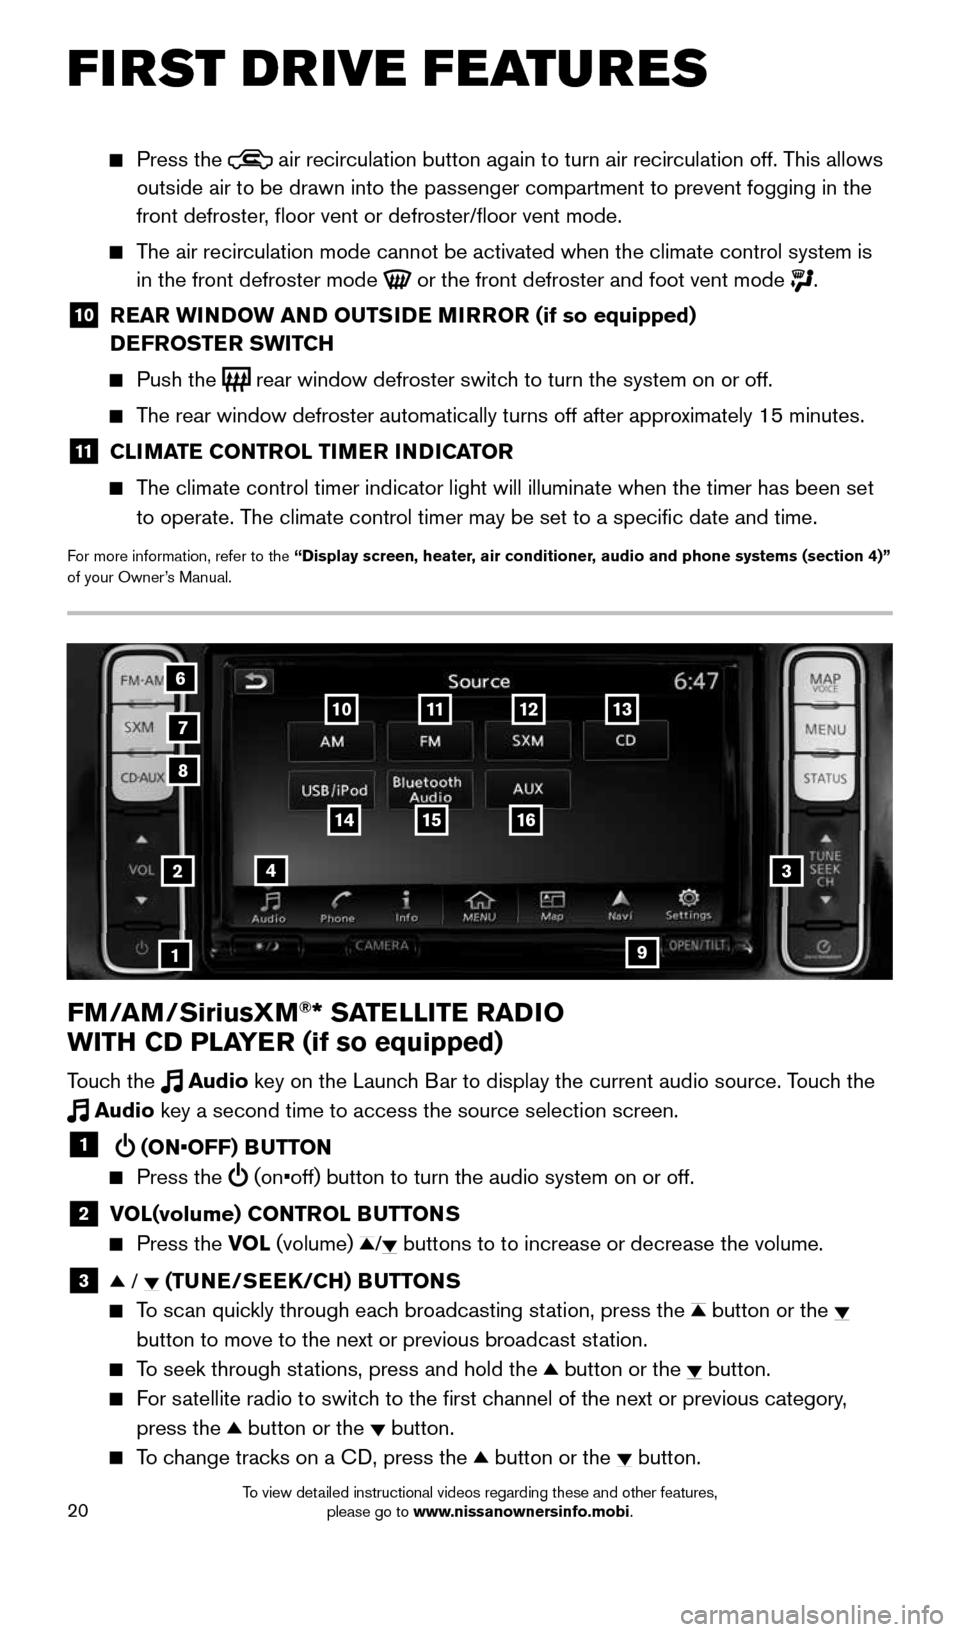
Touch the Audio key on the Launch Bar to display the current audio source. Touch the
Audio key a second time to access the source selection screen.
1 (ON•OFF) BUTTON
Press the (on•off) button to turn the audio system on or off.
2 VOL(volume) CONTROL BUTTONS
Press the VOL (volume) / buttons to to increase or decrease the volume.
3 / (TUNE/SEEK/CH) BUTTONS
To scan quickly through each broadcasting station, press the button or the
button to move to the next or previous broadcast station.
To seek through stations, press and hold the button or the button.
For satellite radio to switch to the first channel of the next or previous category,
press the
button or the button.
To change tracks on a CD, press the button or the button.
2
1
3
8
6
7
4
12
Press the air recirculation button again to turn air recirculation off. This allows
outside air to be drawn into the passenger compartment to prevent foggin\
g in the
front defroster, floor vent or defroster/floor vent mode.
The air recirculation mode cannot be activated when the climate control s\
ystem is
in the front defroster mode
or the front defroster and foot vent mode .
10 REAR WINDOW AND OUTSIDE MIRROR (if so equipped)
DEFROSTER SWITCH
Push the rear window defroster switch to turn the system on or off.
The rear window defroster automatically turns off after approximately 15 minutes.
11 CLIMATE CONTROL TIMER INDICATOR
The climate control timer indicator light will illuminate when the timer \
has been set
to operate. The climate control timer may be set to a specific date and time.
For more information, refer to the “Display screen, heater, air conditioner, audio and phone systems (section 4)”
of your Owner’s Manual.
13
16
9
1514
1110
FIRST DRIVE FEATURES
1996737_16a_Leaf_QRG_071015.indd 207/10/15 11:28 AM
To view detailed instructional videos regarding these and other features, please go to www.nissanownersinfo.mobi.
Page 24 of 35
22
CRUISE CONTROL
The cruise control system enables you to set a
constant cruising speed once the vehicle has
reached 25 mph (40 km/h).
The system will automatically maintain the set
speed until you tap the brake pedal, accelerate,
cancel or turn the system off.
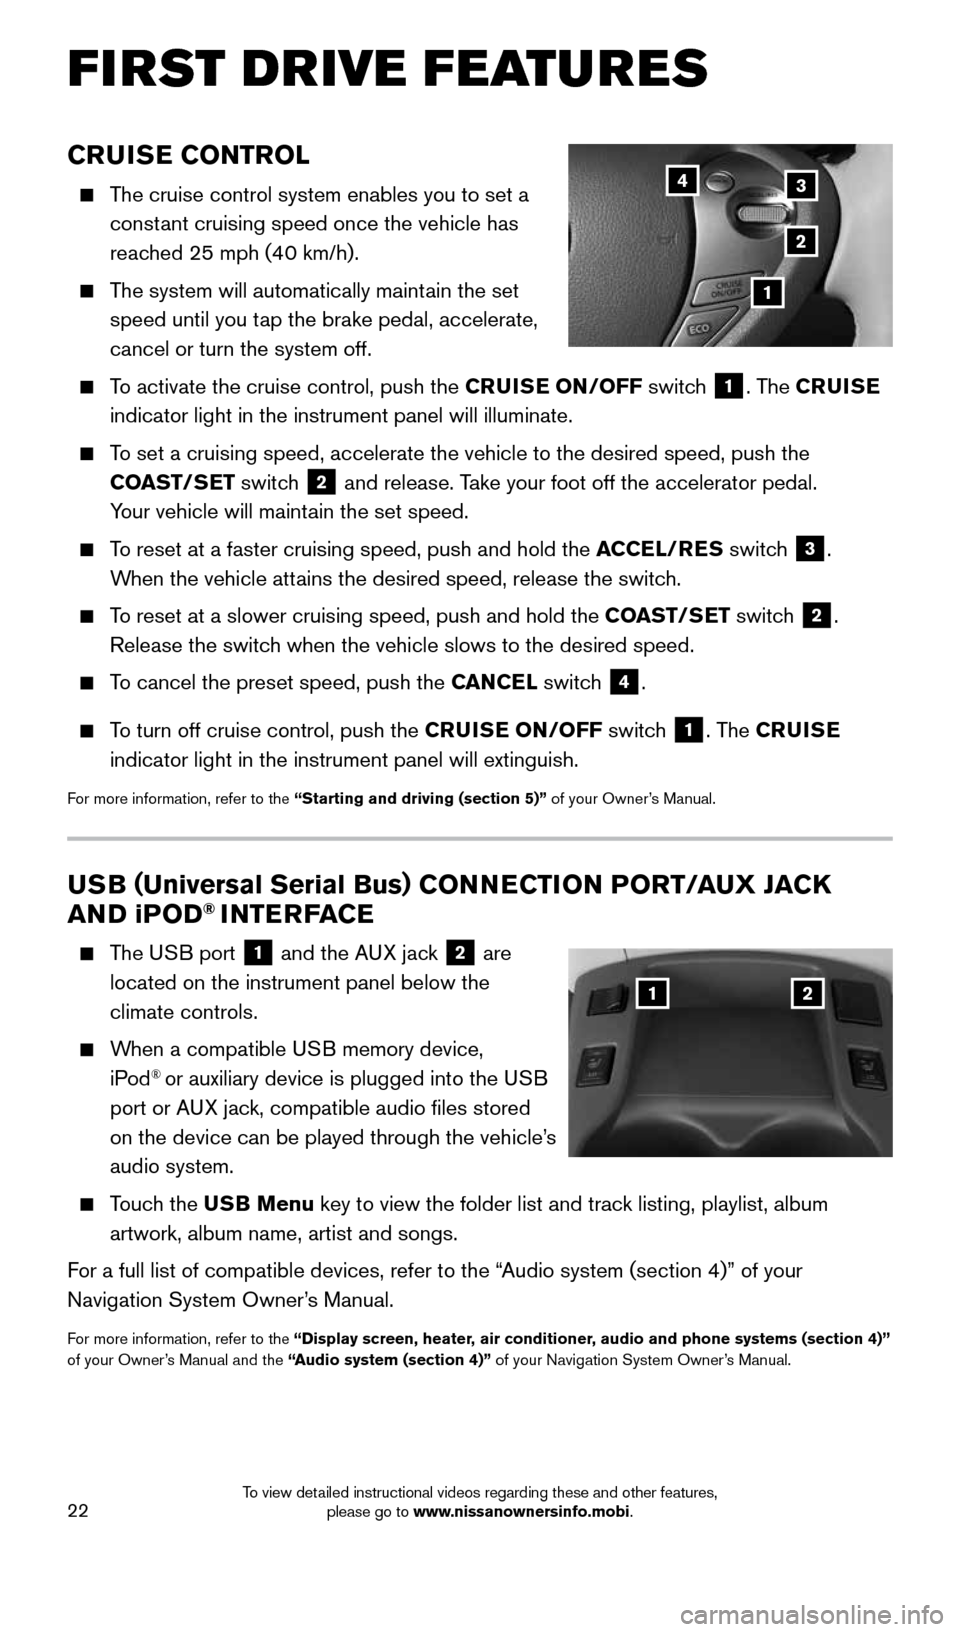
To activate the cruise control, push the CRUISE ON/OFF switch
1. The CRUISE
indicator light in the instrument panel will illuminate.
To set a cruising speed, accelerate the vehicle to the desired speed, pus\
h the
COAST/SET switch
2 and release. Take your foot off the accelerator pedal.
Your vehicle will maintain the set speed.
To reset at a faster cruising speed, push and hold the ACCEL/RES switch
3.
When the vehicle attains the desired speed, release the switch.
To reset at a slower cruising speed, push and hold the COAST/SET switch
2.
Release the switch when the vehicle slows to the desired speed.
To cancel the preset speed, push the CANCEL switch
4.
To turn off cruise control, push the CRUISE ON/OFF switch
1. The CRUISE
indicator light in the instrument panel will extinguish.
For more information, refer to the “Starting and driving (section 5)” of your Owner’s Manual.
FIRST DRIVE FEATURES
3
2
1
4
USB ( Universal Serial Bus) CONNECTION PORT/AUX JACK
AND i POD® INTERFACE
The USB port
1 and the AUX jack 2 are
located on the instrument panel below the
climate controls.
When a compatible USB memory device,
iPod® or auxiliary device is plugged into the USB
port or AUX jack, compatible audio files stored
on the device can be played through the vehicle’s
audio system.
Touch the USB Menu key to view the folder list and track listing, playlist, album
artwork, album name, artist and songs.
For a full list of compatible devices, refer to the “Audio system (section 4)” of your
Navigation System Owner’s Manual.
For more information, refer to the “Display screen, heater, air conditioner, audio and phone systems (section 4)”
of your Owner’s Manual and the “Audio system (section 4)” of your Navigation System Owner’s Manual.
12
1996737_16a_Leaf_QRG_071015.indd 227/10/15 11:28 AM
To view detailed instructional videos regarding these and other features, please go to www.nissanownersinfo.mobi.
Page 33 of 35

31
HOMELINK® UNIVERSAL TRANSCEIVER (if so equipped)
The HomeLink® Universal Transceiver can learn and consolidate the functions of up to
three different hand-held transmitters, operating items such as garage doors, property
gates, outdoor and indoor lights or alarm systems.
To program the HomeLink® Universal Transceiver:
• Position the handheld transceiver 1-3 in (26-76 mm) away from the HomeLink
surface, keeping the HomeLink indicator light in view.
• Press and hold the desired HomeLink button and the handheld transmitter \
button
simultaneously until the HomeLink indicator light flashes slowly and then ra\
pidly.
• Both buttons may be released when the indicator light flashes rapidly.
To verify the programing is complete, press and hold the HomeLink button \
and
observe the indicator light:
• A solid, continuous light indicates the programing is complete and the H\
omeLink
button will activate your device.
• A blinking light that turns to a solid, continuous light after 2 seconds\
indicates
additional steps are required to complete the programing.
An additional person may make the remaining steps easier. To complete the
programing process:
• At the receiver of the device that you are programing to the HomeLink bu\
tton, press
and release the “learn” or “smart” button (the name may var\
y by manufacturer, but it
is usually located near where the hanging antenna wire is attached to the unit). You
have approximately 30 seconds to initiate the following step.
• Press and hold the programed HomeLink button for 2 seconds and release.
You may have to repeat the previous two steps up to 3 times to complete t\
he
programing process. HomeLink should now activate your device.
For more information, refer to the “Instruments and controls (section 2)” of your Owner’s Manual, the HomeLink website at www.homelink.com or call 1-800-355-3515.
HOMELINK
1996737_16a_Leaf_QRG_071015.indd 317/10/15 11:28 AM
To view detailed instructional videos regarding these and other features, please go to www.nissanownersinfo.mobi.