Page 138 of 469
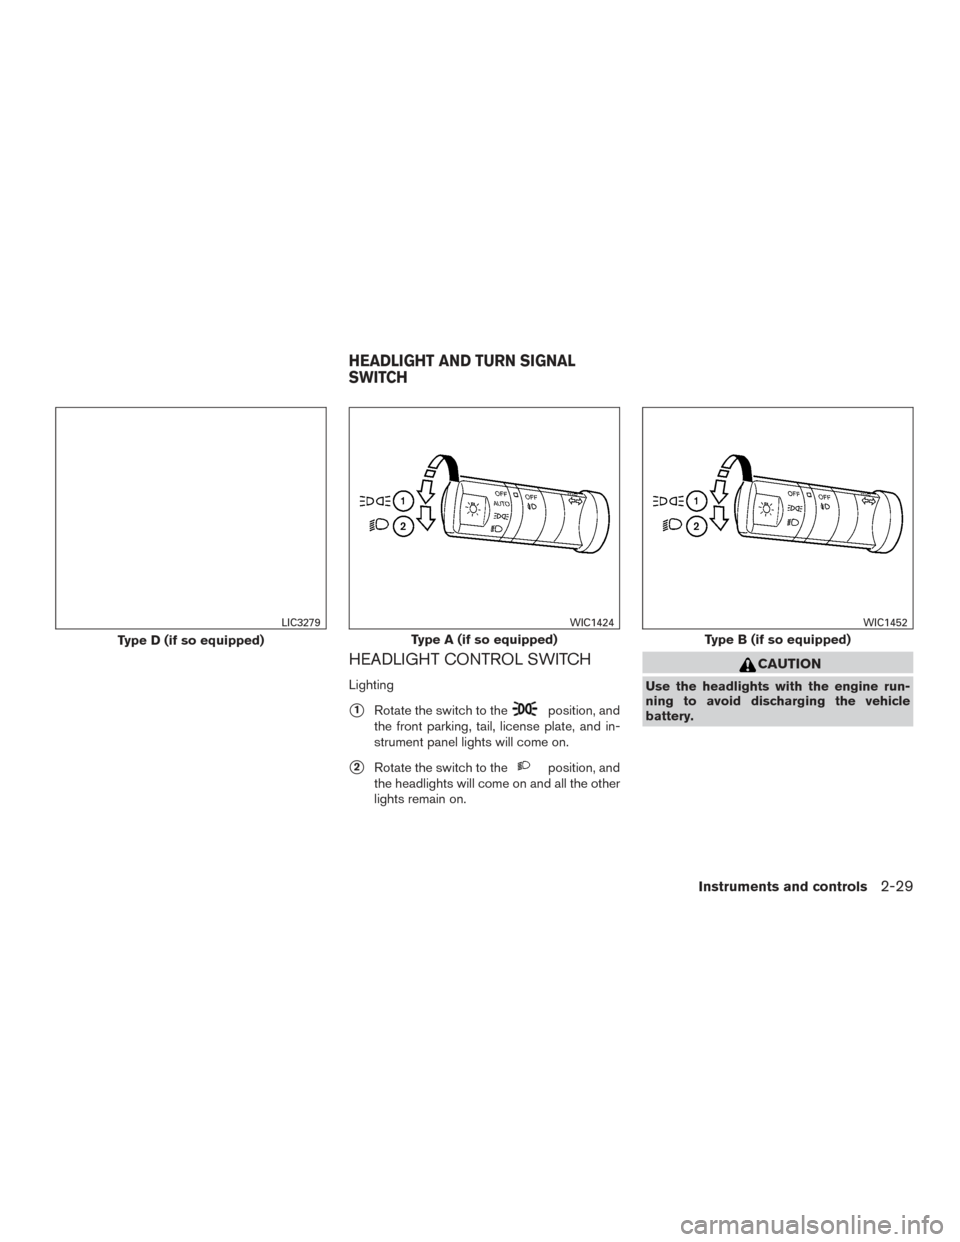
HEADLIGHT CONTROL SWITCH
Lighting
�1Rotate the switch to theposition, and
the front parking, tail, license plate, and in-
strument panel lights will come on.
�2Rotate the switch to theposition, and
the headlights will come on and all the other
lights remain on.
CAUTION
Use the headlights with the engine run-
ning to avoid discharging the vehicle
battery.
Type D (if so equipped)
LIC3279
Type A (if so equipped)
WIC1424
Type B (if so equipped)
WIC1452
HEADLIGHT AND TURN SIGNAL
SWITCH
Instruments and controls2-29
Page 139 of 469
Autolight system (if so equipped)
The autolight system allows the headlights to be
set so they turn on and off automatically. The
autolight system can:● Turn on the headlights, front parking, tail,
license plate and instrument panel lights au-
tomatically when it is dark.
● Turn off all the lights when it is light.
● Keep all the lights on for a period of time after
you turn the key to OFF and all doors are
closed. To turn on the autolight system:
1. Turn the headlight switch to the AUTO posi- tion
�1.
2. Turn the ignition switch to ON.
3. The autolight system automatically turns the headlights on and off.
Initially, if the ignition switch is turned OFF and a
door is opened and left open, the headlights
remain ON for a period of time. If another door is
opened while the headlights are on, then the
timer is reset.
To turn the autolight system off, turn the switch to
the OFF,
,orposition.Type C (if so equipped)
WIC1426LIC0561
2-30Instruments and controls
Page 140 of 469

Be sure you do not put anything on top of
the autolight sensor
�1located in the top
side of the instrument panel. The autolight
sensor controls the autolight; if it is cov-
ered, the autolight sensor reacts as if it is
dark out and the headlights will illuminate.
If this occurs while parked with the engine
off and the switch in the ON position, your
vehicle’s battery could become discharged.Headlight beam select
�1To select the high beam function, push the
lever forward. The high beam lights come on
and the
light illuminates.
�2Pull the lever back to select the low beam.
�3Pulling and releasing the lever flashes the
headlight high beams on and off.
Battery saver system
If the ignition switch is placed in the OFF position
while the headlight switch is in the
orposition, the headlights will turn off after
a period of time. After the headlights automatically turn off with the
headlight switch in the
orposition,
the headlights will illuminate again if the headlight
switch is moved to the OFF position and then
turned to the
orposition.
CAUTION
Even though the battery saver feature au-
tomatically turns off the headlights after a
period of time, you should turn the head-
light switch to the OFF position when the
engine is not running to avoid discharging
the vehicle battery.
DAYTIME RUNNING LIGHT SYSTEM
(Canada only)
The daytime running lights automatically illumi-
nate when the engine is started with the parking
brake released. The daytime running lights oper-
ate with the headlight switch in the OFF position
or in the
position. Turn the headlight switch
to the
position for full illumination when
driving at night.
If the parking brake is applied before the engine is
started, the daytime running lights do not illumi-
nate. The daytime running lights illuminate when
the parking brake is released. The daytime run-
ning lights will remain on until the ignition switch
is placed in the OFF position.
LIC0835LIC0562
Instruments and controls2-31
Page 141 of 469
WARNING
When the daytime running light system is
active, tail lights on your vehicle are not
on. It is necessary at dusk to turn on your
headlights. Failure to do so could cause
an accident injuring yourself and others.
INSTRUMENT BRIGHTNESS
CONTROL
The instrument brightness control operates when
the headlight control switch is in the AUTO (if so
equipped) ,
orposition.
Turn the control
�Ato adjust the brightness of the
instrument panel lights when driving at night.
TURN SIGNAL SWITCH
Turn signal
�1Move the lever up or down to signal the
turning direction. When the turn is com-
pleted, the turn signal cancels automatically.
Lane change signal
�2To signal a lane change, move the lever up or
down to the point where the indicator light
begins to flash, but the lever does not latch.
WIC0917LIC0563
2-32Instruments and controls
Page 142 of 469

To turn the fog lights on, turn the headlight switch
to the
position, then turn the fog light
switch to the
position.
To turn the fog lights on with the headlight swi")
FOG LIGHT SWITCH (if so equipped)
To turn the fog lights on, turn the headlight switch
to the
position, then turn the fog light
switch to the
position.
To turn the fog lights on with the headlight switch
in the AUTO position (if so equipped) , the head-
lights must be on, then turn the fog light switch to
the
position.
To turn the fog lights off, turn the fog light switch
to the OFF position.
The headlights must be on and the low beams
selected for the fog lights to operate. The fog
lights automatically turn off when the high beam
headlights are selected. To sound the horn, push the area between the
horn icons on the steering wheel.
WARNING
Do not disassemble the horn. Doing so
could affect proper operation of the
supplemental front air bag system. Tam-
pering with the supplemental front air bag
system may result in serious personal
injury.
To turn on the cargo lamp, push the switch down
to the ON position.
CAUTION
Be sure to turn the light switch to the OFF
position when you leave the vehicle for
extended periods of time, otherwise the
battery will go dead.
LIC0393WIC1449LIC0616
HORN
CARGO LAMP SWITCH
Instruments and controls2-33
Page 145 of 469
 , and
● the hill descent control system switch must
be ON.
The hill descent control system on indica")
●the 4WD switch must be in the 4H position
and the vehicle speed must be under
35 km/h (21 mph) , and
● the hill descent control system switch must
be ON.
The hill descent control system on indicator light
will come on when the system is activated. Also,
the stop/tail lights illuminate while the hill descent
control system applies the brakes to control ve-
hicle speed.
If the accelerator or brake pedal is depressed
while the hill descent control system is on, the
system will stop operating temporarily. As soon
as the accelerator or brake pedal is released, the
hill descent control system begins to function
again if the hill descent control operating condi-
tions are fulfilled.
The hill descent control system on indicator light
blinks if the switch is on and all conditions for
system activation are not met or if the system
becomes disengaged for any reason.
To turn off the hill descent control system, push
the switch to the OFF position.
For additional information, refer to “Hill descent
control system on indicator light” in this section
and “Hill descent control system” in the “Starting
and driving” section of this manual. The E-Lock system can help provide added trac-
tion if the vehicle is stuck or becoming stuck.
To activate the E-Lock system:
● the 4WD switch must be in the 4LO position
(4-wheel drive vehicles) ,
● the vehicle must be stopped or moving at
4 mph (7 km/h) or less, and
● the E-Lock system switch must be turned
ON. When the E-Lock switch is turned ON, the indi-
cator light will flash until the system engages.
However, if all operation conditions listed above
are not met or the system becomes disengaged,
the indicator light will continue to flash.
The Anti-Lock Brake (ABS) system is disabled
and the ABS light illuminates when the E-Lock
system is ON. Also, the Vehicle Dynamic Control
(VDC) system is disabled and the VDC light
illuminates when the E-Lock system is ON.
For additional information, refer to “Electronic
locking rear differential (E-Lock) system” in the
“Starting and driving” section of this manual for
further explanation and system limitations.
WARNING
●
Never leave the E-Lock system ON when
driving on paved or hard-surfaced
roads. Turning the vehicle may result in
the rear wheels slipping and result in an
accident and personal injury. After us-
ing the E-Lock system to free the ve-
hicle, turn the system OFF.
LIC0729
ELECTRONIC LOCKING REAR
DIFFERENTIAL (E-Lock) SYSTEM
SWITCH (if so equipped)
2-36Instruments and controls
Page 148 of 469

CAUTION
●The outlet and plug may be hot during
or immediately after use.
● Only certain power outlets are designed
for use with a cigarette lighter unit. Do
not use any other power outlet for an
accessory lighter. It is recommended
you visit a NISSAN dealer for additional
information.
● Do not use with accessories that exceed
a 12 volt, 120W (10A) power draw. ●
Do not use double adapters or more
than one electrical accessory.
● Use power outlets with the engine run-
ning to avoid discharging the vehicle
battery.
● Avoid using power outlets when the air
conditioner, headlights or rear window
defroster is on.
● Before inserting or disconnecting a
plug, be sure the electrical accessory
being used is turned OFF.
● Push the plug in as far as it will go. If
good contact is not made, the plug may
overheat or the internal temperature
fuse may open.
● When not in use, be sure to close the
cap. Do not allow water or any other
liquids to contact the outlet.
STORAGE TRAYS
WARNING
Do not place sharp objects in the trays to
help prevent injury in an accident or sud-
den stop.
Center console
LIC0761
Top center tray
LIC1539
STORAGE
Instruments and controls2-39
Page 161 of 469

WARNING
There are some small distances immedi-
ately before the closed position which
cannot be detected. Make sure that all
passengers have their hands, etc., inside
the vehicle before closing the moonroof.
When closing
If the control unit detects something caught in the
moonroof as it moves to the front, the moonroof
will immediately open backward.
When tilting down
If the control unit detects something caught in the
moonroof as it tilts down, the moonroof will im-
mediately tilt up.
If the auto-reverse function malfunctions and re-
peats opening or tilting up the moonroof, keep
pushing the tilt down switch within 5 seconds
after it happens; the moonroof will fully close
gradually. Make sure nothing is caught in the
moonroof.
WARNING
● In an accident you could be thrown from
the vehicle through an open moonroof.
Always use seat belts and child
restraints.
● Do not allow anyone to stand up or
extend any portion of their body out of
the moonroof opening while the vehicle
is in motion or while the moonroof is
closing.
CAUTION
●Remove water drops, snow, ice or sand
from the moonroof before opening.
● Do not place heavy objects on the
moonroof or surrounding area.
Sunshade
Open and close the sunshade by sliding it for-
ward or backward.
If the moonroof does not close
Have your moonroof checked and repaired. It is
recommended you visit a NISSAN dealer for this
service. The interior lights have a three-position switch
and operate regardless of ignition switch posi-
tion.
When the switch is in the ON position
�1, the
interior lights illuminate, regardless of door posi-
tion. The lights will go off after a period of time
unless the ignition switch is in the ON position.
Type A (if so equipped)
LIC0789
INTERIOR LIGHTS
2-52Instruments and controls

The autolight system allows the headlights to be
set so they turn on and off automatically. The
autolight system can:● Turn on the headlights, front parking, tail,")
