Page 111 of 469
1. Vents (P. 4-16)
2. Headlight/fog light (if so equipped)/turnsignal switch (P. 2-29)
3. Steering wheel switch for audio control
(if so equipped) (P. 4-69)
Bluetooth® Hands-Free Phone System
(if so equipped) (P. 4-66)
4. Driver supplemental air bag (P. 1-70) Horn (P. 2-33)
5. Meters and gauges (P. 2-3) Warning and indicator lights (P. 2-14)
6. Cruise control main/set switches
(if so equipped) (P. 5-21)
7. Wiper and washer switch (P. 2-27)
8. Storage (P. 2-39)
9. Audio system (P. 4-35)
10. Front passenger supplemental air bag
(P. 1-70)
11. Upper and lower glove box (P. 2-43)
12. Passenger air bag status light (P. 1-79)
13. Power outlet (P. 2-38)
14. Power outlet (if so equipped) (P. 2-38)
15. Electronic locking rear differential
(E-Lock) system switch (if so
equipped) (P.2-36)
Heated seat switch (if so equipped)
(P. 2-34)
LIC2471
INSTRUMENT PANEL
2-2Instruments and controls
Page 138 of 469
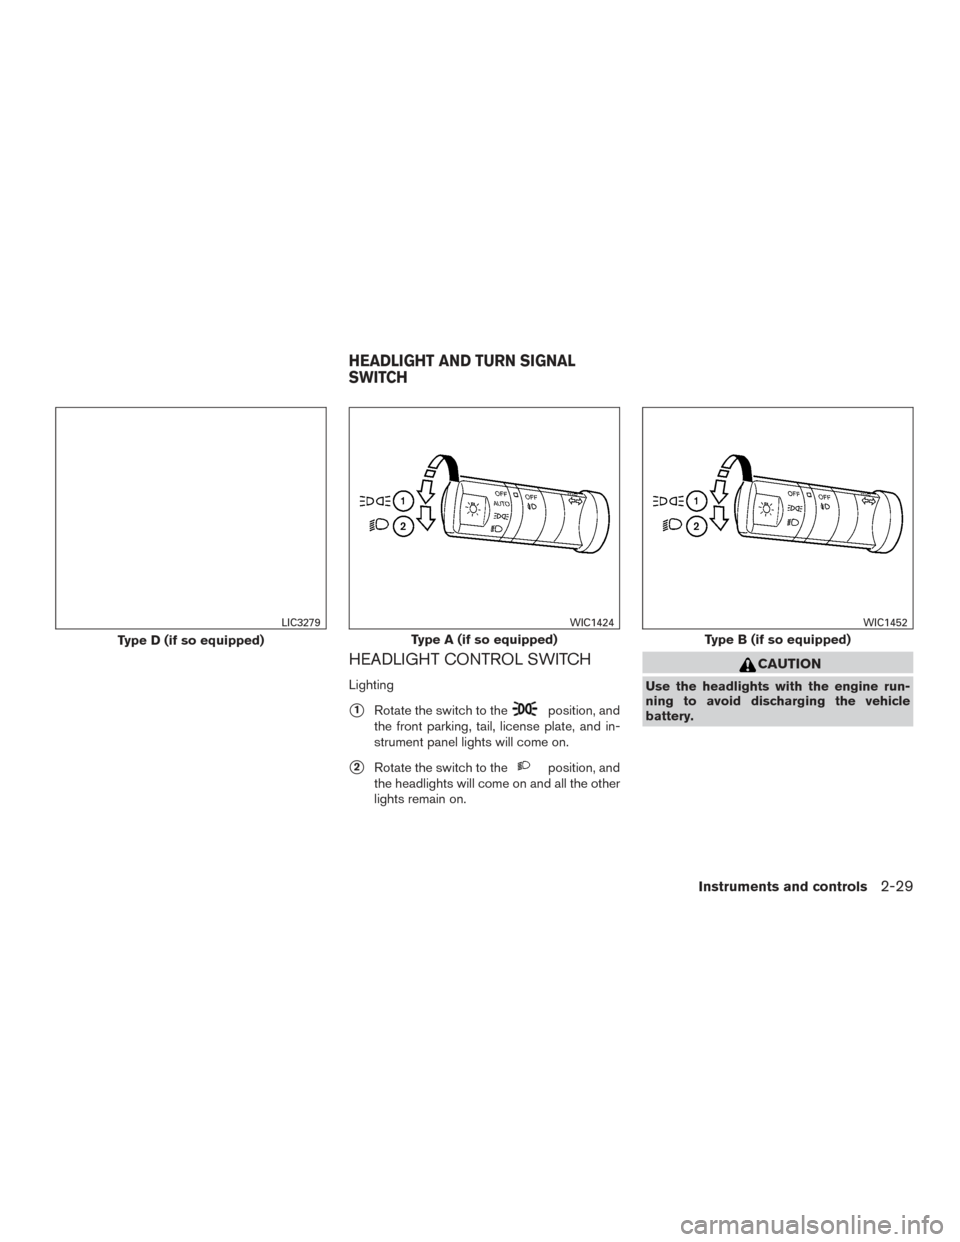
HEADLIGHT CONTROL SWITCH
Lighting
�1Rotate the switch to theposition, and
the front parking, tail, license plate, and in-
strument panel lights will come on.
�2Rotate the switch to theposition, and
the headlights will come on and all the other
lights remain on.
CAUTION
Use the headlights with the engine run-
ning to avoid discharging the vehicle
battery.
Type D (if so equipped)
LIC3279
Type A (if so equipped)
WIC1424
Type B (if so equipped)
WIC1452
HEADLIGHT AND TURN SIGNAL
SWITCH
Instruments and controls2-29
Page 139 of 469
Autolight system (if so equipped)
The autolight system allows the headlights to be
set so they turn on and off automatically. The
autolight system can:● Turn on the headlights, front parking, tail,
license plate and instrument panel lights au-
tomatically when it is dark.
● Turn off all the lights when it is light.
● Keep all the lights on for a period of time after
you turn the key to OFF and all doors are
closed. To turn on the autolight system:
1. Turn the headlight switch to the AUTO posi- tion
�1.
2. Turn the ignition switch to ON.
3. The autolight system automatically turns the headlights on and off.
Initially, if the ignition switch is turned OFF and a
door is opened and left open, the headlights
remain ON for a period of time. If another door is
opened while the headlights are on, then the
timer is reset.
To turn the autolight system off, turn the switch to
the OFF,
,orposition.Type C (if so equipped)
WIC1426LIC0561
2-30Instruments and controls
Page 140 of 469

Be sure you do not put anything on top of
the autolight sensor
�1located in the top
side of the instrument panel. The autolight
sensor controls the autolight; if it is cov-
ered, the autolight sensor reacts as if it is
dark out and the headlights will illuminate.
If this occurs while parked with the engine
off and the switch in the ON position, your
vehicle’s battery could become discharged.Headlight beam select
�1To select the high beam function, push the
lever forward. The high beam lights come on
and the
light illuminates.
�2Pull the lever back to select the low beam.
�3Pulling and releasing the lever flashes the
headlight high beams on and off.
Battery saver system
If the ignition switch is placed in the OFF position
while the headlight switch is in the
orposition, the headlights will turn off after
a period of time. After the headlights automatically turn off with the
headlight switch in the
orposition,
the headlights will illuminate again if the headlight
switch is moved to the OFF position and then
turned to the
orposition.
CAUTION
Even though the battery saver feature au-
tomatically turns off the headlights after a
period of time, you should turn the head-
light switch to the OFF position when the
engine is not running to avoid discharging
the vehicle battery.
DAYTIME RUNNING LIGHT SYSTEM
(Canada only)
The daytime running lights automatically illumi-
nate when the engine is started with the parking
brake released. The daytime running lights oper-
ate with the headlight switch in the OFF position
or in the
position. Turn the headlight switch
to the
position for full illumination when
driving at night.
If the parking brake is applied before the engine is
started, the daytime running lights do not illumi-
nate. The daytime running lights illuminate when
the parking brake is released. The daytime run-
ning lights will remain on until the ignition switch
is placed in the OFF position.
LIC0835LIC0562
Instruments and controls2-31
Page 141 of 469
WARNING
When the daytime running light system is
active, tail lights on your vehicle are not
on. It is necessary at dusk to turn on your
headlights. Failure to do so could cause
an accident injuring yourself and others.
INSTRUMENT BRIGHTNESS
CONTROL
The instrument brightness control operates when
the headlight control switch is in the AUTO (if so
equipped) ,
orposition.
Turn the control
�Ato adjust the brightness of the
instrument panel lights when driving at night.
TURN SIGNAL SWITCH
Turn signal
�1Move the lever up or down to signal the
turning direction. When the turn is com-
pleted, the turn signal cancels automatically.
Lane change signal
�2To signal a lane change, move the lever up or
down to the point where the indicator light
begins to flash, but the lever does not latch.
WIC0917LIC0563
2-32Instruments and controls
Page 158 of 469
1. Window lock button
2. Power door lock switch
3. Front passenger side window switch
4. Right rear passenger window switch(Crew Cab models only)
5. Left rear passenger window switch
(Crew Cab models only)
6. Driver’s side automatic switch
Driver’s side power window switch
The driver’s side control panel is equipped with
switches to open or close the front and rear
passenger windows.
To open a window, push the switch and hold it
down. To close a window, pull the switch and
hold it up. To stop the opening or closing function
at any time, simply release the switch.
Front passenger’s power window
switch
The passenger’s window switch operates only
the corresponding passenger’s window. To open
the window, push the switch and hold it down
�1.
To close the window, pull the switch up
�2.
LIC1329WIC0260
Instruments and controls2-49
Page 177 of 469

The hazard warning lights will flash once and the
horn will sound once to confirm that the horn
beep feature has been reactivated.
Deactivating the horn beep feature does not si-
lence the horn if the alarm is triggered.
�1Pull the hood lock release handle located
below the driver’s side instrument panel. The
hood will spring up slightly.
�2Push the lever at the front of the hood to the
side as illustrated with your fingertips and
raise the hood.
�3Insert the support rod into the slot on the
underside of the hood.
When closing the hood, return the hood rod to its
original position. Lower the hood approximately
12 in (30 cm) above the latch and release it. This
allows proper engagement of the hood latch.
WARNING
● Make sure the hood is completely
closed and latched before driving. Fail-
ure to do so could cause the hood to fly
open and result in an accident.
● If you see steam or smoke coming from
the engine compartment, to avoid injury
do not open the hood.
LPD0302
HOOD
3-10Pre-driving checks and adjustments
Page 205 of 469

2. Press the
button on the control panel.
3. The screen will display the Night settings.
4. Turn t")
For vehicles with Navigation System1. Firmly apply the brake and place the shift lever in R (reverse)
2. Press the
button on the control panel.
3. The screen will display the Night settings.
4. Turn the TUNE knob to adjust the setting up or down.
5. Press the
button again to access the
Auto settings.
6. Turn the TUNE knob to adjust the setting up or down.
● Do not adjust the display settings of the
RearView Monitor while the vehicle is mov-
ing.
REARVIEW MONITOR SYSTEM
LIMITATIONS
WARNING
Listed below are the system limitations for
RearView Monitor. Failure to operate the
vehicle in accordance with these system
limitations could result in serious injury or
death. ●
The system cannot completely elimi-
nate blind spots and may not show ev-
ery object.
● Underneath the bumper and the corner
areas of the bumper cannot be viewed
on the RearView Monitor because of its
monitoring range limitation. The system
will not show small objects below the
bumper, and may not show objects
close to the bumper or on the ground.
● Objects viewed in the RearView Moni-
tor differ from actual distance because
a wide-angle lens is used.
● Objects in the RearView Monitor will
appear visually opposite compared to
when viewed in the rearview and out-
side mirrors.
● Use the displayed lines as a reference.
The lines are highly affected by the
number of occupants, fuel level, vehicle
position, road conditions and road
grade.
● Make sure that the trunk is securely
closed when backing up.
● Do not put anything on the rearview
camera. The rearview camera is in-
stalled above the license plate. ●
When washing the vehicle with high
pressure water, be sure not to spray it
around the camera. Otherwise, water
may enter the camera unit causing wa-
ter condensation on the lens, a mal-
function, fire or an electric shock.
● Do not strike the camera. It is a preci-
sion instrument. Otherwise, it may mal-
function or cause damage resulting in a
fire or an electric shock.
The following are operating limitations and do not
represent a system malfunction: ● When the temperature is extremely high or
low, the screen may not clearly display ob-
jects.
● When strong light directly shines on the
camera, objects may not be displayed
clearly.
● Vertical lines may be seen in objects on the
screen. This is due to strong reflected light
from the bumper.
● The screen may flicker under fluorescent
light.
● The colors of objects on the RearView Moni-
tor may differ somewhat from the actual
color of objects.
4-14Monitor, climate, audio, phone and voice recognition systems

2. Headlight/fog light (if so equipped)/turnsignal switch (P. 2-29)
3. Steering wheel switch for audio control
(if so equipped) (P. 4-69)
Bluetooth® Hands-Free Phone System
(if so")

The autolight system allows the headlights to be
set so they turn on and off automatically. The
autolight system can:● Turn on the headlights, front parking, tail,")


5. Left rear passenger window switch
(Crew Cab models")