Page 173 of 491
�1To block glare from the front, swing down the
main sun visor.
�2To block glare from the side, remove the
main sun visor from the center mount and
swing the visor to the side.
�3To extend (if so equipped) the sun visor, slide
in or out as needed.
CAUTION
● Do not store the sun visor before return-
ing the extension to its original
position.
● Do not pull the extension sun visor
forcedly downward.
VANITY MIRRORS
To access the vanity mirror, pull the sun visor
down and flip open the mirror cover. Some vanity
mirrors are illuminated and turn on when the
mirror cover is open.
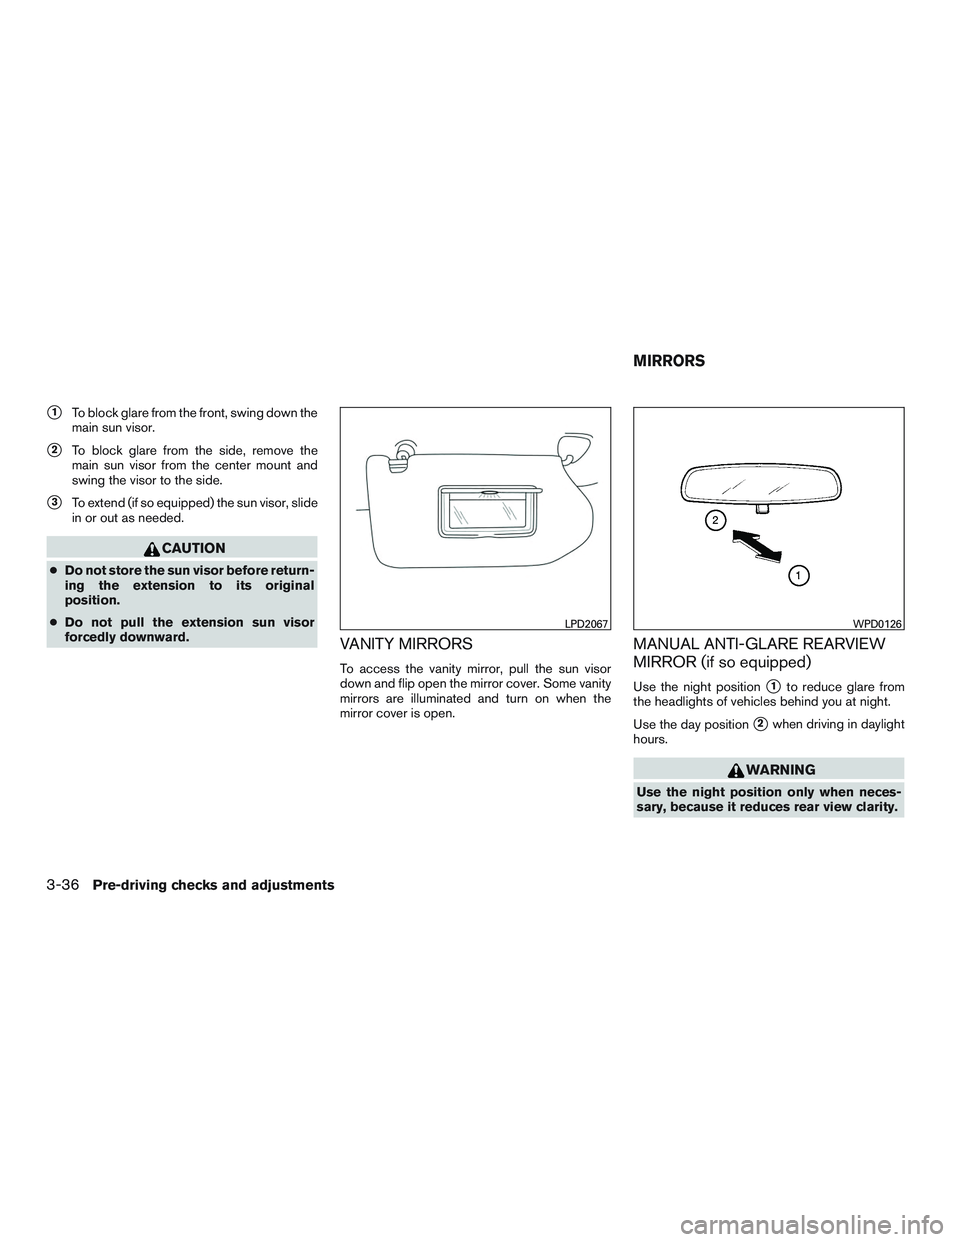
MANUAL ANTI-GLARE REARVIEW
MIRROR (if so equipped)
Use the night position�1to reduce glare from
the headlights of vehicles behind you at night.
Use the day position
�2when driving in daylight
hours.
WARNING
Use the night position only when neces-
sary, because it reduces rear view clarity.
LPD2067WPD0126
MIRRORS
3-36Pre-driving checks and adjustments
Page 174 of 491

The inside mirror is designed so that it automati-
cally dims during night time conditions and ac-
cording to the intensity of the headlights of t")
AUTOMATIC ANTI-GLARE
REARVIEW MIRROR (if so equipped)
The inside mirror is designed so that it automati-
cally dims during night time conditions and ac-
cording to the intensity of the headlights of the
vehicle following you. The automatic anti-glare
feature is activated when the ignition switch is in
the ON position.
The indicator light
�2will illuminate when the
automatic anti-glare feature is operating.
NOTE:
Do not hang any objects over the sensors
�1or apply glass cleaner to the sensors.
Doing so will reduce the sensitivity of the
sensors, resulting in improper operation.
Type A (if so equipped) , Type B (if so
equipped) and Type C (if so equipped)
The indicator light�2will illuminate when the
automatic anti-glare feature is operating.
To turn off the automatic anti-glare feature, press:
● the
button for inside mirrors without
compass and without HomeLink® Universal
Transceiver.
● the O button for inside mirrors without
compass. ●
the
button for inside mirrors with
compass.
The indicator light will turn off.
To turn on the automatic anti-glare feature again,
press:
● the | button for inside mirrors without
compass.
● the
button for inside mirrors with
compass.
The indicator light will turn on.
Type A (if so equipped)
WPD0446
Type B - Without compass (if so equipped)
LPD0469
Pre-driving checks and adjustments3-37
Page 175 of 491
 , refer
to the “HomeLink® Universal Transceiver” in the
“Instruments and controls” section of this")
For additional information on HomeLink® Univer-
sal Transceiver operation (if so equipped) , refer
to the “HomeLink® Universal Transceiver” in the
“Instruments and controls” section of this manual.
For additional information on the compass dis-
play (if so equipped) , refer to “Compass display”
in the “Instruments and controls” section of this
manual.OUTSIDE MIRRORS
WARNING
●Do not adjust the mirrors while driving.
You could lose control of your vehicle
and cause an accident.
● Objects viewed in the outside mirror on
the passenger side are closer than they
appear. Be careful when moving to the
right. Using only this mirror could cause
an accident. Use the inside mirror or
glance over your shoulder to properly
judge distances to other objects. The outside mirror remote control only operates
when the ignition switch is placed in the ACC or
ON position.
Move the small switch
�1to select the right or left
mirror. Adjust each mirror to the desired position
using the large switch
�2.
Type C - With compass (if so equipped)
LPD0470LPD2083
3-38Pre-driving checks and adjustments
Page 176 of 491
Manual folding outside mirrors
Pull the outside mirror toward the door to fold it.
Heated mirrors (if so equipped)
Some outside mirrors can be heated to defrost,
defog, or de-ice for improved visibility. For addi-
tional information, refer to “Rear window and
outside mirror (if so equipped) defroster switch”
in the “Instruments and controls” section of this
manual.
LPD2084
Pre-driving checks and adjustments3-39
Page 177 of 491
MEMO
3-40Pre-driving checks and adjustments
Page 304 of 491

NOTE:
Care should be taken to avoid situations
that can lead to potential battery discharge
and potential no-start conditions such as:1. Installation or extended use of electronic accessories that consume battery power
when the engine is not running (Phone char-
gers, GPS, DVD players, etc.)
2. Vehicle is not driven regularly and/or only driven short distances.
In these cases, the battery may need to be
charged to maintain battery health.
REMOTE START (if so equipped)
Vehicles started with the remote start require the
ignition switch to be placed in the ON position
before the shift lever can be moved from the P
(Park) position. To place the ignition switch to the
ON position, follow these steps: 1. Make sure that the Intelligent Key is on you.
2. Apply the brake.
3. Push the ignition switch once to the ON position.
For additional information, refer to “NISSAN In-
telligent Key®” in the “Pre-driving checks and
adjustments” section of this manual.
CONTINUOUSLY VARIABLE
TRANSMISSION (CVT)
WARNING
● Do not depress the accelerator pedal
while shifting from P (Park) or N (Neu-
tral) to R (Reverse) , D (Drive) , Ds (Drive
Sport) or manual shift mode (if so
equipped) . Always depress the brake
pedal until shifting is completed. Fail-
ure to do so could cause you to lose
control and have an accident.
● Cold engine idle speed is high, so use
caution when shifting into a forward or
reverse gear before the engine has
warmed up.
● Do not downshift abruptly on slippery
roads. This may cause a loss of control.
● Never shift to either the P (Park) or R
(Reverse) while the vehicle is moving
forward and P (Park) or D (Drive) posi-
tion while the vehicle is reversing. This
could cause an accident or damage the
transmission.
CAUTION
● Except in an emergency, do not shift to
the N (Neutral) position while driving.
Coasting with the transmission in the N
(Neutral) position may cause serious
damage to the transmission.
● To avoid possible damage to your ve-
hicle; when stopping the vehicle on an
uphill grade, do not hold the vehicle by
depressing the accelerator pedal. The
foot brake should be used for this
purpose.
The CVT in your vehicle is electronically con-
trolled to produce maximum power and smooth
operation.
The CVT can operate in two different automatic
drive modes: ● D (Drive) mode - Move the shift lever to D
(Drive) , the transmission is in the normal
forward automatic driving mode. The posi-
tion indicator in the meter shows a “D”.
DRIVING THE VEHICLE
Starting and driving5-13

Some outside mirrors can be heated to defrost,
defog, or de-ice for improved visibili")
