Page 116 of 491

To turn the fog lights on, rotate the headlight
switch to the
position, then rotate the fog
light switch to the
position.
To turn the fog lights on with the headlight")
FOG LIGHT SWITCH (if so equipped)
To turn the fog lights on, rotate the headlight
switch to the
position, then rotate the fog
light switch to the
position.
To turn the fog lights on with the headlight switch
in the AUTO position, the headlights must be on,
then rotate the fog light switch to the
po-
sition.
To turn the fog lights off, rotate the fog light
switch to the OFF position.
The headlights must be on and the low beams
selected for the fog lights to operate. The fog
lights automatically turn off when the high beam
headlights are selected. To sound the horn, push near the horn icon on the
steering wheel.
WARNING
Do not disassemble the horn. Doing so
could affect proper operation of the
supplemental front air bag system. Tam-
pering with the supplemental front air bag
system may result in serious personal
injury.
The front seats are warmed by built-in heaters.
1. Start the engine.
2. Push the LO or HI position of the switch, as desired. The indicator light in the switch will
illuminate.
The heater is controlled by a thermostat,
automatically turning the heater on and off.
The indicator light will remain on as long as
the switch is on.
3. When the seat is warmed or before you leave the vehicle, be sure to push the switch
to turn it off.
LIC3256LIC2319LIC3037
HORN HEATED SEAT SWITCHES (if so
equipped)
Instruments and controls2-37
Page 119 of 491
 maximum.
The power outlets are powered only when the
ignition switch is in")
The power outlets are for powering electrical
accessories such as cellular telephones. They
are rated at 12 volt, 120W (10A) maximum.
The power outlets are powered only when the
ignition switch is in the ACC or ON position.
Open the lower half of the console box to access
the power outlet. For additional information, refer
to “Console box” in this section.CAUTION
●The outlet and plug may be hot during
or immediately after use.
● Only certain power outlets are designed
for use with a cigarette lighter unit. Do
not use any other power outlet for an
accessory lighter. For additional infor-
mation, see a NISSAN dealer.
● Do not use with accessories that exceed
a 12 volt, 120W (10A) power draw.
● Do not use double adapters or more
than one electrical accessory. ●
Use power outlets with the engine run-
ning to avoid discharging the vehicle
battery.
● Avoid using power outlets when the air
conditioner, headlights, or rear window
defroster is on.
● Before inserting or disconnecting a
plug, be sure the electrical accessory
being used is turned OFF.
● Push the plug in as far as it will go. If
good contact is not made, the plug may
overheat or the internal temperature
fuse may open.
● When not in use, be sure to close the
cap. Do not allow water or any other
liquid to contact the outlet.
Instrument Panel
LIC3345
Center Console
LIC2616
POWER OUTLETS
2-40Instruments and controls
Page 130 of 491
NOTE:
The step lights illuminate when the driver
and passenger doors are opened regard-
less of the interior light switch position.
These lights will turn off automatically after
a period of time while doors are open to
prevent the battery from becoming dis-
charged.
CAUTION
Do not use for extended periods of time
with the engine stopped. This could result
in a discharged battery.
CONSOLE LIGHT
The console light will turn on whenever the park-
ing lights or headlights are illuminated.
The console light brightness can be adjusted
with the illumination brightness control in the
vehicle information display.
MAP LIGHTS
To turn the map lights on, push the switches. To
turn them off, push the switches again.
CAUTION
Do not use for extended periods of time
with the engine stopped. This could result
in a discharged battery.
LIC2303LIC2304
Instruments and controls2-51
Page 153 of 491
Using the panic alarm
If you are near your vehicle and feel threatened,
you may activate the panic alarm to call attention
by pressing and holding the
button on the
Intelligent Key for longer than 0.5 seconds.
The panic alarm and headlights will stay on for a
period of time. The panic alarm stops when:
● It has run for a period of time, or
● Any button is pressed on the Intelligent Key.
● The request switch on the driver or passen-
ger door has been pushed and the Intelligent
Key is in range of the door handle.
Answer back horn feature
If desired, the answer back horn feature can be
deactivated using the Intelligent Key. When it is
deactivated and the LOCK
button is
pushed, the hazard indicator lights flash twice.
When the UNLOCK
button is pushed, nei-
ther the hazard indicator lights nor the horn op-
erates.
WPD0361WPD0362
3-16Pre-driving checks and adjustments
Page 160 of 491

The Intelligent Key allows you to simultaneously
open windows equipped with automatic opera-
tion.● To open the windows, press the
but-
ton on the Intelligent Key lo")
Opening windows (if so equipped)
The Intelligent Key allows you to simultaneously
open windows equipped with automatic opera-
tion.● To open the windows, press the
but-
ton on the Intelligent Key longer than
3 seconds after all doors are unlocked.
The door windows will open while pressing
the
button on the Intelligent Key.
The door windows cannot be closed by
using the Intelligent Key.
Releasing the trunk lid
Press thebutton for longer than 0.5 sec-
onds to open the trunk lid. The trunk release
button will not operate when the ignition switch is
in the ON position or when the trunk cancel
switch (if so equipped) is in the OFF position. For
additional information, refer to “Cancel switch” in
this section.
Using the panic alarm
If you are near your vehicle and feel threatened,
you may activate the panic alarm to call attention
by pressing and holding the
button on the
Intelligent Key for longer than 0.5 seconds.
The panic alarm and headlights will stay on for a
period of time.
The panic alarm stops when:
● It has run for a period of time, or
● Any button is pressed on the Intelligent Key.
WPD0364WPD0361
Pre-driving checks and adjustments3-23
Page 173 of 491
�1To block glare from the front, swing down the
main sun visor.
�2To block glare from the side, remove the
main sun visor from the center mount and
swing the visor to the side.
�3To extend (if so equipped) the sun visor, slide
in or out as needed.
CAUTION
● Do not store the sun visor before return-
ing the extension to its original
position.
● Do not pull the extension sun visor
forcedly downward.
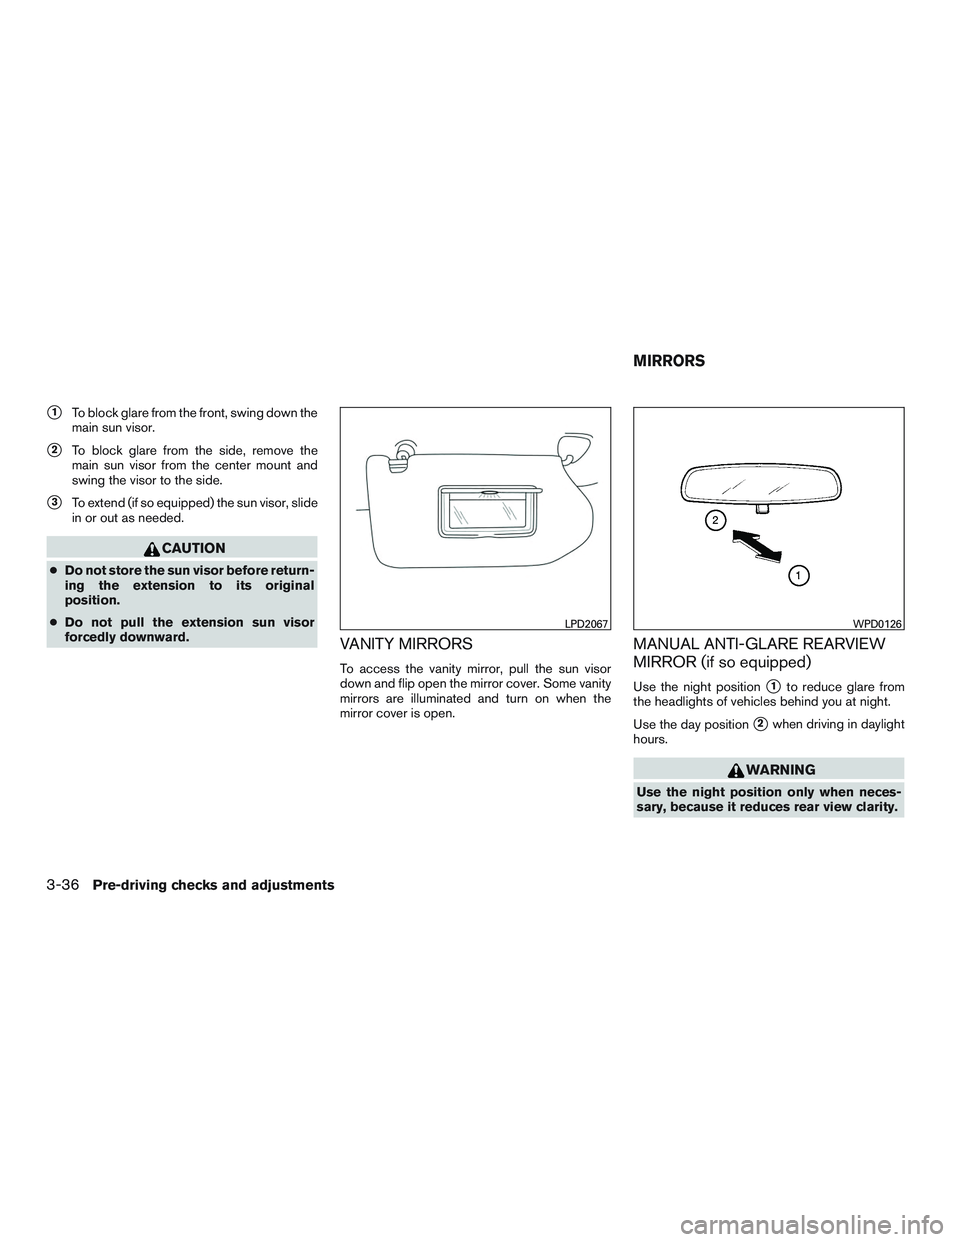
VANITY MIRRORS
To access the vanity mirror, pull the sun visor
down and flip open the mirror cover. Some vanity
mirrors are illuminated and turn on when the
mirror cover is open.
MANUAL ANTI-GLARE REARVIEW
MIRROR (if so equipped)
Use the night position�1to reduce glare from
the headlights of vehicles behind you at night.
Use the day position
�2when driving in daylight
hours.
WARNING
Use the night position only when neces-
sary, because it reduces rear view clarity.
LPD2067WPD0126
MIRRORS
3-36Pre-driving checks and adjustments
Page 174 of 491

The inside mirror is designed so that it automati-
cally dims during night time conditions and ac-
cording to the intensity of the headlights of t")
AUTOMATIC ANTI-GLARE
REARVIEW MIRROR (if so equipped)
The inside mirror is designed so that it automati-
cally dims during night time conditions and ac-
cording to the intensity of the headlights of the
vehicle following you. The automatic anti-glare
feature is activated when the ignition switch is in
the ON position.
The indicator light
�2will illuminate when the
automatic anti-glare feature is operating.
NOTE:
Do not hang any objects over the sensors
�1or apply glass cleaner to the sensors.
Doing so will reduce the sensitivity of the
sensors, resulting in improper operation.
Type A (if so equipped) , Type B (if so
equipped) and Type C (if so equipped)
The indicator light�2will illuminate when the
automatic anti-glare feature is operating.
To turn off the automatic anti-glare feature, press:
● the
button for inside mirrors without
compass and without HomeLink® Universal
Transceiver.
● the O button for inside mirrors without
compass. ●
the
button for inside mirrors with
compass.
The indicator light will turn off.
To turn on the automatic anti-glare feature again,
press:
● the | button for inside mirrors without
compass.
● the
button for inside mirrors with
compass.
The indicator light will turn on.
Type A (if so equipped)
WPD0446
Type B - Without compass (if so equipped)
LPD0469
Pre-driving checks and adjustments3-37
Page 400 of 491

8 Maintenance and do-it-yourself
Maintenance requirements..........................8-2
General maintenance ..............................8-2
Explanation of general maintenance items .........8-2
Maintenance precautions ...........................8-5
Engine compartment check locations ................8-7
Engine cooling system .............................8-9
Checking engine coolant level ..................8-10
Changing engine coolant .......................8-10
Engine oil ........................................ 8-11
Checking engine oil level .......................8-11
Changing engine oil ........................... 8-12
Changing engine oil filter .......................8-14
Continuously Variable Transmission (CVT) fluid ......8-15
Power steering fluid ............................... 8-15
Brake fluid ....................................... 8-16
Windshield-washer fluid ........................... 8-16
Windshield-washer fluid reservoir ...............8-16
Battery .......................................... 8-17
Jump starting ................................. 8-19
Variable voltage control system .....................8-19
Drive belt ........................................ 8-20
Spark plugs ...................................... 8-21Replacing spark plugs
......................... 8-21
Air cleaner ....................................... 8-22
In-cabin microfilter (if so equipped) ..............8-22
Windshield wiper blades .......................... 8-23
Cleaning ..................................... 8-23
Replacing .................................... 8-23
Brakes .......................................... 8-24
Fuses ........................................... 8-25
Engine compartment ........................... 8-25
Passenger compartment .......................8-26
Battery replacement .............................. 8-27
NISSAN Intelligent Key® .......................8-28
Lights ........................................... 8-29
Headlights .................................... 8-29
Fog
lights (if so equipped) ...................... 8-29
Exterior and interior lights .......................8-31
Wheels and tires ................................. 8-34
Tire pressure .................................. 8-34
Tire labeling ................................... 8-38
Types of tires .................................. 8-41
Tire chains .................................... 8-42
Changing wheels and tires .....................8-43