2016 NISSAN ALTIMA SEDAN Automatic start
[x] Cancel search: Automatic startPage 164 of 491
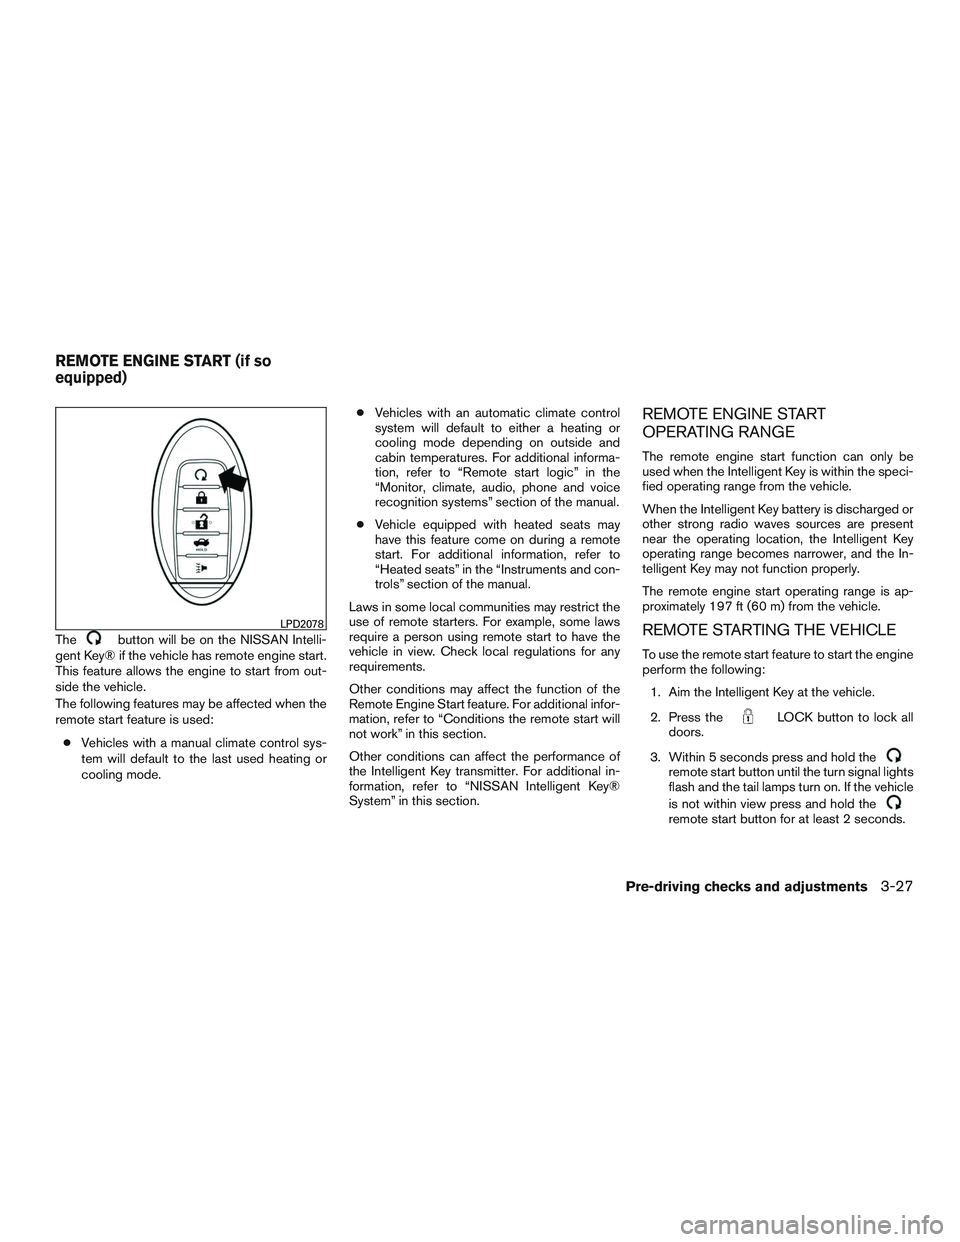
Thebutton will be on the NISSAN Intelli-
gent Key® if the vehicle has remote engine start.
This feature allows the engine to start from out-
side the vehicle.
The following features may be affected when the
remote start feature is used:
● Vehicles with a manual climate control sys-
tem will default to the last used heating or
cooling mode. ●
Vehicles with an automatic climate control
system will default to either a heating or
cooling mode depending on outside and
cabin temperatures. For additional informa-
tion, refer to “Remote start logic” in the
“Monitor, climate, audio, phone and voice
recognition systems” section of the manual.
● Vehicle equipped with heated seats may
have this feature come on during a remote
start. For additional information, refer to
“Heated seats” in the “Instruments and con-
trols” section of the manual.
Laws in some local communities may restrict the
use of remote starters. For example, some laws
require a person using remote start to have the
vehicle in view. Check local regulations for any
requirements.
Other conditions may affect the function of the
Remote Engine Start feature. For additional infor-
mation, refer to “Conditions the remote start will
not work” in this section.
Other conditions can affect the performance of
the Intelligent Key transmitter. For additional in-
formation, refer to “NISSAN Intelligent Key®
System” in this section.
REMOTE ENGINE START
OPERATING RANGE
The remote engine start function can only be
used when the Intelligent Key is within the speci-
fied operating range from the vehicle.
When the Intelligent Key battery is discharged or
other strong radio waves sources are present
near the operating location, the Intelligent Key
operating range becomes narrower, and the In-
telligent Key may not function properly.
The remote engine start operating range is ap-
proximately 197 ft (60 m) from the vehicle.
REMOTE STARTING THE VEHICLE
To use the remote start feature to start the engine
perform the following: 1. Aim the Intelligent Key at the vehicle.
2. Press the
LOCK button to lock all
doors.
3. Within 5 seconds press and hold the
remote start button until the turn signal lights
flash and the tail lamps turn on. If the vehicle
is not within view press and hold the
remote start button for at least 2 seconds.
LPD2078
REMOTE ENGINE START (if so
equipped)
Pre-driving checks and adjustments3-27
Page 170 of 491
FUEL-FILLER CAP
WARNING
●Gasoline is extremely flammable and
highly explosive under certain condi-
tions. You could be burned or seriously
injured if it is misused or mishandled.
Always stop the engine and do not
smoke or allow open flames or sparks
near the vehicle when refueling.
● Do not attempt to top off the fuel tank
after the fuel pump nozzle shuts off
automatically. Continued refueling may
cause fuel overflow, resulting in fuel
spray and possibly a fire.
● Use only an original equipment type
fuel-filler cap as a replacement. It has a
built-in safety valve needed for proper
operation of the fuel system and emis-
sion control system. An incorrect cap
can result in a serious malfunction and
possible injury. It could also cause
the
Malfunction Indicator Light
(MIL) to come on.
● Never pour fuel into the throttle body to
attempt to start your vehicle. ●
Do not fill a portable fuel container in
the vehicle or trailer. Static electricity
can cause an explosion of flammable
liquid, vapor or gas in any vehicle or
trailer. To reduce the risk of serious
injury or death when filling portable fuel
containers:
– Always place the container on the ground when filling.
– Do not use electronic devices when filling.
– Keep the pump nozzle in contact with the container while you are fill-
ing it.
– Use only approved portable fuel con- tainers for flammable liquid.
CAUTION
●Do not use E-15 or E-85 fuel in your
vehicle. For additional information, re-
fer to “Fuel recommendation” in the
“Technical and consumer information”
section of this manual. ●
The LOOSE FUEL CAP warning will ap-
pear if the fuel-filler cap is not properly
tightened. It may take a few driving trips
for the message to be displayed. Failure
to tighten the fuel-filler cap properly
after the LOOSE FUEL CAP warning ap-
pears may cause the
Malfunction
Indicator Light (MIL) to illuminate.
● Failure to tighten the fuel-filler cap
properly may cause the
Malfunc-
tion Indicator Light (MIL) to illuminate.
If the
light illuminates because
the fuel-filler cap is loose or missing,
tighten or install the cap and continue
to drive the vehicle. The
light
should turn off after a few driving trips.
If the
light does not turn off after a
few driving trips, have the vehicle in-
spected. It is recommended you visit a
NISSAN dealer for this service.
● For additional information, refer to
“Malfunction Indicator Light (MIL)” in
the “Instruments and controls” section
of this manual.
● If fuel is spilled on the vehicle body,
flush it away with water to avoid paint
damage.
Pre-driving checks and adjustments3-33
Page 196 of 491
Ventilation
This mode directs outside air to the side and
center vents.1. Press the
button to the OFF position.
2. Press the
air flow control button.
3. Turn the
fan control dial to the desired
position.
4. Turn the temperature control dial to the de- sired position.
Defrosting or defogging
This mode directs the air to the defrost outlets to
defrost/defog the windows.
1. Press the
defrost/defog button .
2. Turn the
fan control dial to the desired
position.
3. Turn the temperature control dial to the de- sired position between the middle and the
hot position.
● To quickly remove ice or fog from the win-
dows, turn the
fan control dial to the
highest setting and the temperature control
to the full HOT position. ●
When the
position is selected, the air
conditioner automatically turns on if the out-
side temperature is more than 36°F (2°C) .
This dehumidifies the air which helps defog
the windshield. The
mode automati-
cally turns off, allowing outside air to be
drawn into the passenger compartment to
further improve the defogging performance.
The recirculation mode cannot be activated
in the
position.
Bi-level heating
The bi-level mode directs warmed air to the side
and center vents and to the front and rear floor
outlets.
1. Press the
button to the OFF position.
2. Press the
air flow control button.
3. Turn the
fan control dial to the desired
position.
4. Turn the temperature control dial to the de- sired position.
Heating and defogging
This mode heats the interior and defogs the wind-
shield.
1. Press the
air flow control button. 2. Turn the
fan control dial to the desired
position.
3. Turn the temperature control dial to the de- sired position between the middle and the
hot position.
● When the
position is selected, the air
conditioner automatically turns on if the out-
side temperature is more than 36°F (2°C) .
This dehumidifies the air which helps defog
the windshield. The
mode automati-
cally turns off, allowing outside air to be
drawn into the passenger compartment to
further improve the defogging performance.
The recirculation mode cannot be activated
in the
position.
Operating tips
Clear snow and ice from the wiper blades
and air inlet in front of the windshield. This
improves heater operation.
AIR CONDITIONER OPERATION
Start the engine, turn thefan control dial to
the desired position, and press the
button
to activate the air conditioner. When the air con-
ditioner is on, cooling and dehumidifying func-
tions are added to the heater operation.
The air conditioner cooling function oper-
ates only when the engine is running.
Monitor, climate, audio, phone and voice recognition systems4-19
Page 201 of 491
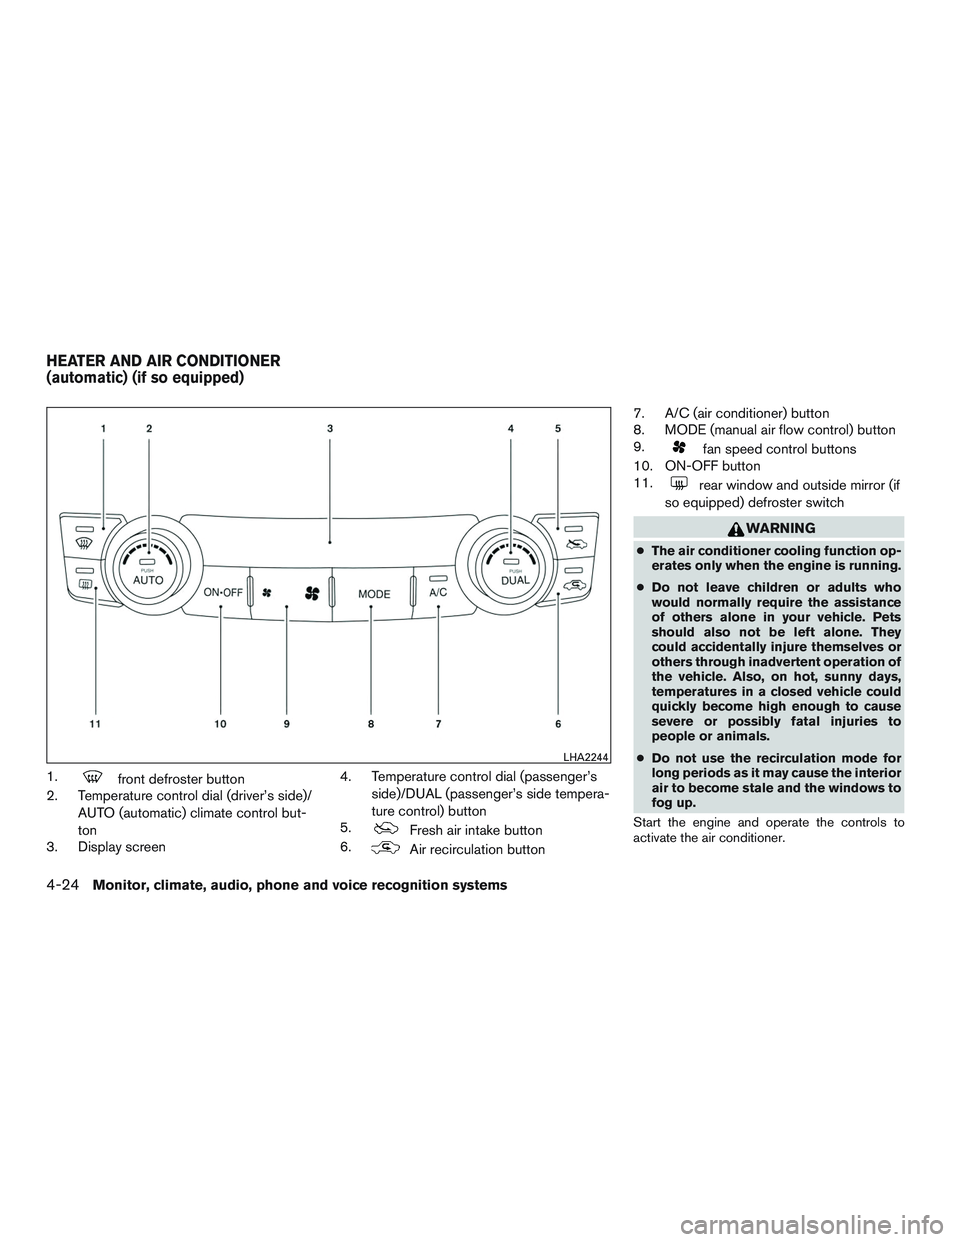
1.front defroster button
2. Temperature control dial (driver’s side)/
AUTO (automatic) climate control but-
ton
3. Display screen 4. Temperature control dial (passenger’s
side)/DUAL (passenger’s side tempera-
ture control) button
5.
Fresh air intake button
6.
Air recirculation button 7. A/C (air conditioner) button
8. MODE (manual air flow control) button
9.
fan speed control buttons
10. ON-OFF button
11.
rear window and outside mirror (if
so equipped) defroster switch
WARNING
● The air conditioner cooling function op-
erates only when the engine is running.
● Do not leave children or adults who
would normally require the assistance
of others alone in your vehicle. Pets
should also not be left alone. They
could accidentally injure themselves or
others through inadvertent operation of
the vehicle. Also, on hot, sunny days,
temperatures in a closed vehicle could
quickly become high enough to cause
severe or possibly fatal injuries to
people or animals.
● Do not use the recirculation mode for
long periods as it may cause the interior
air to become stale and the windows to
fog up.
Start the engine and operate the controls to
activate the air conditioner.
LHA2244
HEATER AND AIR CONDITIONER
(automatic) (if so equipped)
4-24Monitor, climate, audio, phone and voice recognition systems
Page 203 of 491
Remote start logic (if so equipped)
Vehicles equipped with automatic climate con-
trols and remote start function may go into auto-
matic heating or cooling mode when remote start
is activated depending on outside and cabin tem-
peratures. During this period, the climate control
display and buttons will be inoperable until igni-
tion switch is turned on.
MANUAL OPERATION
Fan speed control
Press thefan speed control buttons to
manually control the fan speed.
Press the AUTO button to return to automatic
control of the fan speed.
Air recirculation
Press theair recirculation button to recir-
culate interior air inside the vehicle.
The air recirculation cannot be activated when
the air conditioner is in the
front defogging
mode.
Fresh air intake
Press thefresh air intake button to draw
outside air into the passenger compartment.
Air flow control
Pressing the MODE button manually controls air
flow and selects the air outlet:
— Air flows from center and side
vents.
— Air flows from center and sidevents and foot outlets.
— Air flows mainly from foot outlets.
— Air flows from defroster and footoutlets.
To turn system off
Press the ON-OFF button.
OPERATING TIPS
●When the engine coolant temperature and
outside air temperature are low, the air flow
from the foot outlets may not operate for a
maximum of 150 seconds. However, this is
not a malfunction. After the coolant tempera-
ture warms up, air flow from the foot outlets
will operate normally. The sunload sensor, located on the top driver’s
side of the instrument panel, helps the system
maintain a constant temperature. Do not put any-
thing on or around this sensor.
LHA1136
4-26Monitor, climate, audio, phone and voice recognition systems
Page 214 of 491
Press the FM button to change the band as
follows:
FM1→FM2 →FM1
If another audio source is playing when the FM
button is pressed, the audio source playing will
automatically be turned off and the last radio
station played will begin playing.
SEEK and TRACK (tuning) buttons
Press the SEEK button
to tune from low to
high frequencies and stop at the next broadcast-
ing station.
Press the TRACK button
to tune from high
to low frequencies and stop at the next broad-
casting station.
Press and hold either button to seek at a faster
speed.
SCAN (tuning) button
Press the SCAN button. SCAN illuminates in the
display window. Scan tuning begins from low to
high frequencies. Scan tuning stops for 5 sec-
onds at each broadcasting station that has suffi-
cient signal strength. When scanning, SCAN
blinks in the display. Pressing the SCAN button
again during this 5 second period stops scan
tuning and the radio remains tuned to that station. TUNE/FOLDER knob tuning
Turn the TUNE/FOLDER knob to the left or right
for manual tuning.
1 to 6 Station memory operations
Twelve stations can be set for the FM band (6 for
FM1, 6 for FM2) and six stations can be set for
the AM band.
1. Choose the radio band AM, FM1 or FM2 using the AM or FM button.
2. Tune to the desired station using manual, SEEK or SCAN tuning. Press and hold any
of the desired station memory buttons (1 –
6) until a beep sound is heard.
3. The channel indicator will then come on and the sound will resume. Programming is now
complete.
4. Other buttons can be set in the same man- ner.
If the battery cable is disconnected or if the fuse
opens, the radio memory will be canceled. In that
case, reset the desired stations.
Compact disc (CD) player operation
Place the ignition switch in the ACC or ON
position, and carefully insert the compact disc into the slot with the label side up. The compact
disc is automatically pulled into the slot and starts
to play.
If the radio is already operating, it automatically
turns off and the compact disc begins to play.
CD button
When the CD button is pressed with a compact
disc loaded and the radio playing, the radio turns
off and the last used compact disc starts to play.
SEEK and TRACK (Fast
Forward, Rewind) buttons
When the SEEK button
or TRACKbutton is pressed while the compact disc is play-
ing, the compact disc plays at an increased
speed while fast forwarding or rewinding. When
the button is released, the compact disc returns
to normal play speed.
SEEK and TRACK buttons
When the SEEK
button is pressed while
the compact disc is playing, the next track follow-
ing the present one starts to play from the begin-
ning. Press the SEEK
button several times
to skip several tracks. Each time the button is
pressed, the CD advances one additional track.
The track number appears in the display window.
Monitor, climate, audio, phone and voice recognition systems4-37
Page 231 of 491
REWIND/
FAST
FORWARDTo rewind/ fast forward a
track, hold the
or
seek/track button.
Compact disc (CD) player operation
If the radio is already operating, it automatically
turns off and the compact disc begins to play.
CD button
When the CD button is pressed with the system
off and the compact disc loaded, the system will
turn on and the compact disc will start to play. When the CD button is pressed with a compact
disc loaded and the radio playing, the radio will
automatically be turned off and the compact disc
will start to play.
CD/MP3 display mode
Menu item
CD/MP3 display mode While listening to a CD or an MP3/WMA CD, certain text may be displayed (when a CD encoded with text is
being used) . Depending on how the CD or MP3/WMA CD is encoded, the text is displayed listing the artist,
album and song title. There are other keys displayed on the screen when a CD is playing:
Random Touch the “Random” key to apply a random play pattern to the CD. If an MP3 CD is playing, touching “Ran-
dom” or alternates between Random Folder, and Random All. This text will appear on the display. To cancel
Random mode, touch the “Random” key until the key is no longer highlighted.
Repeat Touch the “Repeat” key to apply a repeat play pattern to the CD. If an MP3 CD is playing, touching “Repeat”
alternates between repeating the current song and repeating the current folder. This text will appear on the
display. To cancel Repeat mode, touch the “Repeat” key until the key is no longer highlighted
Browse Touch the “Browse” key to display the titles on the CD in list format. Touch the title of a song in the list to begin
playing that song. If an MP3 CD is playing, touching the “Browse” key will also list the folders on the disc. Fol-
low the procedure for selecting a song with the touch-screen to choose a folder.
4-54Monitor, climate, audio, phone and voice recognition systems
Page 249 of 491
Models without navigation system1. Connect a Siri Eyes Free enabled iPhone® to the vehicle. For additional information,
refer to “Initialization” in this section.
2. After the Bluetooth® connection is estab- lished, the switch operation select screen is
displayed.
3. Select “Short Press” or “Long Press” for Siri Eyes Free activation Switch action can also
be changed from the Bluetooth® settings
menu. For additional information, refer to
“Changing Siri Eyes Free Settings (models
without navigation system” in this section.
OPERATING SIRI® EYES FREE
1. Push or push and hold theTALK
switch.
2. Speak your command and then listen to the Siri Eyes Free reply.
After starting Siri Eyes Free, push the
TALK switch again within 5 seconds of the end of
the Siri Eyes Free announcement to extend the
session.
Example 1 – Playing music
1. Push or push and hold the
TALK
switch.
2. Say “Play (artist name, song name, etc.)”. 3. Your vehicle will automatically change to
Bluetooth® Audio or iPod® mode* when
the music starts playing. Mode selection is
determined by the phone.
* If the iPhone® is also connected with the USB
cable.
If the audio track does not start playing automati-
cally after Siri Eyes Free ends, try changing the
track or audio source to resume playback.
NOTE:
For best results, use the native music app.
Performance of music control function
while using Podcasts, Audiobook or other
3rd party music apps may vary and is con-
trolled by the iPhone®.
Example 2 – Replying to text messages 1. If a compatible iPhone® is connected and “Show Notifications” of the iPhone® set-
tings is enabled, the vehicle will display a
notification for new incoming text messages.
2. After reading the message, push or push and hold the
TALK switch to reply
using Siri Eyes Free.
3. After a beep sounds, say “Text message” or a similar command to reply using Siri Eyes
Free.
CHANGING SIRI® EYES FREE
SETTINGS (models without navigation
system)
Settings for Siri Eyes Free can be found in the
Bluetooth settings menu. For additional informa-
tion, refer to “Bluetooth® settings” in this section.
1. Press the ENTER/SETTING button.
2. Use the TUNE/FOLDER or TUNE/SCROLL knob to select “Bluetooth” and then press
the ENTER/SETTING button.
3. Use the TUNE/FOLDER or TUNE/SCROLL knob to select “Siri” and then press the
ENTER/SETTING button.
4. Select “Short Press” or “Long Press” using the TUNE/FOLDER or TUNE/SCROLL
knob and then press the ENTER/SETTING
button.
4-72Monitor, climate, audio, phone and voice recognition systems