2016 NISSAN 370Z ROADSTER tire pressure
[x] Cancel search: tire pressurePage 332 of 428
psi (180 kPa) within 10 minutes, the tire
may be seriously damaged andthe tire
cannot be repaired with this tire repair
kit. Contact a NISSAN dealer.
7. When the tire pressure is at the specified amount, turn the air compressor off. If the
pressure cannot be inflated to the specified
amount, the air compressor can be turned
off at the minimum of 26 psi (180 kPa) .
Remove the power plug from the power
outlet and quickly remove the hose from the
tire valve. Attach the protective cap and
valve cap. Properly stow the emergency tire
puncture repair kit in the trunk.
CAUTION
To avoid serious personal injury when
stowing the emergency tire puncture
repair kit:
.Keep the sealant bottle screwed
into the compressor. Failure to do
so can cause the sealant to spray
into the air and get into your eyes or
on the skin.
8. Immediately drive the vehicle for 10 minutes or 2 miles (3 km) at a speed of 50 MPH (80
km/h) or less. 9. After driving, make sure that the air com-
pressor switch is in the OFF position, then
screw the hose securely onto the tire valve.
Check the tire pressure with the pressure
gauge. The temporary repair is completed if
the tire pressure does not drop.
Make sure the pressure is adjusted to the
pressure that is specified on the tire and
loading information label before driving.
10. If the tire pressure drops, repeat the steps from 5 to 9. If the pressure drops again or
under 19 psi (130 kPa), the tire cannot be
repaired with this tire repair kit. Contact
a NISSAN dealer.
The sealant bottle and hose can not be
reused to repair another punctured tire.
Contact a NISSAN dealer to purchase
replacements.
After repairing tire
See a NISSAN dealer for tire repair/replacement
as soon as possible.
WARNING
. After using Emergency Tire Sealant
to repair a minor tire puncture, do
not drive the vehicle at speeds
faster than 50 MPH (80 km/h) . .
Immediately after using Emergency
Tire Sealant to repair a minor tire
puncture, take your vehicle to a
NISSAN dealer to inspect, and re-
pair or replace the tire. The Emer-
gency Tire Sealant cannot
permanently seal a punctured tire.
Continuing operation of the vehicle
without a permanent tire repair can
lead to a crash.
. NISSAN recommends using only
Genuine NISSAN Emergency Tire
Sealant provided with your vehicle.
Other tire sealants may damage the
valve stem seal which can cause the
tire to lose air pressure. Visit a
NISSAN dealer as soon as possible
after using tire repair sealant.
In case of emergency6-13
Page 345 of 428
7-4Appearance and care
damage the vehicle finish.
Machine compound or aggressive polishing on a
base coat/clear coat paint finish may dull the
finish or leave swirl marks.
REMOVING SPOTS
Remove tar and oil spots, industrial dust,
insects, and tree sap as quickly as possible
from the paint surface to avoid lasting damage
or staining. Special cleaning products are
available at a NISSAN dealer or any automotive
accessory stores.
UNDERBODY
In areas where road salt is used in winter, the
underbody must be cleaned regularly. This will
prevent dirt and salt from building up and
causing the acceleration of corrosion on the
underbody and suspension. Before the winter
period and again in the spring, the underseal
must be checked and, if necessary, re-treated.
GLASS
Use glass cleaner to remove smoke and dust
film from the glass surfaces. It is normal for glass
to become coated with a film after the vehicle is
parked in the hot sun. Glass cleaner and a soft
cloth will easily remove this film.
CAUTION
. When cleaning the inside of the
windows, do not use sharp-edged
tools, abrasive cleaners or chlorine-
based disinfectant cleaners. They
could damage the electrical conduc-
tors, radio antenna elements or rear
window defroster elements.
. If glass cleaner gets on the soft top,
immediately wash it off with clean
water (Roadster models) .
WHEELS
Wash the wheels when washing the vehicle to
maintain their appearance.
.Clean the inner side of the wheels when the
wheel is changed or the underside of the
vehicle is washed.
. Inspect wheel rims regularly for dents or
corrosion. Such damage may cause loss of
pressure or poor seal at the tire bead.
. NISSAN recommends that the road wheels
be waxed to protect against road salt in
areas where it is used during winter.
CAUTION
Do not use abrasive cleaners when
washing the wheels.
Aluminum alloy wheels
Wash regularly with a sponge dampened in a
mild soap solution, especially during winter
months in areas where road salt is used. Salt
could discolor the wheels if not removed.
CAUTION
Follow the directions below to avoid
staining or discoloring the wheels:
.Do not use a cleaner that uses
strong acid or alkali contents to
clean the wheels.
. Do not apply wheel cleaners to the
wheels when they are hot. The
wheel temperature should be the
same as ambient temperature.
. Rinse the wheel to completely re-
move the cleaner within 15 minutes
after the cleaner is applied.
Page 350 of 428
8 Maintenance and do-it-yourself
Maintenance requirements ...................................................... 8-3Scheduled maintenance .................................................... 8-3
General maintenance ......................................................... 8-3
Where to go for service .................................................... 8-3
General maintenance ............................................................... 8-3 Explanation of maintenance items ................................... 8-3
Maintenance precautions ........................................................ 8-6
Engine compartment check locations .................................. 8-7 VQ37VHR engine model .................................................. 8-7
Engine cooling system ............................................................. 8-8
Checking engine coolant level ......................................... 8-9
Changing engine coolant .................................................. 8-9
Engine oil ........................................................................\
......... 8-10
Checking engine oil level ............................................... 8-10
Changing engine oil and filter ....................................... 8-10
Automatic Transmission Fluid (ATF) .................................. 8-12
Power steering fluid ............................................................... 8-12
Brake and clutch fluid ........................................................... 8-13 Brake fluid ........................................................................\
.. 8-13
Clutch fluid (Manual transmission models) ............... 8-14
Window washer fluid ............................................................ 8-14
Battery ........................................................................\
............... 8-15 Jump starting ..................................................................... 8-17 Variable voltage control system ......................................... 8-17
Drive belts ........................................................................\
....... 8-18
Spark plugs ........................................................................\
..... 8-18
Replacing spark plugs .................................................. 8-19
Air cleaner ........................................................................\
....... 8-19
Windshield wiper blades ..................................................... 8-20
Cleaning ........................................................................\
... 8-20
Replacing ........................................................................\
. 8-20
Brakes ........................................................................\
.............. 8-21 Self-adjusting brakes .................................................... 8-21
Brake pad wear warning .............................................. 8-21
Fuses ........................................................................\
................ 8-22 Engine compartment ..................................................... 8-22
Passenger compartment .............................................. 8-23
Intelligent Key battery replacement ................................... 8-24
Lights ........................................................................\
................ 8-26
Coupe ........................................................................\
....... 8-26
Roadster ........................................................................\
... 8-27
Headlights ........................................................................\
8-27
Exterior and interior lights ............................................ 8-28
Wheels and tires ................................................................... 8-30 Tire pressure ................................................................... 8-30
Tire labeling ..................................................................... 8-33
Page 353 of 428
8-4Maintenance and do-it-yourself
Lights*:Clean the headlights on a regular basis.
Make sure that the headlights, stop lights, tail
lights, turn signal lights, and other lights are all
operating properly and installed securely. Also
check headlight aim.
Road wheel nuts (lug nuts)*: When checking
the tires, make sure no wheel nuts are missing,
and check for any loose wheel nuts. Tighten if
necessary.
Tire rotation*: Tires cannot be rotated, as the
front tires are a different size from the rear tires
and the direction of wheel rotation is fixed in
each tire.
Tires*: Check the pressure with a gauge often
and always prior to long distance trips. If
necessary, adjust the pressure in all tires,
including the spare, to the pressure specified.
Check carefully for damage, cuts or excessive
wear.
Tire Pressure Monitoring System (TPMS)
transmitter components: Replace the TPMS
transmitter grommet seal, valve core and cap
when the tires are replaced due to wear or age.
Tire, wheel alignment and balance: If the
vehicle should pull to either side while driving on
a straight and level road, or if you detect uneven
or abnormal tire wear, there may be a need for
wheel alignment. If the steering wheel or seat vibrates at normal
highway speeds, wheel balancing may be
needed.
For additional information regarding tires, refer
to “Important Tire Safety Information” (US) or
“Tire Safety Information” (Canada) in the
NISSAN Warranty Information Booklet.
Windshield:
Clean the windshield on a regular
basis. Check the windshield at least every six
months for cracks or other damage. Have a
damaged windshield repaired by a qualified
repair facility.
Windshield wiper blades*: Check for cracks
or wear if they do not wipe properly.
Inside the vehicle
The maintenance items listed here should be
checked on a regular basis, such as when
performing scheduled maintenance, cleaning
the vehicle, etc.
Accelerator pedal: Check the pedal for
smooth operation and make sure the pedal
does not catch or require uneven effort. Keep
the floor mat away from the pedal.
Automatic transmission P (Park) mechan-
ism: On a fairly steep hill, check that your
vehicle is held securely with the shift lever in the
P (Park) position without applying any brakes. Brake pedal:
Check the pedal for smooth
operation. If the brake pedal suddenly goes
down further than normal, the pedal feels
spongy or the vehicle seems to take longer to
stop, see a NISSAN dealer immediately. Keep
the floor mat away from the pedal.
Brakes: Check that the brakes do not pull the
vehicle to one side when applied.
Parking brake: Check the parking brake
operation regularly. The vehicle should be
securely held on a fairly steep hill with only the
parking brake applied. If the parking brake needs
adjusted, see a NISSAN dealer.
Seat belts: Check that all parts of the seat belt
system (for example, buckles, anchors, adjuster
and retractors) operate properly and smoothly,
and are installed securely. Check the belt
webbing for cuts, fraying, wear or damage.
Seats: Check seat position controls such as
seat adjusters, seatback recliner, etc. to ensure
they operate smoothly and that all latches lock
securely in every position. Check that the head
restraints move up and down smoothly and that
the locks (if so equipped) hold securely in all
latched positions.
Steering wheel: Check for changes in the
steering conditions, such as excessive free play,
hard steering or strange noises.
Page 379 of 428
8-30Maintenance and do-it-yourself
If you have a flat tire, see “Flat tire” (P.6-3) .
TIRE PRESSURE
Tire Pressure Monitoring System (TPMS)
This vehicle is equipped with the Tire Pressure
Monitoring System (TPMS) . It monitors tire
pressure of all tires except the spare. When
the low tire pressure warning light is lit and the
CHECK TIRE PRESSURE warning appears on
the vehicle information display, one or more of
your tires is significantly under-inflated.
The TPMS will activate only when the vehicle is
driven at speeds above 16 MPH (25 km/h) .
Also, this system may not detect a sudden drop
in tire pressure (for example a flat tire while
driving) .
For more details, see “Low tire pressure warning
light” (P.2-13) , “Tire Pressure Monitoring Sys-
tem (TPMS)” (P.5-3) and “Tire Pressure Mon-
itoring System (TPMS)” (P.6-3) .
Tire inflation pressure
Check the pressure of the tires (including
the spare) often and always prior to long
distance trips. The recommended tire
pressure specifications are shown on the
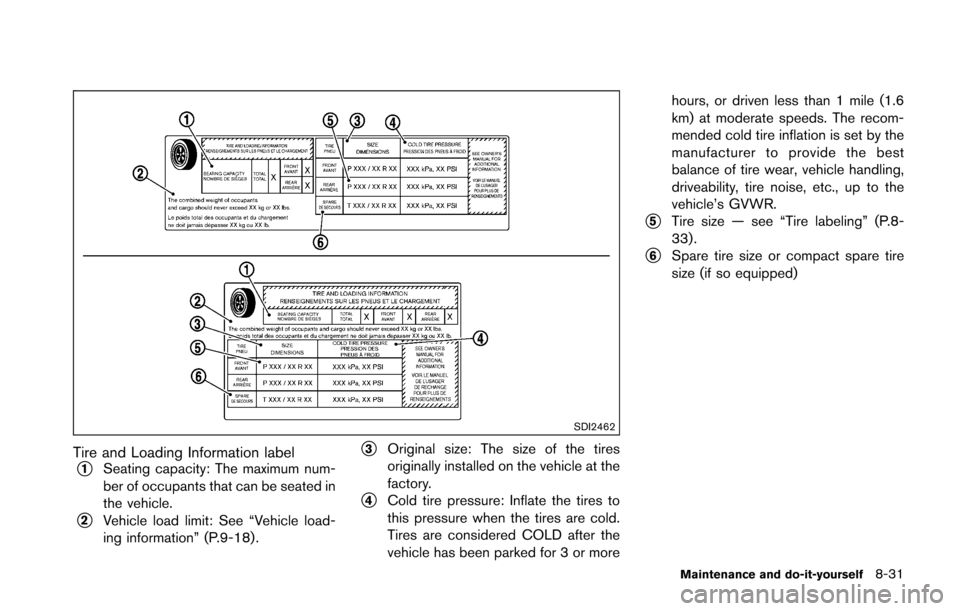
Tire and Loading Information label under
the “Cold Tire Pressure” heading. The Tire
and Loading Information label is affixed tothe driver side center pillar. Tire pressures
should be checked regularly because:
.
Most tires naturally lose air over time.
. Tires can lose air suddenly when driven
over potholes or other objects or if the
vehicle strikes a curb while parking.
The tire pressures should be checked
when the tires are cold. The tires are
considered COLD after the vehicle has
been parked for 3 or more hours, or driven
less than 1 mile (1.6 km) at moderate
speeds.
Incorrect tire pressure, including un-
der inflation, may adversely affect tire
life and vehicle handling.
WARNING
. Improperly inflated tires can fail
suddenly and cause an accident.
. The Gross Vehicle Weight rating
(GVWR) is located on the F.M.V.
S.S./C.M.V.S.S. label. The vehi-
cle weight capacity is indicated
on the Tire and Loading Infor-
mation label. Do not load your vehicle beyond this capacity.
Overloading your vehicle may
result in reduced tire life, unsafe
operating conditions due to pre-
mature tire failure, or unfavor-
able handling characteristics
and could also lead to a serious
accident. Loading beyond the
specified capacity may also re-
sult in failure of other vehicle
components.
. Before taking a long trip, or
whenever you heavily load your
vehicle, use a tire pressure
gauge to ensure that the tire
pressures are at the specified
level.
. For additional information re-
garding tires, refer to “Important
Tire Safety Information” (US) or
“Tire Safety Information” (Cana-
da) in the Warranty Information
Booklet.
WHEELS AND TIRES
Page 380 of 428
SDI2462
Tire and Loading Information label*1Seating capacity: The maximum num-
ber of occupants that can be seated in
the vehicle.
*2Vehicle load limit: See “Vehicle load-
ing information” (P.9-18) .
*3Original size: The size of the tires
originally installed on the vehicle at the
factory.
*4Cold tire pressure: Inflate the tires to
this pressure when the tires are cold.
Tires are considered COLD after the
vehicle has been parked for 3 or morehours, or driven less than 1 mile (1.6
km) at moderate speeds. The recom-
mended cold tire inflation is set by the
manufacturer to provide the best
balance of tire wear, vehicle handling,
driveability, tire noise, etc., up to the
vehicle’s GVWR.
*5Tire size — see “Tire labeling” (P.8-
33) .
*6Spare tire size or compact spare tire
size (if so equipped)
Maintenance and do-it-yourself8-31
Page 381 of 428
8-32Maintenance and do-it-yourself
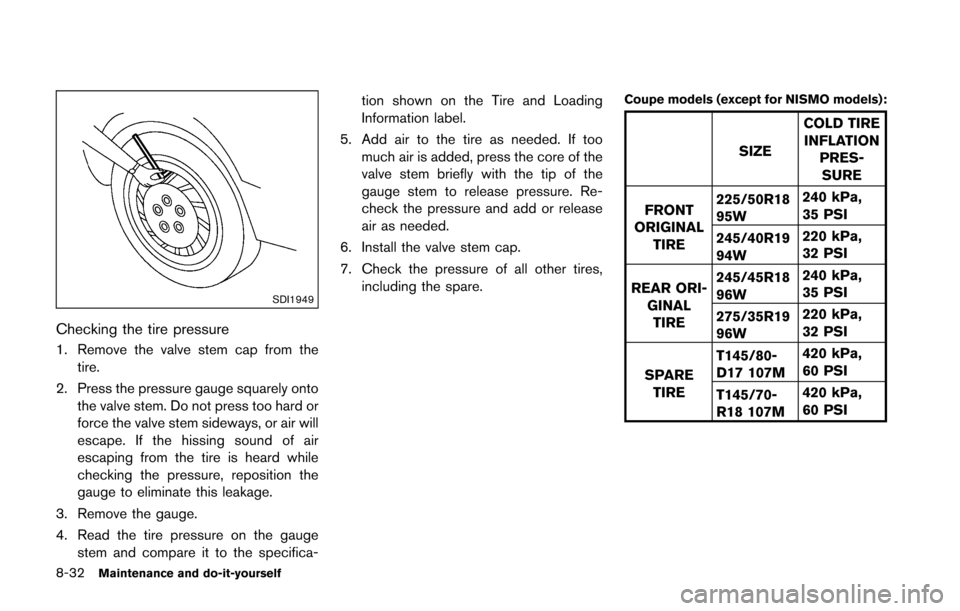
SDI1949
Checking the tire pressure
1. Remove the valve stem cap from thetire.
2. Press the pressure gauge squarely onto the valve stem. Do not press too hard or
force the valve stem sideways, or air will
escape. If the hissing sound of air
escaping from the tire is heard while
checking the pressure, reposition the
gauge to eliminate this leakage.
3. Remove the gauge.
4. Read the tire pressure on the gauge stem and compare it to the specifica- tion shown on the Tire and Loading
Information label.
5. Add air to the tire as needed. If too much air is added, press the core of the
valve stem briefly with the tip of the
gauge stem to release pressure. Re-
check the pressure and add or release
air as needed.
6. Install the valve stem cap.
7. Check the pressure of all other tires, including the spare.
Coupe models (except for NISMO models):
SIZE COLD TIRE
INFLATION PRES-
SURE
FRONT
ORIGINAL TIRE 225/50R18
95W
240 kPa,
35 PSI
245/40R19
94W 220 kPa,
32 PSI
REAR ORI- GINALTIRE 245/45R18
96W
240 kPa,
35 PSI
275/35R19
96W 220 kPa,
32 PSI
SPARE TIRE T145/80-
D17 107M
420 kPa,
60 PSI
T145/70-
R18 107M 420 kPa,
60 PSI
Page 384 of 428
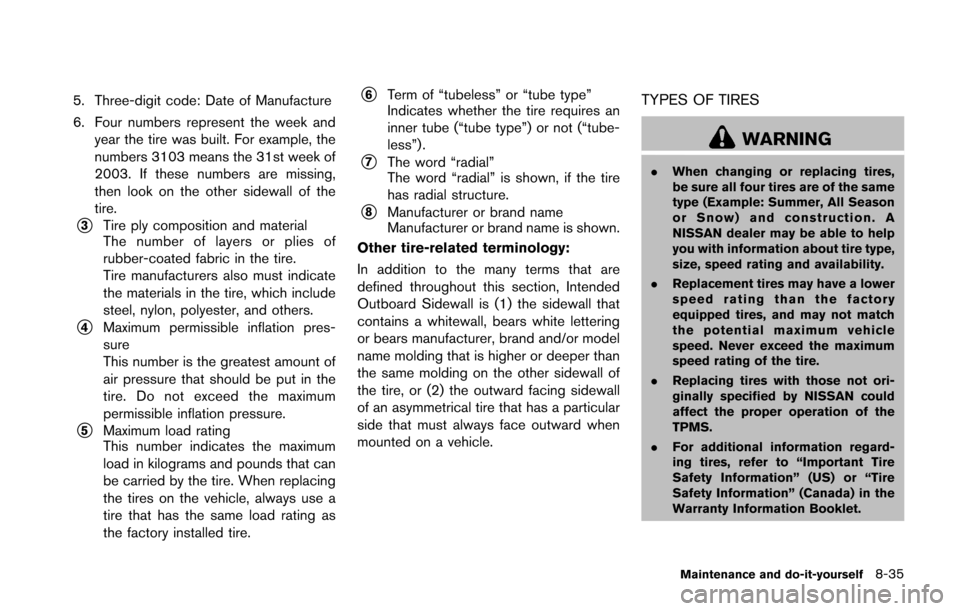
5. Three-digit code: Date of Manufacture
6. Four numbers represent the week andyear the tire was built. For example, the
numbers 3103 means the 31st week of
2003. If these numbers are missing,
then look on the other sidewall of the
tire.
*3Tire ply composition and material
The number of layers or plies of
rubber-coated fabric in the tire.
Tire manufacturers also must indicate
the materials in the tire, which include
steel, nylon, polyester, and others.
*4Maximum permissible inflation pres-
sure
This number is the greatest amount of
air pressure that should be put in the
tire. Do not exceed the maximum
permissible inflation pressure.
*5Maximum load rating
This number indicates the maximum
load in kilograms and pounds that can
be carried by the tire. When replacing
the tires on the vehicle, always use a
tire that has the same load rating as
the factory installed tire.
*6Term of “tubeless” or “tube type”
Indicates whether the tire requires an
inner tube (“tube type”) or not (“tube-
less”) .
*7The word “radial”
The word “radial” is shown, if the tire
has radial structure.
*8Manufacturer or brand name
Manufacturer or brand name is shown.
Other tire-related terminology:
In addition to the many terms that are
defined throughout this section, Intended
Outboard Sidewall is (1) the sidewall that
contains a whitewall, bears white lettering
or bears manufacturer, brand and/or model
name molding that is higher or deeper than
the same molding on the other sidewall of
the tire, or (2) the outward facing sidewall
of an asymmetrical tire that has a particular
side that must always face outward when
mounted on a vehicle.
TYPES OF TIRES
WARNING
. When changing or replacing tires,
be sure all four tires are of the same
type (Example: Summer, All Season
or Snow) and construction. A
NISSAN dealer may be able to help
you with information about tire type,
size, speed rating and availability.
. Replacement tires may have a lower
speed rating than the factory
equipped tires, and may not match
the potential maximum vehicle
speed. Never exceed the maximum
speed rating of the tire.
. Replacing tires with those not ori-
ginally specified by NISSAN could
affect the proper operation of the
TPMS.
. For additional information regard-
ing tires, refer to “Important Tire
Safety Information” (US) or “Tire
Safety Information” (Canada) in the
Warranty Information Booklet.
Maintenance and do-it-yourself8-35