2016 NISSAN 370Z COUPE lock
[x] Cancel search: lockPage 110 of 428
SIC3999
GLOVE BOX
WARNING
Keep glove box lid closed while driving
to help prevent injury in an accident or a
sudden stop.
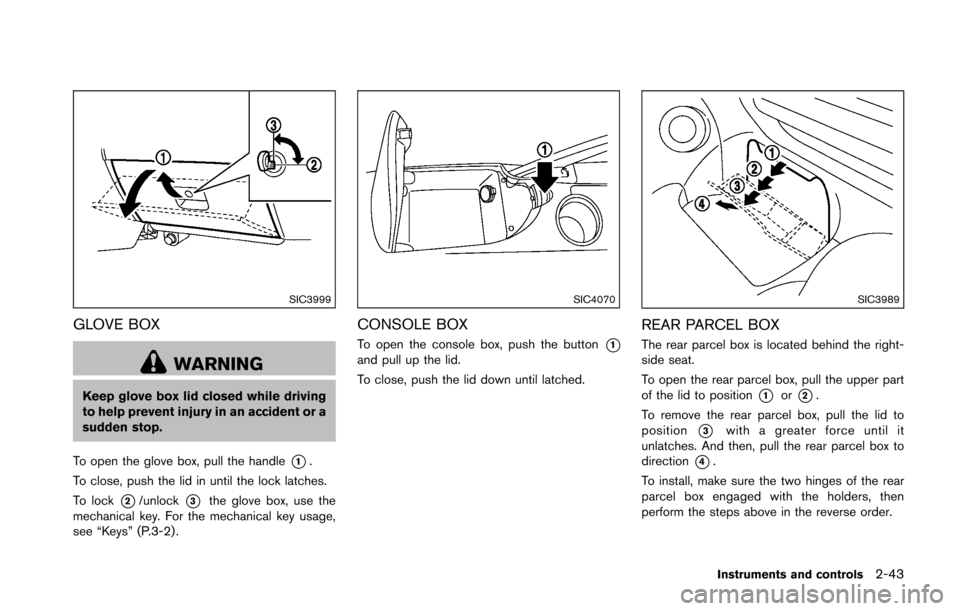
To open the glove box, pull the handle
*1.
To close, push the lid in until the lock latches.
To lock
*2/unlock*3the glove box, use the
mechanical key. For the mechanical key usage,
see “Keys” (P.3-2) .
SIC4070
CONSOLE BOX
To open the console box, push the button*1and pull up the lid.
To close, push the lid down until latched.
SIC3989
REAR PARCEL BOX
The rear parcel box is located behind the right-
side seat.
To open the rear parcel box, pull the upper part
of the lid to position
*1or*2.
To remove the rear parcel box, pull the lid to
position
*3with a greater force until it
unlatches. And then, pull the rear parcel box to
direction
*4.
To install, make sure the two hinges of the rear
parcel box engaged with the holders, then
perform the steps above in the reverse order.
Instruments and controls2-43
Page 112 of 428
sliding or shifting. Do not place
cargo higher than the seatbacks. In
a sudden stop or collision, unse-
cured cargo could cause personal
injury.
. Your child could be seriously injured
or killed in a collision if the child
restraint top tether strap is da-
maged.
— If the cargo cover contacts the
top tether strap when it is at-
tached to the top tether anchor,
remove the cargo cover from the
vehicle or secure it on the cargo
floor below its attachment loca-
tion. If the cargo cover is not
removed, it may damage the top
tether strap during a collision.
— Do not allow cargo to contact the top tether strap when it is
attached to the top tether an-
chor. Properly secure the cargo
so it does not contact the top
tether strap. Cargo that is not
properly secured or that con-
tacts the top tether strap may
damage the top tether strap
during a collision.POWER WINDOWS
WARNING
. Make sure that all passengers have
their hands, etc. inside the vehicle
while it is in motion and before
closing the windows. Use the win-
dow lock switch to prevent unex-
pected use of the power windows.
. Do not leave children unattended
inside the vehicle. They could un-
knowingly activate switches or con-
trols and become trapped in the
window. Unattended children could
become involved in serious acci-
dents.
The power windows operate when the ignition
switch is in the ON position or for about 45
seconds after the ignition switch is pushed to
the OFF position. If the driver’s or front
passenger’s door is opened during this period
of about 45 seconds, power to the windows is
canceled.
The power window switches will be deactivated
during soft top operation (Roadster models) .
JVI1248X
1. Driver side window
2. Front passenger side window
3. Window lock button
Main power window switch (driver’s
side)
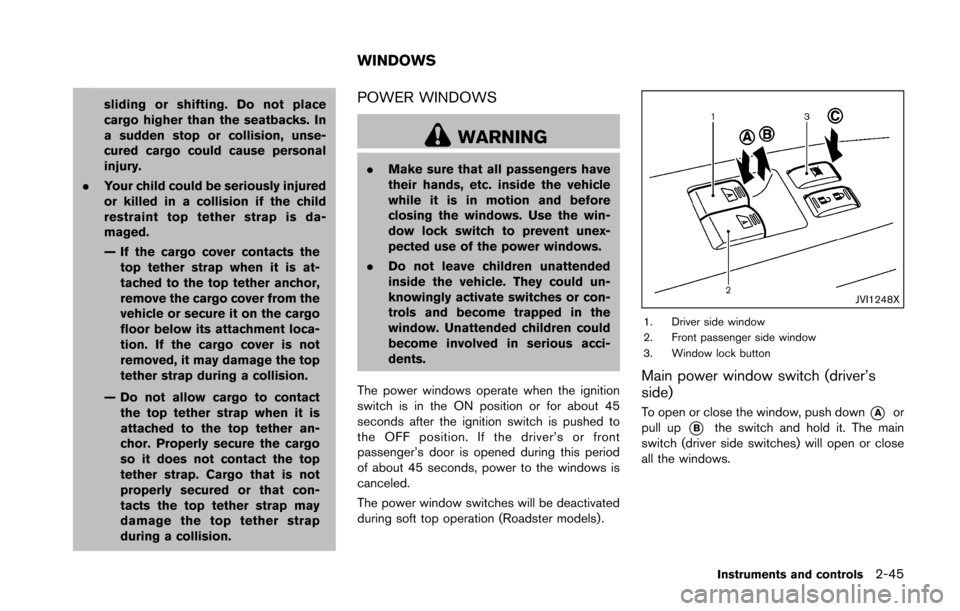
To open or close the window, push down*Aor
pull up
*Bthe switch and hold it. The main
switch (driver side switches) will open or close
all the windows.
Instruments and controls2-45
WINDOWS
Page 113 of 428
2-46Instruments and controls
Locking passengers’ window
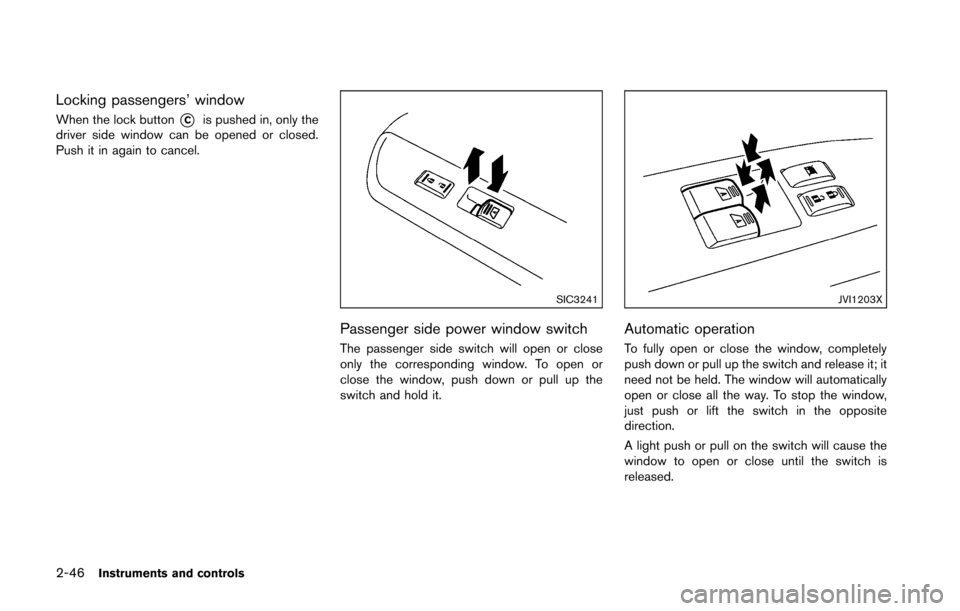
When the lock button*Cis pushed in, only the
driver side window can be opened or closed.
Push it in again to cancel.
SIC3241
Passenger side power window switch
The passenger side switch will open or close
only the corresponding window. To open or
close the window, push down or pull up the
switch and hold it.
JVI1203X
Automatic operation
To fully open or close the window, completely
push down or pull up the switch and release it; it
need not be held. The window will automatically
open or close all the way. To stop the window,
just push or lift the switch in the opposite
direction.
A light push or pull on the switch will cause the
window to open or close until the switch is
released.
Page 115 of 428
2-48Instruments and controls
SIC4238
MAP LIGHTS
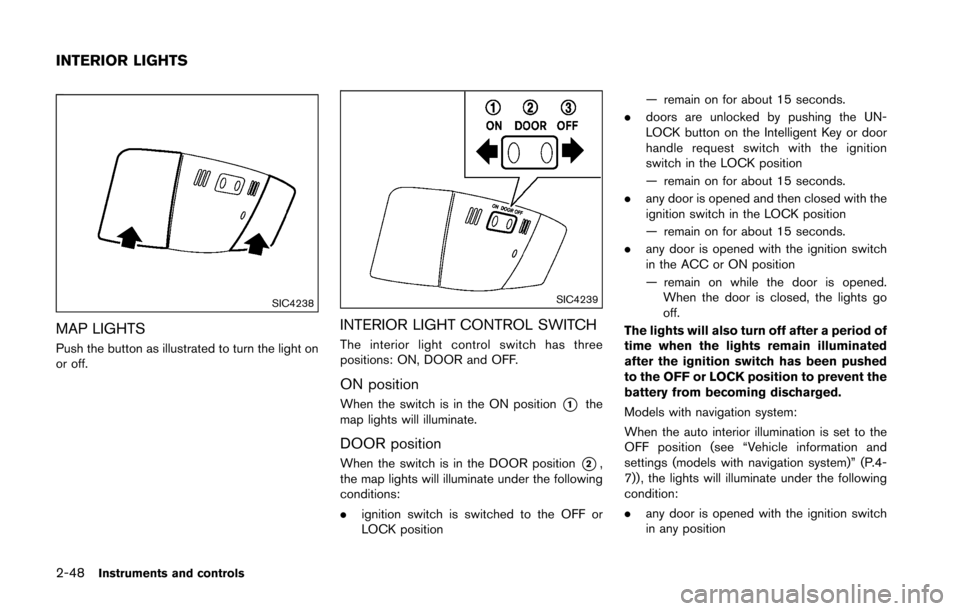
Push the button as illustrated to turn the light on
or off.
SIC4239
INTERIOR LIGHT CONTROL SWITCH
The interior light control switch has three
positions: ON, DOOR and OFF.
ON position
When the switch is in the ON position*1the
map lights will illuminate.
DOOR position
When the switch is in the DOOR position*2,
the map lights will illuminate under the following
conditions:
. ignition switch is switched to the OFF or
LOCK position — remain on for about 15 seconds.
. doors are unlocked by pushing the UN-
LOCK button on the Intelligent Key or door
handle request switch with the ignition
switch in the LOCK position
— remain on for about 15 seconds.
. any door is opened and then closed with the
ignition switch in the LOCK position
— remain on for about 15 seconds.
. any door is opened with the ignition switch
in the ACC or ON position
— remain on while the door is opened.
When the door is closed, the lights go
off.
The lights will also turn off after a period of
time when the lights remain illuminated
after the ignition switch has been pushed
to the OFF or LOCK position to prevent the
battery from becoming discharged.
Models with navigation system:
When the auto interior illumination is set to the
OFF position (see “Vehicle information and
settings (models with navigation system)” (P.4-
7)) , the lights will illuminate under the following
condition:
. any door is opened with the ignition switch
in any position
INTERIOR LIGHTS
Page 117 of 428
2-50Instruments and controls
The light illuminates when the rear hatch is
opened. When the rear hatch is closed, the light
will turn off.
The light will also turn off after a period of
time when the light remains illuminated
after the ignition switch has been pushed
to the OFF or LOCK position to prevent the
battery from becoming discharged.The light illuminates when the trunk lid is
opened. When the trunk lid is closed, the light
turns off.
The HomeLink�ŠUniversal Transceiver provides a
convenient way to consolidate the functions of
up to three individual hand-held transmitters into
one built-in device.
HomeLink
�ŠUniversal Transceiver:
. Will operate most Radio Frequency (RF)
devices such as garage doors, gates, home
and office lighting, entry door locks and
security systems.
. Is powered by your vehicle’s battery. No
separate batteries are required. If the
vehicle’s battery is discharged or is dis-
connected, HomeLink
�Šwill retain all pro-
gramming.
When the HomeLink
�ŠUniversal Transcei-
ver is programmed, retain the original
transmitter for future programming proce-
dures (Example: new vehicle purchases) .
Upon sale of the vehicle, the programmed
HomeLink
�ŠUniversal Transceiver buttons
should be erased for security purposes.
For additional information, refer to “Pro-
gramming HomeLink
�Š” (P.2-51) .
WARNING
. Do not use the HomeLink�ŠUniversal
Transceiver with any garage door
opener that lacks safety stop and
CARGO LIGHT (Coupe models) TRUNK LIGHT (Roadster models) HomeLink�ŠUNIVERSAL
TRANSCEIVER (if so equipped)
Page 122 of 428
3 Pre-driving checks and adjustments
Keys ........................................................................\
...................... 3-2Intelligent Key ....................................................................... 3-2
Valet hand-off ....................................................................... 3-3
Doors ........................................................................\
.................... 3-4 Locking with mechanical key ............................................ 3-4
Opening and closing windows with the
mechanical key ..................................................................... 3-4
Locking with inside lock knob .......................................... 3-5
Locking with power door lock switch ............................ 3-5
Automatic door locks ......................................................... 3-5
Intelligent Key system .............................................................. 3-6 Intelligent Key operating range ....................................... 3-8
Door locks/unlocks precaution ....................................... 3-8
Intelligent Key operation .................................................... 3-9
Battery saver system ....................................................... 3-11
Warning signals ................................................................ 3-11
Troubleshooting guide ..................................................... 3-12
Remote keyless entry system ............................................. 3-13 How to use remote keyless entry system .................. 3-13
Hood ........................................................................\
.................. 3-16
Rear hatch (Coupe models) ............................................... 3-17 Rear hatch opener switch .............................................. 3-17
Secondary rear hatch release ....................................... 3-18
Trunk lid (Roadster models) ................................................ 3-19 Trunk lid opener switch .................................................. 3-19 Trunk release power cancel switch ........................... 3-19
Interior trunk lid release ................................................ 3-20
Secondary trunk lid release ......................................... 3-20
Soft top (Roadster models) ................................................ 3-21 Before operating the top .............................................. 3-21
When operating the top ............................................... 3-23
Opening the top ............................................................. 3-25
Closing the top ............................................................... 3-25
Opening the top using the Intelligent Key ............... 3-26
Troubleshooting guide .................................................. 3-27
If the top does not open or close electrically ......... 3-28
Care of the soft top and the vehicle body .............. 3-32
Front, side and rear unique parts (NISMO models) ..... 3-32
Fuel-filler door ........................................................................\
3-34 Opening the fuel-filler door ......................................... 3-34
Fuel-filler cap .................................................................. 3-34
Tilt steering ........................................................................\
..... 3-36 Manual operation ............................................................ 3-36
Sun visors ........................................................................\
........ 3-36
Mirrors ........................................................................\
.............. 3-37
Inside mirror ..................................................................... 3-37
Outside mirrors ............................................................... 3-38
Vanity mirror ..................................................................... 3-39
Page 124 of 428
ceed 1408F (608C) .
— Do not change or modify the Intelligent Key.
— Do not use a magnet key holder.
— Do not place the Intelligent Key near an electric appliance such
as a television set, personal
computer or cellular phone.
— Do not allow the Intelligent Key to come into contact with water
or salt water, and do not wash it
in a washing machine. This
could affect the system function.
. If an Intelligent Key is lost or stolen,
NISSAN recommends erasing the ID
code of that Intelligent Key. This will
prevent the Intelligent Key from
unauthorized use to unlock the
vehicle. For information regarding
the erasing procedure, please con-
tact a NISSAN dealer.
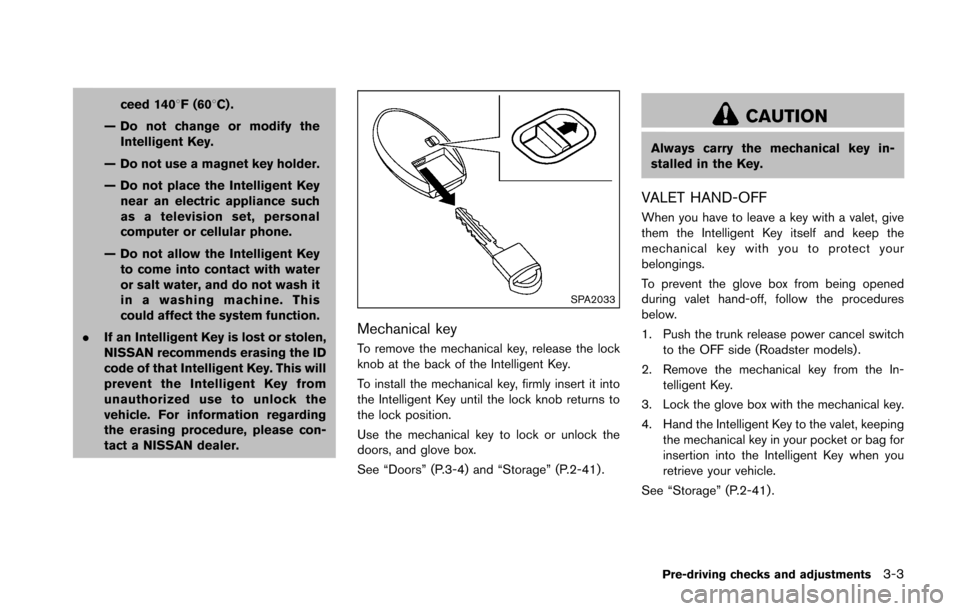
SPA2033
Mechanical key
To remove the mechanical key, release the lock
knob at the back of the Intelligent Key.
To install the mechanical key, firmly insert it into
the Intelligent Key until the lock knob returns to
the lock position.
Use the mechanical key to lock or unlock the
doors, and glove box.
See “Doors” (P.3-4) and “Storage” (P.2-41) .
CAUTION
Always carry the mechanical key in-
stalled in the Key.
VALET HAND-OFF
When you have to leave a key with a valet, give
them the Intelligent Key itself and keep the
mechanical key with you to protect your
belongings.
To prevent the glove box from being opened
during valet hand-off, follow the procedures
below.
1. Push the trunk release power cancel switch
to the OFF side (Roadster models) .
2. Remove the mechanical key from the In- telligent Key.
3. Lock the glove box with the mechanical key.
4. Hand the Intelligent Key to the valet, keeping the mechanical key in your pocket or bag for
insertion into the Intelligent Key when you
retrieve your vehicle.
See “Storage” (P.2-41) .
Pre-driving checks and adjustments3-3
Page 125 of 428
3-4Pre-driving checks and adjustments
WARNING
.Always have the doors locked while
driving. Along with the use of seat
belts, this provides greater safety in
the event of an accident by helping
to prevent persons from being
thrown from the vehicle. This also
helps keep children and others from
unintentionally opening the doors,
and will help keep out intruders.
. Before opening any door, always
look for and avoid oncoming traffic.
. Do not leave children unattended
inside the vehicle. They could un-
knowingly activate switches or con-
trols. Unattended children could
become involved in serious acci-
dents.
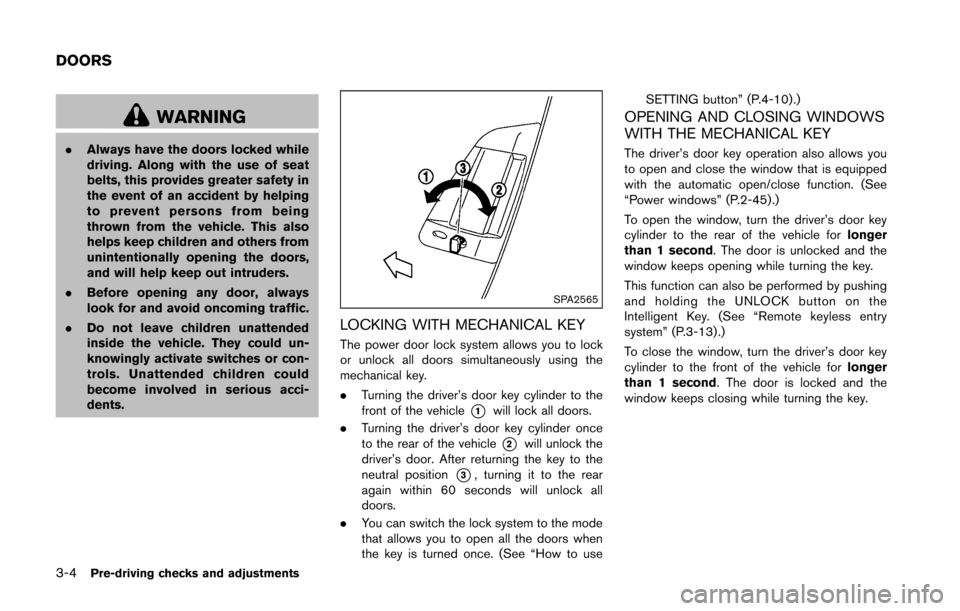
SPA2565
LOCKING WITH MECHANICAL KEY
The power door lock system allows you to lock
or unlock all doors simultaneously using the
mechanical key.
.Turning the driver’s door key cylinder to the
front of the vehicle
*1will lock all doors.
. Turning the driver’s door key cylinder once
to the rear of the vehicle
*2will unlock the
driver’s door. After returning the key to the
neutral position
*3, turning it to the rear
again within 60 seconds will unlock all
doors.
. You can switch the lock system to the mode
that allows you to open all the doors when
the key is turned once. (See “How to use SETTING button” (P.4-10).)
OPENING AND CLOSING WINDOWS
WITH THE MECHANICAL KEY
The driver’s door key operation also allows you
to open and close the window that is equipped
with the automatic open/close function. (See
“Power windows” (P.2-45).)
To open the window, turn the driver’s door key
cylinder to the rear of the vehicle for
longer
than 1 second. The door is unlocked and the
window keeps opening while turning the key.
This function can also be performed by pushing
and holding the UNLOCK button on the
Intelligent Key. (See “Remote keyless entry
system” (P.3-13) .)
To close the window, turn the driver’s door key
cylinder to the front of the vehicle for longer
than 1 second. The door is locked and the
window keeps closing while turning the key.
DOORS