2016 NISSAN 370Z COUPE ECU
[x] Cancel search: ECUPage 111 of 428
2-44Instruments and controls
WARNING
Keep the rear parcel box lid closed
while driving to help prevent injury in an
accident or a sudden stop.
SIC4026
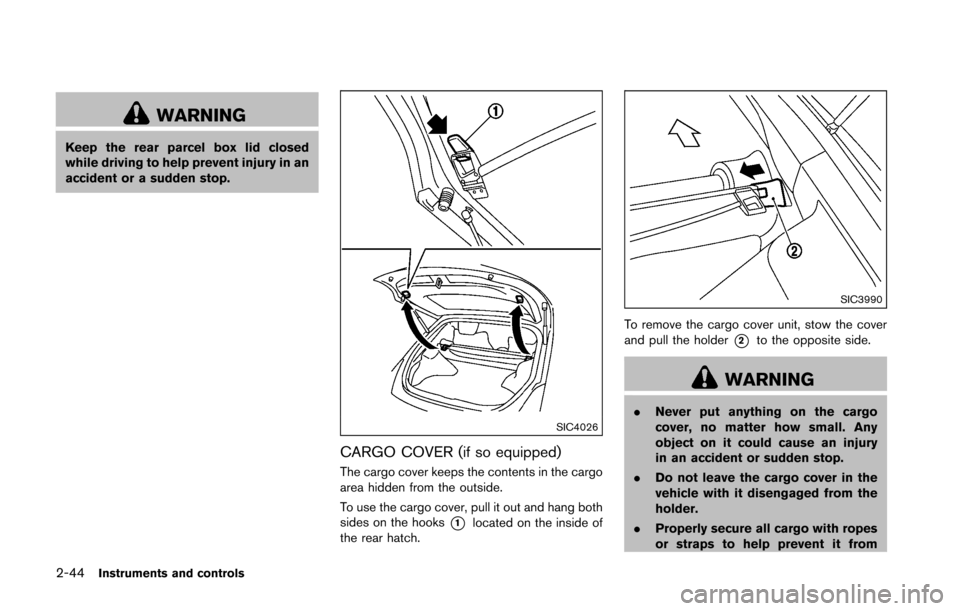
CARGO COVER (if so equipped)
The cargo cover keeps the contents in the cargo
area hidden from the outside.
To use the cargo cover, pull it out and hang both
sides on the hooks
*1located on the inside of
the rear hatch.
SIC3990
To remove the cargo cover unit, stow the cover
and pull the holder
*2to the opposite side.
WARNING
. Never put anything on the cargo
cover, no matter how small. Any
object on it could cause an injury
in an accident or sudden stop.
. Do not leave the cargo cover in the
vehicle with it disengaged from the
holder.
. Properly secure all cargo with ropes
or straps to help prevent it from
Page 112 of 428
sliding or shifting. Do not place
cargo higher than the seatbacks. In
a sudden stop or collision, unse-
cured cargo could cause personal
injury.
. Your child could be seriously injured
or killed in a collision if the child
restraint top tether strap is da-
maged.
— If the cargo cover contacts the
top tether strap when it is at-
tached to the top tether anchor,
remove the cargo cover from the
vehicle or secure it on the cargo
floor below its attachment loca-
tion. If the cargo cover is not
removed, it may damage the top
tether strap during a collision.
— Do not allow cargo to contact the top tether strap when it is
attached to the top tether an-
chor. Properly secure the cargo
so it does not contact the top
tether strap. Cargo that is not
properly secured or that con-
tacts the top tether strap may
damage the top tether strap
during a collision.POWER WINDOWS
WARNING
. Make sure that all passengers have
their hands, etc. inside the vehicle
while it is in motion and before
closing the windows. Use the win-
dow lock switch to prevent unex-
pected use of the power windows.
. Do not leave children unattended
inside the vehicle. They could un-
knowingly activate switches or con-
trols and become trapped in the
window. Unattended children could
become involved in serious acci-
dents.
The power windows operate when the ignition
switch is in the ON position or for about 45
seconds after the ignition switch is pushed to
the OFF position. If the driver’s or front
passenger’s door is opened during this period
of about 45 seconds, power to the windows is
canceled.
The power window switches will be deactivated
during soft top operation (Roadster models) .
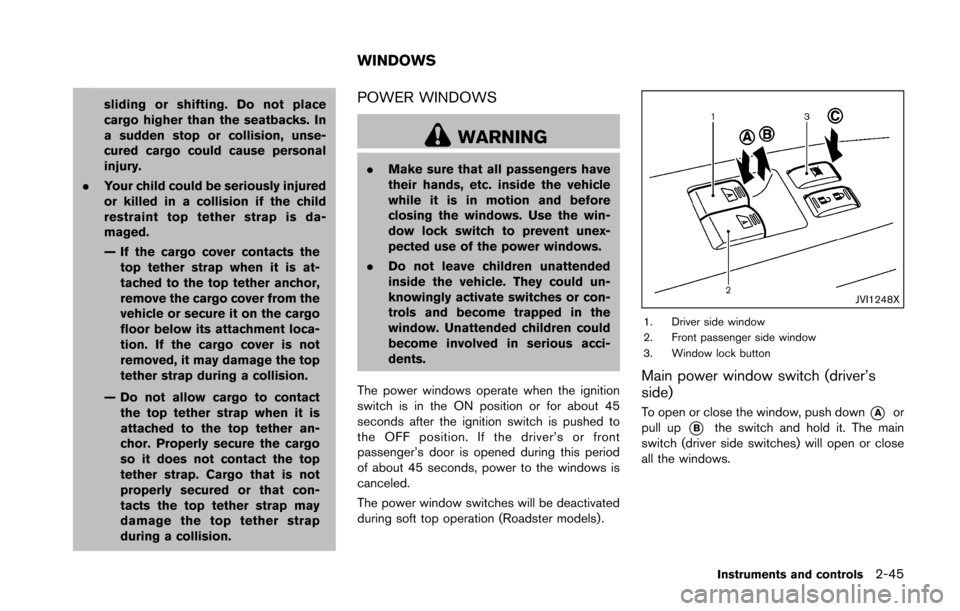
JVI1248X
1. Driver side window
2. Front passenger side window
3. Window lock button
Main power window switch (driver’s
side)
To open or close the window, push down*Aor
pull up
*Bthe switch and hold it. The main
switch (driver side switches) will open or close
all the windows.
Instruments and controls2-45
WINDOWS
Page 117 of 428
2-50Instruments and controls
The light illuminates when the rear hatch is
opened. When the rear hatch is closed, the light
will turn off.
The light will also turn off after a period of
time when the light remains illuminated
after the ignition switch has been pushed
to the OFF or LOCK position to prevent the
battery from becoming discharged.The light illuminates when the trunk lid is
opened. When the trunk lid is closed, the light
turns off.
The HomeLink�ŠUniversal Transceiver provides a
convenient way to consolidate the functions of
up to three individual hand-held transmitters into
one built-in device.
HomeLink
�ŠUniversal Transceiver:
. Will operate most Radio Frequency (RF)
devices such as garage doors, gates, home
and office lighting, entry door locks and
security systems.
. Is powered by your vehicle’s battery. No
separate batteries are required. If the
vehicle’s battery is discharged or is dis-
connected, HomeLink
�Šwill retain all pro-
gramming.
When the HomeLink
�ŠUniversal Transcei-
ver is programmed, retain the original
transmitter for future programming proce-
dures (Example: new vehicle purchases) .
Upon sale of the vehicle, the programmed
HomeLink
�ŠUniversal Transceiver buttons
should be erased for security purposes.
For additional information, refer to “Pro-
gramming HomeLink
�Š” (P.2-51) .
WARNING
. Do not use the HomeLink�ŠUniversal
Transceiver with any garage door
opener that lacks safety stop and
CARGO LIGHT (Coupe models) TRUNK LIGHT (Roadster models) HomeLink�ŠUNIVERSAL
TRANSCEIVER (if so equipped)
Page 118 of 428
reverse features as required by
federal safety standards. (These
standards became effective for
opener models manufactured after
April 1, 1982) . A garage door opener
which cannot detect an object in the
path of a closing garage door and
then automatically stop and reverse,
does not meet current federal safety
standards. Using a garage door
opener without these features in-
creases the risk of serious injury or
death.
. During the programming procedure
your garage door or security gate
will open and close (if the transmit-
ter is within range) . Make sure that
people or objects are clear of the
garage door, gate, etc. that you are
programming.
. Your vehicle’s engine should be
turned off while programming the
HomeLink
�ŠUniversal Transceiver.
Do not breathe exhaust gases; they
contain colorless and odorless car-
bon monoxide. Carbon monoxide is
dangerous. It can cause uncon-
sciousness or death.
PROGRAMMING HomeLink�Š
If you have any questions or are having difficulty
programming your HomeLink�Šbuttons, refer to
the HomeLink�Šweb site at: www.homelink.com
or call 1-800-355-3515.
NOTE:
It is also recommended that a new battery
be placed in the hand-held transmitter of
the device being programmed to
HomeLink
�Šfor quicker programming and
accurate transmission of the radio-fre-
quency.
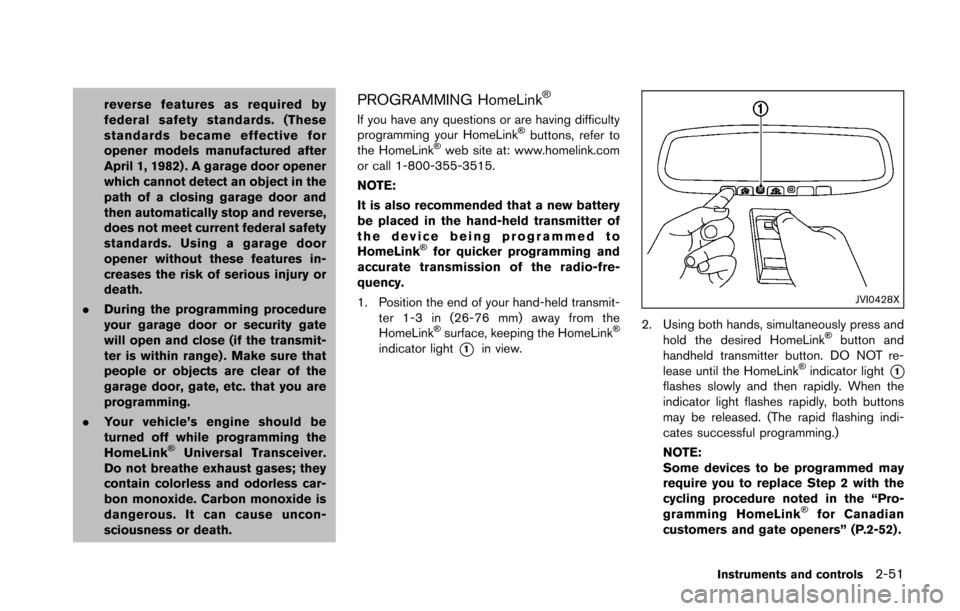
1. Position the end of your hand-held transmit- ter 1-3 in (26-76 mm) away from the
HomeLink
�Šsurface, keeping the HomeLink�Š
indicator light*1in view.
JVI0428X
2. Using both hands, simultaneously press and
hold the desired HomeLink�Šbutton and
handheld transmitter button. DO NOT re-
lease until the HomeLink
�Šindicator light*1flashes slowly and then rapidly. When the
indicator light flashes rapidly, both buttons
may be released. (The rapid flashing indi-
cates successful programming.)
NOTE:
Some devices to be programmed may
require you to replace Step 2 with the
cycling procedure noted in the “Pro-
gramming HomeLink
�Šfor Canadian
customers and gate openers” (P.2-52) .
Instruments and controls2-51
Page 129 of 428
3-8Pre-driving checks and adjustments
SPA2567
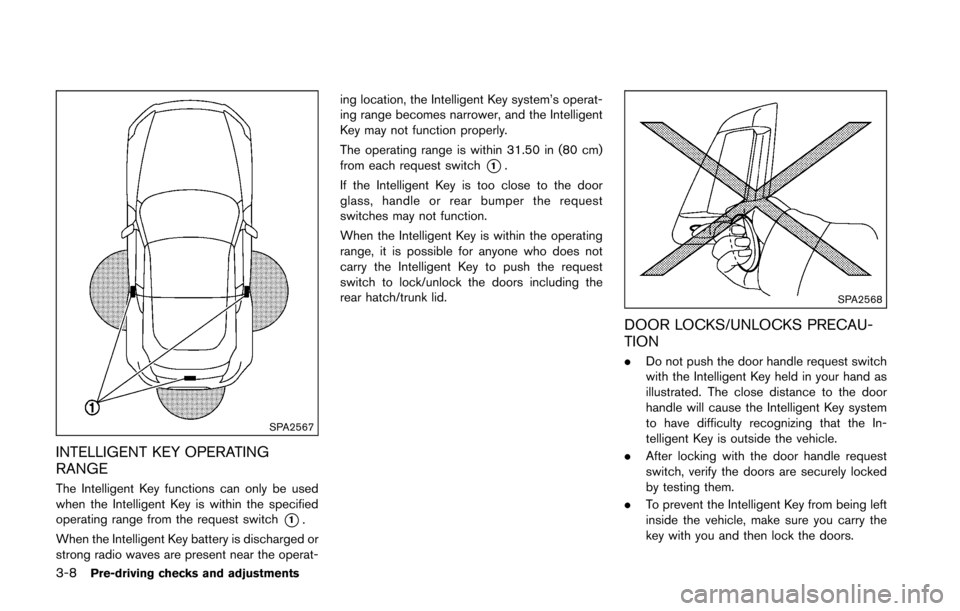
INTELLIGENT KEY OPERATING
RANGE
The Intelligent Key functions can only be used
when the Intelligent Key is within the specified
operating range from the request switch
*1.
When the Intelligent Key battery is discharged or
strong radio waves are present near the operat- ing location, the Intelligent Key system’s operat-
ing range becomes narrower, and the Intelligent
Key may not function properly.
The operating range is within 31.50 in (80 cm)
from each request switch
*1.
If the Intelligent Key is too close to the door
glass, handle or rear bumper the request
switches may not function.
When the Intelligent Key is within the operating
range, it is possible for anyone who does not
carry the Intelligent Key to push the request
switch to lock/unlock the doors including the
rear hatch/trunk lid.
SPA2568
DOOR LOCKS/UNLOCKS PRECAU-
TION
. Do not push the door handle request switch
with the Intelligent Key held in your hand as
illustrated. The close distance to the door
handle will cause the Intelligent Key system
to have difficulty recognizing that the In-
telligent Key is outside the vehicle.
. After locking with the door handle request
switch, verify the doors are securely locked
by testing them.
. To prevent the Intelligent Key from being left
inside the vehicle, make sure you carry the
key with you and then lock the doors.
Page 133 of 428
3-12Pre-driving checks and adjustments
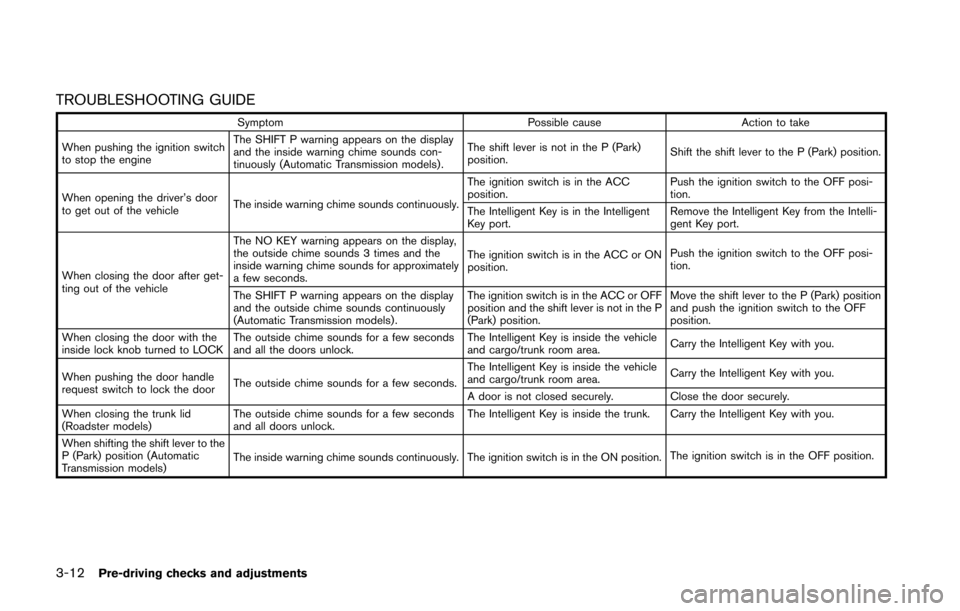
TROUBLESHOOTING GUIDE
SymptomPossible causeAction to take
When pushing the ignition switch
to stop the engine The SHIFT P warning appears on the display
and the inside warning chime sounds con-
tinuously (Automatic Transmission models) .
The shift lever is not in the P (Park)
position.
Shift the shift lever to the P (Park) position.
When opening the driver’s door
to get out of the vehicle The inside warning chime sounds continuously. The ignition switch is in the ACC
position.
Push the ignition switch to the OFF posi-
tion.
The Intelligent Key is in the Intelligent
Key port. Remove the Intelligent Key from the Intelli-
gent Key port.
When closing the door after get-
ting out of the vehicle The NO KEY warning appears on the display,
the outside chime sounds 3 times and the
inside warning chime sounds for approximately
a few seconds.
The ignition switch is in the ACC or ON
position.
Push the ignition switch to the OFF posi-
tion.
The SHIFT P warning appears on the display
and the outside chime sounds continuously
(Automatic Transmission models) . The ignition switch is in the ACC or OFF
position and the shift lever is not in the P
(Park) position.Move the shift lever to the P (Park) position
and push the ignition switch to the OFF
position.
When closing the door with the
inside lock knob turned to LOCK The outside chime sounds for a few seconds
and all the doors unlock. The Intelligent Key is inside the vehicle
and cargo/trunk room area.
Carry the Intelligent Key with you.
When pushing the door handle
request switch to lock the door The outside chime sounds for a few seconds. The Intelligent Key is inside the vehicle
and cargo/trunk room area.
Carry the Intelligent Key with you.
A door is not closed securely. Close the door securely.
When closing the trunk lid
(Roadster models) The outside chime sounds for a few seconds
and all doors unlock. The Intelligent Key is inside the trunk. Carry the Intelligent Key with you.
When shifting the shift lever to the
P (Park) position (Automatic
Transmission models) The inside warning chime sounds continuously. The ignition switch is in the ON position.
The ignition switch is in the OFF position.
Page 134 of 428
WARNING
The Intelligent Key transmits radio
waves when the buttons are pushed.
The FAA advises that the radio waves
may affect aircraft navigation and com-
munication systems. Do not operate the
Intelligent Key while on an airplane.
Make sure the buttons are not operated
unintentionally when the unit is stored
during a flight.
It is possible to lock/unlock all doors, fuel-filler
door, activate the panic alarm and open the
windows by pushing the buttons on the Intelli-
gent Key from outside the vehicle.
Before locking the doors, make sure the
Intelligent Key is not left in the vehicle.
The LOCK/UNLOCK button on the Intelligent
Key can operate at a distance of approximately
33 ft (10 m) from the vehicle. (The effective
distance depends upon the conditions around
the vehicle.)
As many as 4 Intelligent Keys can be used with
one vehicle. For information concerning the
purchase and use of additional Intelligent Keys,
contact a NISSAN dealer. The lock and unlock buttons on the Intelligent
Key will not operate when:
.
the distance between the Intelligent Key and
the vehicle is over 33 ft (10 m) .
. the Intelligent Key battery is discharged.
After locking with the remote keyless entry
function, pull the door handle to make sure the
doors are securely locked.
The LOCK/UNLOCK operating range varies
depending on the environment. To securely
operate the lock and unlock buttons, approach
the vehicle to about 3 ft (1 m) from the door.
SPA2252B
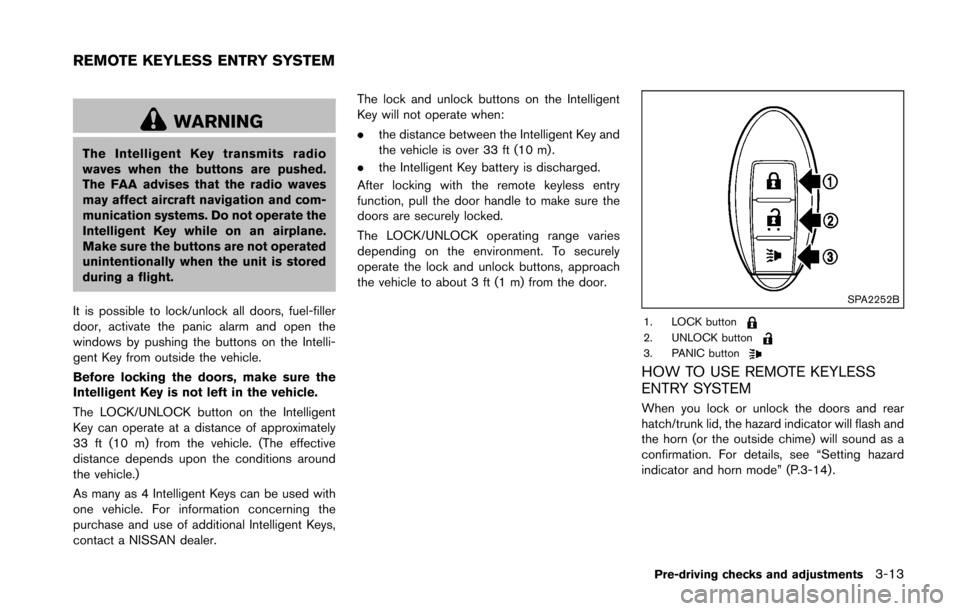
1. LOCK button2. UNLOCK button3. PANIC button
HOW TO USE REMOTE KEYLESS
ENTRY SYSTEM
When you lock or unlock the doors and rear
hatch/trunk lid, the hazard indicator will flash and
the horn (or the outside chime) will sound as a
confirmation. For details, see “Setting hazard
indicator and horn mode” (P.3-14) .
Pre-driving checks and adjustments3-13
REMOTE KEYLESS ENTRY SYSTEM
Page 137 of 428
3-16Pre-driving checks and adjustments
SPA2572
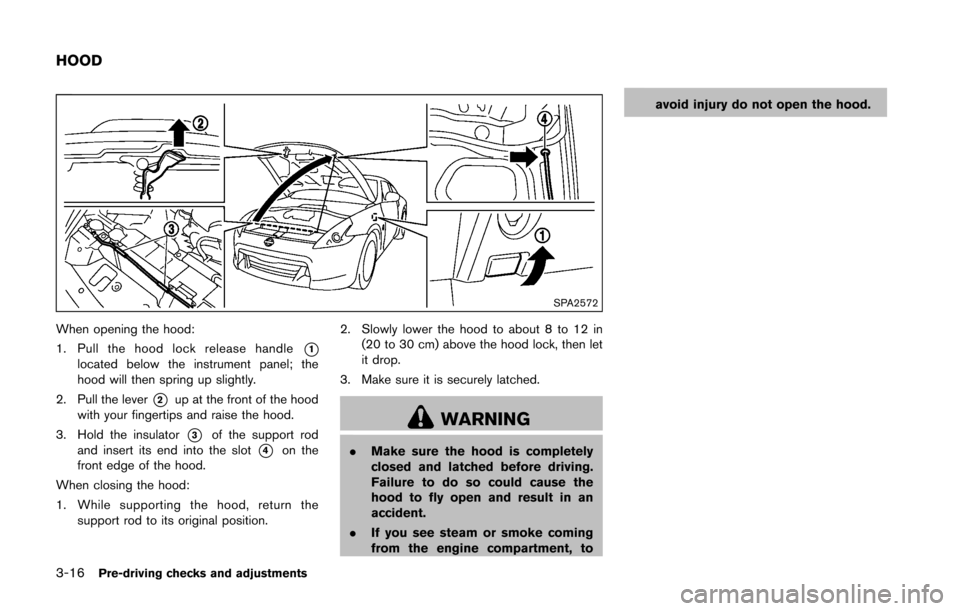
When opening the hood:
1. Pull the hood lock release handle
*1located below the instrument panel; the
hood will then spring up slightly.
2. Pull the lever
*2up at the front of the hood
with your fingertips and raise the hood.
3. Hold the insulator
*3of the support rod
and insert its end into the slot
*4on the
front edge of the hood.
When closing the hood:
1. While supporting the hood, return the support rod to its original position. 2. Slowly lower the hood to about 8 to 12 in
(20 to 30 cm) above the hood lock, then let
it drop.
3. Make sure it is securely latched.
WARNING
. Make sure the hood is completely
closed and latched before driving.
Failure to do so could cause the
hood to fly open and result in an
accident.
. If you see steam or smoke coming
from the engine compartment, to avoid injury do not open the hood.
HOOD