2016 NISSAN 370Z COUPE tires
[x] Cancel search: tiresPage 317 of 428
5-32Starting and driving
FREEING A FROZEN DOOR LOCK
To prevent a door lock from freezing, apply
deicer through the key hole. If the lock becomes
frozen, heat the key before inserting it into the
key hole or use the Intelligent Key system.
ANTIFREEZE
In the winter when it is anticipated that the
outside temperature will drop below 328F(08C) ,
check antifreeze to assure proper winter protec-
tion. For additional information, see “Engine
cooling system” (P.8-8).
BATTERY
If the battery is not fully charged during
extremely cold weather conditions, the battery
fluid may freeze and damage the battery. To
maintain maximum efficiency, the battery should
be checked regularly. For additional information,
see “Battery” (P.8-15) .
DRAINING OF COOLANT WATER
If the vehicle is to be left outside without
antifreeze, drain the cooling system, including
the engine block. Refill before operating the
vehicle. For details, see “Engine cooling system”
(P.8-8) .
TIRE EQUIPMENT
SUMMER tires have a tread designed to provide
superior performance on dry pavement. How-
ever, the performance of these tires will be
substantially reduced in snowy and icy condi-
tions. If you operate your vehicle on snowy or icy
roads, NISSAN recommends the use of MUD &
SNOW or ALL SEASON tires on all four wheels.
Consult a NISSAN dealer for the tire type, size,
speed rating and availability information.
For additional traction on icy roads, studded
tires may be used. However, some U.S. states
and Canadian provinces prohibit their use.
Check local, state and provincial laws before
installing studded tires.
Skid and traction capabilities of studded
snow tires, on wet or dry surfaces, may be
poorer than that of non-studded snow
tires.
Tire chains may be used. For details, see “Tire
chains” (P.8-36) of this manual.
SPECIAL WINTER EQUIPMENT
It is recommended that the following items be
carried in the vehicle during winter:
. A scraper and stiff-bristled brush to remove
ice and snow from the windows and wiper
blades. .
A sturdy, flat board to be placed under the
jack to give it firm support.
. A shovel to dig the vehicle out of snowdrifts.
. Extra window washer fluid to refill the
reservoir tank.
DRIVING ON SNOW OR ICE
WARNING
.Wet ice (328F, 0 8C and freezing rain) ,
very cold snow or ice can be slick
and very hard to drive on. The
vehicle will have much less traction
or “grip” under these conditions. Try
to avoid driving on wet ice until the
road is salted or sanded.
. Whatever the condition, drive with
caution. Accelerate and slow down
with care. If accelerating or down-
shifting too fast, the drive wheels
will lose even more traction.
. Allow more stopping distance under
these conditions. Braking should be
started sooner than on dry pave-
ment.
. Allow greater following distances
on slippery roads.
COLD WEATHER DRIVING
Page 322 of 428
To shut off the engine in an emergency situation
while driving, perform the following procedure:
.Rapidly push the push-button ignition switch
3 consecutive times in less than 1.5
seconds, or
. Push and hold the push-button ignition
switch for more than 2 seconds.TIRE PRESSURE MONITORING SYS-
TEM (TPMS)
This vehicle is equipped with the Tire Pressure
Monitoring System (TPMS) . It monitors tire
pressure of all tires except the spare. When
the low tire pressure warning light is lit and the
CHECK TIRE PRESSURE warning appears on
the vehicle information display, one or more of
your tires is significantly under-inflated. If the
vehicle is being driven with low tire pressure, the
TPMS will activate and warn you of it by the low
tire pressure warning light. This system will
activate only when the vehicle is driven at
speeds above 16 MPH (25 km/h) . For more
details, see “Warning lights, indicator lights and
audible reminders” (P.2-10) and “Tire Pressure
Monitoring System (TPMS)” (P.5-3) .
WARNING
.If the low tire pressure warning light
illuminates while driving, avoid sud-
den steering maneuvers or abrupt
braking, reduce vehicle speed, pull
off the road to a safe location and
stop the vehicle as soon as possi-
ble. Driving with under-inflated tires
may permanently damage the tires
and increase the likelihood of tire failure. Serious vehicle damage
could occur and may lead to an
accident and could result in serious
personal injury. Check the tire pres-
sure for all four tires. Adjust the tire
pressure to the recommended COLD
tire pressure shown on the Tire and
Loading Information label to turn
the low tire pressure warning light
OFF. If the light still illuminates
while driving after adjusting the tire
pressure, a tire may be flat. If you
have a flat tire, replace it with a
spare tire as soon as possible.
. When a spare tire is mounted or a
wheel is replaced, the TPMS will not
function and the low tire pressure
warning light will flash for approxi-
mately 1 minute. The light will
remain on after 1 minute. Contact
your NISSAN dealer as soon as
possible for tire replacement and/
or system resetting.
. Replacing tires with those not ori-
ginally specified by NISSAN could
affect the proper operation of the
TPMS.
. NISSAN recommends using only
Genuine NISSAN Emergency Tire
In case of emergency6-3
EMERGENCY ENGINE SHUT OFF FLAT TIRE
Page 323 of 428
6-4In case of emergency
Sealant provided with your vehicle.
Other tire sealants may damage the
valve stem seal which can cause the
tire to lose air pressure. Visit a
NISSAN dealer as soon as possible
after using tire repair sealant (for
models equipped with the emer-
gency tire puncture repair kit) .
CHANGING A FLAT TIRE (for models
with spare tire)
If you have a flat tire, follow the instructions
below.
Stopping the vehicle
1. Safely move the vehicle off the road andaway from traffic.
2. Turn on the hazard warning flashers.
3. Park on a level surface and apply the parking brake. Move the shift lever to the P (Park)
position (Automatic transmission models) .
Move the shift lever to the R (Reverse) gear
(Manual transmission models) .
4. Turn off the engine.
5. Raise the hood to warn other traffic, and to signal professional road assistance person-
nel that you need assistance. 6. Have all passengers get out of the vehicle
and stand in a safe place, away from traffic
and clear of the vehicle.
WARNING
.Make sure the parking brake is
securely applied and the manual
transmission is shifted into R (Re-
verse) , or the automatic transmis-
sion into P (Park) .
. Never change tires when the vehicle
is on a slope, ice or slippery areas.
This is hazardous.
. Never change tires if oncoming
traffic is close to your vehicle. Wait
for professional road assistance.
MCE0001A
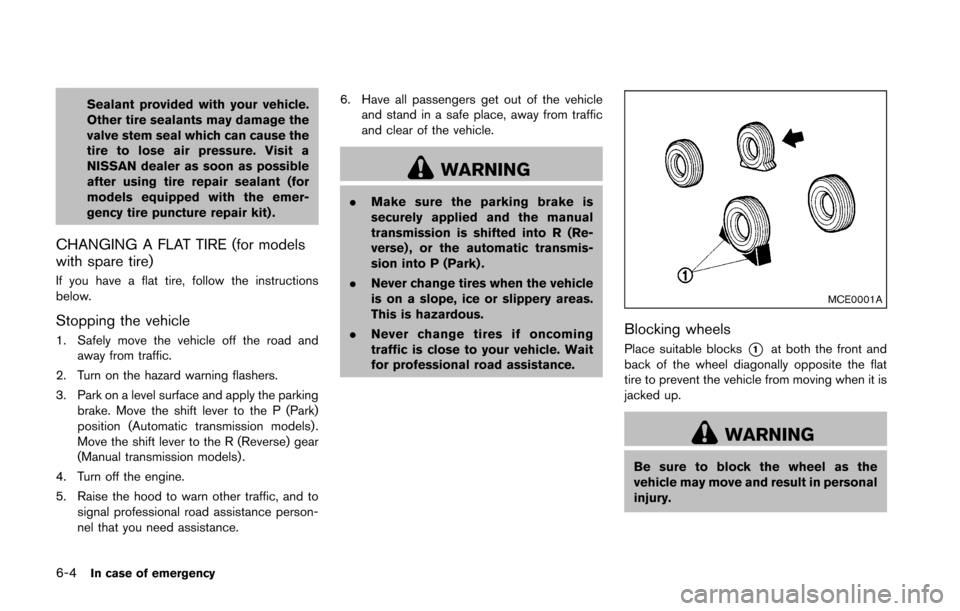
Blocking wheels
Place suitable blocks*1at both the front and
back of the wheel diagonally opposite the flat
tire to prevent the vehicle from moving when it is
jacked up.
WARNING
Be sure to block the wheel as the
vehicle may move and result in personal
injury.
Page 326 of 428
SCE0661
Installing the spare tire
The T-type spare tire is designed for
emergency use. (See specific instructions
under the heading “Wheels and tires” (P.8-
30) .)
1. Clean any mud or dirt from the surfacebetween the wheel and hub.
2. Carefully put the spare tire on and tighten the wheel nuts finger tight. Check that all the
wheel nuts contact the wheel surface
horizontally.
Models equipped with different sized
tires in the front and rear:
When replacing a front tire, make sure that the hole in the spare tire wheel is aligned
with the pin on the brake rotor.
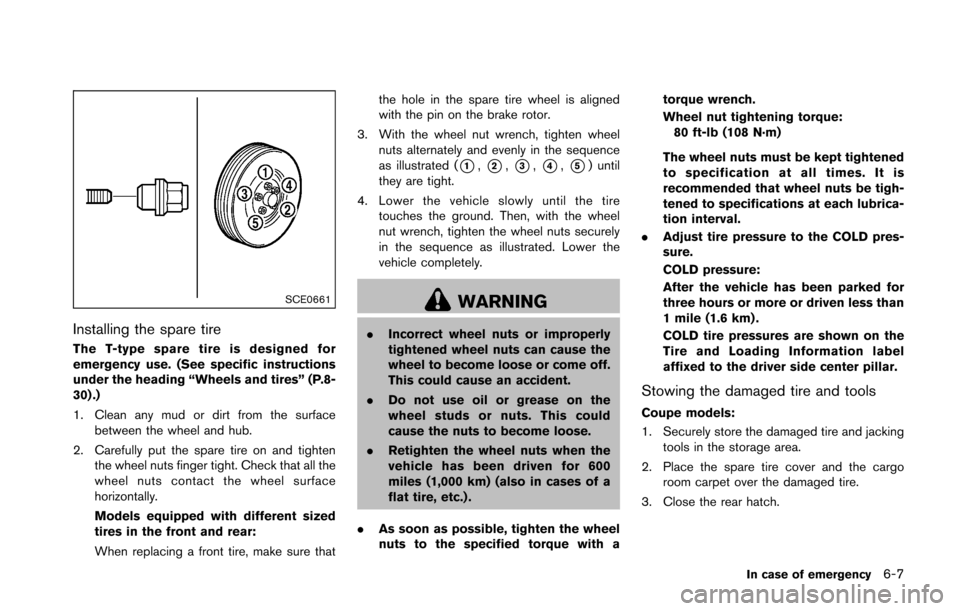
3. With the wheel nut wrench, tighten wheel nuts alternately and evenly in the sequence
as illustrated (
*1,*2,*3,*4,*5) until
they are tight.
4. Lower the vehicle slowly until the tire touches the ground. Then, with the wheel
nut wrench, tighten the wheel nuts securely
in the sequence as illustrated. Lower the
vehicle completely.
WARNING
.Incorrect wheel nuts or improperly
tightened wheel nuts can cause the
wheel to become loose or come off.
This could cause an accident.
. Do not use oil or grease on the
wheel studs or nuts. This could
cause the nuts to become loose.
. Retighten the wheel nuts when the
vehicle has been driven for 600
miles (1,000 km) (also in cases of a
flat tire, etc.) .
. As soon as possible, tighten the wheel
nuts to the specified torque with a torque wrench.
Wheel nut tightening torque:
80 ft-lb (108 N·m)
The wheel nuts must be kept tightened
to specification at all times. It is
recommended that wheel nuts be tigh-
tened to specifications at each lubrica-
tion interval.
. Adjust tire pressure to the COLD pres-
sure.
COLD pressure:
After the vehicle has been parked for
three hours or more or driven less than
1 mile (1.6 km) .
COLD tire pressures are shown on the
Tire and Loading Information label
affixed to the driver side center pillar.
Stowing the damaged tire and tools
Coupe models:
1. Securely store the damaged tire and jacking
tools in the storage area.
2. Place the spare tire cover and the cargo room carpet over the damaged tire.
3. Close the rear hatch.
In case of emergency6-7
Page 327 of 428
6-8In case of emergency
SCE0845
Roadster models:
Securely store the jacking tools in the storage
area.
Place the spare tire cover and trunk room carpet
back in the trunk, and then close the trunk lid.
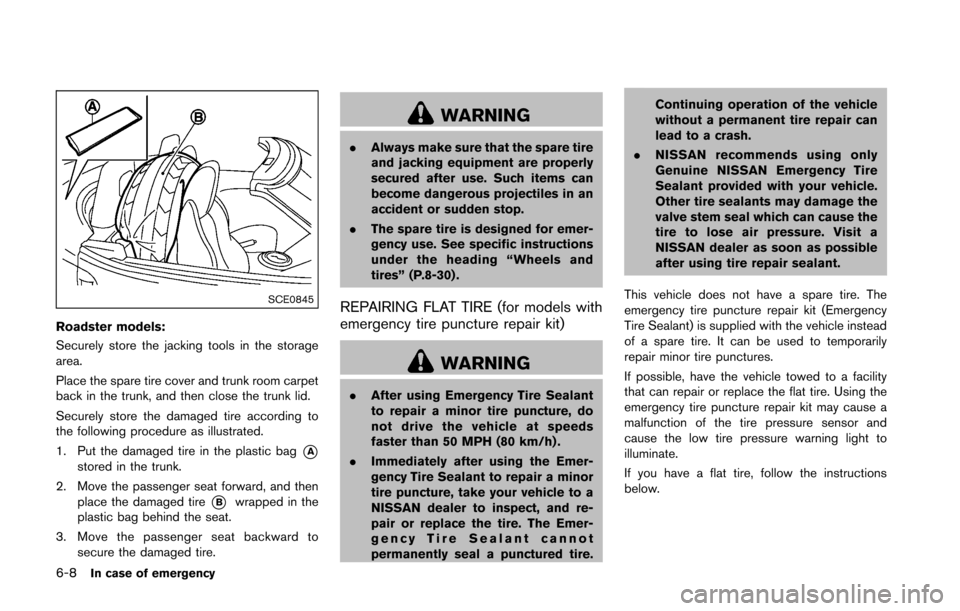
Securely store the damaged tire according to
the following procedure as illustrated.
1. Put the damaged tire in the plastic bag
*Astored in the trunk.
2. Move the passenger seat forward, and then place the damaged tire
*Bwrapped in the
plastic bag behind the seat.
3. Move the passenger seat backward to secure the damaged tire.
WARNING
.Always make sure that the spare tire
and jacking equipment are properly
secured after use. Such items can
become dangerous projectiles in an
accident or sudden stop.
. The spare tire is designed for emer-
gency use. See specific instructions
under the heading “Wheels and
tires” (P.8-30) .
REPAIRING FLAT TIRE (for models with
emergency tire puncture repair kit)
WARNING
.After using Emergency Tire Sealant
to repair a minor tire puncture, do
not drive the vehicle at speeds
faster than 50 MPH (80 km/h) .
. Immediately after using the Emer-
gency Tire Sealant to repair a minor
tire puncture, take your vehicle to a
NISSAN dealer to inspect, and re-
pair or replace the tire. The Emer-
gency Tire Sealant cannot
permanently seal a punctured tire. Continuing operation of the vehicle
without a permanent tire repair can
lead to a crash.
. NISSAN recommends using only
Genuine NISSAN Emergency Tire
Sealant provided with your vehicle.
Other tire sealants may damage the
valve stem seal which can cause the
tire to lose air pressure. Visit a
NISSAN dealer as soon as possible
after using tire repair sealant.
This vehicle does not have a spare tire. The
emergency tire puncture repair kit (Emergency
Tire Sealant) is supplied with the vehicle instead
of a spare tire. It can be used to temporarily
repair minor tire punctures.
If possible, have the vehicle towed to a facility
that can repair or replace the flat tire. Using the
emergency tire puncture repair kit may cause a
malfunction of the tire pressure sensor and
cause the low tire pressure warning light to
illuminate.
If you have a flat tire, follow the instructions
below.
Page 328 of 428
CAUTION
.To avoid the emergency tire punc-
ture repair kit being damaged dur-
ing storage or use:
— Only use the emergency tire
puncture repair kit on your ve-
hicle. Do not use it on other
vehicles.
— Only use the kit to inflate the tires of your vehicle and to
check the vehicle’s tire pressure.
— Only plug the compressor into a 12V DC car power point.
— Keep the kit free of water and dirt.
— Do not disassemble or modify the kit.
— Do not drop the kit or allow hard impacts to the kit.
. Do not use the emergency tire
puncture repair kit under the follow-
ing conditions. Contact a NISSAN
dealer or professional road assis-
tance. — when the sealant has passed its
expiration date (shown on the
label attached to the bottle)
— when the cut or the puncture is approximately 0.25 in (6 mm) or
longer
— when the tire sidewall is da- maged
— when the vehicle has been dri- ven with extremely low tire
pressure
— when the tire has come off the inside or the outside of the
wheel.
— when the tire wheel is damaged
— when two or more tires are flat
Stopping the vehicle
1. Safely move the vehicle off the road and away from traffic.
2. Turn on the hazard warning flashers.
3. Park on a level surface and apply the parking brake.
4. Automatic Transmission models:
Move the shift lever to the P (Park) position. Manual Transmission models:
Move the shift lever to the R (Reverse)
position.
5. Turn off the engine.
6. Raise the hood to warn other traffic and to signal professional road assistance person-
nel that you need assistance.
7. Have all passengers get out of the vehicle and stand in a safe place, away from traffic
and clear of the vehicle.
WARNING
Make sure the parking brake is securely
applied and the manual transmission is
shifted into R (Reverse) or the auto-
matic transmission into P (Park) .
.Never repair tires when the vehicle
is on a slope, ice or slippery areas.
This is hazardous.
. Never repair tires if oncoming traffic
is close to your vehicle. Wait for
professional road assistance.
In case of emergency6-9
Page 340 of 428
VEHICLE RECOVERY (freeing a stuck
vehicle)
WARNING
.Stand clear of a stuck vehicle.
. Do not spin your tires at high speed.
This could cause them to explode
and result in serious injury. Parts of
your vehicle could also overheat
and be damaged.
Pulling a stuck vehicle
If your vehicle is stuck in sand, snow, mud, etc.,
use a tow strap or other device designed
specifically for vehicle recovery. Always follow
the manufacturer’s instructions for the recovery
device.
SCE0793
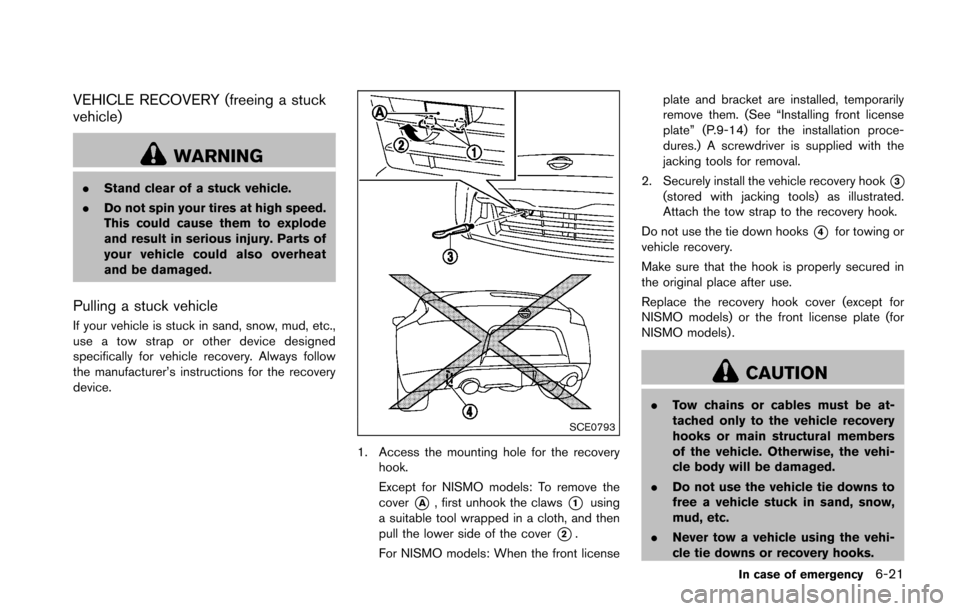
1. Access the mounting hole for the recovery
hook.
Except for NISMO models: To remove the
cover
*A, first unhook the claws*1using
a suitable tool wrapped in a cloth, and then
pull the lower side of the cover
*2.
For NISMO models: When the front license plate and bracket are installed, temporarily
remove them. (See “Installing front license
plate” (P.9-14) for the installation proce-
dures.) A screwdriver is supplied with the
jacking tools for removal.
2. Securely install the vehicle recovery hook
*3(stored with jacking tools) as illustrated.
Attach the tow strap to the recovery hook.
Do not use the tie down hooks
*4for towing or
vehicle recovery.
Make sure that the hook is properly secured in
the original place after use.
Replace the recovery hook cover (except for
NISMO models) or the front license plate (for
NISMO models) .
CAUTION
. Tow chains or cables must be at-
tached only to the vehicle recovery
hooks or main structural members
of the vehicle. Otherwise, the vehi-
cle body will be damaged.
. Do not use the vehicle tie downs to
free a vehicle stuck in sand, snow,
mud, etc.
. Never tow a vehicle using the vehi-
cle tie downs or recovery hooks.
In case of emergency6-21
Page 341 of 428
6-22In case of emergency
.Always pull the cable straight out
from the front of the vehicle. Never
pull on the vehicle at an angle.
. Pulling devices should be routed so
they do not touch any part of the
suspension, steering, brake or cool-
ing systems.
. Pulling devices such as ropes or
canvas straps are not recommended
for use in vehicle towing or recov-
ery.
Rocking a stuck vehicle
If your vehicle is stuck in sand, snow, mud, etc.,
use the following procedure:
1. Turn off the Vehicle Dynamic Control (VDC)
system.
2. Make sure the area in front and behind the vehicle is clear of obstructions.
3. Turn the steering wheel right and left to clear an area around the front tires.
4. Slowly rock the vehicle forward and back- ward.
.Shift back and forth between R (Reverse)
and D (Drive) (automatic transmission
models) or 1st and R (Reverse) (manual
transmission models) .
.Apply the accelerator as little as possibleto maintain the rocking motion.
.Release the accelerator pedal beforeshifting between R (Reverse) and D
(Drive) (automatic transmission models)
or 1st and R (Reverse) (manual transmis-
sion models) .
.Do not spin the tires above 35 MPH (55 km/h) .
5. If the vehicle cannot be freed after a few tries, contact a professional towing service
to remove the vehicle.