2016 NISSAN 370Z COUPE fuse
[x] Cancel search: fusePage 206 of 428
automatically adapt the language setting.
Scroll direction:
Set the scrolling behavior of the TUNE/MENU
knob to scroll UP or DOWN.
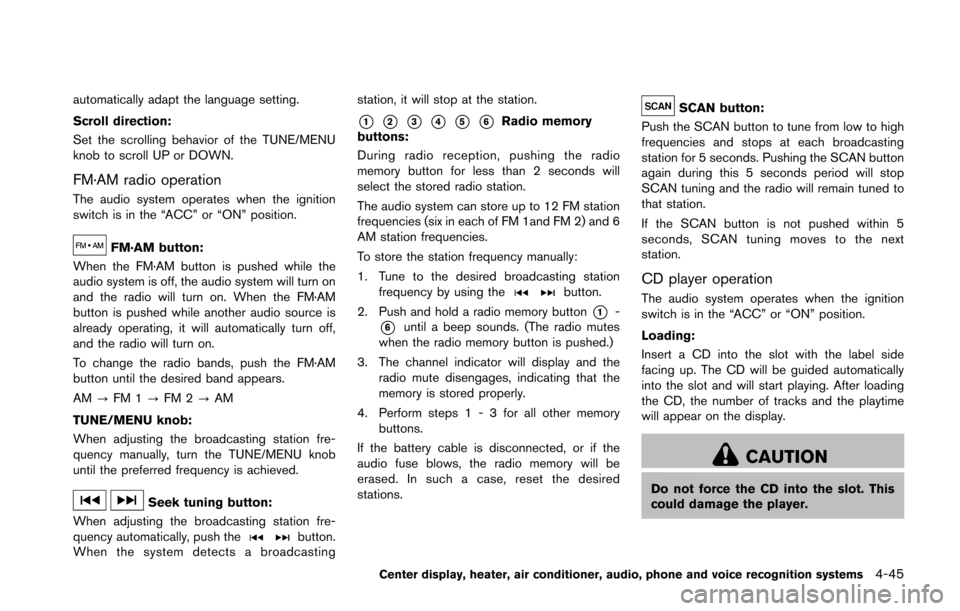
FM·AM radio operation
The audio system operates when the ignition
switch is in the “ACC” or “ON” position.
FM·AM button:
When the FM·AM button is pushed while the
audio system is off, the audio system will turn on
and the radio will turn on. When the FM·AM
button is pushed while another audio source is
already operating, it will automatically turn off,
and the radio will turn on.
To change the radio bands, push the FM·AM
button until the desired band appears.
AM ?FM 1 ?FM 2 ?AM
TUNE/MENU knob:
When adjusting the broadcasting station fre-
quency manually, turn the TUNE/MENU knob
until the preferred frequency is achieved.
Seek tuning button:
When adjusting the broadcasting station fre-
quency automatically, push the
button.
When the system detects a broadcasting station, it will stop at the station.
*1*2*3*4*5*6Radio memory
buttons:
During radio reception, pushing the radio
memory button for less than 2 seconds will
select the stored radio station.
The audio system can store up to 12 FM station
frequencies (six in each of FM 1and FM 2) and 6
AM station frequencies.
To store the station frequency manually:
1. Tune to the desired broadcasting station frequency by using the
button.
2. Push and hold a radio memory button
*1-
*6until a beep sounds. (The radio mutes
when the radio memory button is pushed.)
3. The channel indicator will display and the radio mute disengages, indicating that the
memory is stored properly.
4. Perform steps 1 - 3 for all other memory buttons.
If the battery cable is disconnected, or if the
audio fuse blows, the radio memory will be
erased. In such a case, reset the desired
stations.
SCAN button:
Push the SCAN button to tune from low to high
frequencies and stops at each broadcasting
station for 5 seconds. Pushing the SCAN button
again during this 5 seconds period will stop
SCAN tuning and the radio will remain tuned to
that station.
If the SCAN button is not pushed within 5
seconds, SCAN tuning moves to the next
station.
CD player operation
The audio system operates when the ignition
switch is in the “ACC” or “ON” position.
Loading:
Insert a CD into the slot with the label side
facing up. The CD will be guided automatically
into the slot and will start playing. After loading
the CD, the number of tracks and the playtime
will appear on the display.
CAUTION
Do not force the CD into the slot. This
could damage the player.
Center display, heater, air conditioner, audio, phone and voice recognition systems4-45
Page 214 of 428
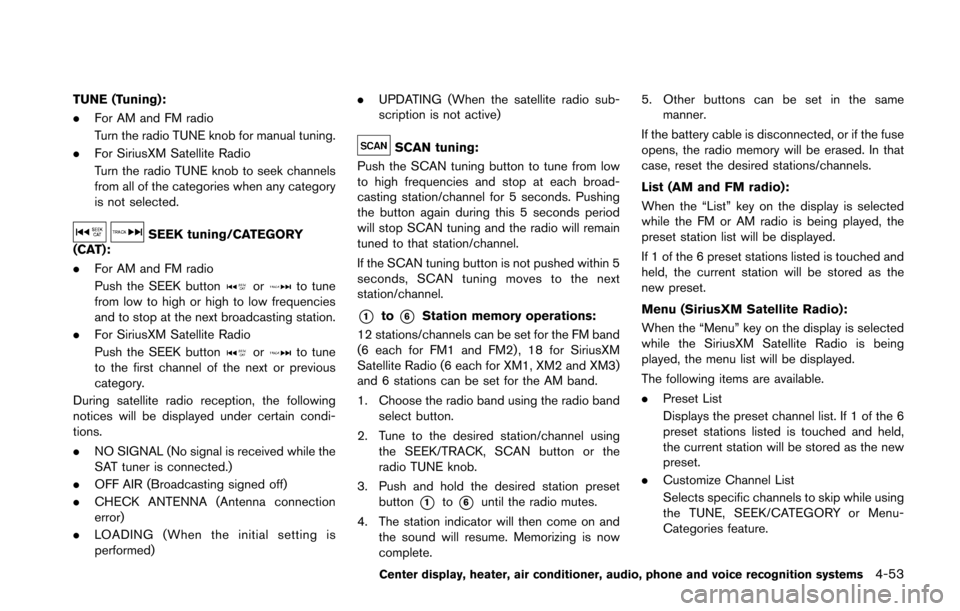
TUNE (Tuning):
.For AM and FM radio
Turn the radio TUNE knob for manual tuning.
. For SiriusXM Satellite Radio
Turn the radio TUNE knob to seek channels
from all of the categories when any category
is not selected.
SEEK tuning/CATEGORY
(CAT):
. For AM and FM radio
Push the SEEK button
orto tune
from low to high or high to low frequencies
and to stop at the next broadcasting station.
. For SiriusXM Satellite Radio
Push the SEEK button
orto tune
to the first channel of the next or previous
category.
During satellite radio reception, the following
notices will be displayed under certain condi-
tions.
. NO SIGNAL (No signal is received while the
SAT tuner is connected.)
. OFF AIR (Broadcasting signed off)
. CHECK ANTENNA (Antenna connection
error)
. LOADING (When the initial setting is
performed) .
UPDATING (When the satellite radio sub-
scription is not active)
SCAN tuning:
Push the SCAN tuning button to tune from low
to high frequencies and stop at each broad-
casting station/channel for 5 seconds. Pushing
the button again during this 5 seconds period
will stop SCAN tuning and the radio will remain
tuned to that station/channel.
If the SCAN tuning button is not pushed within 5
seconds, SCAN tuning moves to the next
station/channel.
*1to*6Station memory operations:
12 stations/channels can be set for the FM band
(6 each for FM1 and FM2) , 18 for SiriusXM
Satellite Radio (6 each for XM1, XM2 and XM3)
and 6 stations can be set for the AM band.
1. Choose the radio band using the radio band select button.
2. Tune to the desired station/channel using the SEEK/TRACK, SCAN button or the
radio TUNE knob.
3. Push and hold the desired station preset button
*1to*6until the radio mutes.
4. The station indicator will then come on and the sound will resume. Memorizing is now
complete. 5. Other buttons can be set in the same
manner.
If the battery cable is disconnected, or if the fuse
opens, the radio memory will be erased. In that
case, reset the desired stations/channels.
List (AM and FM radio):
When the “List” key on the display is selected
while the FM or AM radio is being played, the
preset station list will be displayed.
If 1 of the 6 preset stations listed is touched and
held, the current station will be stored as the
new preset.
Menu (SiriusXM Satellite Radio):
When the “Menu” key on the display is selected
while the SiriusXM Satellite Radio is being
played, the menu list will be displayed.
The following items are available.
. Preset List
Displays the preset channel list. If 1 of the 6
preset stations listed is touched and held,
the current station will be stored as the new
preset.
. Customize Channel List
Selects specific channels to skip while using
the TUNE, SEEK/CATEGORY or Menu-
Categories feature.
Center display, heater, air conditioner, audio, phone and voice recognition systems4-53
Page 246 of 428
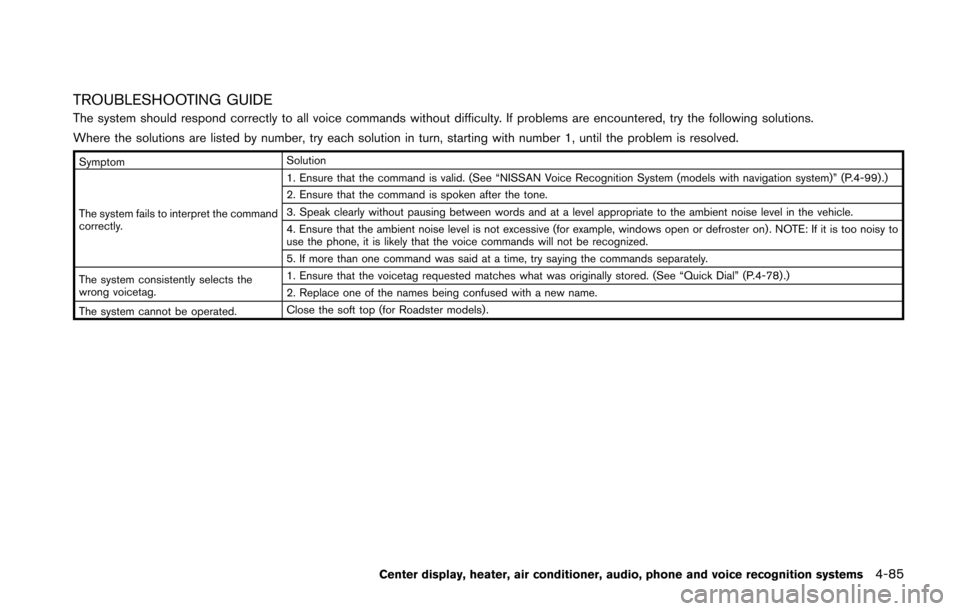
TROUBLESHOOTING GUIDE
The system should respond correctly to all voice commands without difficulty. If problems are encountered, try the following solutions.
Where the solutions are listed by number, try each solution in turn, starting with number 1, until the problem is resolved.
SymptomSolution
The system fails to interpret the command
correctly. 1. Ensure that the command is valid. (See “NISSAN Voice Recognition System (models with navigation system)” (P.4-99) .)
2. Ensure that the command is spoken after the tone.
3. Speak clearly without pausing between words and at a level appropriate to the ambient noise level in the vehicle.
4. Ensure that the ambient noise level is not excessive (for example, windows open or defroster on) . NOTE: If it is too noisy to
use the phone, it is likely that the voice commands will not be recognized.
5. If more than one command was said at a time, try saying the commands separately.
The system consistently selects the
wrong voicetag. 1. Ensure that the voicetag requested matches what was originally stored. (See “Quick Dial” (P.4-78) .)
2. Replace one of the names being confused with a new name.
The system cannot be operated. Close the soft top (for Roadster models) .
Center display, heater, air conditioner, audio, phone and voice recognition systems4-85
Page 259 of 428
4-98Center display, heater, air conditioner, audio, phone and voice recognition systems
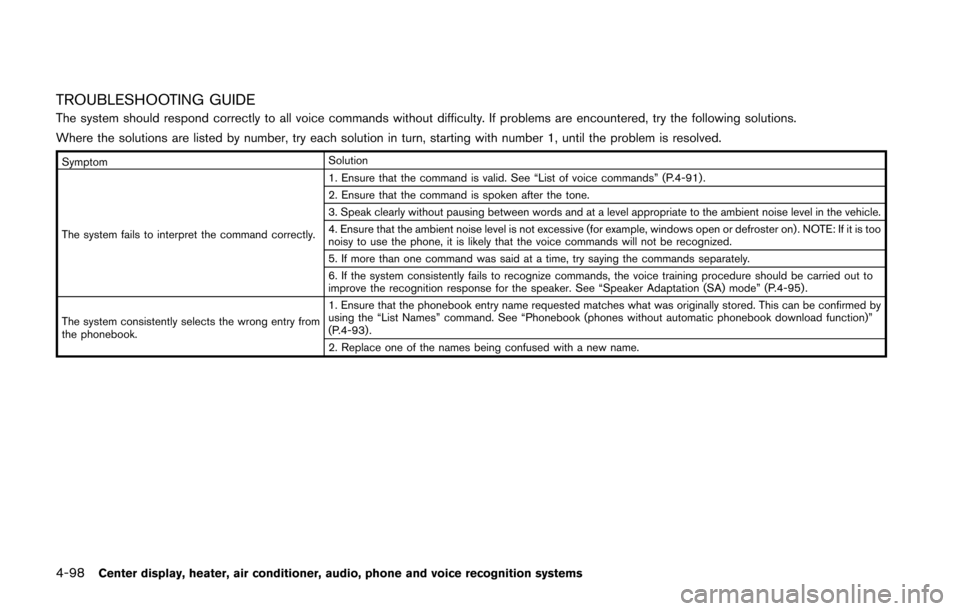
TROUBLESHOOTING GUIDE
The system should respond correctly to all voice commands without difficulty. If problems are encountered, try the following solutions.
Where the solutions are listed by number, try each solution in turn, starting with number 1, until the problem is resolved.
SymptomSolution
The system fails to interpret the command correctly. 1. Ensure that the command is valid. See “List of voice commands” (P.4-91) .
2. Ensure that the command is spoken after the tone.
3. Speak clearly without pausing between words and at a level appropriate to the ambient noise level in the vehicle.
4. Ensure that the ambient noise level is not excessive (for example, windows open or defroster on) . NOTE: If it is too
noisy to use the phone, it is likely that the voice commands will not be recognized.
5. If more than one command was said at a time, try saying the commands separately.
6. If the system consistently fails to recognize commands, the voice training procedure should be carried out to
improve the recognition response for the speaker. See “Speaker Adaptation (SA) mode” (P.4-95) .
The system consistently selects the wrong entry from
the phonebook. 1. Ensure that the phonebook entry name requested matches what was originally stored. This can be confirmed by
using the “List Names” command. See “Phonebook (phones without automatic phonebook download function)”
(P.4-93) .
2. Replace one of the names being confused with a new name.
Page 284 of 428
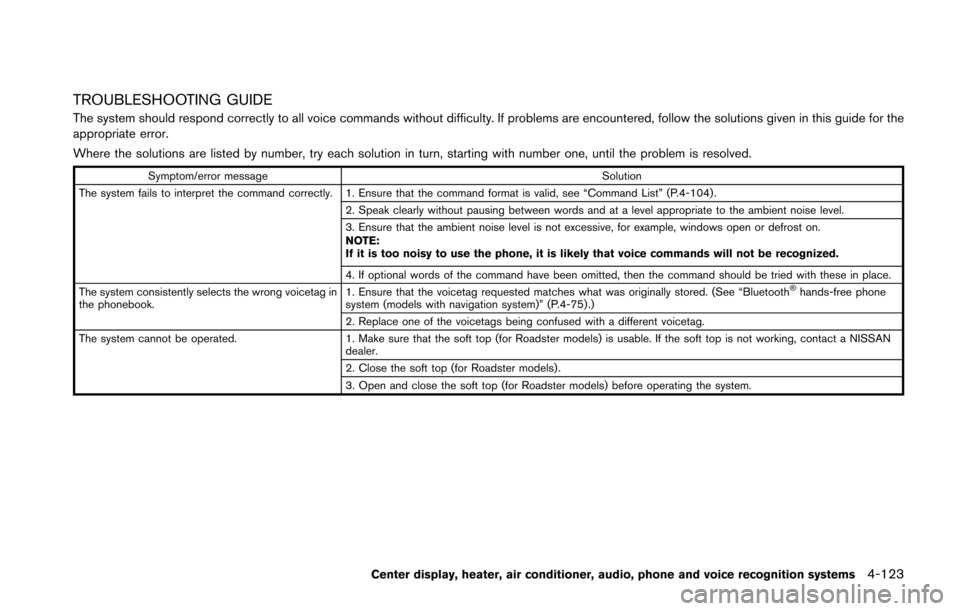
TROUBLESHOOTING GUIDE
The system should respond correctly to all voice commands without difficulty. If problems are encountered, follow the solutions given in this guide for the
appropriate error.
Where the solutions are listed by number, try each solution in turn, starting with number one, until the problem is resolved.
Symptom/error messageSolution
The system fails to interpret the command correctly. 1. Ensure that the command format is valid, see “Command List” (P.4-104) . 2. Speak clearly without pausing between words and at a level appropriate to the ambient noise level.
3. Ensure that the ambient noise level is not excessive, for example, windows open or defrost on.
NOTE:
If it is too noisy to use the phone, it is likely that voice commands will not be recognized.
4. If optional words of the command have been omitted, then the command should be tried with these in place.
The system consistently selects the wrong voicetag in
the phonebook. 1. Ensure that the voicetag requested matches what was originally stored. (See “Bluetooth
�Šhands-free phone
system (models with navigation system)” (P.4-75) .)
2. Replace one of the voicetags being confused with a different voicetag.
The system cannot be operated. 1. Make sure that the soft top (for Roadster models) is usable. If the soft top is not working, contact a NISSAN
dealer.
2. Close the soft top (for Roadster models) .
3. Open and close the soft top (for Roadster models) before operating the system.
Center display, heater, air conditioner, audio, phone and voice recognition systems4-123
Page 339 of 428
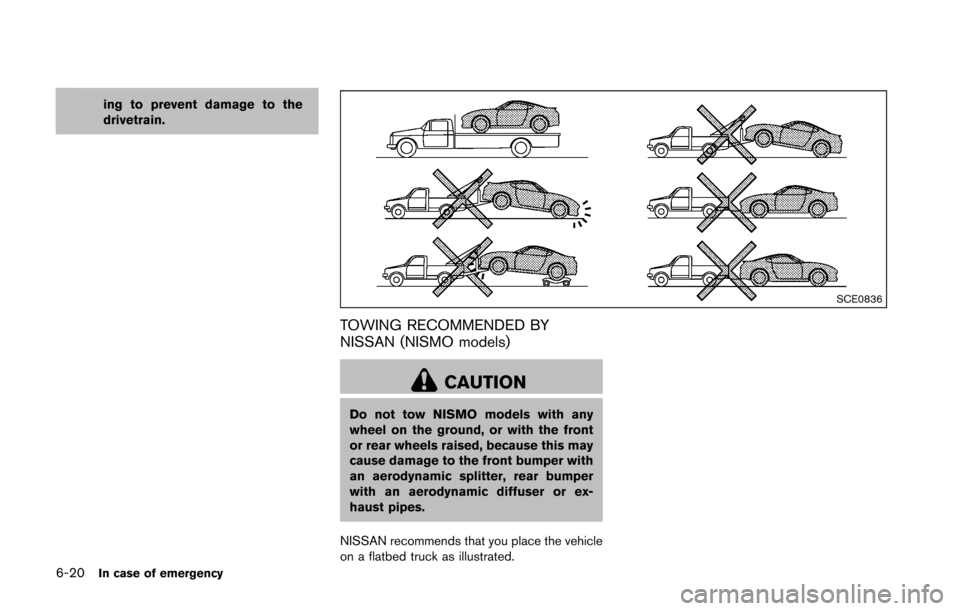
6-20In case of emergency
ing to prevent damage to the
drivetrain.
SCE0836
TOWING RECOMMENDED BY
NISSAN (NISMO models)
CAUTION
Do not tow NISMO models with any
wheel on the ground, or with the front
or rear wheels raised, because this may
cause damage to the front bumper with
an aerodynamic splitter, rear bumper
with an aerodynamic diffuser or ex-
haust pipes.
NISSAN recommends that you place the vehicle
on a flatbed truck as illustrated.
Page 350 of 428
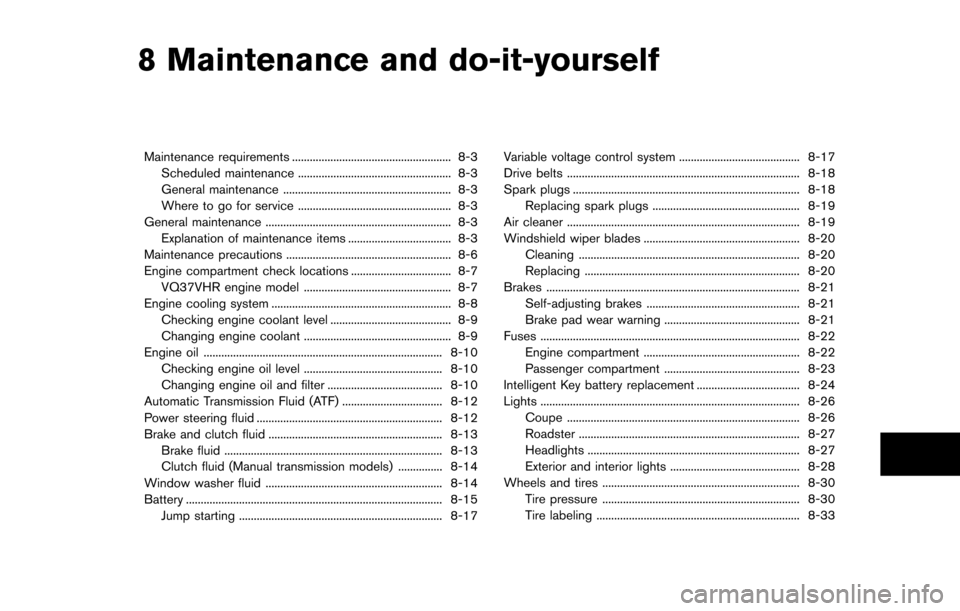
8 Maintenance and do-it-yourself
Maintenance requirements ...................................................... 8-3Scheduled maintenance .................................................... 8-3
General maintenance ......................................................... 8-3
Where to go for service .................................................... 8-3
General maintenance ............................................................... 8-3 Explanation of maintenance items ................................... 8-3
Maintenance precautions ........................................................ 8-6
Engine compartment check locations .................................. 8-7 VQ37VHR engine model .................................................. 8-7
Engine cooling system ............................................................. 8-8
Checking engine coolant level ......................................... 8-9
Changing engine coolant .................................................. 8-9
Engine oil ........................................................................\
......... 8-10
Checking engine oil level ............................................... 8-10
Changing engine oil and filter ....................................... 8-10
Automatic Transmission Fluid (ATF) .................................. 8-12
Power steering fluid ............................................................... 8-12
Brake and clutch fluid ........................................................... 8-13 Brake fluid ........................................................................\
.. 8-13
Clutch fluid (Manual transmission models) ............... 8-14
Window washer fluid ............................................................ 8-14
Battery ........................................................................\
............... 8-15 Jump starting ..................................................................... 8-17 Variable voltage control system ......................................... 8-17
Drive belts ........................................................................\
....... 8-18
Spark plugs ........................................................................\
..... 8-18
Replacing spark plugs .................................................. 8-19
Air cleaner ........................................................................\
....... 8-19
Windshield wiper blades ..................................................... 8-20
Cleaning ........................................................................\
... 8-20
Replacing ........................................................................\
. 8-20
Brakes ........................................................................\
.............. 8-21 Self-adjusting brakes .................................................... 8-21
Brake pad wear warning .............................................. 8-21
Fuses ........................................................................\
................ 8-22 Engine compartment ..................................................... 8-22
Passenger compartment .............................................. 8-23
Intelligent Key battery replacement ................................... 8-24
Lights ........................................................................\
................ 8-26
Coupe ........................................................................\
....... 8-26
Roadster ........................................................................\
... 8-27
Headlights ........................................................................\
8-27
Exterior and interior lights ............................................ 8-28
Wheels and tires ................................................................... 8-30 Tire pressure ................................................................... 8-30
Tire labeling ..................................................................... 8-33
Page 356 of 428
You should be aware that incomplete or
improper servicing may result in operating
difficulties or excessive emissions, and could
affect your warranty coverage.If in doubt
about any servicing, we recommend that
it be done by a NISSAN dealer.
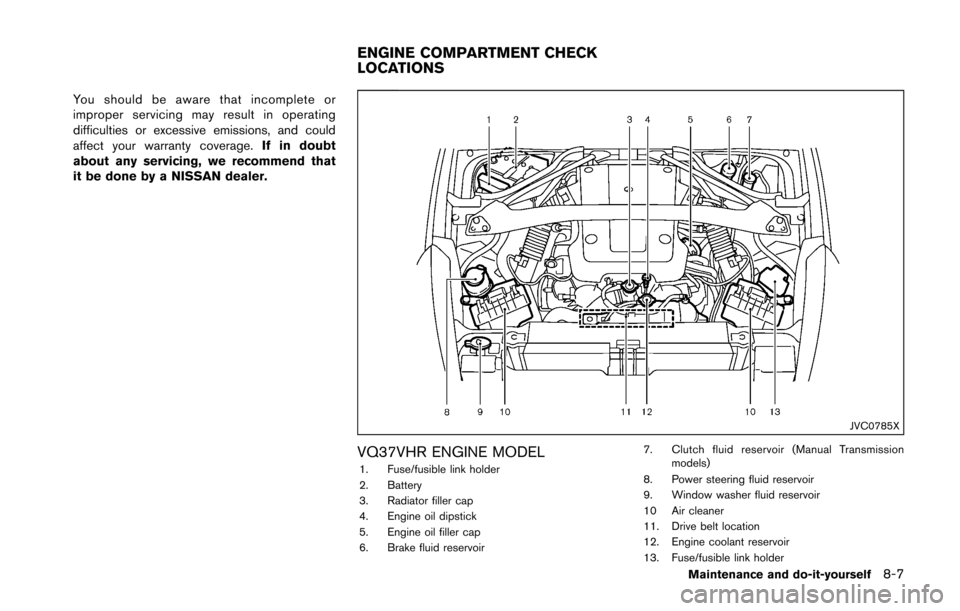
JVC0785X
VQ37VHR ENGINE MODEL1. Fuse/fusible link holder
2. Battery
3. Radiator filler cap
4. Engine oil dipstick
5. Engine oil filler cap
6. Brake fluid reservoir 7. Clutch fluid reservoir (Manual Transmission
models)
8. Power steering fluid reservoir
9. Window washer fluid reservoir
10 Air cleaner
11. Drive belt location
12. Engine coolant reservoir
13. Fuse/fusible link holder
Maintenance and do-it-yourself8-7
ENGINE COMPARTMENT CHECK
LOCATIONS