2016 NISSAN 370Z COUPE brake light
[x] Cancel search: brake lightPage 88 of 428
JVI0582X
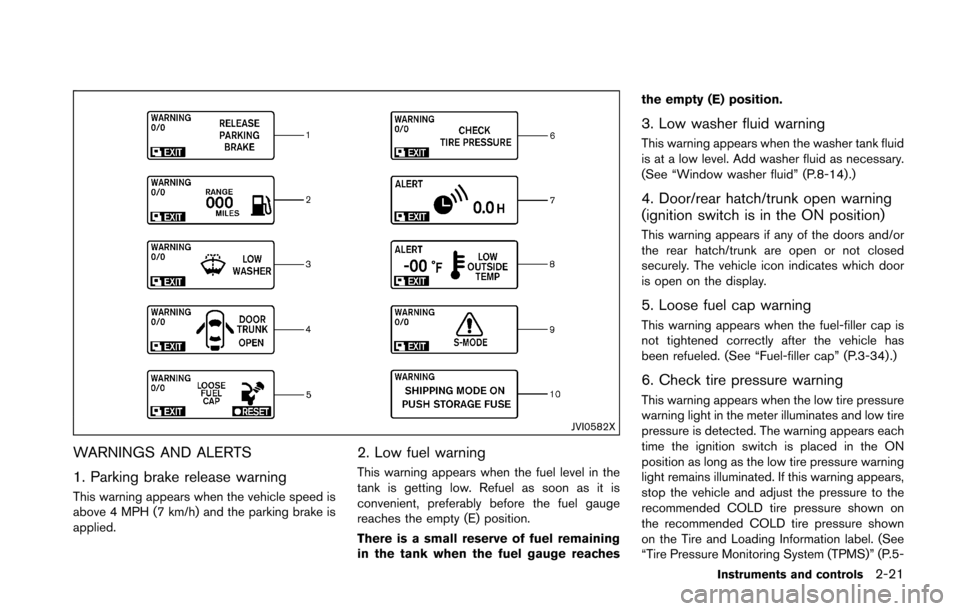
WARNINGS AND ALERTS
1. Parking brake release warning
This warning appears when the vehicle speed is
above 4 MPH (7 km/h) and the parking brake is
applied.
2. Low fuel warning
This warning appears when the fuel level in the
tank is getting low. Refuel as soon as it is
convenient, preferably before the fuel gauge
reaches the empty (E) position.
There is a small reserve of fuel remaining
in the tank when the fuel gauge reachesthe empty (E) position.
3. Low washer fluid warning
This warning appears when the washer tank fluid
is at a low level. Add washer fluid as necessary.
(See “Window washer fluid” (P.8-14).)
4. Door/rear hatch/trunk open warning
(ignition switch is in the ON position)
This warning appears if any of the doors and/or
the rear hatch/trunk are open or not closed
securely. The vehicle icon indicates which door
is open on the display.
5. Loose fuel cap warning
This warning appears when the fuel-filler cap is
not tightened correctly after the vehicle has
been refueled. (See “Fuel-filler cap” (P.3-34) .)
6. Check tire pressure warning
This warning appears when the low tire pressure
warning light in the meter illuminates and low tire
pressure is detected. The warning appears each
time the ignition switch is placed in the ON
position as long as the low tire pressure warning
light remains illuminated. If this warning appears,
stop the vehicle and adjust the pressure to the
recommended COLD tire pressure shown on
the recommended COLD tire pressure shown
on the Tire and Loading Information label. (See
“Tire Pressure Monitoring System (TPMS)” (P.5-
Instruments and controls2-21
Page 102 of 428
SIC3996
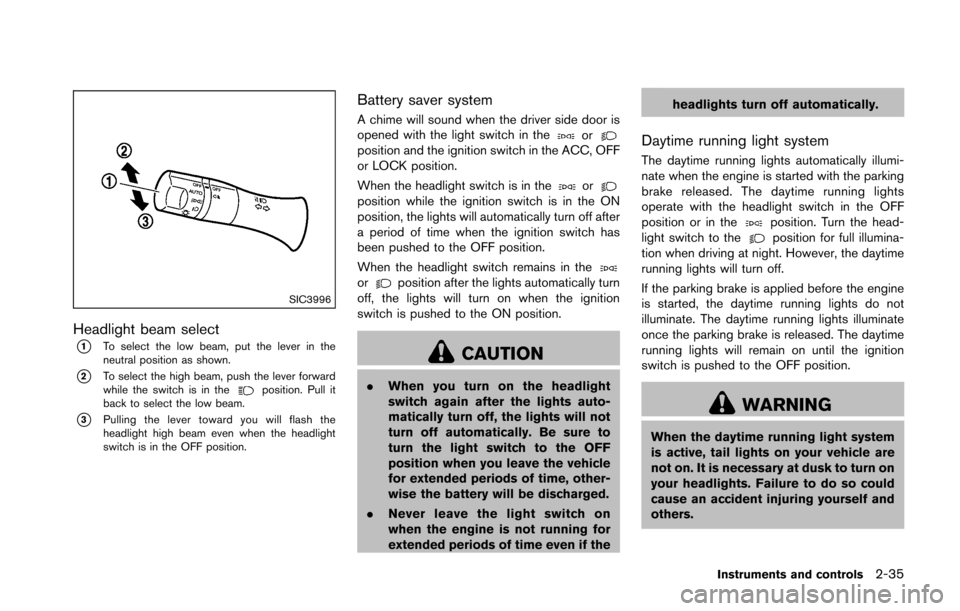
Headlight beam select
*1To select the low beam, put the lever in the
neutral position as shown.
*2To select the high beam, push the lever forward
while the switch is in theposition. Pull it
back to select the low beam.
*3Pulling the lever toward you will flash the
headlight high beam even when the headlight
switch is in the OFF position.
Battery saver system
A chime will sound when the driver side door is
opened with the light switch in theorposition and the ignition switch in the ACC, OFF
or LOCK position.
When the headlight switch is in the
orposition while the ignition switch is in the ON
position, the lights will automatically turn off after
a period of time when the ignition switch has
been pushed to the OFF position.
When the headlight switch remains in the
orposition after the lights automatically turn
off, the lights will turn on when the ignition
switch is pushed to the ON position.
CAUTION
. When you turn on the headlight
switch again after the lights auto-
matically turn off, the lights will not
turn off automatically. Be sure to
turn the light switch to the OFF
position when you leave the vehicle
for extended periods of time, other-
wise the battery will be discharged.
. Never leave the light switch on
when the engine is not running for
extended periods of time even if the headlights turn off automatically.
Daytime running light system
The daytime running lights automatically illumi-
nate when the engine is started with the parking
brake released. The daytime running lights
operate with the headlight switch in the OFF
position or in the
position. Turn the head-
light switch to theposition for full illumina-
tion when driving at night. However, the daytime
running lights will turn off.
If the parking brake is applied before the engine
is started, the daytime running lights do not
illuminate. The daytime running lights illuminate
once the parking brake is released. The daytime
running lights will remain on until the ignition
switch is pushed to the OFF position.
WARNING
When the daytime running light system
is active, tail lights on your vehicle are
not on. It is necessary at dusk to turn on
your headlights. Failure to do so could
cause an accident injuring yourself and
others.
Instruments and controls2-35
Page 174 of 428
screen off, the screen turns on for further
operation. The screen will turn off automatically
5 seconds after the operation is finished.
To turn on the screen, set this item to the ON
position, or push and hold the “
OFF”
button.
. Brightness/Contrast/Background Color
To adjust the brightness and contrast of the
screen, select the “Brightness” or “Contrast”
key.
Then, you can adjust the brightness and contrast
using the multi-function controller.
For information on the “Background Color” key,
refer to the separate Navigation System Own-
er’s Manual.
For Roadster models:
Depending on the driver’s seat position, the
display could be hard to read. Adjust the
brightness and contrast of the display on the
setting screen.
Color Theme:
Choose the theme color of the menu screen
from “Black”, “Blue” or “Red”.
SAA2487
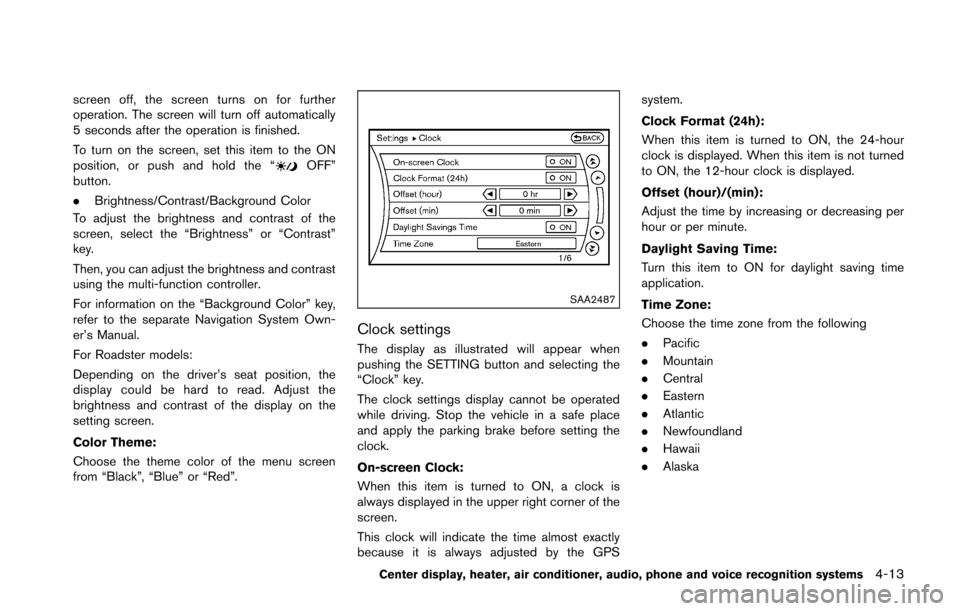
Clock settings
The display as illustrated will appear when
pushing the SETTING button and selecting the
“Clock” key.
The clock settings display cannot be operated
while driving. Stop the vehicle in a safe place
and apply the parking brake before setting the
clock.
On-screen Clock:
When this item is turned to ON, a clock is
always displayed in the upper right corner of the
screen.
This clock will indicate the time almost exactly
because it is always adjusted by the GPS system.
Clock Format (24h):
When this item is turned to ON, the 24-hour
clock is displayed. When this item is not turned
to ON, the 12-hour clock is displayed.
Offset (hour)/(min):
Adjust the time by increasing or decreasing per
hour or per minute.
Daylight Saving Time:
Turn this item to ON for daylight saving time
application.
Time Zone:
Choose the time zone from the following
.
Pacific
. Mountain
. Central
. Eastern
. Atlantic
. Newfoundland
. Hawaii
. Alaska
Center display, heater, air conditioner, audio, phone and voice recognition systems4-13
Page 184 of 428
HOW TO ADJUST SCREEN
To adjust the Display ON/OFF, Brightness, Tint,
Color, Contrast and Black Level of the RearView
Monitor, push the SETTING button with the
RearView Monitor on, select the “Display” key
on the screen and select the item key and adjust
the level using the multi-function controller.
Do not adjust the Brightness, Tint, Color,
Contrast and Black Level of the RearView
Monitor while the vehicle is moving. Make sure
the parking brake is firmly applied.
OPERATING TIPS
.When the shift lever is shifted to the R
(Reverse) position, the monitor screen auto-
matically changes to the RearView Monitor
mode. However, the radio can be heard.
. When the temperature is extremely high or
low, the screen may not clearly display
objects. This is not a malfunction.
. When strong light is directly coming on the
camera, objects may not be displayed
clearly. This is not a malfunction.
. Vertical lines may be seen in objects on the
screen. This is due to strong reflected light
from the bumper. This is not a malfunction.
. The screen may flicker under fluorescent
light. This is not a malfunction. .
The colors of objects on the RearView
Monitor may differ somewhat from the actual
color of objects. This is not a malfunction.
. Objects on the monitor may not be clear in a
dark environment. This is not a malfunction.
. If dirt, rain or snow accumulates on the
camera, the RearView Monitor may not
display object clearly. Clean the camera.
. Do not use alcohol, benzine or thinner to
clean the camera. This will cause discolora-
tion. To clean the camera, wipe with a cloth
dampened with diluted mild cleaning agent
and then wipe with a dry cloth.
. Do not damage the camera as the monitor
screen may be adversely affected.
. Do not use wax on the camera window.
Wipe off any wax with a clean cloth
dampened with mild detergent diluted with
water.SAA2275
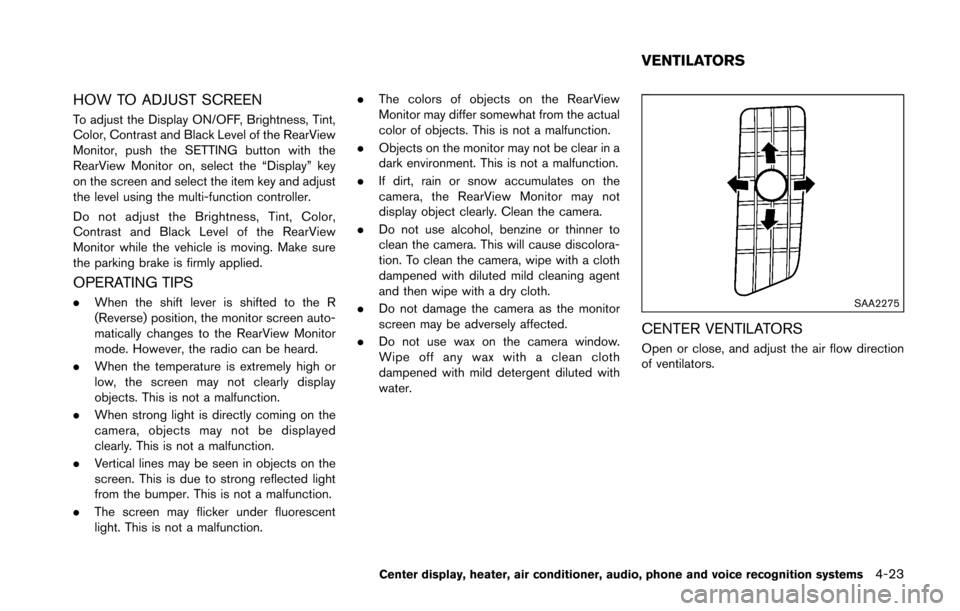
CENTER VENTILATORS
Open or close, and adjust the air flow direction
of ventilators.
Center display, heater, air conditioner, audio, phone and voice recognition systems4-23
VENTILATORS
Page 292 of 428
1. Remain calm and do not overreact.
2. Maintain a firm grip on the steering wheelwith both hands and try to hold a straight
course.
3. When appropriate, slowly release the accel- erator pedal to gradually slow the vehicle.
4. Gradually steer the vehicle to a safe location off the road and away from traffic if possible.
5. Lightly apply the brake pedal to gradually stop the vehicle.
6. Turn on the hazard warning flashers and either contact a roadside emergency service
to change the tire or see “Changing a flat
tire (for models with spare tire)” (P.6-4) of
this Owner’s Manual.
DRINKING ALCOHOL/DRUGS AND
DRIVING
WARNING
Never drive under the influence of
alcohol or drugs. Alcohol in the blood-
stream reduces coordination, delays
reaction time and impairs judgement.
Driving after drinking alcohol increases
the likelihood of being involved in an
accident injuring yourself and others.
Additionally, if you are injured in an accident, alcohol can increase the se-
verity of the injury.
NISSAN is committed to safe driving. However,
you must choose not to drive under the influence
of alcohol. Every year thousands of people are
injured or killed in alcohol-related accidents.
Although the local laws vary on what is
considered to be legally intoxicated, the fact is
that alcohol affects all people differently and
most people underestimate the effects of
alcohol.
Remember, drinking and driving don’t mix! And
that is true for drugs, too (over-the-counter,
prescription, and illegal drugs) . Don’t drive if
your ability to operate your vehicle is impaired by
alcohol, drugs, or some other physical condition.
WARNING
Do not operate the push-button ignition
switch while driving the vehicle except
in an emergency. (The engine will stop
when the ignition switch is pushed 3
consecutive times or the ignition switch
is pushed and held for more than 2
seconds.) If the engine stops while the
vehicle is being driven, this could lead
to a crash and serious injury.
Before operating the push-button ignition
switch, be sure to move the shift lever to the P
(Park) position (for automatic transmission
model) or the shift lever to the N (Neutral)
position (for manual transmission model) .
Starting and driving5-7
PUSH-BUTTON IGNITION SWITCH
Page 295 of 428
5-10Starting and driving
SSD0826
INTELLIGENT KEY BATTERY DIS-
CHARGE
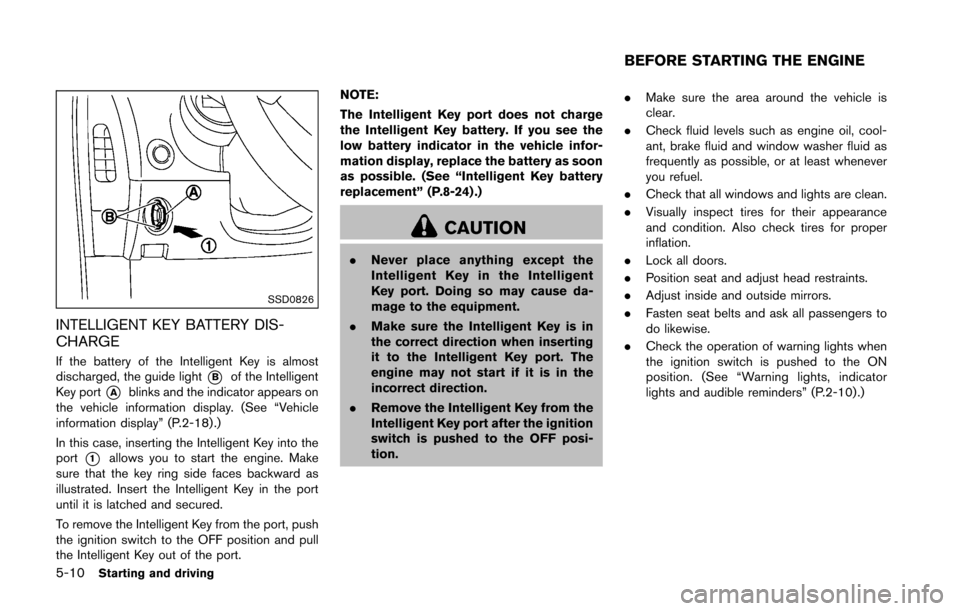
If the battery of the Intelligent Key is almost
discharged, the guide light
*Bof the Intelligent
Key port
*Ablinks and the indicator appears on
the vehicle information display. (See “Vehicle
information display” (P.2-18) .)
In this case, inserting the Intelligent Key into the
port
*1allows you to start the engine. Make
sure that the key ring side faces backward as
illustrated. Insert the Intelligent Key in the port
until it is latched and secured.
To remove the Intelligent Key from the port, push
the ignition switch to the OFF position and pull
the Intelligent Key out of the port. NOTE:
The Intelligent Key port does not charge
the Intelligent Key battery. If you see the
low battery indicator in the vehicle infor-
mation display, replace the battery as soon
as possible. (See “Intelligent Key battery
replacement” (P.8-24) .)
CAUTION
.
Never place anything except the
Intelligent Key in the Intelligent
Key port. Doing so may cause da-
mage to the equipment.
. Make sure the Intelligent Key is in
the correct direction when inserting
it to the Intelligent Key port. The
engine may not start if it is in the
incorrect direction.
. Remove the Intelligent Key from the
Intelligent Key port after the ignition
switch is pushed to the OFF posi-
tion. .
Make sure the area around the vehicle is
clear.
. Check fluid levels such as engine oil, cool-
ant, brake fluid and window washer fluid as
frequently as possible, or at least whenever
you refuel.
. Check that all windows and lights are clean.
. Visually inspect tires for their appearance
and condition. Also check tires for proper
inflation.
. Lock all doors.
. Position seat and adjust head restraints.
. Adjust inside and outside mirrors.
. Fasten seat belts and ask all passengers to
do likewise.
. Check the operation of warning lights when
the ignition switch is pushed to the ON
position. (See “Warning lights, indicator
lights and audible reminders” (P.2-10) .)
BEFORE STARTING THE ENGINE
Page 301 of 428
5-16Starting and driving
SSD0829
Shift lock release
If the battery charge is low or discharged, the
shift lever may not be moved from the P (Park)
position even with the brake pedal depressed
and the shift lever button pushed.
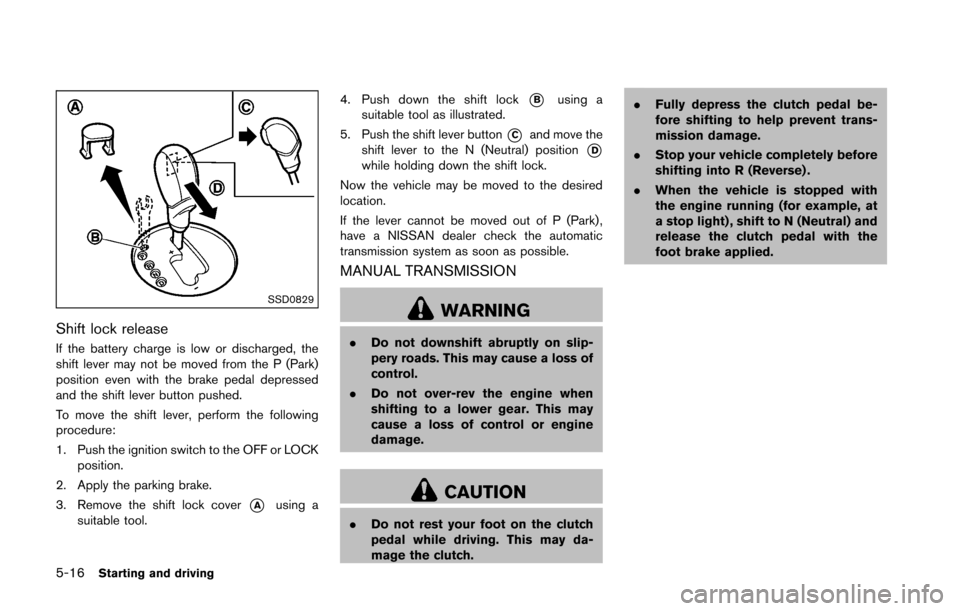
To move the shift lever, perform the following
procedure:
1. Push the ignition switch to the OFF or LOCKposition.
2. Apply the parking brake.
3. Remove the shift lock cover
*Ausing a
suitable tool. 4. Push down the shift lock
*Busing a
suitable tool as illustrated.
5. Push the shift lever button
*Cand move the
shift lever to the N (Neutral) position
*Dwhile holding down the shift lock.
Now the vehicle may be moved to the desired
location.
If the lever cannot be moved out of P (Park) ,
have a NISSAN dealer check the automatic
transmission system as soon as possible.
MANUAL TRANSMISSION
WARNING
. Do not downshift abruptly on slip-
pery roads. This may cause a loss of
control.
. Do not over-rev the engine when
shifting to a lower gear. This may
cause a loss of control or engine
damage.
CAUTION
.Do not rest your foot on the clutch
pedal while driving. This may da-
mage the clutch. .
Fully depress the clutch pedal be-
fore shifting to help prevent trans-
mission damage.
. Stop your vehicle completely before
shifting into R (Reverse) .
. When the vehicle is stopped with
the engine running (for example, at
a stop light) , shift to N (Neutral) and
release the clutch pedal with the
foot brake applied.
Page 306 of 428
SPA2110
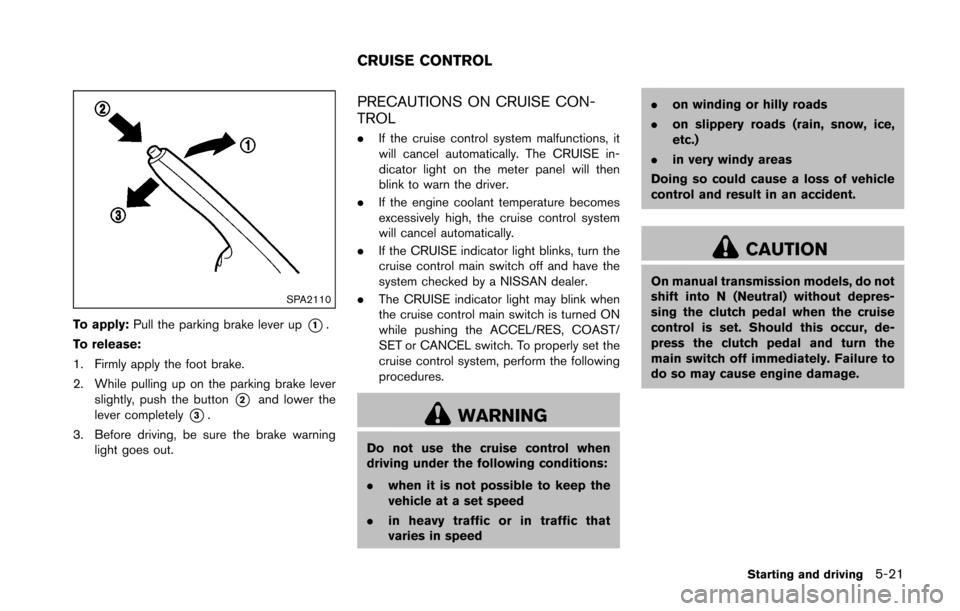
To apply:Pull the parking brake lever up*1.
To release:
1. Firmly apply the foot brake.
2. While pulling up on the parking brake lever slightly, push the button
*2and lower the
lever completely
*3.
3. Before driving, be sure the brake warning light goes out.
PRECAUTIONS ON CRUISE CON-
TROL
.If the cruise control system malfunctions, it
will cancel automatically. The CRUISE in-
dicator light on the meter panel will then
blink to warn the driver.
. If the engine coolant temperature becomes
excessively high, the cruise control system
will cancel automatically.
. If the CRUISE indicator light blinks, turn the
cruise control main switch off and have the
system checked by a NISSAN dealer.
. The CRUISE indicator light may blink when
the cruise control main switch is turned ON
while pushing the ACCEL/RES, COAST/
SET or CANCEL switch. To properly set the
cruise control system, perform the following
procedures.
WARNING
Do not use the cruise control when
driving under the following conditions:
.when it is not possible to keep the
vehicle at a set speed
. in heavy traffic or in traffic that
varies in speed .
on winding or hilly roads
. on slippery roads (rain, snow, ice,
etc.)
. in very windy areas
Doing so could cause a loss of vehicle
control and result in an accident.
CAUTION
On manual transmission models, do not
shift into N (Neutral) without depres-
sing the clutch pedal when the cruise
control is set. Should this occur, de-
press the clutch pedal and turn the
main switch off immediately. Failure to
do so may cause engine damage.
Starting and driving5-21
CRUISE CONTROL