2016 NISSAN 370Z COUPE phone
[x] Cancel search: phonePage 281 of 428
4-120Center display, heater, air conditioner, audio, phone and voice recognition systems
ing examples:
.1-800-662-6200
— “Dial one eight zero zero six six two six
two zero zero.”
Note 1: For the best voice recognition phone
dialing results, say phone numbers as single
digits.
Note 2: You cannot say 555-6000 as “five five
five six thousands”.
Note 3: When speaking a house number, speak
the number “0” as “zero”. If the letter “o (oh)” is
included in the house number, it will not be
recognized as the number “0 (zero)” even if you
speak “oh” instead of “zero”. Please speak
“zero” for the number “0 (zero)”, “oh” for the
letter “o (oh)”.
Send digits using dial tone:
. Push the TALK
switch during a phone
call.
. The menu will be launched and you will be
provided with the following guidance:
"Please say the digits to dial".
. After guidance, say the digits of the number
you want to send. After this, the digits that
have been recognized will be read out.
. If you push the ENTER button on the
steering wheel or on the multi-function
controller, the selected digits will be sent.
SAA2549
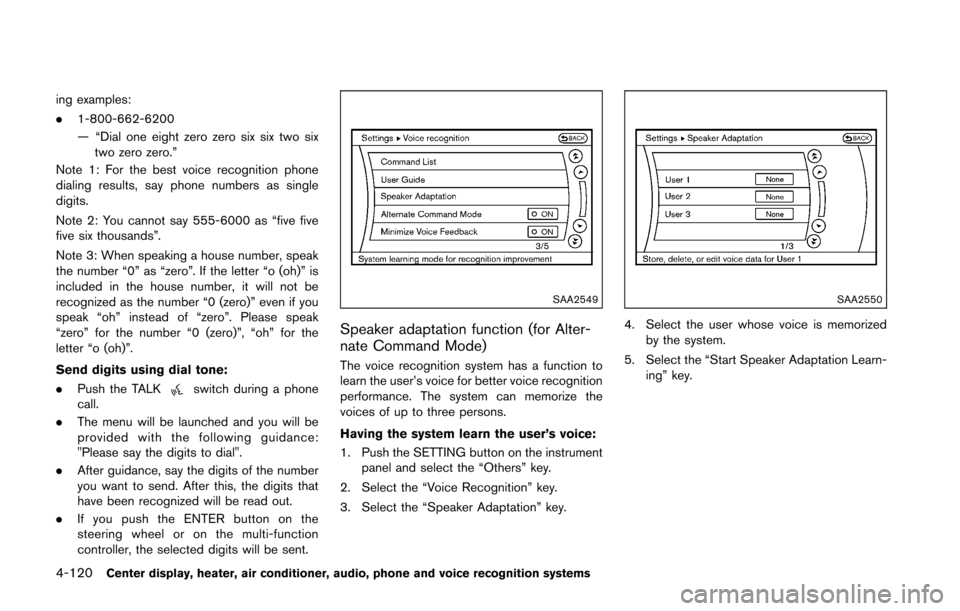
Speaker adaptation function (for Alter-
nate Command Mode)
The voice recognition system has a function to
learn the user’s voice for better voice recognition
performance. The system can memorize the
voices of up to three persons.
Having the system learn the user’s voice:
1. Push the SETTING button on the instrument
panel and select the “Others” key.
2. Select the “Voice Recognition” key.
3. Select the “Speaker Adaptation” key.
SAA2550
4. Select the user whose voice is memorized by the system.
5. Select the “Start Speaker Adaptation Learn- ing” key.
Page 282 of 428
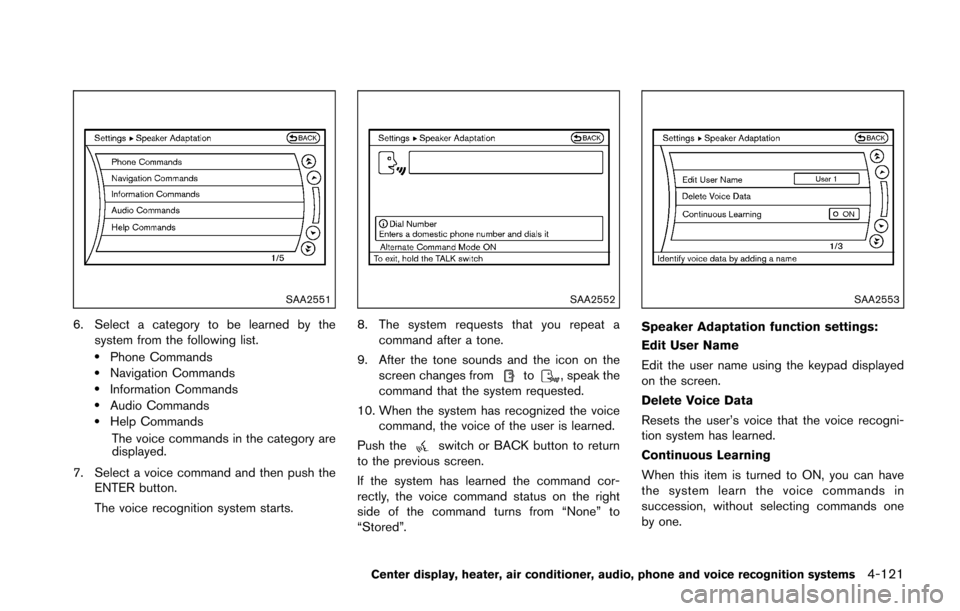
SAA2551
6. Select a category to be learned by thesystem from the following list.
.Phone Commands.Navigation Commands.Information Commands.Audio Commands.Help Commands
The voice commands in the category are
displayed.
7. Select a voice command and then push the ENTER button.
The voice recognition system starts.
SAA2552
8. The system requests that you repeat a
command after a tone.
9. After the tone sounds and the icon on the screen changes from
to, speak the
command that the system requested.
10. When the system has recognized the voice command, the voice of the user is learned.
Push the
switch or BACK button to return
to the previous screen.
If the system has learned the command cor-
rectly, the voice command status on the right
side of the command turns from “None” to
“Stored”.
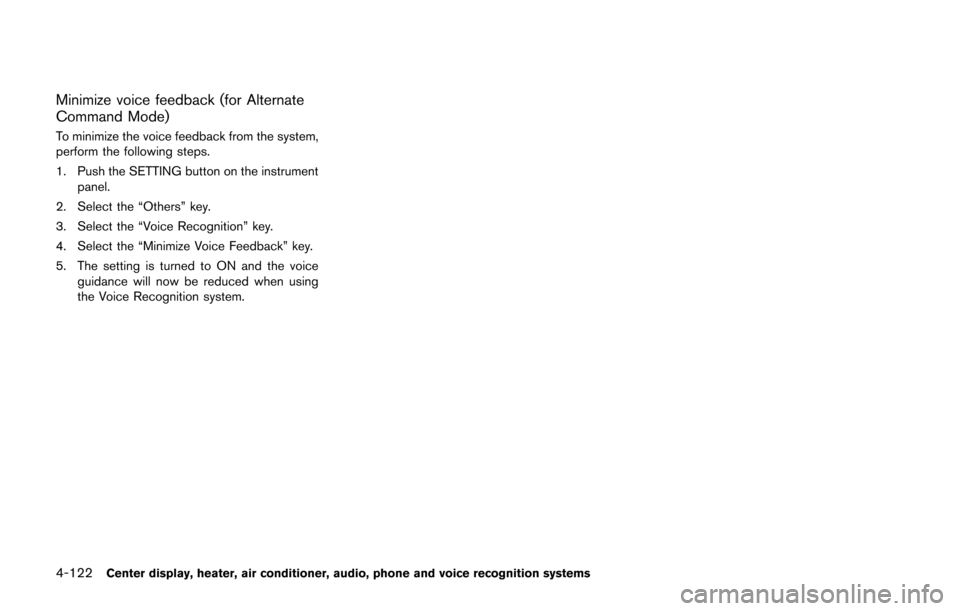
SAA2553
Speaker Adaptation function settings:
Edit User Name
Edit the user name using the keypad displayed
on the screen.
Delete Voice Data
Resets the user’s voice that the voice recogni-
tion system has learned.
Continuous Learning
When this item is turned to ON, you can have
the system learn the voice commands in
succession, without selecting commands one
by one.
Center display, heater, air conditioner, audio, phone and voice recognition systems4-121
Page 283 of 428
4-122Center display, heater, air conditioner, audio, phone and voice recognition systems
Minimize voice feedback (for Alternate
Command Mode)
To minimize the voice feedback from the system,
perform the following steps.
1. Push the SETTING button on the instrumentpanel.
2. Select the “Others” key.
3. Select the “Voice Recognition” key.
4. Select the “Minimize Voice Feedback” key.
5. The setting is turned to ON and the voice guidance will now be reduced when using
the Voice Recognition system.
Page 284 of 428
TROUBLESHOOTING GUIDE
The system should respond correctly to all voice commands without difficulty. If problems are encountered, follow the solutions given in this guide for the
appropriate error.
Where the solutions are listed by number, try each solution in turn, starting with number one, until the problem is resolved.
Symptom/error messageSolution
The system fails to interpret the command correctly. 1. Ensure that the command format is valid, see “Command List” (P.4-104) . 2. Speak clearly without pausing between words and at a level appropriate to the ambient noise level.
3. Ensure that the ambient noise level is not excessive, for example, windows open or defrost on.
NOTE:
If it is too noisy to use the phone, it is likely that voice commands will not be recognized.
4. If optional words of the command have been omitted, then the command should be tried with these in place.
The system consistently selects the wrong voicetag in
the phonebook. 1. Ensure that the voicetag requested matches what was originally stored. (See “Bluetooth
�Šhands-free phone
system (models with navigation system)” (P.4-75) .)
2. Replace one of the voicetags being confused with a different voicetag.
The system cannot be operated. 1. Make sure that the soft top (for Roadster models) is usable. If the soft top is not working, contact a NISSAN
dealer.
2. Close the soft top (for Roadster models) .
3. Open and close the soft top (for Roadster models) before operating the system.
Center display, heater, air conditioner, audio, phone and voice recognition systems4-123
Page 285 of 428

4-124Center display, heater, air conditioner, audio, phone and voice recognition systems
MEMO
Page 296 of 428
1. Apply the parking brake.
2.Automatic Transmission (AT) model:
Move the shift lever to the P (Park) or N
(Neutral) position. (P is recommended.)
The starter is designed not to operate unless
the shift lever is in either of the above
positions.
Manual Transmission (MT) model:
Move the shift lever to the N (Neutral)
position. Depress the clutch pedal fully to
the floor.
The starter is designed not to operate unless
the clutch pedal is fully depressed.
The Intelligent Key must be carried
when operating the ignition switch.
3. Push the ignition switch to the ON position. Depress the brake pedal (AT model) or the
clutch pedal (MT model) and push the
ignition switch to start the engine.
To start the engine immediately, push and
release the ignition switch while depressing
the brake pedal or the clutch pedal with the
ignition switch in any position.
.If the engine is very hard to start inextremely cold weather or when restart-
ing, depress the accelerator pedal a little
(approximately 1/3 to the floor) and while
holding, crank the engine. Release the accelerator pedal when the engine starts.
.If the engine is very hard to start because
it is flooded, depress the accelerator
pedal all the way to the floor and hold it.
Push the ignition switch to the ON
position to start cranking the engine.
After 5 or 6 seconds, stop cranking by
pushing the ignition switch to OFF. After
cranking the engine, release the accel-
erator pedal. Crank the engine with your
foot off the accelerator pedal by
depressing the brake pedal and pushing
the push-button ignition switch to start
the engine. If the engine starts, but fails
to run, repeat the above procedure.
CAUTION
Do not operate the starter for more
than 15 seconds at a time. If the engine
does not start, push the ignition switch
to OFF and wait 10 seconds before
cranking again, otherwise the starter
could be damaged.
4. Warm-up
Allow the engine to idle for at least 30
seconds after starting. Do not race the
engine while warming it up. Drive at moderate speed for a short distance first,
especially in cold weather. In cold weather,
keep the engine running for a minimum of 2 -
3 minutes before shutting it off. Starting and
stopping the engine over a short period of
time may make the vehicle more difficult to
start.
When racing the engine up to 4,500 rpm or
more under no load condition, the engine
will enter the fuel cut mode.
5. To stop the engine, shift the shift lever to the P (Park) position (AT model) or move the
shift lever to the N (Neutral) position (MT
model) , and push the ignition switch to the
OFF position.
NOTE:
Care should be taken to avoid situations
that can lead to potential battery discharge
and potential no-start conditions such as:
1. Installation or extended use of electro-
nic accessories that consume battery
power when the engine is not running
(Phone chargers, GPS, DVD players,
etc.)
2. Vehicle is not driven regularly and/or
only driven short distances.
In these cases, the battery may need to be
charged to maintain battery health.
Starting and driving5-11
STARTING THE ENGINE
Page 319 of 428
5-34Starting and driving
JVS0583X
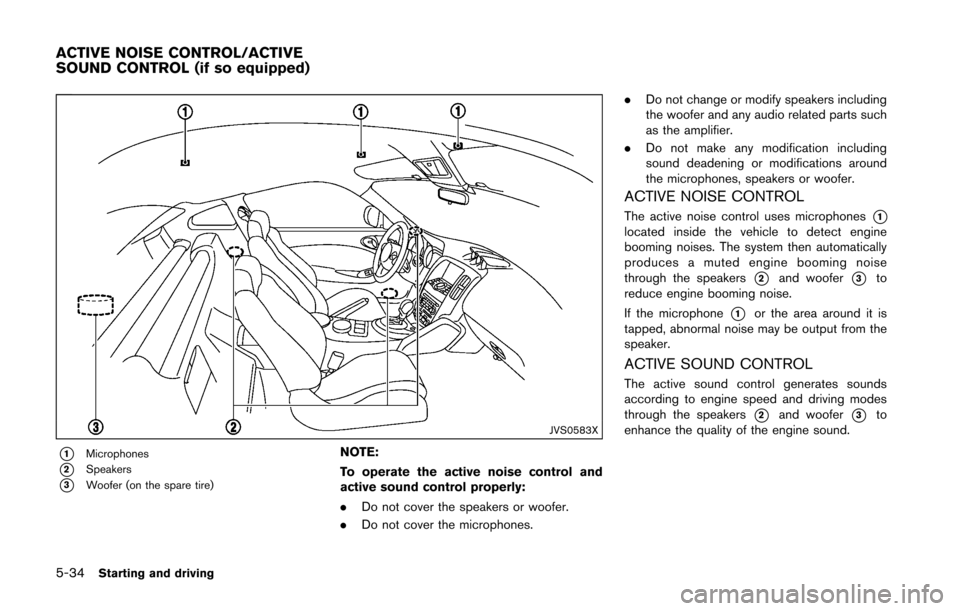
*1Microphones
*2Speakers
*3Woofer (on the spare tire)
NOTE:
To operate the active noise control and
active sound control properly:
.Do not cover the speakers or woofer.
. Do not cover the microphones. .
Do not change or modify speakers including
the woofer and any audio related parts such
as the amplifier.
. Do not make any modification including
sound deadening or modifications around
the microphones, speakers or woofer.
ACTIVE NOISE CONTROL
The active noise control uses microphones*1located inside the vehicle to detect engine
booming noises. The system then automatically
produces a muted engine booming noise
through the speakers
*2and woofer*3to
reduce engine booming noise.
If the microphone
*1or the area around it is
tapped, abnormal noise may be output from the
speaker.
ACTIVE SOUND CONTROL
The active sound control generates sounds
according to engine speed and driving modes
through the speakers
*2and woofer*3to
enhance the quality of the engine sound.
ACTIVE NOISE CONTROL/ACTIVE
SOUND CONTROL (if so equipped)
Page 354 of 428
Warning lights and chimes:Make sure that
all warning lights and chimes are operating
properly.
Windshield defroster: Check that the air
comes out of the defroster outlets properly and
in sufficient quantity when operating the heater
or air conditioner.
Windshield wiper and washer*: Check that
the wipers and washer operate properly and that
the wipers do not streak.
Under the hood and vehicle
The maintenance items listed here should be
checked periodically (for example, each time you
check the engine oil or refuel) .
Battery*: Check the fluid level in each cell. It
should be between the MAX and MIN lines.
Vehicles operated in high temperatures or under
severe condition require frequent checks of the
battery fluid level.
NOTE:
Care should be taken to avoid situations
that can lead to potential battery discharge
and potential no-start conditions such as:
1. Installation or extended use of electro-
nic accessories that consume battery
power when the engine is not running
(Phone chargers, GPS, DVD players,
etc.) 2.
Vehicle is not driven regularly and/or
only driven short distances.
In these cases, the battery may need to be
charged to maintain battery health.
Brake and clutch fluid levels*: Make sure
that the brake and clutch fluid levels are
between the MAX and MIN lines on the
reservoirs.
Engine coolant level*: Check the coolant level
when the engine is cold.
Engine drive belts*: Make sure that no belt is
frayed, worn, cracked or oily.
Engine oil level*: Check the level after parking
the vehicle on a level spot and turning off the
engine. Wait more than 15 minutes for the oil to
drain back into the oil pan.
Exhaust system: Make sure there are no loose
supports, cracks or holes. If the sound of the
exhaust seems unusual or there is a smell of
exhaust fumes, immediately have the exhaust
system inspected by a NISSAN dealer. (See
“Precautions when starting and driving” (P.5-2)
for exhaust gas (carbon monoxide) .)
Fluid leaks: Check under the vehicle for fuel,
oil, water or other fluid leaks after the vehicle has
been parked for a while. Water dripping from the
air conditioner after use is normal. If you should
notice any leaks or if fuel fumes are evident, check for the cause and have it corrected
immediately.
Power steering fluid level* and lines:
Check
the level with the engine off. Check the lines for
proper attachment, leaks, cracks, etc.
Radiator and hoses: Check the front of the
radiator and clean off any dirt, insects, leaves,
etc., that may have accumulated. Make sure the
hoses have no cracks, deformation, rot or loose
connections.
Underbody: The underbody is frequently ex-
posed to corrosive substances such as those
used on icy roads or to control dust. It is very
important to remove these substances, other-
wise rust will form on the floor pan, frame, fuel
lines and around the exhaust system. At the end
of winter, the underbody should be thoroughly
flushed with plain water, being careful to clean
those areas where mud and dirt may accumu-
late. For additional information, see “Cleaning
exterior” (P.7-2).
Windshield washer fluid*: Check that there is
adequate fluid in the reservoir.
Maintenance and do-it-yourself8-5