Page 424 of 464
Fuses 9-26 Vehicle care and maintenance
9
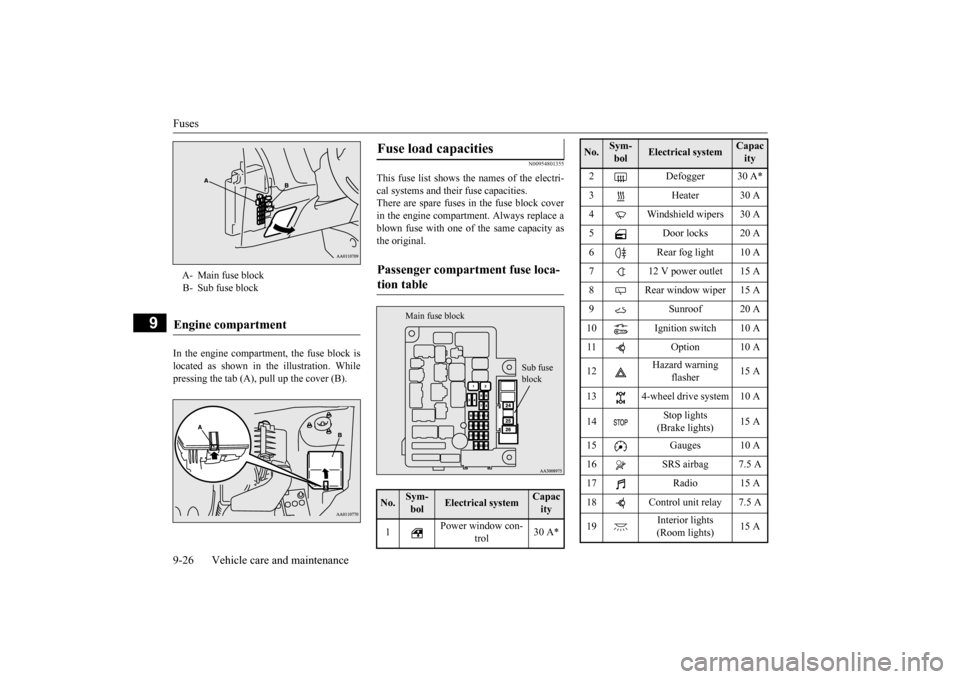
In the engine compartment, the fuse block is located as shown in the illustration. Whilepressing the tab (A), pull up the cover (B).
N00954801355
This fuse list shows the names of the electri- cal systems and their fuse capacities. There are spare fuses in the fuse block coverin the engine compartment. Always replace a blown fuse with one of the same capacity as the original.
A- Main fuse block B- Sub fuse blockEngine compartment
Fuse load capacities Passenger compartment fuse loca- tion table No.
Sym- bol
Electrical system
Capacity
1
Power window con-
trol
30 A*
Sub fuse block
Main fuse block
2 Defogger 30 A* 3 Heater 30 A 4 Windshield wipers 30 A 5 Door locks 20 A6 Rear fog light 10 A7 12 V power outlet 15 A8 Rear window wiper 15 A9 Sunroof 20 A 10 Ignition switch 10 A 11 Option 10 A 12
Hazard warning
flasher
15 A
13 4-wheel drive system 10 A 14
Stop lights (Brake lights)
15 A
15 Gauges 10 A 16 SRS airbag 7.5 A 17 Radio 15 A18 Control unit relay 7.5 A 19
Interior lights (Room lights)
15 A
No.
Sym- bol
Electrical system
Capacity
BK0223400US.book 26 ページ 2015年2月13日 金曜日 午後12時15分
Page 425 of 464
Fuses
Vehicle care and maintenance 9-27
9
*: Fusible link Some fuses may not be installed on your vehicle, depending on
the vehicle model
or specifications. The table above show
s the main equip-
ment corresponding to each fuse. 20 Back-up lights 7.5 A 21
Heated outside rearview mirrors
7.5 A
22
Outside rearview
mirrors
10 A
23
Cigarette lighter/ 12 V power outlet
15 A
24 Charge 7.5 A 25 Power seat 30 A*26 Heated seats 30 ANo.
Sym- bol
Electrical system
Capacity
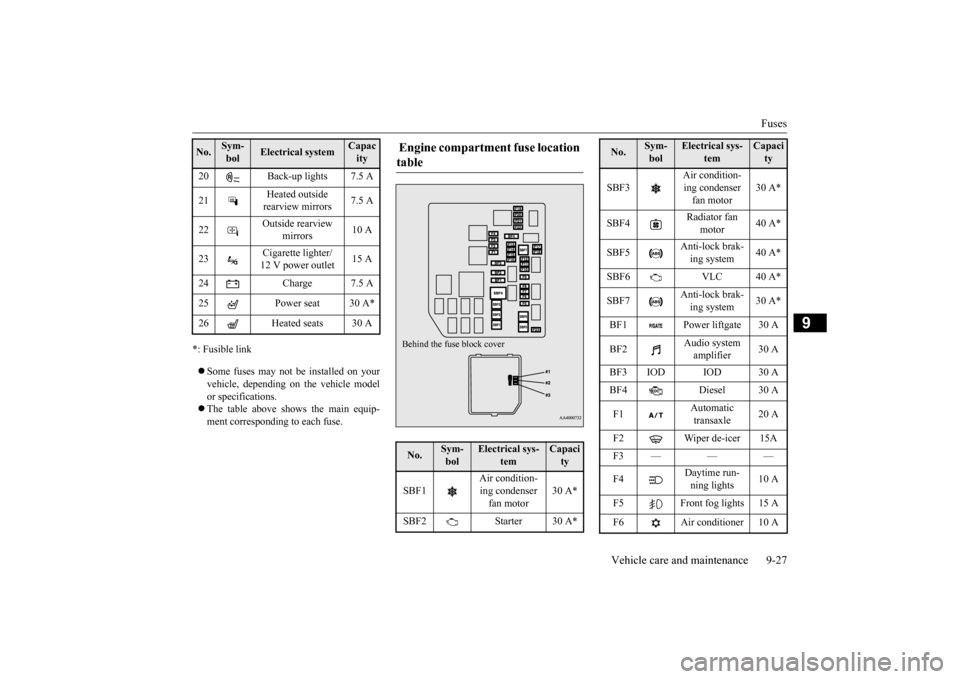
Engine compartment fuse location table No.
Sym- bol
Electrical sys-
tem
Capacity
SBF1
Air condition- ing condenser fan motor
30 A*
SBF2 Starter 30 A*Behind the fuse block cover
SBF3
Air condition- ing condenser fan motor
30 A*
SBF4
Radiator fan
motor
40 A*
SBF5
Anti-lock brak- ing system
40 A*
SBF6 VLC 40 A* SBF7
Anti-lock brak- ing system
30 A*
BF1 Power liftgate 30 A BF2
Audio system amplifier
30 A
BF3 IOD IOD 30 A BF4 Diesel 30 A F1
Automatic transaxle
20 A
F2 Wiper de-icer 15A F3——— F4
Daytime run- ning lights
10 A
F5 Front fog lights 15 A F6 Air conditioner 10 ANo.
Sym- bol
Electrical sys-
tem
Capacity
BK0223400US.book 27 ページ 2015年2月13日 金曜日 午後12時15分
Page 428 of 464
Replacement of light bulbs 9-30 Vehicle care and maintenance
9
N00943000132
The bulb should only be replaced with a new bulb with the same rating and type. The type and rating are listed on the base of the bulb.
N00950301987
Handle halogen light bul
b with care. The gas
inside a halogen light
bulb is highly pressur-
ized, so dropping, knocking, or scratching ahalogen light bulb can
cause it to shatter.
Never hold the halogen
light bulb with a bare
hand, dirty glove, etc. The oil from your hand could cause the bulb to break the next ti
me the headlights are
used. If the glass surface is dirty, clean it with alcohol and let it dr
y completely before
installing the bulb.NOTE
If you are unsure of how to carry out the work as required, it is recommended that these procedures be ca
rried out by an autho-
rized Mitsubishi Motors
dealer or a repair
facility of your choice. Be careful not to scratch the vehicle body when removing a light and lens.CAUTION
When it rains, or wh
en the vehicle has been
washed, the inside of the lens sometimesbecomes temporarily foggy. This is the samephenomenon as when window glass mists up on a humid day, and does not indicate a func- tional problem.When the light is switched on, the heat will remove the fog. However, if water gathers inside the light, please
have it checked by an
authorized Mitsubishi Motors dealer or a repair facility of your choice.
Bulb capacity
NOTE
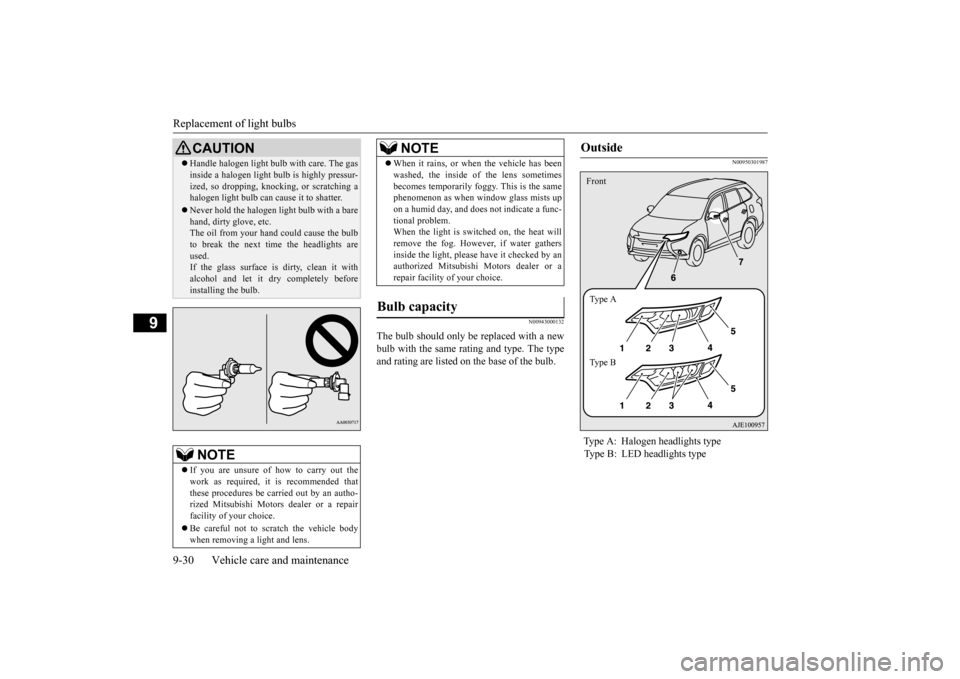
Outside Type A: Halogen headlights type Type B: LED headlights typeFront Ty p e A Ty p e B
BK0223400US.book 30 ページ 2015年2月13日 金曜日 午後12時15分
Page 429 of 464
Replacement of light bulbs
Vehicle care and maintenance 9-31
9
Item
Watt- age
ANSI Tr a d e No. or Bulb type
1 - Front turn signal light 21 W PY21W 2 - Headlight, high beam 60 W
9005 HB3
3 -
Head- light, low beam
Halogen bulb
55 W H7
LED — —
4 - Parking light/
Daytime running light (if so equipped)
——
5 - Front side-marker
light
5 W W5W
6- Front fog light
(if so equipped)
19 W H16
7 - Side turn signal light
(if so equipped)
——
NOTE
The following lights us
e an LED instead of
the bulb.Check with an authorized Mitsubishi Motors dealer or a repair facility of your choice when either light needs to be repaired orreplaced. • Headlight, low be
am (LED type)
• Parking light • Daytime running light • Side turn signal light
Item
Wattage
ANSI trade No. or Bulb type
1 - High-mounted
stop light
——
2 - Tail light — — 3 - Rear side-
marker light
——
4 - License plate
light
5 W W5W
5 - Back-up light 16 W W16W 6 - Rear turn sig-
nal light
21 W WY21W
NOTE
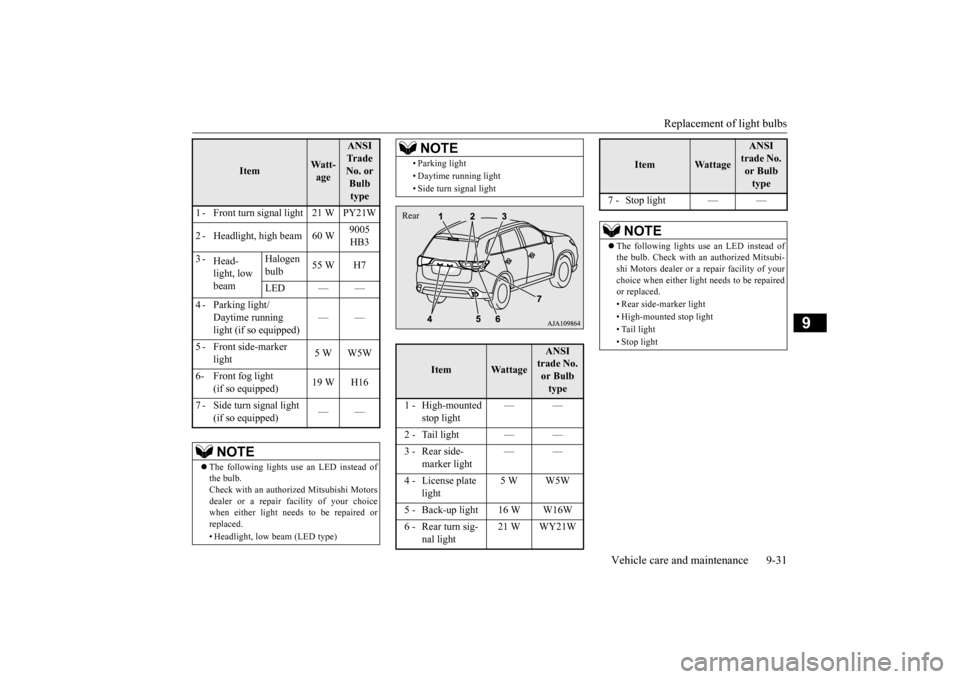
Rear
7 - Stop light — —
NOTE
The following lights us
e an LED instead of
the bulb. Check with an authorized Mitsubi-shi Motors dealer or a repair facility of your choice when either light needs to be repaired or replaced. • Rear side-marker light • High-mounted stop light • Tail light• Stop light
Item
Wattage
ANSI trade No. or Bulb type
BK0223400US.book 31 ページ 2015年2月13日 金曜日 午後12時15分
Page 430 of 464
Replacement of light bulbs 9-32 Vehicle care and maintenance
9
N00950401656
N00901801173
1. When replacing the bulb on the left side of the vehicle, remo
ve the bolt (A) hold-
ing down the relay box and move the relay box toward the rear of the vehicle.(if so equipped)
2. Turn the cap (B) counterclockwise to remove it. 3. Turn the socket (C) counterclockwise to remove it, and then pull the bulb out of the socket.
Inside
Item
Wattage
1 - Cargo room light 8 W 2 - Dome light (rear) 8 W 3 -
Dome light (front)/Read- ing light
8 W
4 - Downlight – 5 - Vanity mirror lights 2 W 6 - Glove compartment light 1.4 W
NOTE
The downlight uses an LED instead of the bulb. Check with an
authorized Mitsubishi
Motors dealer or a re
pair facility of your
choice when the light needs to be repaired or replaced.
Headlights (low beam, except for vehicles e
quipped with LED
headlights) *- Front of the vehicle
*- Front of the vehicle
BK0223400US.book 32 ページ 2015年2月13日 金曜日 午後12時15分
Page 431 of 464
Replacement of light bulbs
Vehicle care and maintenance 9-33
9
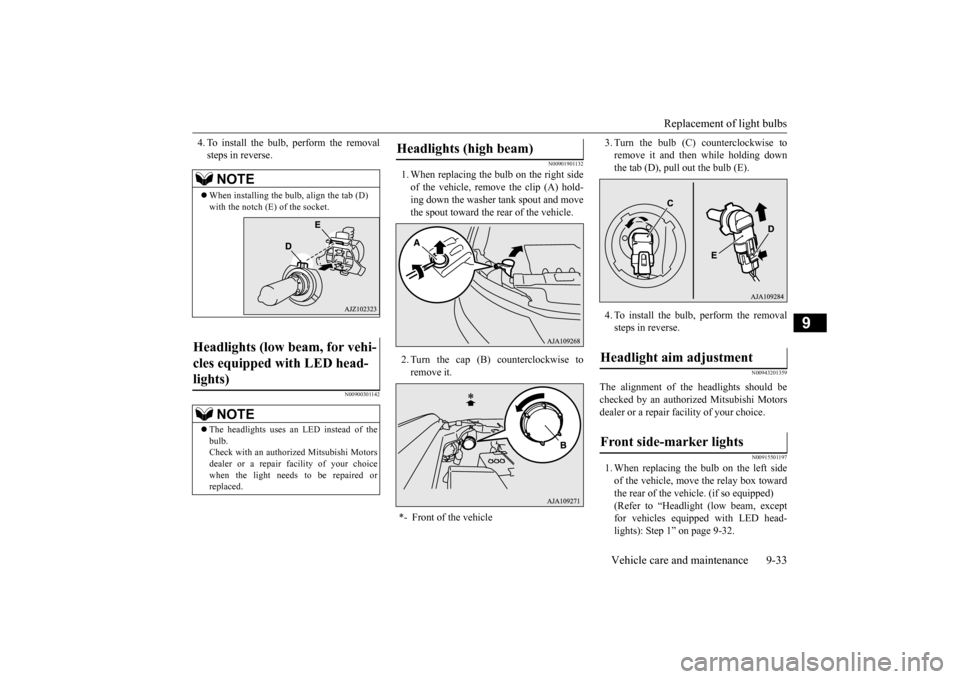
4. To install the bulb, perform the removal steps in reverse.
N00900301142
N00901901132
1. When replacing the bulb on the right side of the vehicle, remove the clip (A) hold- ing down the washer
tank spout and move
the spout toward the rear of the vehicle. 2. Turn the cap (B) counterclockwise to remove it.
3. Turn the bulb (C) counterclockwise to remove it and then while holding downthe tab (D), pull out the bulb (E). 4. To install the bulb, perform the removal steps in reverse.
N00943201359
The alignment of the headlights should be checked by an authorized Mitsubishi Motors dealer or a repair fa
cility of your choice.
N00915501197
1. When replacing the bulb on the left side of the vehicle, move the relay box towardthe rear of the vehicle. (if so equipped) (Refer to “Headlight
(low beam, except
for vehicles equipped with LED head-lights): Step 1” on page 9-32.
NOTE
When installing the bul
b, align the tab (D)
with the notch (E) of the socket.
Headlights (low beam, for vehi- cles equipped with LED head- lights)
NOTE
The headlights uses an LED instead of the bulb.Check with an authorized Mitsubishi Motors dealer or a repair facility of your choice when the light needs to be repaired orreplaced.
Headlights (high beam) *- Front of the vehicle
Headlight aim adjustment Front side-marker lights
BK0223400US.book 33 ページ 2015年2月13日 金曜日 午後12時15分
Page 432 of 464
Replacement of light bulbs 9-34 Vehicle care and maintenance
9
2. Turn the socket (A) counterclockwise to remove it, and then pull the bulb out ofthe socket. 3. To install the bulb, perform the removal steps in reverse.
N00917301610 N00943401423
1. Remove the 12 clips (A, B), and then remove the cover (C).
2. Turn the socket (D) counterclockwise to remove it, then remove the bulb from thesocket by turning it counterclockwise while pressing in. 3. To install the bulb, perform the removal steps in reverse.
*- Front of the vehicle
Parking lights/Daytime running lights
(if so equipped)NOTE
The parking lights
and daytime running
lights (if so equipped)
uses an LED instead
of the bulb. Check with an authorized Mitsubishi Motorsdealer or a repair facility of your choice when the light needs to be repaired or replaced.
Front turn signal lights
*: Front of the vehicle
BK0223400US.book 34 ページ 2015年2月13日 金曜日 午後12時15分
Page 433 of 464
Replacement of light bulbs
Vehicle care and maintenance 9-35
9
N00943501147 N00943601845
1. Insert a straight blade (or minus) screw- driver with a cloth over its tip at the pointsindicated by arrows
and pry gently to
remove the cover (A).
2. Remove the 3 screws (B) and remove the light unit.
3. While holding down the tab (D), pull out the socket (E). 4. Turn the bulb (F) counterclockwise to remove it. 5. To install the bulb, perform the removal steps in reverse.
N00943701556
1. Open the liftgate.
Side turn signal lights
(if so
equipped)
NOTE
The side turn signal lights uses an LED instead of the bulb. Check with an authorized Mitsubishi Motors dealer or a repair facility of your choicewhen the light needs to be repaired or replaced.
Front fog lights
(if so equipped)
NOTE
When unfastening the screws or the fog light, be careful not to
move the beam posi-
tion adjustment screw (C).
Rear combination lights
BK0223400US.book 35 ページ 2015年2月13日 金曜日 午後12時15分