2016 MITSUBISHI OUTLANDER Car seat
[x] Cancel search: Car seatPage 392 of 464
How to change a tire 8-10 For emergencies
8
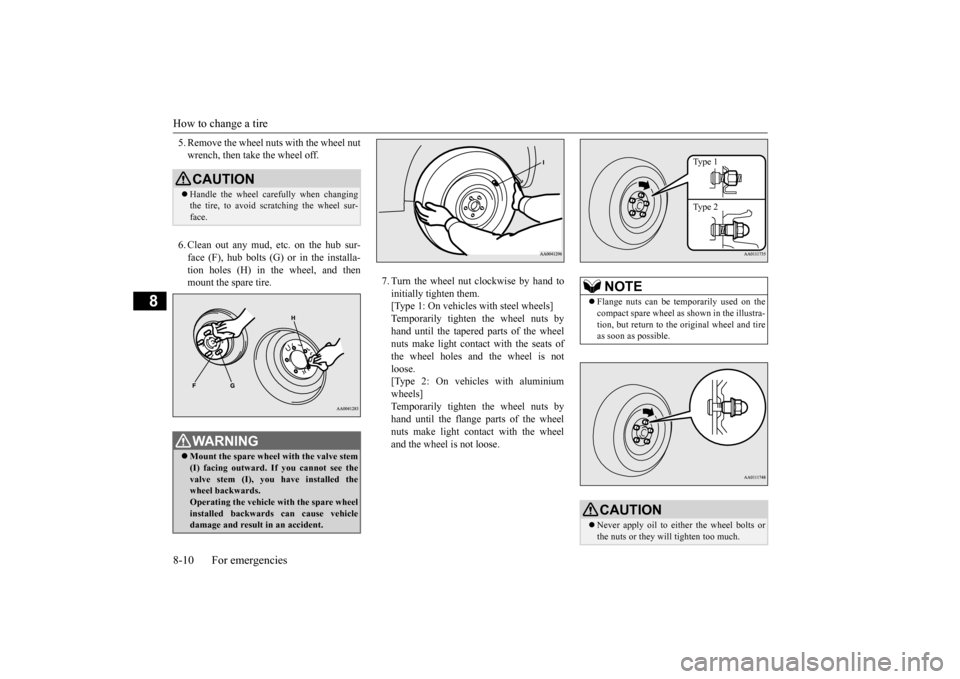
5. Remove the wheel nuts with the wheel nut wrench, then take the wheel off. 6. Clean out any mud, etc. on the hub sur- face (F), hub bolts (G)
or in the installa-
tion holes (H) in the wheel, and then mount the spare tire.
7. Turn the wheel nut clockwise by hand to initially tighten them. [Type 1: On vehicles
with steel wheels]
Temporarily tighten the wheel nuts by hand until the tapered parts of the wheel nuts make light contac
t with the seats of
the wheel holes and the wheel is not loose. [Type 2: On vehicles with aluminiumwheels] Temporarily tighten the wheel nuts by hand until the flange parts of the wheelnuts make light cont
act with the wheel
and the wheel is not loose.
CAUTION Handle the wheel carefully when changing the tire, to avoid scratching the wheel sur- face.WA R N I N G Mount the spare wheel with the valve stem (I) facing outward. If
you cannot see the
valve stem (I), you
have installed the
wheel backwards.Operating the vehicle with the spare wheel installed backwards can cause vehicle damage and result
in an ac
cident.
NOTE
Flange nuts can be te
mporarily used on the
compact spare wheel as shown in the illustra- tion, but return to the original wheel and tire as soon as possible.CAUTION Never apply oil to either the wheel bolts or the nuts or they will tighten too much.
Type 1 Type 2
BK0223400US.book 10 ページ 2015年2月13日 金曜日 午後12時15分
Page 413 of 464
Tires
Vehicle care and maintenance 9-15
9
N00939201589
It is important to famil
iarize yourself with the
following terms: Cold tire pressure: • The measured pressu
re after the vehicle
has been parked for at least three hours, or• The measured pressure when the vehicle is driven less than 1 mile (1.6 km) after having been parked for three hours.
Maximum pressure: the maximum per- missible cold tire inflation pressure for this tire.
Recommended inflation pressure: the inflation pressure for optimum tire perfor-mance. Intended outboard sidewall: • The sidewall that
contains a whitewall,
bears white lettering or bears manufac- turer, brand, and/or model name molding that is higher or deeper than the samemolding on the other sidewall of the tire, or • The outward facing sidewall of an asym- metrical tire that has a particular side that must always face outward whenmounted on a vehicle.
Passenger car tire: a tire intended for use on passenger cars,
multipurpose passen-
ger vehicles, and trucks
that have a gross
vehicle weight rating (GVWR) of 10,000 pounds or less. Light truck (LT) tire
: a tire designated by
its manufacturer as primarily intended for use on lightweight tr
ucks or multipurpose
passenger vehicles. Tread: portion of a tire that comes into contact with the road. Tread rib: a tread se
ction running circum-
ferentially around a tire. Tread separation: pulling away of the tread from the tire carcass. Carcass: the tire structure, except tread and sidewall rubber which, when inflated,bears the load.
Sidewall: portion of
a tire between the
tread and bead. Section width: the lin
ear distance between
the exteriors of th
e sidewalls of an
inflated tire, excluding elevations due tolabeling, decoration,
or protective bands.
Bead: the part of the tire that is made of steel wires, wrapped or reinforced by plycords and that is shaped to fit the rim. Ply: a layer of r
ubber-coated parallel
cords. Cord: the strands forming the plies in the tire. Rim: a metal support for a tire or a tire and tube assembly upon which the tire beads are seated. Rim diameter: nominal diameter of the bead seat. Groove: the space between two adjacent tread ribs.
Tires
WA R N I N G Driving with tires that are worn, damaged or improperly infl
ated is dangerous.
These type tire conditions will adversely affect vehicle performance. These type tire conditions can also cause atread separation or blowout which may result in an accident causing serious injury or death. Tires, including spar
e tire, degrade over
time with age even when they are notbeing used. It is recommended that tires over 6 years generally be replaced
even if damage is
not obvious.
BK0223400US.book 15 ページ 2015年2月13日 金曜日 午後12時15分
Page 423 of 464
For cold and snowy weather
Vehicle care and maintenance 9-25
9
N00942501124
The hood lock release mechanism and hood safety catch should be
checked, cleaned, and
oiled when needed for easy movement and to prevent rust and wear. Use Multipurpose Grease NLGI Grade 2 sp
aringly for all sliding
parts of the hood latc
h and release lever.
Work the grease into the hood lock mecha- nism until all the mo
vable surfaces are cov-
ered. Also, put a light coat of the same grease onthe safety catch wherever moving parts touch.
N00942600102
The ventilation slots in front of the wind-shield should be brus
hed clear after a heavy
snowfall so that the operation of the heating and ventilation systems
will not be impaired.
To prevent freezing of the weatherstripping on the doors, engine hood, etc., they should be treated with silicone grease. It is a good idea to carry a shovel or a short- handled spade in the vehicle during the win-ter so that you can clear away snow if you get stranded. A small hand-brush for sweeping snow off the vehicle a
nd a plastic scraper for
the windshield, side an
d rear window are also
useful.
N00942700291
The fusible links will melt to prevent a fire ifa large current attempts
to flow through cer-
tain electrical systems.In case of a melted fusible link, see your authorized Mitsubishi Motors dealer or a repair facility of your
choice for inspection
and replacement. For the fusible links, pl
ease refer to “Fuse
load capacities” on page 9-26.
N00942801912
To prevent damage to the electrical systemfrom short-circuiting
or overloading, each
individual circuit is e
quipped with a fuse. The
fuse blocks are located in the passenger com- partment and in the engine compartment. The fuse blocks in the passenger compart- ment are located behind the fuse lid in frontof the driver’s seat at the position shown in the illustration. Pull the fuse lid to remove it.
Hood lock release mechanism and safety catch For cold and snowy weather Ventilation slots
Weatherstripping Additional equipment (For regions where snow is encoun- tered) Fusible links
WA R N I N G Fusible links must not be replaced by any other device. Failing to fit the correct fus-ible link may result in fire in the vehicle,property destruction and serious or fatal injuries at any time.
Fuses Fuse block location Passenger compartment
BK0223400US.book 25 ページ 2015年2月13日 金曜日 午後12時15分
Page 425 of 464
Fuses
Vehicle care and maintenance 9-27
9
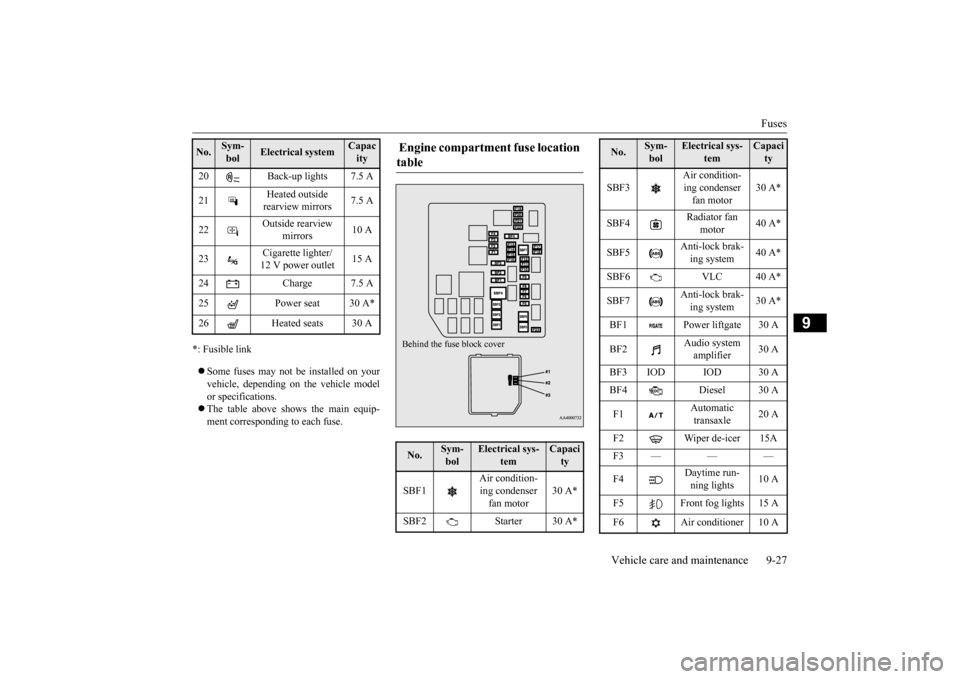
*: Fusible link Some fuses may not be installed on your vehicle, depending on
the vehicle model
or specifications. The table above show
s the main equip-
ment corresponding to each fuse. 20 Back-up lights 7.5 A 21
Heated outside rearview mirrors
7.5 A
22
Outside rearview
mirrors
10 A
23
Cigarette lighter/ 12 V power outlet
15 A
24 Charge 7.5 A 25 Power seat 30 A*26 Heated seats 30 ANo.
Sym- bol
Electrical system
Capacity
Engine compartment fuse location table No.
Sym- bol
Electrical sys-
tem
Capacity
SBF1
Air condition- ing condenser fan motor
30 A*
SBF2 Starter 30 A*Behind the fuse block cover
SBF3
Air condition- ing condenser fan motor
30 A*
SBF4
Radiator fan
motor
40 A*
SBF5
Anti-lock brak- ing system
40 A*
SBF6 VLC 40 A* SBF7
Anti-lock brak- ing system
30 A*
BF1 Power liftgate 30 A BF2
Audio system amplifier
30 A
BF3 IOD IOD 30 A BF4 Diesel 30 A F1
Automatic transaxle
20 A
F2 Wiper de-icer 15A F3——— F4
Daytime run- ning lights
10 A
F5 Front fog lights 15 A F6 Air conditioner 10 ANo.
Sym- bol
Electrical sys-
tem
Capacity
BK0223400US.book 27 ページ 2015年2月13日 金曜日 午後12時15分
Page 437 of 464
Cleaning the outside of your vehicle Vehicle care and maintenance 9-39
9
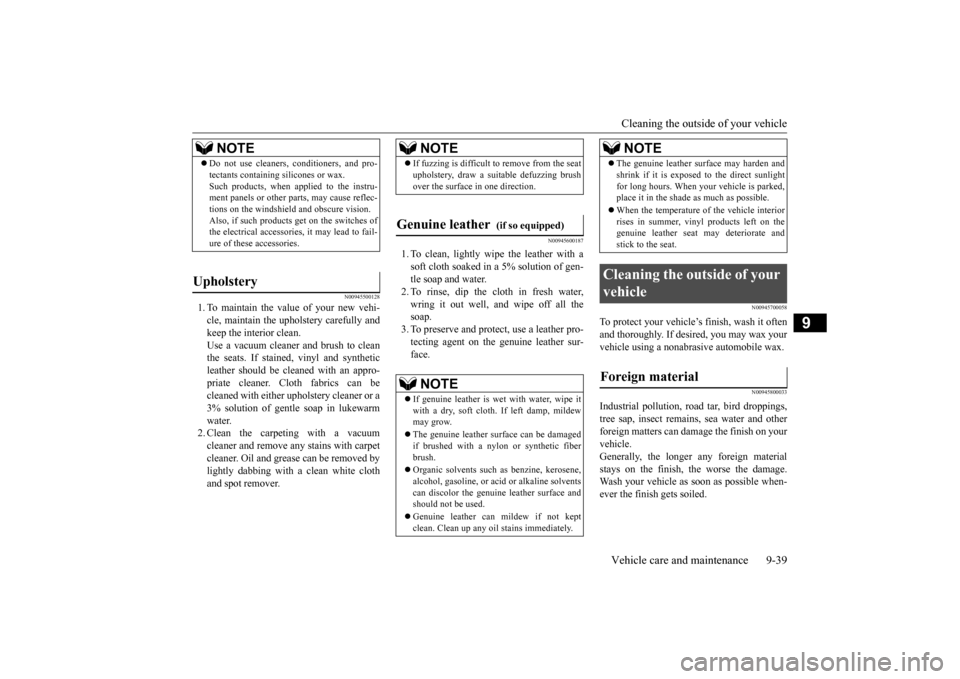
N00945500128
1. To maintain the value of your new vehi- cle, maintain the upholstery carefully andkeep the interior clean. Use a vacuum cleaner
and brush to clean
the seats. If stained,
vinyl and synthetic
leather should be clea
ned with an appro-
priate cleaner. Cloth fabrics can be cleaned with either
upholstery cleaner or a
3% solution of gentle soap in lukewarm water. 2. Clean the carpeting with a vacuumcleaner and remove a
ny stains with carpet
cleaner. Oil and grea
se can be removed by
lightly dabbing with a clean white clothand spot remover.
N00945600187
1. To clean, lightly wipe the leather with a soft cloth soaked in a 5% solution of gen- tle soap and water.2. To rinse, dip the cloth in fresh water, wring it out well, a
nd wipe off all the
soap.3. To preserve and protect, use a leather pro- tecting agent on the genuine leather sur- face.
N00945700058
To protect your vehicle’s finish, wash it oftenand thoroughly. If desired, you may wax your vehicle using a nonabra
sive automobile wax.
N00945800033
Industrial pollution, road tar, bird droppings, tree sap, insect remain
s, sea water and other
foreign matters
can damage the finish on your
vehicle. Generally, the longer
any foreign material
stays on the finish, the worse the damage.Wash your vehicle as soon as possible when- ever the finish gets soiled.
NOTE
Do not use cleaners, conditioners, and pro- tectants containing silicones or wax.Such products, when applied to the instru-ment panels or other pa
rts, may cause reflec-
tions on the windshield and obscure vision. Also, if such products
get on the switches of
the electrical accessories, it may lead to fail- ure of these accessories.
Upholstery
NOTE
If fuzzing is difficult to remove from the seat upholstery, draw a suit
able defuzzing brush
over the surface in one direction.
Genuine leather
(if so equipped)
NOTE
If genuine leather is we
t with water, wipe it
with a dry, soft cloth. If left damp, mildew may grow. The genuine leather su
rface can be damaged
if brushed with a nylon or synthetic fiberbrush. Organic solvents such as benzine, kerosene, alcohol, gasoline, or acid
or alkaline solvents
can discolor the genuine
leather surface and
should not be used. Genuine leather can
mildew if not kept
clean. Clean up any oi
l stains immediately.
The genuine leather su
rface may harden and
shrink if it is exposed to the direct sunlightfor long hours. When your vehicle is parked,place it in the shade as much as possible. When the temperature of the vehicle interior rises in summer, vinyl
products left on the
genuine leather seat
may deteriorate and
stick to the seat.
Cleaning the outside of your vehicle Foreign material
NOTE
BK0223400US.book 39 ページ 2015年2月13日 金曜日 午後12時15分
Page 451 of 464
Vehicle weights
Specifications 11-5
11
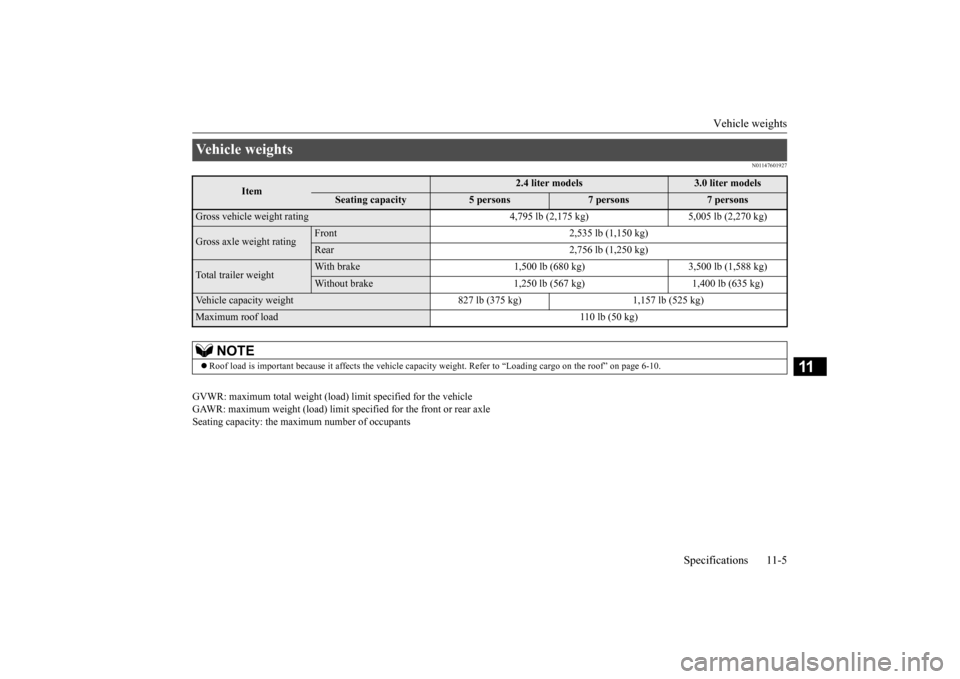
N01147601927
GVWR: maximum total weight (load) limit specified for the vehicle GAWR: maximum weight (load) limit specified for the front or rear axle Seating capacity: the maxi
mum number of occupants
Vehicle weights
Item
2.4 liter models
3.0 liter models
Seating capacity
5 persons
7 persons
7 persons
Gross vehicle weight
rating 4,795 lb (2,175 kg) 5,005 lb (2,270 kg)
Gross axle weight rating
Front 2,535 lb (1,150 kg)Rear 2,756 lb (1,250 kg)
Total trailer weight
With brake 1,500 lb (680 kg) 3,500 lb (1,588 kg)Without brake 1,250 lb (567 kg) 1,400 lb (635 kg)
Vehicle capacity weight 827 lb (375 kg) 1,157 lb (525 kg)Maximum roof load 110 lb (50 kg)
NOTE
Roof load is important becaus
e it affects the vehicle capacity weight. Refe
r to “Loading cargo on the roof” on page 6-10.
BK0223400US.book 5 ページ 2015年2月13日 金曜日 午後12時15分
Page 460 of 464
Alphabetical index 12-4
12
M
MIVEC engine
..........................
5-25
, 5-64
Modification of your vehicle
..................
3-5
Multi information display - Type 1
.....
5-128
Multi information display - Type 2
.....
5-146
O
Octane rating
........................................
3-2
Oil
Engine oil
......................................
11-7
Rear axle oil
...................................
11-7
Transfer oil
....................................
11-7
Operation under adverse driving conditions
...
8-15 Outside rearview mirrors
.....................
5-57
Overheating
.........................................
8-4
P
Parking
................................................
6-6
Parking brake
.................................
5-53
Parking lights
Bulb capacity
.................................
9-30
Replacement
..................................
9-34
Polishing
............................................
9-41
Power brakes
......................................
5-89
Power liftgate
.....................................
5-38
Power outlet
.....................................
5-219
Power windows
...................................
5-49
Puncture (Tire changing)
.......................
8-6
R
Radiator cap
........................................
9-9
Radio
.................................................
7-15
General information
about your radio 7-52
Reading lights
Bulb capacity
..................................
9-32
Rear axle oil
..............................
9-12
, 11-7
Rear combination lights
Bulb capacity
..................................
9-30
Replacement
...................................
9-35
Rear side-marker lights
Bulb capacity
..................................
9-30
Rear turn signal light
Bulb capacity
..................................
9-30
Replacement
...................................
9-35
Rear-view camera
.............................
5-124
Rearview mirror
Inside rearview mirror
.....................
5-55
Outside rearview mirrors
.................
5-57
Replacement of light bulbs
...................
9-29
Replacing tires and wheels
...................
9-19
Reporting Safety Defects
.....................
10-2
Roof antenna
......................................
7-51
S
Safe driving techniques
.........................
6-4
S-AWC (Super-All Wheel Control)
......
5-81
Seat belt
Adjustable seat belt shoulder anchor
.4-23
Child restraint systems
....................
4-26
Front passenger seat belt warning light
.....
4-22Maintenance and inspection
.............
4-33
Seat belt extender
...........................
4-24
Seat belt force limitter
.....................
4-26
Seat belt pr
e-tensioners
...................
4-24
Seat belt use
during pregnancy
.........
4-24
Seat belts
...........................................
4-17
Seats
....................................................
4-2
Arm rest
..........................................
4-9
Front seats
.......................................
4-4
Head restraints
...............................
4-10
Heated seat
......................................
4-8
Making a cargo area
........................
4-12
Making a flat seat
...........................
4-16
Seat arrangement
..............................
4-3
Seats and restraint systems
................
4-4
Second row seats
..............................
4-8
Third row seats
...............................
4-10
Service brake
......................................
5-89
Service precautions
...............................
9-2
Side turn-signal light
Bulb capacity
.................................
9-30
BK0223400US.book 4 ページ 2015年2月13日 金曜日 午後12時15分