2016 MITSUBISHI OUTLANDER clock
[x] Cancel search: clockPage 430 of 464
Replacement of light bulbs 9-32 Vehicle care and maintenance
9
N00950401656
N00901801173
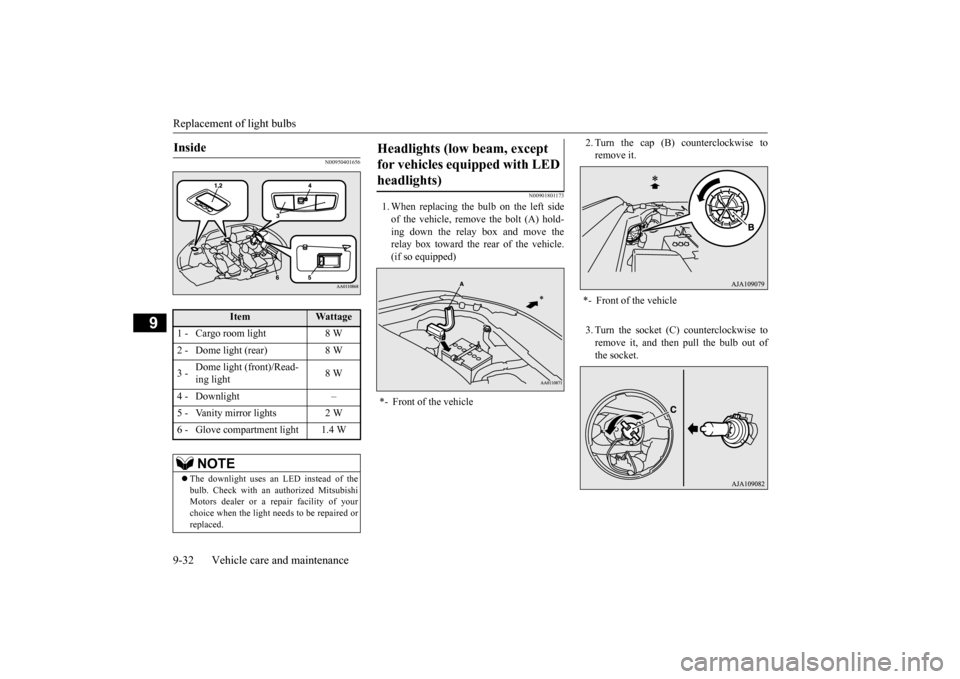
1. When replacing the bulb on the left side of the vehicle, remo
ve the bolt (A) hold-
ing down the relay box and move the relay box toward the rear of the vehicle.(if so equipped)
2. Turn the cap (B) counterclockwise to remove it. 3. Turn the socket (C) counterclockwise to remove it, and then pull the bulb out of the socket.
Inside
Item
Wattage
1 - Cargo room light 8 W 2 - Dome light (rear) 8 W 3 -
Dome light (front)/Read- ing light
8 W
4 - Downlight – 5 - Vanity mirror lights 2 W 6 - Glove compartment light 1.4 W
NOTE
The downlight uses an LED instead of the bulb. Check with an
authorized Mitsubishi
Motors dealer or a re
pair facility of your
choice when the light needs to be repaired or replaced.
Headlights (low beam, except for vehicles e
quipped with LED
headlights) *- Front of the vehicle
*- Front of the vehicle
BK0223400US.book 32 ページ 2015年2月13日 金曜日 午後12時15分
Page 431 of 464
Replacement of light bulbs
Vehicle care and maintenance 9-33
9
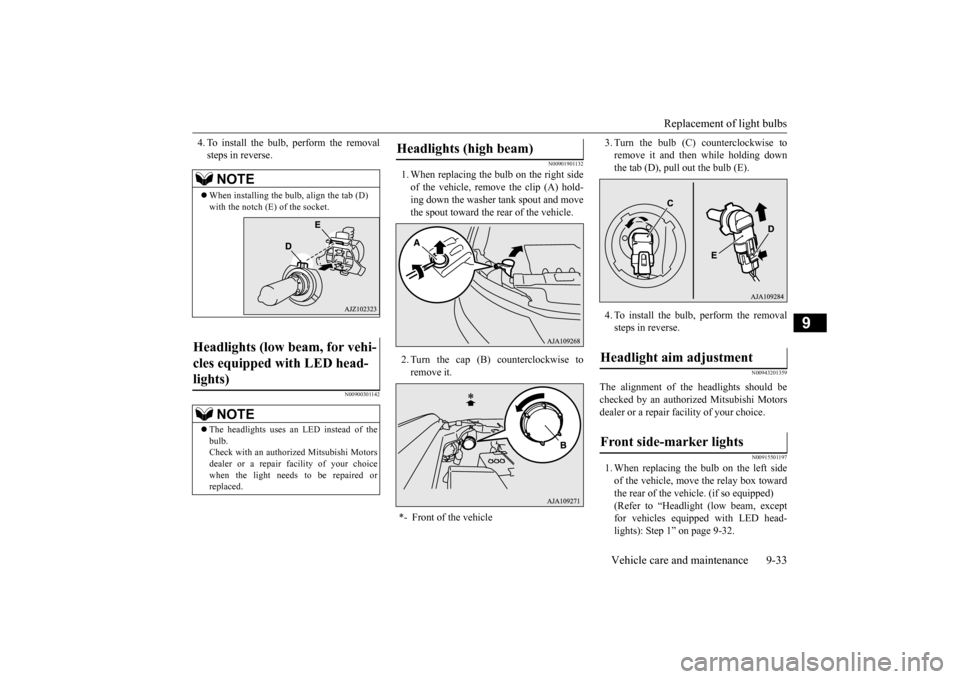
4. To install the bulb, perform the removal steps in reverse.
N00900301142
N00901901132
1. When replacing the bulb on the right side of the vehicle, remove the clip (A) hold- ing down the washer
tank spout and move
the spout toward the rear of the vehicle. 2. Turn the cap (B) counterclockwise to remove it.
3. Turn the bulb (C) counterclockwise to remove it and then while holding downthe tab (D), pull out the bulb (E). 4. To install the bulb, perform the removal steps in reverse.
N00943201359
The alignment of the headlights should be checked by an authorized Mitsubishi Motors dealer or a repair fa
cility of your choice.
N00915501197
1. When replacing the bulb on the left side of the vehicle, move the relay box towardthe rear of the vehicle. (if so equipped) (Refer to “Headlight
(low beam, except
for vehicles equipped with LED head-lights): Step 1” on page 9-32.
NOTE
When installing the bul
b, align the tab (D)
with the notch (E) of the socket.
Headlights (low beam, for vehi- cles equipped with LED head- lights)
NOTE
The headlights uses an LED instead of the bulb.Check with an authorized Mitsubishi Motors dealer or a repair facility of your choice when the light needs to be repaired orreplaced.
Headlights (high beam) *- Front of the vehicle
Headlight aim adjustment Front side-marker lights
BK0223400US.book 33 ページ 2015年2月13日 金曜日 午後12時15分
Page 432 of 464
Replacement of light bulbs 9-34 Vehicle care and maintenance
9
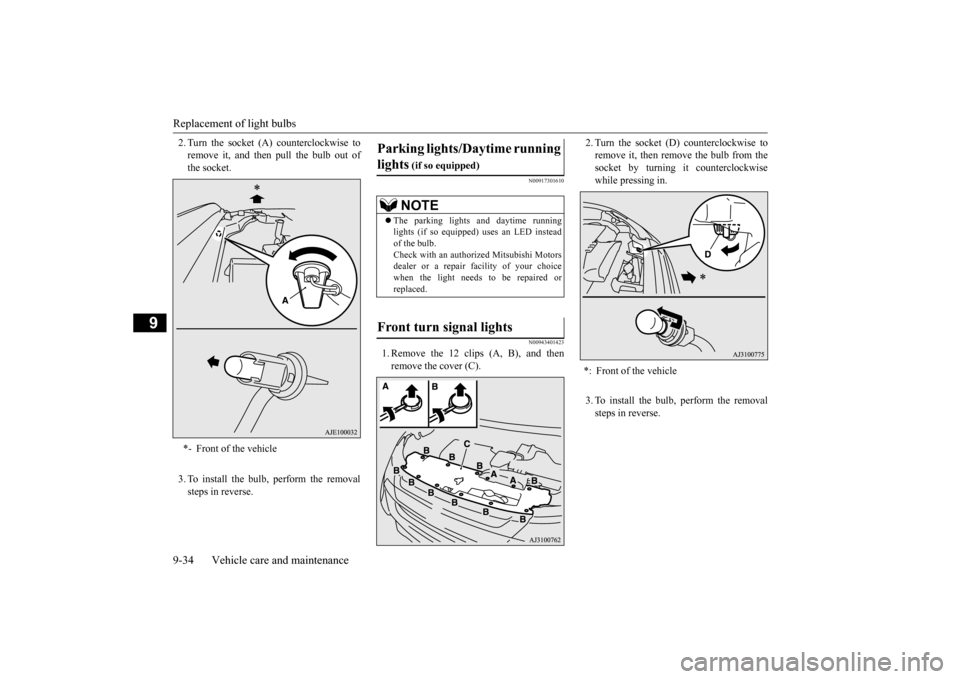
2. Turn the socket (A) counterclockwise to remove it, and then pull the bulb out ofthe socket. 3. To install the bulb, perform the removal steps in reverse.
N00917301610 N00943401423
1. Remove the 12 clips (A, B), and then remove the cover (C).
2. Turn the socket (D) counterclockwise to remove it, then remove the bulb from thesocket by turning it counterclockwise while pressing in. 3. To install the bulb, perform the removal steps in reverse.
*- Front of the vehicle
Parking lights/Daytime running lights
(if so equipped)NOTE
The parking lights
and daytime running
lights (if so equipped)
uses an LED instead
of the bulb. Check with an authorized Mitsubishi Motorsdealer or a repair facility of your choice when the light needs to be repaired or replaced.
Front turn signal lights
*: Front of the vehicle
BK0223400US.book 34 ページ 2015年2月13日 金曜日 午後12時15分
Page 433 of 464
Replacement of light bulbs
Vehicle care and maintenance 9-35
9
N00943501147 N00943601845
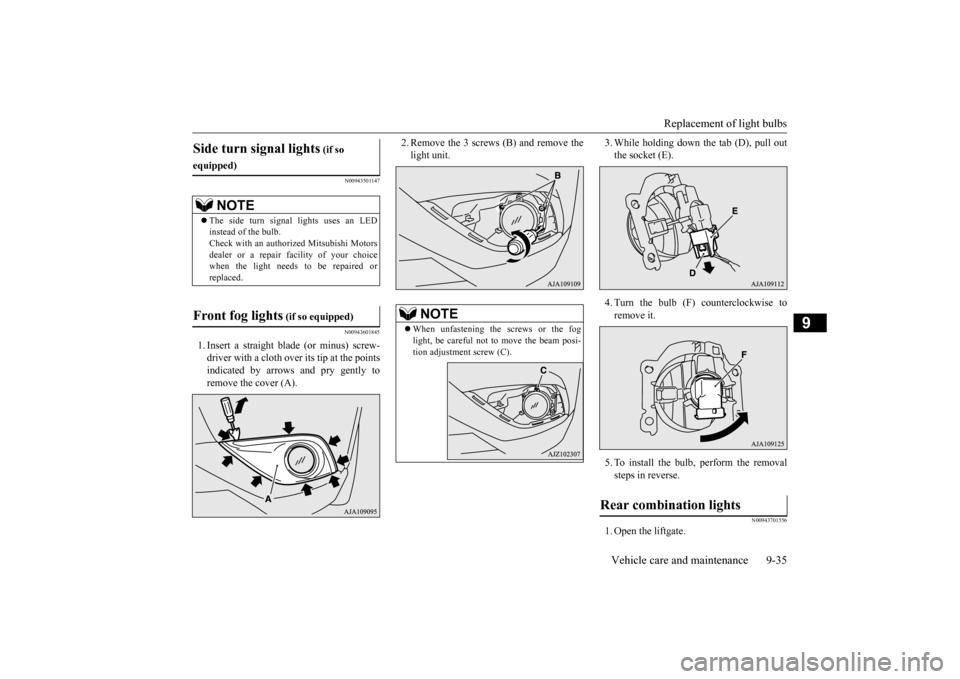
1. Insert a straight blade (or minus) screw- driver with a cloth over its tip at the pointsindicated by arrows
and pry gently to
remove the cover (A).
2. Remove the 3 screws (B) and remove the light unit.
3. While holding down the tab (D), pull out the socket (E). 4. Turn the bulb (F) counterclockwise to remove it. 5. To install the bulb, perform the removal steps in reverse.
N00943701556
1. Open the liftgate.
Side turn signal lights
(if so
equipped)
NOTE
The side turn signal lights uses an LED instead of the bulb. Check with an authorized Mitsubishi Motors dealer or a repair facility of your choicewhen the light needs to be repaired or replaced.
Front fog lights
(if so equipped)
NOTE
When unfastening the screws or the fog light, be careful not to
move the beam posi-
tion adjustment screw (C).
Rear combination lights
BK0223400US.book 35 ページ 2015年2月13日 金曜日 午後12時15分
Page 434 of 464
Replacement of light bulbs 9-36 Vehicle care and maintenance
9
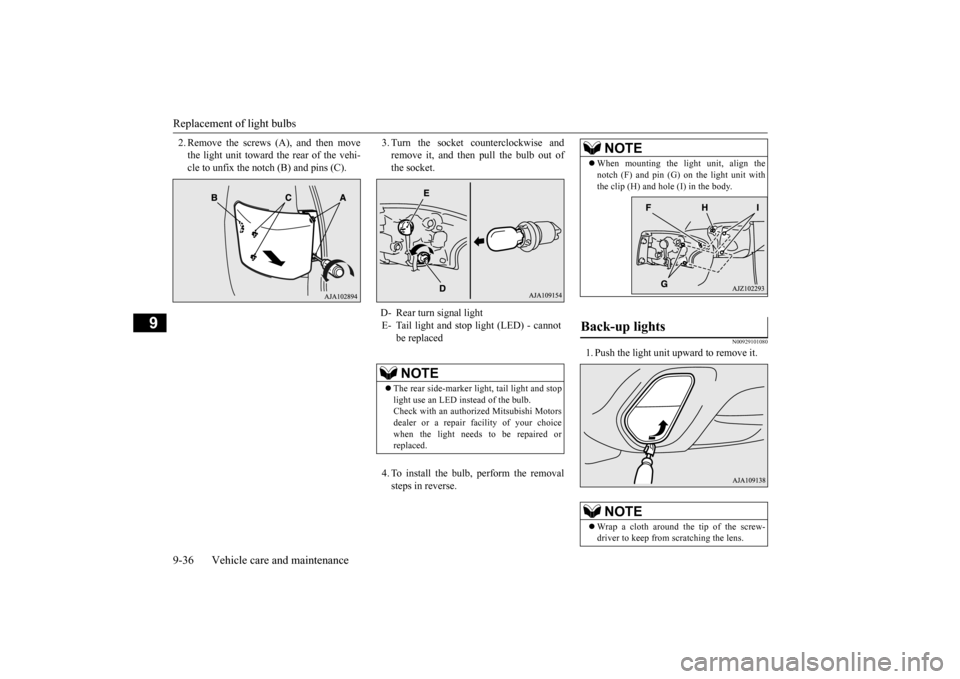
2. Remove the screws
(A), and then move
the light unit toward the rear of the vehi-cle to unfix the notch (B) and pins (C).
3. Turn the socket counterclockwise and remove it, and then pull the bulb out ofthe socket. 4. To install the bulb, perform the removal steps in reverse.
N00929101080
1. Push the light unit upward to remove it.
D- Rear turn signal light E- Tail light and stop light (LED) - cannot
be replacedNOTE
The rear side-marker light, tail light and stop light use an LED instead of the bulb. Check with an authorized Mitsubishi Motorsdealer or a repair facility of your choice when the light needs to be repaired or replaced.
NOTE
When mounting the light unit, align the notch (F) and pin (G)
on the light unit with
the clip (H) and hole (I) in the body.
Back-up lights
NOTE
Wrap a cloth around the tip of the screw- driver to keep from scratching the lens.
BK0223400US.book 36 ページ 2015年2月13日 金曜日 午後12時15分
Page 435 of 464
Replacement of light bulbs
Vehicle care and maintenance 9-37
9
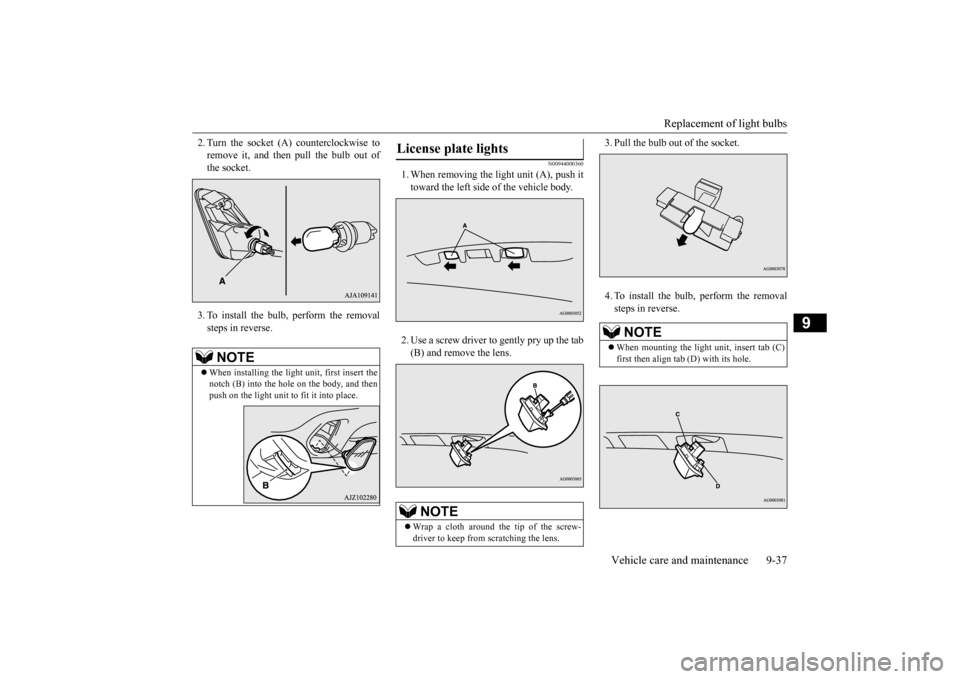
2. Turn the socket (A
) counterclockwise to
remove it, and then pull the bulb out ofthe socket. 3. To install the bulb, perform the removal steps in reverse.
N00944000360
1. When removing the li
ght unit (A), push it
toward the left side of the vehicle body. 2. Use a screw driver to gently pry up the tab (B) and remove the lens.
3. Pull the bulb out of the socket. 4. To install the bulb, perform the removal steps in reverse.
NOTE
When installing the light unit, first insert the notch (B) into the hole on the body, and thenpush on the light unit to fit it into place.
License plate lights
NOTE
Wrap a cloth around the tip of the screw- driver to keep from scratching the lens.
NOTE
When mounting the light unit, insert tab (C) first then align tab (D) with its hole.
BK0223400US.book 37 ページ 2015年2月13日 金曜日 午後12時15分
Page 458 of 464
Alphabetical index 12-2
12
Child safety locks for rear door
............
5-36
Cleaning
Inside of your vehicle
......................
9-38
Outside of your vehicle
...................
9-39
Clock
.................................................
7-51
Coat hook
........................................
5-235
Consumer information
........................
10-2
Continuously variable transmission (CVT)
....
5-71 Fluid
....................................
9-11
, 11-7
Selector lever operation
...................
5-72
Selector le
ver positions
...................
5-75
Sports mode
...................................
5-76
Coolant (engine)
..........................
9-8
, 11-7
Cruise control
.....................................
5-96
Cup holder
.......................................
5-232
D
Daytime running lights
Bulb capacity
.................................
9-30
Replacement
..................................
9-34
Defogger (rear window)
....................
5-190
Defrosting or defogging (windshield, door windows)
..................................
7-9
, 7-13
Digital clock
Time setting
...................................
7-47
Dimensions
........................................
11-4
Dimmer (high/lo
w beam change)
.......
5-180
Disc brake pads
...................................
9-24
Dome light (front)/Reading lights
.......
5-226
Bulb capacity
..................................
9-32
Dome light (rear)
...............................
5-226
Bulb capacity
..................................
9-32
Doors
Lock
..............................................
5-33
Power door locks
............................
5-35
Driving during cold weather
..................
6-5
Driving precaution
...............................
6-2
Driving, alcohol and drugs
....................
6-2
E
ECO mode switch
.............................
5-184
Electric power steering system (EPS)
....
5-93
Electric rear window
defogger switch
..5-190
Electronic immobilizer (Anti-theft starting system)
.....................................
5-4
, 5-27
Electronically cont
rolled 4WD system
..5-79
Emission-control system maintenance
...
9-22
Engine
Compartment
...................................
9-5
Coolant
...................................
9-8
, 11-7
Hood
...............................................
9-3
Malfunction indicator light
.............
5-173
MIVEC
.................................
5-25
, 5-64
Oil and oil filter
.......................
9-6
, 11-7
Overheating
.....................................
8-4
Serial number
.................................
11-2
Specification
..................................
11-6
Engine hood
.........................................
9-3
Engine switch
.....................................
5-18
Exhaust system
...................................
9-24
F
Floor console box
.............................
5-229
Floor mat
.............................................
6-3
Fluid
Automatic transaxle fluid
.......
9-11
, 11-7
Brake fluid
............................
9-12
, 11-7
Continuously variable transmission (CVT) fluid
...................................
9-11
, 11-7
Engine coolant
........................
9-8
, 11-7
Engine oil
...............................
9-6
, 11-7
Rear axle oil
..........................
9-12
, 11-7
Transfer oil
...........................
9-12
, 11-7
Washer fluid
.........................
9-12
, 11-7
Fluid capacities and lubricants
.............
11-7
Forward Collision Miti
gation System (FCM)
5-111 Free-hand advanced security transmitter (F.A.S.T.-key)
..................................
5-12
Front fog lights
Bulb capacity
.................................
9-30
Indicators
.....................................
5-172
Replacement
..................................
9-35
Switch
.........................................
5-184
BK0223400US.book 2 ページ 2015年2月13日 金曜日 午後12時15分