2016 MITSUBISHI OUTLANDER III steering
[x] Cancel search: steeringPage 259 of 464
Turn signal lever
Features and controls 5-183
5
N00522601529
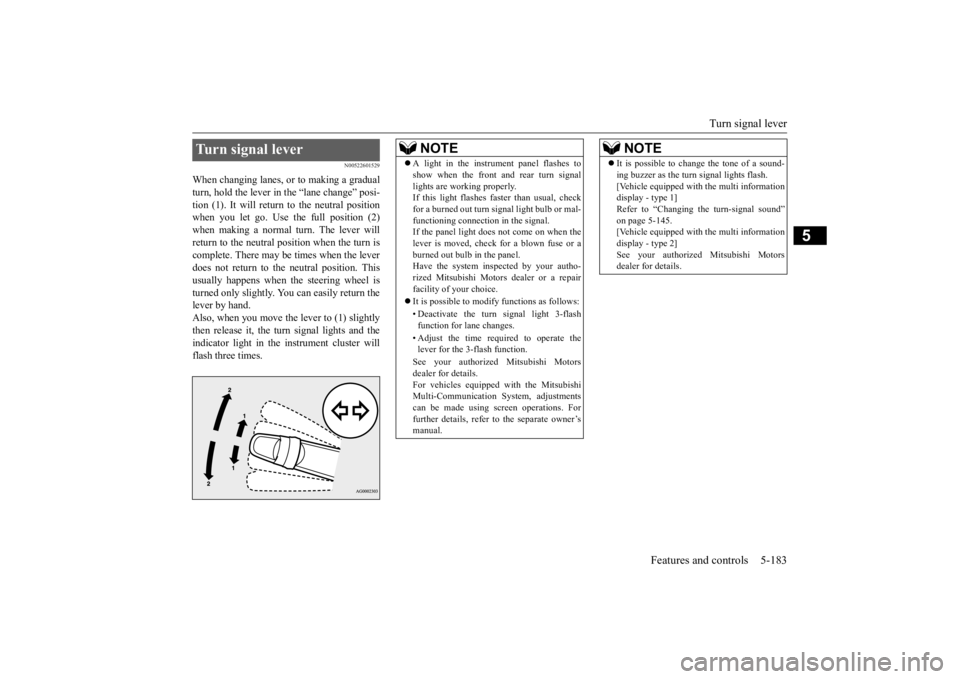
When changing lanes, or to making a gradual turn, hold the lever in the “lane change” posi- tion (1). It will return to the neutral positionwhen you let go. Use the full position (2) when making a normal turn. The lever will return to the neutral position when the turn iscomplete. There may be times when the lever does not return to th
e neutral position. This
usually happens when
the steering wheel is
turned only slightly. You
can easily return the
lever by hand.Also, when you move the lever to (1) slightly then release it, the turn signal lights and the indicator light in the instrument cluster willflash three times.Turn signal lever
NOTE
A light in the instrument panel flashes to show when the front and rear turn signallights are working properly.If this light flashes fast
er than usual, check
for a burned out turn signal light bulb or mal- functioning connecti
on in the signal.
If the panel light does not come on when the lever is moved, check
for a blown fuse or a
burned out bulb in the panel.Have the system inspected by your autho- rized Mitsubishi Motors
dealer or a repair
facility of your choice. It is possible to modify functions as follows: • Deactivate the turn signal light 3-flash function for lane changes. • Adjust the time required to operate the lever for the 3-flash function. See your authorized Mitsubishi Motors dealer for details. For vehicles equipped
with the Mitsubishi
Multi-Communication System, adjustments can be made using sc
reen operations. For
further details, refer to the separate owner’smanual.
It is possible to change the tone of a sound- ing buzzer as the turn signal lights flash.[Vehicle equipped with the multi informationdisplay - type 1] Refer to “Changing the turn-signal sound” on page 5-145.[Vehicle equipped with the multi information display - type 2] See your authorized Mitsubishi Motorsdealer for details.NOTE
BK0223400US.book 183 ページ 2015年2月13日 金曜日 午後12時15分
Page 267 of 464
Horn switch
Features and controls 5-191
5
After about 15 to 20 minutes of operation, the system will shut off automatically.To switch the defogger OFF before 15 to 20 minutes have passed, pr
ess the switch again.
The indicator light will go out and the defog-ger will turn off. If you need the defogger for more than 15 to 20 minutes, press the switch again. This willadd 15 to 20 more minutes.
N00523801195
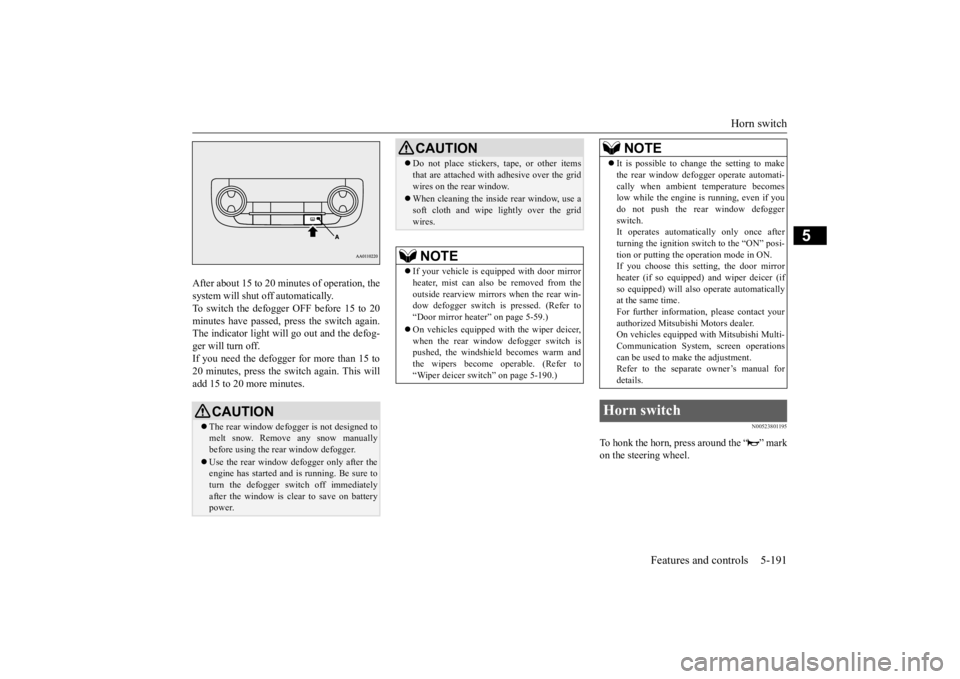
To honk the horn, press around the “ ” markon the steering wheel.
CAUTION The rear window defogge
r is not designed to
melt snow. Remove
any snow manually
before using the rear window defogger. Use the rear window de
fogger only after the
engine has started and
is running. Be sure to
turn the defogger swit
ch off immediately
after the window is cl
ear to save on battery
power.
Do not place stickers
, tape, or other items
that are attached with
adhesive over the grid
wires on the rear window. When cleaning the insi
de rear window, use a
soft cloth and wipe lightly over the gridwires.NOTE
If your vehicle is equi
pped with door mirror
heater, mist can also be removed from the outside rearview mirrors
when the rear win-
dow defogger switch is pressed. (Refer to“Door mirror heater” on page 5-59.) On vehicles equipped wi
th the wiper deicer,
when the rear window defogger switch is pushed, the windshield becomes warm and the wipers become operable. (Refer to“Wiper deicer switch” on page 5-190.)CAUTION
It is possible to change the setting to make the rear window defogger operate automati-cally when ambient temperature becomeslow while the engine is running, even if you do not push the rear window defogger switch.It operates automati
cally only once after
turning the ignition sw
itch to the “ON” posi-
tion or putting the ope
ration mode in ON.
If you choose this setting, the door mirror heater (if so equipped)
and wiper deicer (if
so equipped) will also
operate automatically
at the same time. For further informati
on, please contact your
authorized Mitsubish
i Motors dealer.
On vehicles equipped
with Mitsubishi Multi-
Communication System
, screen operations
can be used to make the adjustment.Refer to the separate owner’s manual for details.
Horn switch
NOTE
BK0223400US.book 191 ページ 2015年2月13日 金曜日 午後12時15分
Page 269 of 464
Bluetooth® 2.0 interface (if so equipped)
Features and controls 5-193
5
Steering control swit
ch and microphone
P.5-193Voice recognition function
P.5-195
Useful voice commands
P.5-196
Speaker enrollment function
P.5-197
Connecting the Bluetooth
® 2.0 interface and
the Bluetooth
® device
P.5-199
Operating a music player connected via Blue- tooth
® P.5-205
How to make or receive hands-free calls
P.5-205Phonebook function
P.5-207
N00564001109
Press this button to increase the volume.
NOTE
If the ignition switch
or the operation mode
is left in ACC, the accessory power willautomatically turn off after a certain periodof time and you will no longer be able to use the Bluetooth
® 2.0 interface. The accessory
power comes on again if the ignition switch or the engine switch is operated. Refer to“ACC power auto-cutout
function” on page
5-19 and 5-60. The Bluetooth
® 2.0 interface
cannot be used
if the Bluetooth
® device has a dead battery
or the device power is turned off. Hands-free calls will
not be possible if your
phone does not have
service available.
If you place the Bluetooth
® device in the
vehicle’s third seat or luggage compartment, you may not be able to use the Bluetooth
®
2.0 interface. Some Bluetooth
® devices are not compatible
with the Bluetooth
® 2.0 interface.
You can confirm the Link System software version by pressing the HANG-UP button 3times (press and hold 2 times and then press briefly) within 10 seconds.
For detail of the Bluetooth
® 2.0 interface,
refer to the following website: [For vehicles sold in U.S.A.] You can access the Mits
ubishi Motors North
America website. [For vehicles sold in
Canada and Mexico]
You can access the Mitsubishi Motors web-site. Please read and agree to the “Warning about Links to the Web Sites of Other Companies”,the websites mentione
d above may connect
you to websites other than the Mitsubishi Motors website.http://www.mitsubishi
-motors.com/en/prod-
ucts/index.html Software updates by cellular phone/digital audio device manufacturers may change/alter devi
ce connectivity.
NOTE
Steering control switch and microphone
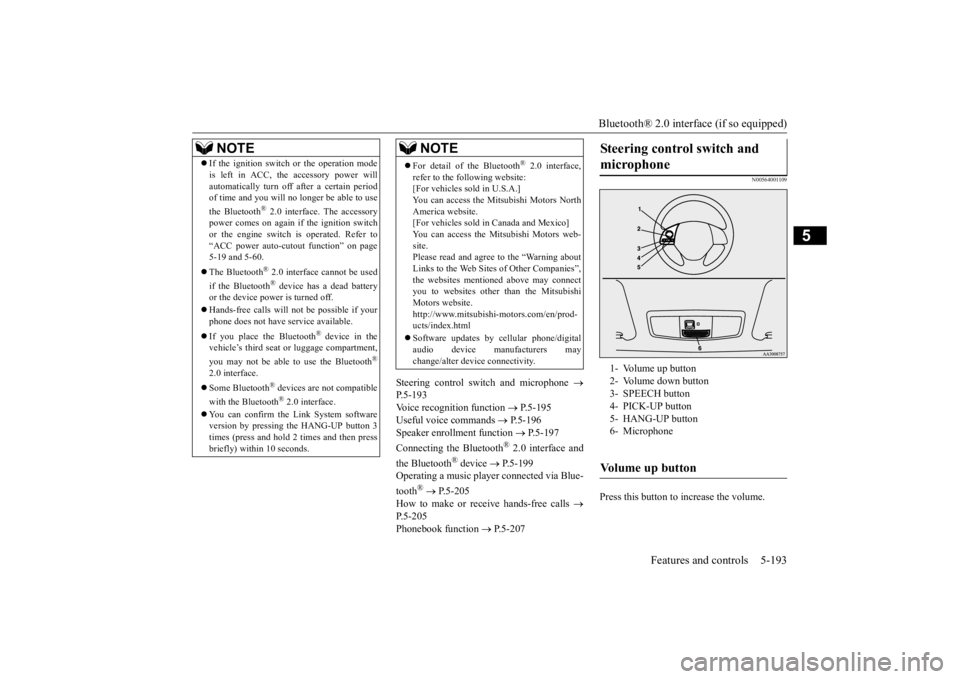
1- Volume up button 2- Volume down button 3- SPEECH button4- PICK-UP button 5- HANG-UP button 6- MicrophoneVolume up button
BK0223400US.book 193 ページ 2015年2月13日 金曜日 午後12時15分
Page 283 of 464

Bluetooth® 2.0 interface (if so equipped)
Features and controls 5-207
5
You can redial the last
number called, based
on the history of dialed calls in the paired cel-lular phone. Use the following procedure to redial. 1. Press the SPEECH button (except for vehicles with Mitsubishi Multi-Commu- nication System) or PICK-UP button (forvehicles with Mitsubishi Multi-Commu- nication System). 2. Say “Redial.”
N00565700018
During a call, press the SPEECH button toenter voice recognitio
n mode, then say
“
a call you need to sim-
ulate the pressing of a phone button as a
response to an automated system, press the SPEECH button and speak “1 2 3 4 poundsend” and the 1234# will be sent via your cel- lular phone.
N00565801045
If an incoming phone call is received whilethe ignition switch or
the operation mode is in
ON or ACC, the audio sy
stem will be auto-
matically turned on and switched to the incoming call, even when the audio systemwas originally off. The voice guide a
nnouncement for the
incoming call will be output from the frontpassenger’s seat speaker. If the CD player or radio was playing when the incoming call was received, the audio sys-tem will mute the sound from the CD player or radio and output onl
y the incoming call.
To receive the call, press the PICK-UP buttonon the steering wheel control switch. When the call is over, the audio system will return to its previous state.
N00565900010
At any time during a ca
ll, you can mute the
vehicle microphone.
Pressing the SPEECH button and then saying “Mute” during a call will turn ON the mutefunction and mute the microphone. Saying “Mute off” in the same way will turn off the mute function and cancel the mute onthe microphone.
N00566600014
The Bluetooth
® 2.0 interface can switch
between hands-free m
ode (hands-free calls)
and private mode (calls
using cellular phone).
If you press the SPEECH button and say“Transfer call” duri
ng a hands-free call, you
can stop the hands-free m
ode and talk in pri-
vate mode. To return to hands-free mode, press the SPEECH button again and say “Transfer call.”
N00566000018
The Bluetooth
® 2.0 interface has 2 types of
unique phonebooks that are different from thephonebook stored in the cellular phone. They are the vehicle phonebook and the mobile phonebook.
NOTE
When the confirmation function is on, the system will check if
the name and location of
the receiver are correct. If the name is cor-rect, answer “Yes.” To change the name
or location to call,
answer “No.” The system will return to Step3.
RedialingSend function
Receiving calls
Mute function
Switching between hands-free mode and private mode
Phonebook function
BK0223400US.book 207 ページ 2015年2月13日 金曜日 午後12時15分
Page 316 of 464

Vehicle preparation before driving 6-4 Driving safety
6
N00629001709
For a safer and more enjoyable trip, always check for the following: Before starting the vehicle, make certain that you and all passengers are seated and wearing their seat
belts properly (with
children in the rear seat, in appropriate restraints), and that all the doors and the liftgate are locked. Move the driver’s seat as far backward as possible, while keep
ing good visibility,
and good control of the steering wheel,brakes, accelerator,
and controls. Check
the instrument panel
indicators and multi-
information display for any possible prob-lem. Similarly, the front
passenger seat should
also be moved as far back as possible. Make sure that infa
nts and small children
are properly restrained in accordance with all laws and regulations.
Check these by selecting the defroster mode, and set the blower swit
ch on high. You should
be able to feel the air blowing against thewindshield. Refer to “Defrosti
ng or defogging (wind-
shield, door windows)” on page 7-13 Check all the tires for heavy tread wear or uneven wear patterns. Look for stones, nails, glass, or other objects
stuck in the tread. Look
for any tread cuts or
sidewall cracks. Check
the wheel nuts for tightness, and the tires (including spare tire) for proper pressure. Replace your tires before they are heavilyworn out. As your vehicle is equi
pped with a tire pres-
sure monitoring system, there is a risk ofdamage to the tire inflation pressure sensors when the tire is replaced on the rim. Tire replacement should, only, be performed by anauthorized Mitsubishi Motors dealer. Have someone watch while you turn all the exterior lights on and off. Also check the turn
signal indicators and hi
gh-beam indicators on
the instrument panel. Check the ground under the vehicle after parking overnight, for
fuel, water, oil, or
other leaks. Make sure
all the fluid levels are
correct. Also, if you
can smell fuel, you need
to find out why imme
diately and have it
fixed.
N00629201134
Even this vehicle’s sa
fety equipment, and
your safest driving, ca
nnot guarantee that you
can avoid an accident or injury. However, ifyou give extra attention to the following areas, you can better protect yourself and your passengers: Drive defensively. Be aware of traffic, road and weather conditions. Leave plenty of stopping distance between your vehicle and the vehicle ahead. Before changing lanes, check your mir- rors, blind spots, and use your turn-signal light. While driving, watch the behavior of other drivers, bicyc
lists, and pedestrians.
Vehicle preparation before driving Seat belts and seats
Defrosters Tires Lights
Fluid leaks Safe driving techniques
BK0223400US.book 4 ページ 2015年2月13日 金曜日 午後12時15分
Page 318 of 464
Parking 6-6 Driving safety
6
N00629601330
When parking on a hill, set the parking brake, and turn the front wheels toward the curb on a downhill, or away from
the curb on an uphill.
If necessary, apply chocks to the wheels. Be sure that the parki
ng brake is firmly set
when parked and that the selector lever is in the “P” (PARK) position. When parking on a hill, it
is important to set
the parking brake before moving the selector lever to the “P” (PARK) position. This pre- vents loading the parking brake against thetransaxle. When this ha
ppens, it is difficult to
move the selector lever out of the “P” (PARK) position. Never leave the engine running while you take a short nap or rest. Also, never leave the engine running in a closed or poorly venti- lated place.
Your front bumper can be damaged if you scrape it over curbs or parking stop blocks.Be careful when traveling up or down steep slopes where your bumper can scrape the road. Always remove the key from the ignition switch and lock all doors and the liftgate when leaving the
vehicle unattended.
Always try to park your vehicle in a well lit area.
Move effort could be required to turn the steering wheel.Refer to “Electric power steering system (EPS)” on page 5-93.
N00629900352
It is very important to know how much weight your vehicle can carry. This weight iscalled the vehicle ca
pacity weight and
includes the weight of
all occupants, cargo
(including the roof load), non-factory-installed options, and the tongue weight of the trailer, if any, being towed. The tire and loading information placard located on thedriver’s door sill of
your vehicle will show
how much weight it may properly carry. It is important to familiarize yourself with the following terms before
loading your vehicle:
Parking Parking on a hill Parking with the engine run- ning
WA R N I N G Leaving the engine ru
nning risks injury or
death from accidentally moving the selec-tor lever or the accumulation of toxicexhaust fumes in the passenger compart- ment.
Where you park
WA R N I N G Do not park your vehicle in areas where combustible materials
such as dry grass or
leaves can come in contact with a hotexhaust, since a fire could occur.
When leaving the vehicle
Do not keep the steering wheel fully turned for a long time Loading information
WA R N I N G Never overload your ve
hicle. Overloading
can damage your vehicle, adversely affectvehicle performance, including handling and braking, cause tire failure, and result in an accident.
BK0223400US.book 6 ページ 2015年2月13日 金曜日 午後12時15分
Page 319 of 464

Loading information Driving safety 6-7
6
Vehicle maximum load on the tire: load on an individual tire that is determined bydistributing to each axle its share of the maximum loaded vehicle weight and dividing by two. Vehicle normal load on the tire: load on an individual tire that is determined by dis- tributing to each axle its share of the curbweight, accessory weight, and normal occupant weight and dividing by two. Maximum loaded vehicle weight: the sum of - (a) Curb weight;(b) Accessory weight; (c) Vehicle capacity weight; and (d) Production options weight. Curb weight: the weight of a motor vehi- cle with standard e
quipment including the
maximum capacity of fuel, oil, and cool-ant. Accessory weight: the combined weight (in excess of those
standard items which
may be replaced) of automatic transmis- sion, power steering, power brakes, power windows, power seats, radio, and heater,to the extent that these items are available as factory- installed equipment (whether installed or not). Vehicle capacity weight: the rated cargo and luggage load plus 150 lbs (68 kg) * times the vehicle’s
designated seating
capacity.
Production options weight: the combined weight of those installed regular produc-tion options weighing over 5 lbs (2.3 kg) in excess of those standard items which they replace, not prev
iously considered in
curb weight or accessory weight, includ- ing heavy duty brakes,
ride levelers, roof
rack, heavy duty battery, and special trim. Normal occupant weight: 150 lbs (68 kg) * times the number of
specified occupants
(3 in the case of your vehicle) Occupant distribution:
Occupant distribu-
tion within the passenger compartment (Inyour vehicle the distribution is 2 in front, 1 in second row seat)
N00630101407
The tire and loading information placard is located on the inside sill of the driver’s door.
This placard shows the maximum number of occupants permitted to
ride in your vehicle as
well as “the combined
weight of occupants
and cargo” (A), which
is called the vehicle
capacity weight. The weight of any non-fac-tory installed options, as well as the tongue weight of a trailer being towed and roof load is included in the defi
nition of “cargo” when
determining the vehicle
capacity weight. This
placard also tells you the size and recom- mended inflation pressure for the originalequipment tires on your vehicle. For more information, refer to
“Tires” on page 9-15.
* :150 lbs (68 kg) is th
e weight of one per-
son as defined by U.S.A. and Canadian regulations.
Tire and loading information placard
BK0223400US.book 7 ページ 2015年2月13日 金曜日 午後12時15分
Page 323 of 464
Trailer towing
Driving safety 6-11
6
N00630601112
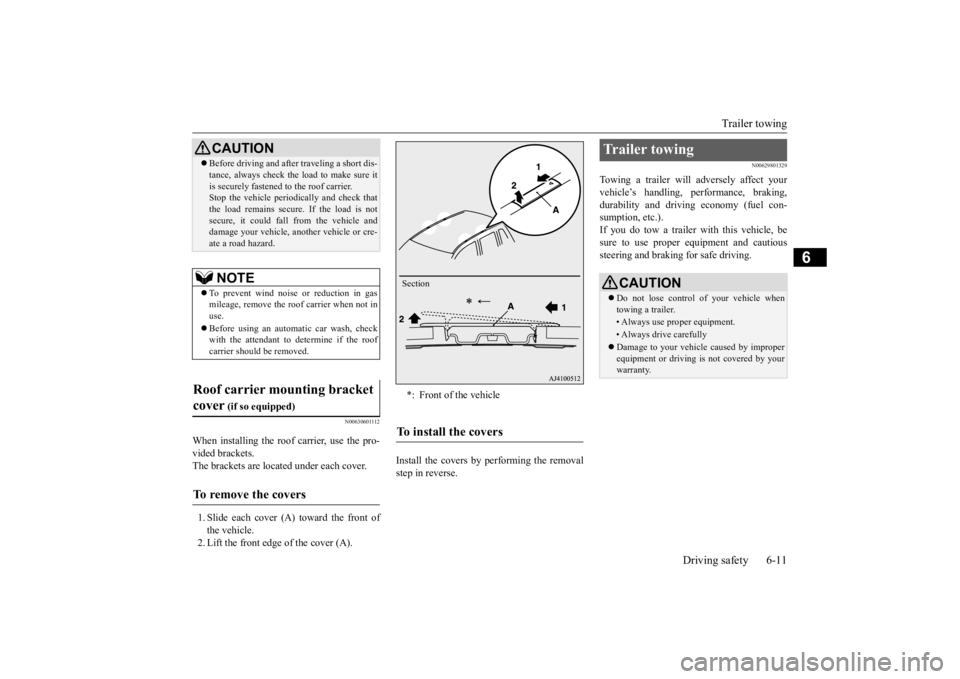
When installing the roof carrier, use the pro- vided brackets. The brackets are located under each cover. 1. Slide each cover (A) toward the front of the vehicle. 2. Lift the front edge of the cover (A).
Install the covers by performing the removal step in reverse.
N00629801329
Towing a trailer will adversely affect yourvehicle’s handling, performance, braking, durability and driving economy (fuel con-sumption, etc.). If you do tow a trailer
with this vehicle, be
sure to use proper e
quipment and cautious
steering and braking for safe driving.
Before driving and after traveling a short dis- tance, always check the load to make sure itis securely fastened to the roof carrier.Stop the vehicle periodi
cally and check that
the load remains secure. If the load is not secure, it could fall from the vehicle anddamage your vehicle,
another vehicle or cre-
ate a road hazard.NOTE
To prevent wind noise or reduction in gas mileage, remove the roof carrier when not in use. Before using an automatic car wash, check with the attendant to determine if the roofcarrier should be removed.
Roof carrier mounting bracket cover
(if so equipped)
To remove the covers
CAUTION
*: Front of the vehicleTo install the covers
Section
Trailer towing
CAUTION Do not lose control of your vehicle when towing a trailer.• Always use proper equipment.• Always drive carefully Damage to your vehicle caused by improper equipment or driving is not covered by your warranty.
BK0223400US.book 11 ページ 2015年2月13日 金曜日 午後12時15分